[3D Printing Daily] Issue 742
<span>For those without a printer, don't worry! You can click on the public account menu 'Local Printing' to contact local friends for printing assistance.</span>
1. Another Servo-Driven FPV Mini Tank

<span>[ID:3013262]</span> This micro FPV tank is designed specifically for LEGO tracks (x939) and 360-degree servos.
The wheels can be directly screwed onto the modified MG90S servo. For the freewheel part, to reduce friction, standard 3x8x4mm ball bearings can be inserted, or screws can be used for fixation.
The upper and lower halves of the tank are designed for magnetic connection, using 7x4mm cylindrical magnets, or can be connected with printed rods if preferred.
Additionally, extra servos can be installed on top to drive a shovel or camera arm. The design files include a scheme that allows a camera with a 24mm hole to be directly screwed onto the shovel arm.
This mini tank cleverly utilizes the MG90S servo, simplifying the installation of the drive system. The magnetic connection method facilitates disassembly and assembly while providing another solid connection option. The extra servo mounting points expand its functionality, whether for entertaining shoveling or professional FPV shooting, offering good scalability. It is compatible with common FPV cameras, allowing users to customize according to their needs.
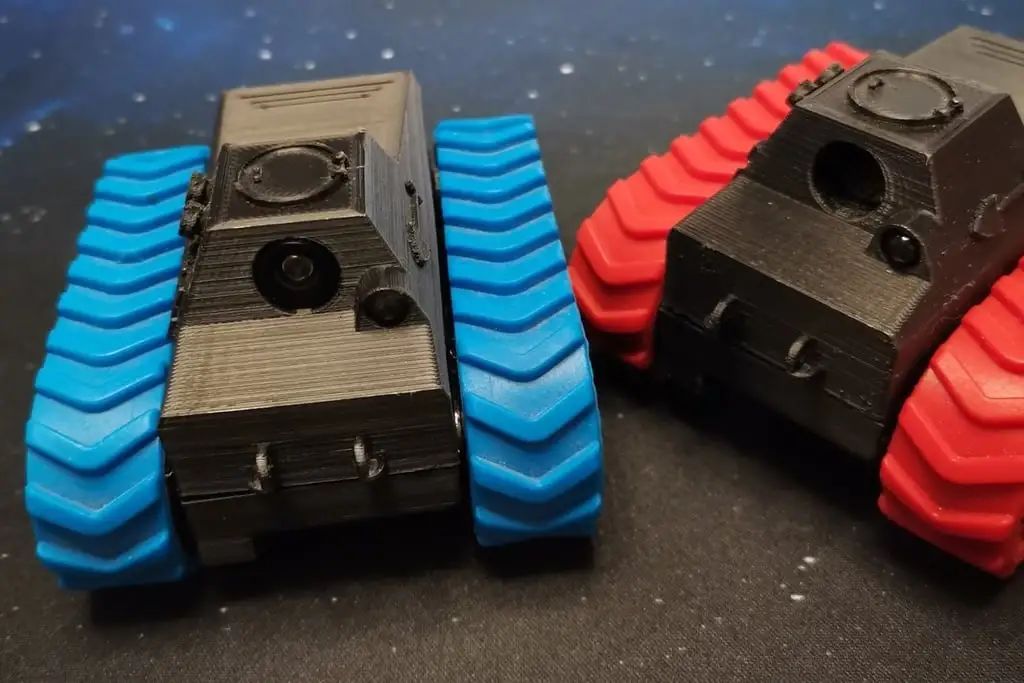
2. Professional FPV Mini Tank
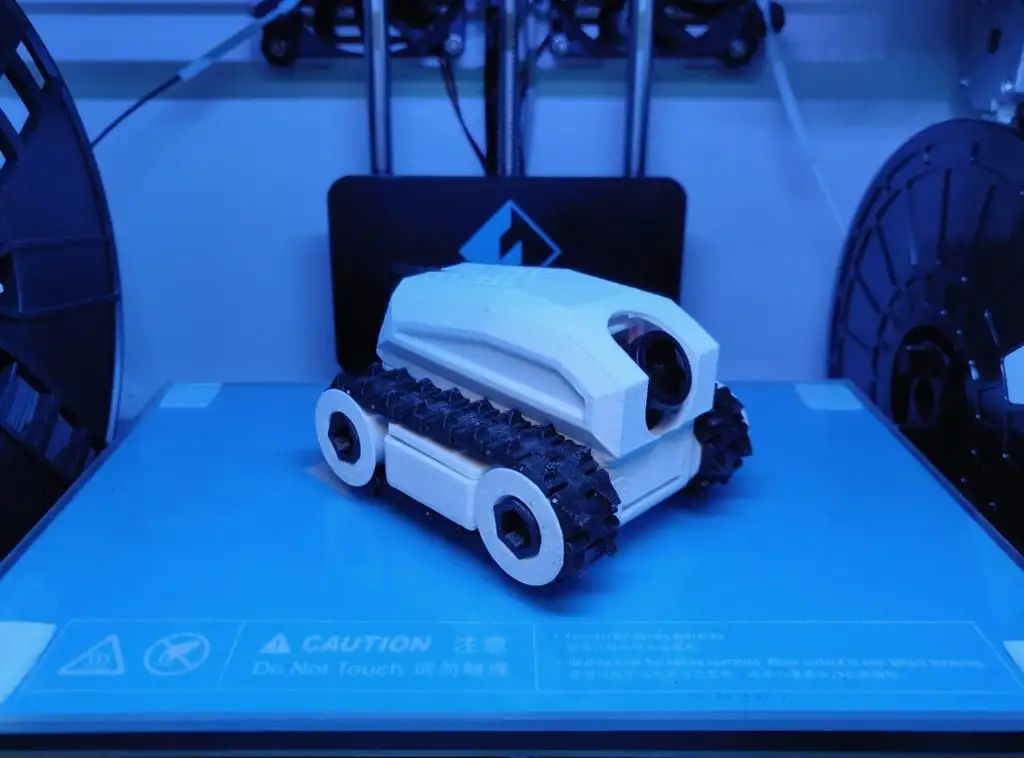
<span>[ID:3668908]</span> This FPV mini tank/tracked vehicle incorporates a wealth of features in its design, including a tiltable camera mount and, most importantly, a modular design. This design fully utilizes the space between the tracks while maintaining a low profile, achieving more possibilities.
The wheels and tracks are slightly modified based on Jani Kabalin’s Tiny FPV Tank design. Except for the tracks, camera mount, and wheel covers printed with TPU (flexible material), all other parts are printed with PLA. The TPU material tracks seem to provide better grip than PLA.
The chassis and mid-plate are connected via built-in clips; be careful not to over-bend the clips. The top cover and mid-plate are connected by magnets. For best results, the mid-plate and top cover should be printed in the same orientation as when actually assembled. Although it requires a lot of support material and cleanup, it helps build the overall structure.
Each link of the track requires about 15mm of metal wire connection, which is also used for the servo linkage of the camera tilt mechanism. The servo wheel is directly mounted on the servo. There is a reserved position for magnet installation under the mid-plate, but it is not necessary to install it.
A modified version of the chassis is now available, compatible with common SG90 servos. Depending on the specific servo model, modifications to the servo housing may be required to allow the wires to exit from the bottom instead of the side.
Print quantity: except for the track links (40, 20 on each side), bearing wheels (2), servo wheels (2), and wheel covers (4), all other parts are printed once.
Electronic components:
•Battery: 400mAh 2S Lipo•Receiver: FrSky RX4R•Drive servos: (2) EMAX ES08MDII•Camera servo: EMAX ES9251II•Camera: Runcam Eagle Micro•Video transmitter: Runcam TX200U
Hardware:
•Bearing: (2) 3x8x4, taken from an old 2206 brushless motor•Bolt: (2) M3x12mm•Magnets: 3x1mm disc/cylindrical magnets•Track metal wire: 1mm spring steel wire (can also use cut paper clips)
Modular design: The chassis has reserved positions for 4 magnets and clips, which can be used to create new “modules”. The mid-plate also has reserved positions for 4 magnets, which can be used for different top cover designs, such as a small top cover for non-tilting/smaller cameras or mini combat robot modules, offering endless possibilities.
3. Mini Tracked Truck – Inspired by Tiny FPV Tank/Tiny Trak
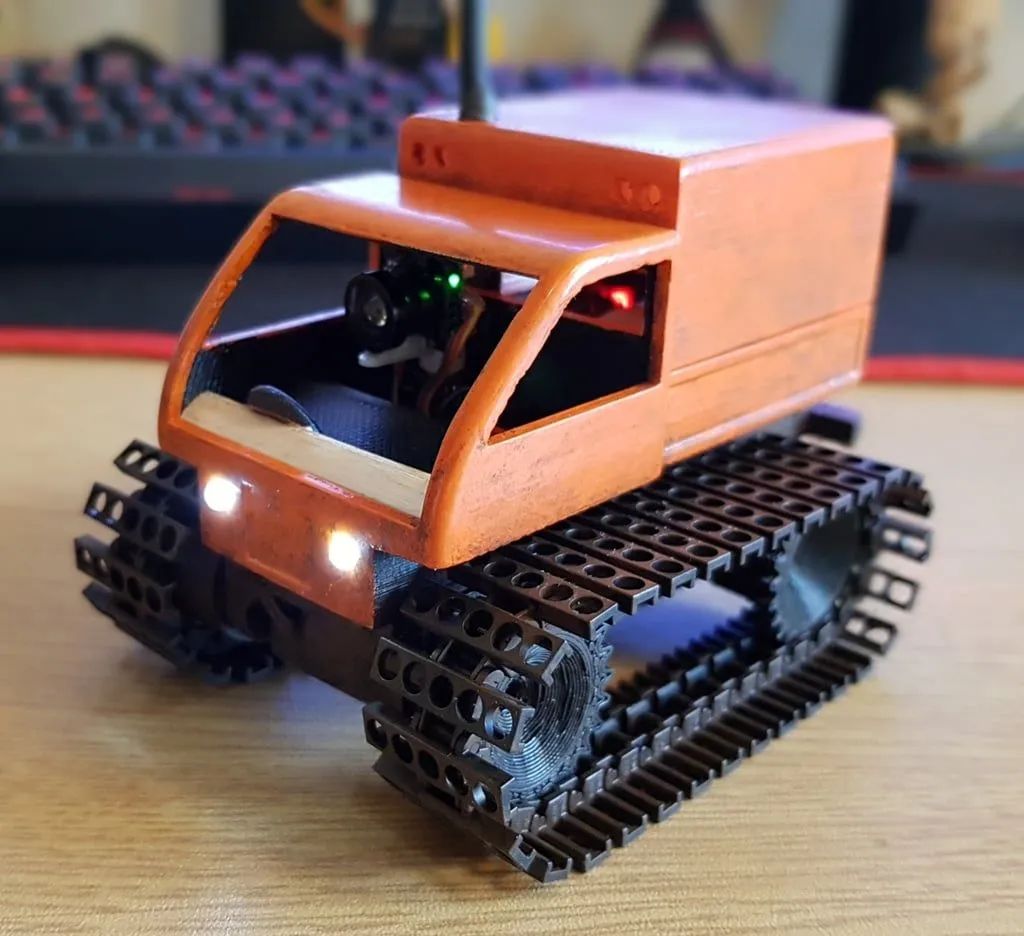
<span>[ID:3668608]</span> This tracked chassis designed by Jani Kablin has been enhanced with a cabin for mounting a servo-controlled camera.
The redesigned sprocket can be directly replaced with the 60x LEGO 3873 track and retains the original 8x4x3 bearings. The widened sprocket is used for mounting bearings, while the narrower sprocket is used for connecting the servo arm hub, provided the servo arm has been trimmed.
Most electronic components are installed at the front, and the cabin is fixed to the chassis with hot glue. The VTX (video transmitter) and battery are located in the removable rear cabin.
The electrical system includes two 9g continuous rotation servos, a Frsky XMR receiver, a Matek 5V BEC (voltage regulator), and a 2.5g servo motor for horizontal rotation of the camera. A modified 9g servo PCB is used to control a 3mm LED light. The integrated camera/video transmitter has been modified/separated. The battery is a 2S 300mAh.
Additionally, a rear deck/cargo cover has been added, which was completed before the rear cabin.
Experience shows that using impact glue to attach rubber band scraps to the tracks can significantly enhance grip.
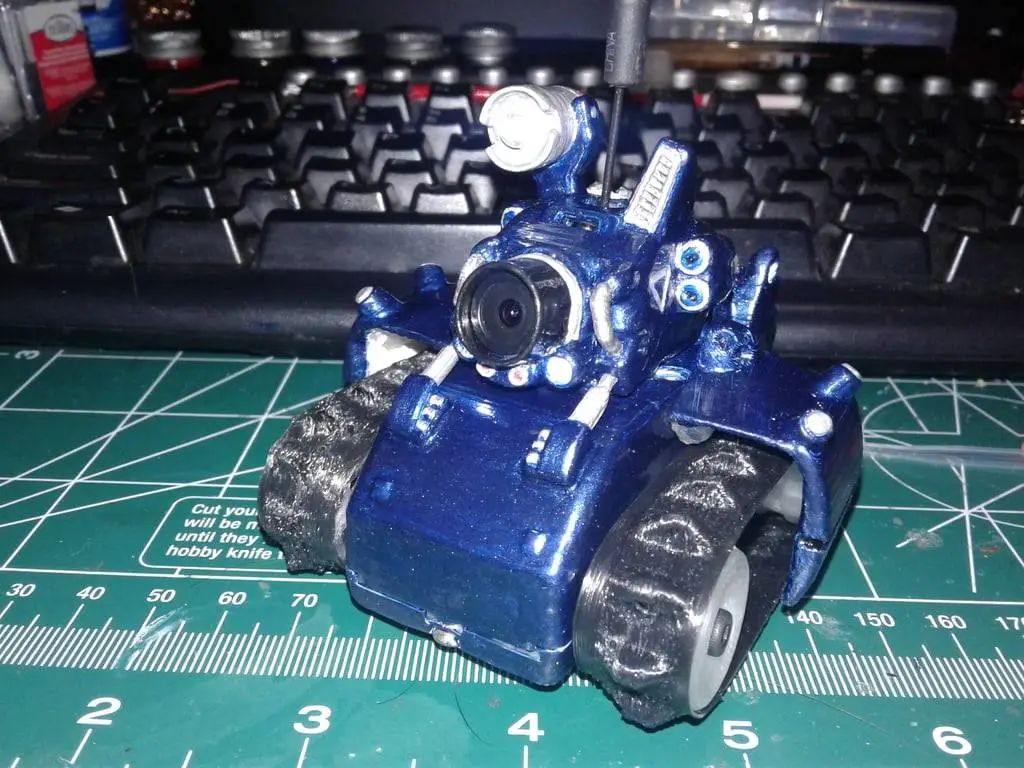
4. RD9000 RC Tank with FPV (Modified Certain Parts)
<span>[ID:4729163]</span> I have improved the gears and drive wheels to ensure smoother movement and compatibility with 60mm M5 screws.
This product is an improved upgrade version of the existing gears and drive wheels, aimed at providing a smoother and more stable movement experience. By finely adjusting key components, the stability and smoothness of the operation process have been significantly optimized, thus enhancing overall performance. This improvement specifically targets the connection method to ensure perfect compatibility with 60mm M5 screws, making it easy for users to install and replace. The combination of precision craftsmanship and optimized design ensures the product’s reliability and durability in various application scenarios. Whether you need to optimize the performance of existing equipment or seek an excellent motion control solution for new projects, this improved gear and drive wheel is your ideal choice. It will provide you with a smoother, more reliable motion experience while reducing maintenance costs.
5. ESP32 FPV ROVER
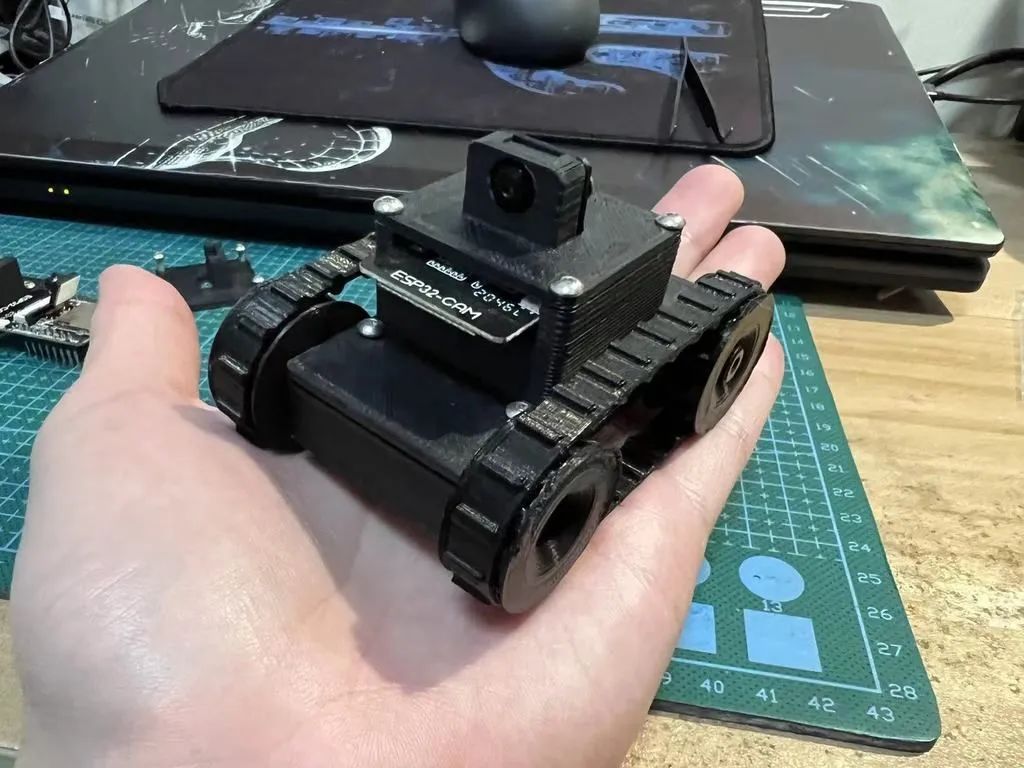
<span>[ID:5240956]</span> An FPV tracked vehicle based on ESP32-CAM and Arduino, easy to build and low material cost. Users can control it remotely via a mobile browser, with power management and charging handled by the IP5306 chip. The tracks are 3D printed using TPU material.
The core components include: two N20 micro motors (10x12x15mm), an ESP32-CAM development board equipped with an OV2640 camera, and a 2S-350mAh 3.7V lithium battery (size less than 39x25x10mm).
The custom PCB circuit board’s main components: one IP5306 power management/charging IC (SOP8 package), two L9110s motor driver ICs (SOP8 package), and a USB Type-C interface.
Required screw specifications: M3 6×8, M2 4×2, M4*15 x2 (half-thread).
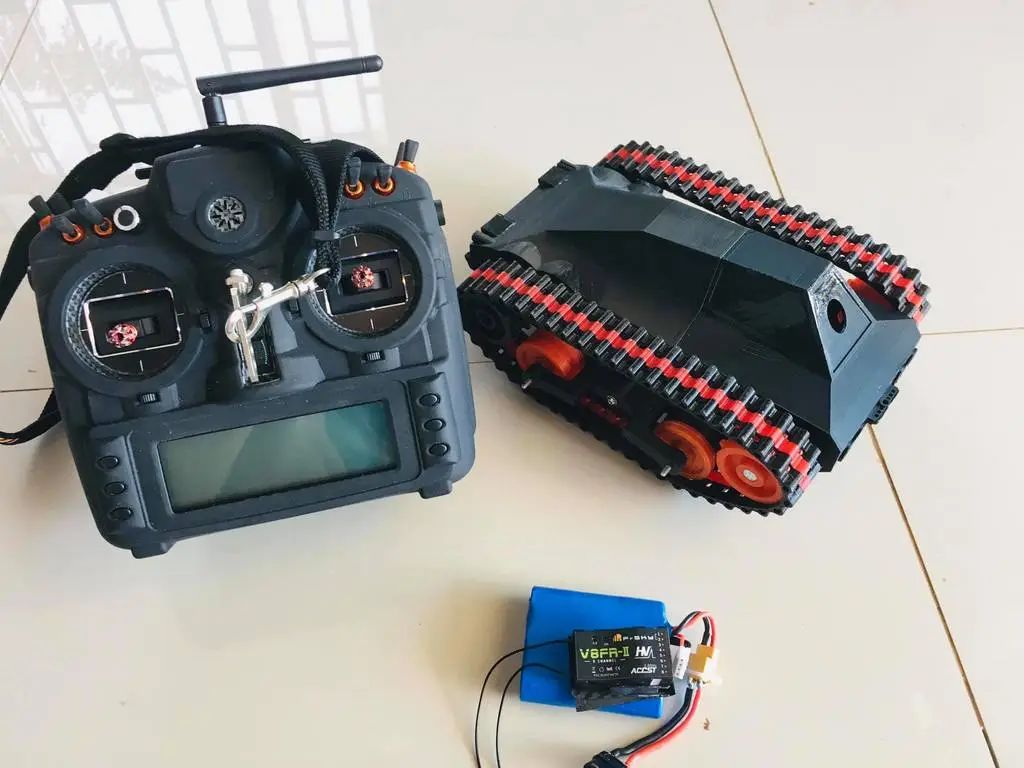
6. CORSAC Mini FPV Rover
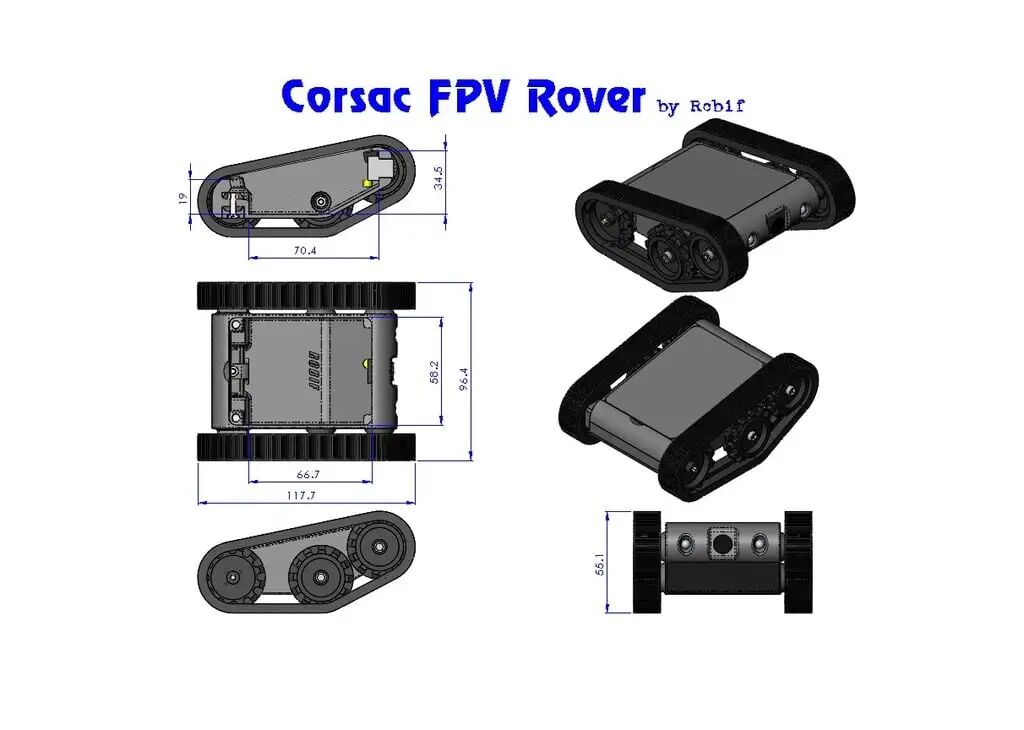
<span>[ID:3434286]</span> The Corsac Rover is a mini FPV tracked vehicle that uses high-quality Pololu tracks, wheels, and motors. Its elevated front idler wheel design allows it to easily climb over small obstacles, but this sacrifices a smaller ground contact area and a higher center of gravity. Even if it flips, it can drive upside down.
Four magnets fixed with epoxy resin are used to secure the hatch. The two front LED lights provide illumination. Currently, my version is hardwired, but if you want to further compress the electronic components, a receiver-controlled switch can be added.
This project has undergone over 15 hours of CAD design, multiple revisions, prints, and documentation.
7. FPV Rover For Playmobil Trucks Tiny Trak
<span>[ID:5207425]</span> This model kit is based on the Playmobil 3279 track, creating a compact and feature-rich system. It cleverly utilizes two continuously rotating 9g servos for power, achieving smooth and fluid motion control. The integrated Eachine TX06 FPV camera provides users with a first-person perspective experience, enhancing interactivity and immersion.
To ensure stable power supply, a 5V boost converter is used to raise the voltage of a 1S 380mAh lithium battery to the required level, providing reliable energy for the servos and camera. Two 5mm LED lights add visual effects, making it clearly visible even in low-light environments.
Four 4x2mm magnets are used to secure components, simplifying the assembly process and ensuring structural stability. The overall design is compact and easy to operate, making it particularly suitable for enthusiasts interested in small robots, remote-controlled vehicles, or track systems. This kit combines classic Playmobil elements with modern electronic components, providing a creative and practical project suitable for various uses such as education, entertainment, and prototyping. It can be easily assembled without complex tools or expertise, allowing users to quickly experience the joy of DIY and explore knowledge in control, vision, and power engineering.
8. Base for Installing EEZYbotARM MK2 on FPV-Rover
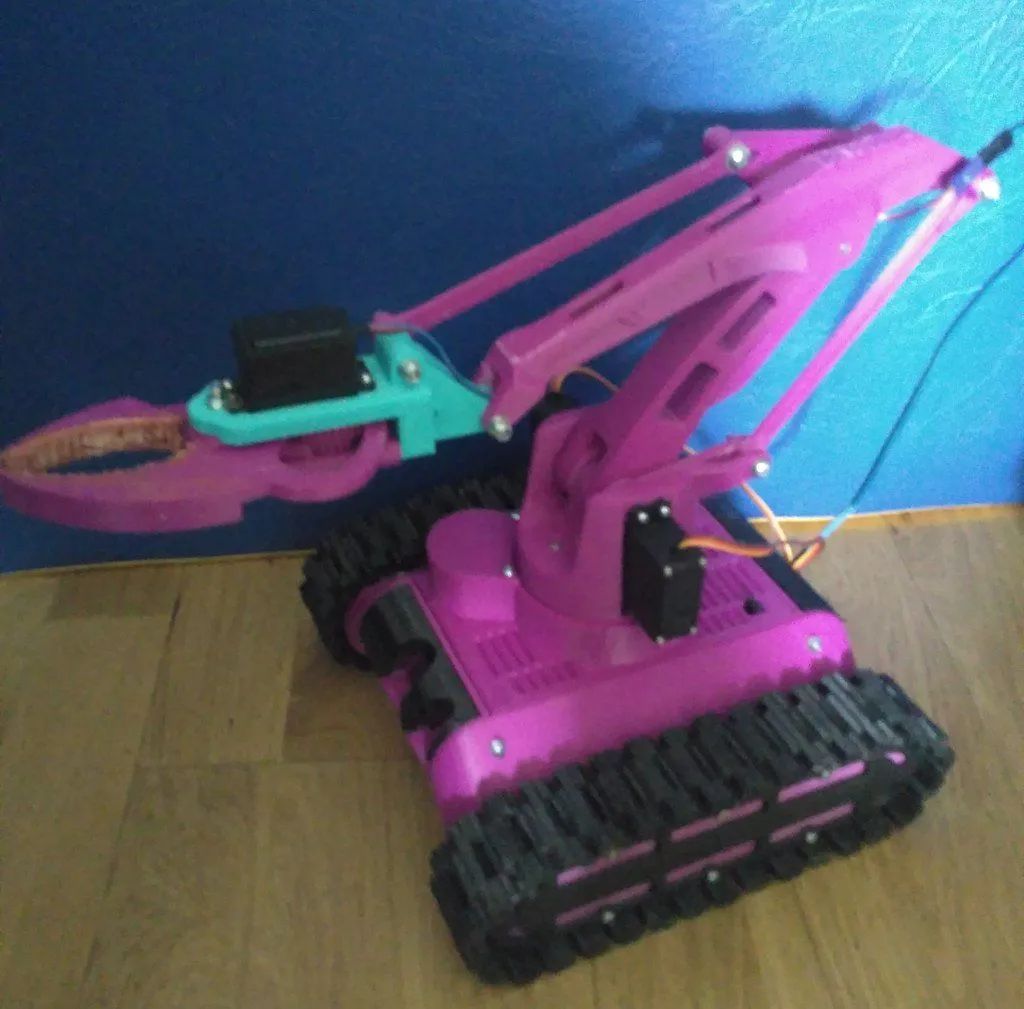
<span>[ID:3686505]</span> This product is a base with lateral rotating servo drive, designed to lower the overall height. This base can be used with FPV-Rover V1.21 or FPV-Rover V1.31, and can also be applied to EEZYbotARM MK2. Additionally, an optional Mantis Gripper adapter for EEZYbotARM MK2 can be used, or the Mantis Gripper adapter can be used directly.
Parts required for assembly include: M3 x 6 screws (for securing the servo), M3 x 20 screws (for securing the top cover), M3 x 10-12/16-20 screws and M3 nuts (for V1 locking structure), as well as 3-4 Servo 995 or 946 servos, 25 steel balls with a diameter of 6mm, and 1 606zz bearing. For other parts required to assemble EEZYbotARM MK2 and FPV-Rover V1.1/V1.2/V1.3, please refer to the relevant component documentation.
It is recommended to use plastic gear grease XY-2.
Optional components include: 2-channel 4CH Frsky receiver, 8-channel Frsky receiver, SBUS to PWM/PPM decoder (8-channel) + receiver with SBUS, Crossfire receiver, CRSF to PWM converter + receiver with Crossfire, or CRServoF “blue pill” project. Additionally, a servo tester may be required.
For older versions of the locking structure, it is recommended to use glue for fixation. For the V1 version of the locking structure, screws and nuts should be used for fixation. Please note that the required parts include a large number of printed components.
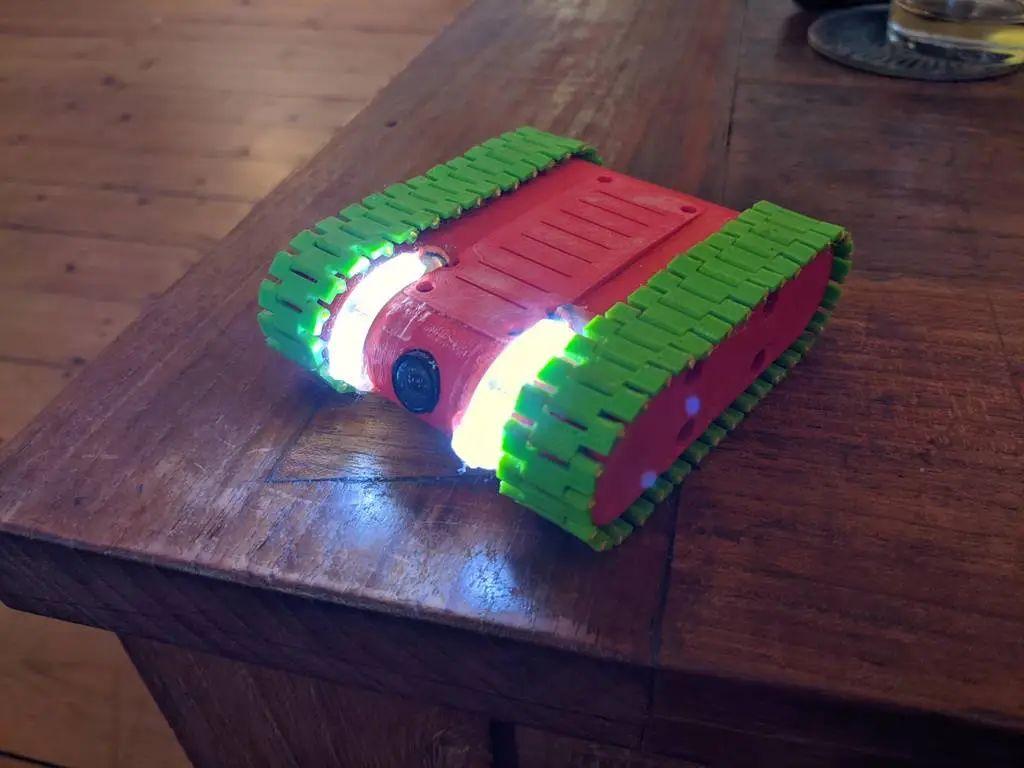
9. Tiny Tank FPV (18650 Li-ion Version)
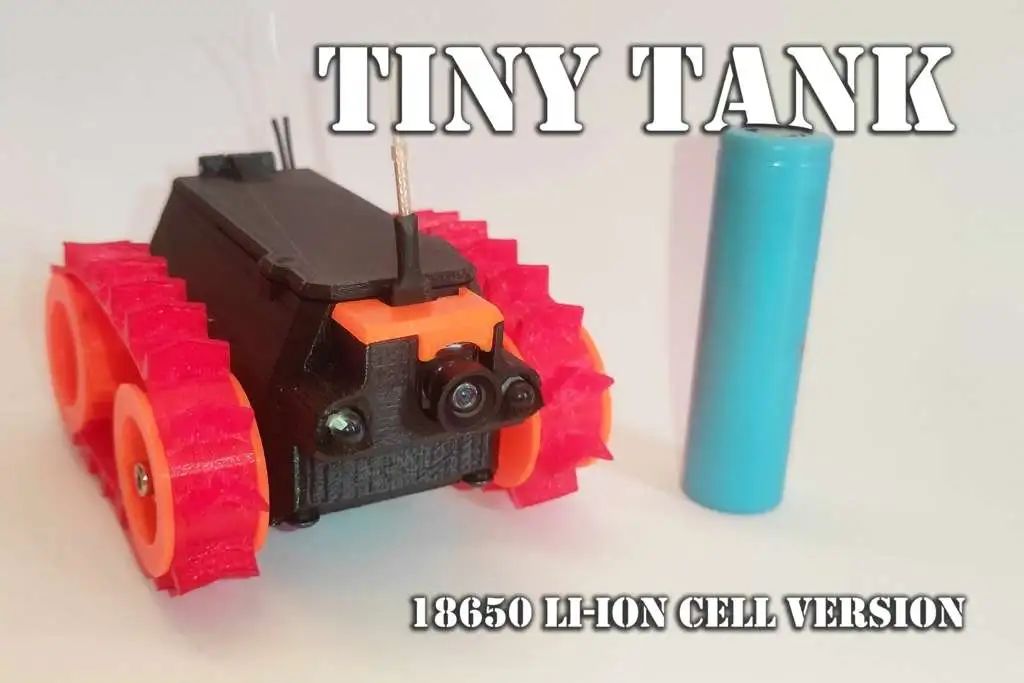
<span>[ID:6053666]</span> The design concept of this FPV RC mini tank is to provide longer driving time than similar tanks using LiPo batteries while maintaining a compact form. The 18650 lithium-ion battery has a high energy density, allowing the tank to perform “long-distance” missions. In practice, using a 3200mAh battery can easily drive for over an hour. The tank also features controllable front LED lights.
Required Parts List:
Electronic Components:
•FrSky Xm+ receiver (other SBUS receivers can also be used)•SBUS to PWM servo decoder•2 9g SG90 servos•PWM signal control switch (for controlling front LED lights)•Eachine TX04 3-in-1 video system•2 5mm LEDs•50 Ohm 1/4 Watt resistor•18650 lithium-ion battery
Hardware:
•2 M3x20mm screws (for passive wheels)•2 M2x6mm screws (for drive wheels)•4 M3x15mm screws (for connecting chassis and top plate)•6 M3 4.2mm diameter heat melt nuts (2 for passive wheels, 4 for chassis connection)•Battery connector (can be recycled from an old battery holder or creatively made; see photo)•2 6x19x6mm bearings (for passive wheels)•4 4x2mm magnets (for battery cover)
Notes:
•Servos need to be modified for 360-degree rotation.•The top plate and battery cover are connected by a 1.75mm filament.•All parts except the tracks are printed with regular PLA. The tracks are printed with flexible TPU.
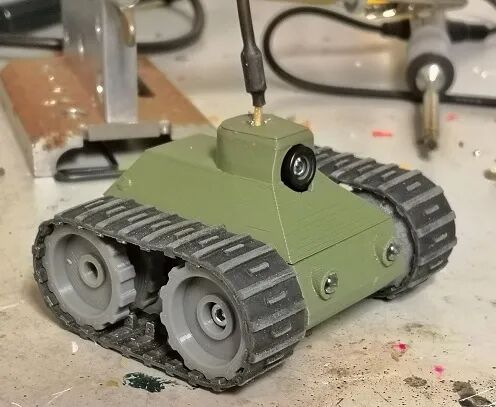
10. Tiny Trak with LED Lights
<span>[ID:3197418]</span> This remote-controlled FPV tank model aims to create a product that combines visual impact and functionality. No additional parts procurement is required; it can be assembled using existing resources. The model design is rich in detail, and although the version shown in the pictures has not yet installed the exhaust pipe and rear turret, the overall shape is already quite imposing.
The parts required for model assembly include: a micro integrated FPV camera (recommended to use a 10mm lens, such as Eachine EF-01; other products of the same specification can also be used, noting that the antenna position is about 5mm behind the PCB); two MG90 metal gear servos (360 degrees, regular servos can also be modified); a 3.7V to 5V DC-DC voltage regulator; a remote control receiver; a 5mm LED bulb and matching resistor (for spotlight); two 3mm LED bulbs and matching resistors (for front lights); two 3mm LED bulbs and matching resistors (for tail lights); three M3 5mm countersunk screws (for securing the servo housing); two M3 10-15mm screws (for securing the wheels, can be cut as needed); a female power connector (recommended to use Micro JST PH 1.25 2 PIN female connector; other models may also be suitable); a battery (battery compartment size 25mmW x 10mmH x 40mmL); a male connector matching the battery; and various wires, solder, heat shrink tubing, glue suitable for printed plastics, and glue suitable for LED bulbs and cameras. Additionally, flexible filament is needed for printing the tracks. Users can adjust various components according to actual conditions and are welcome to provide improvement suggestions.
11. FPV -ROVER v2.0 – Larger Motors, Smaller FPV Camera Setup
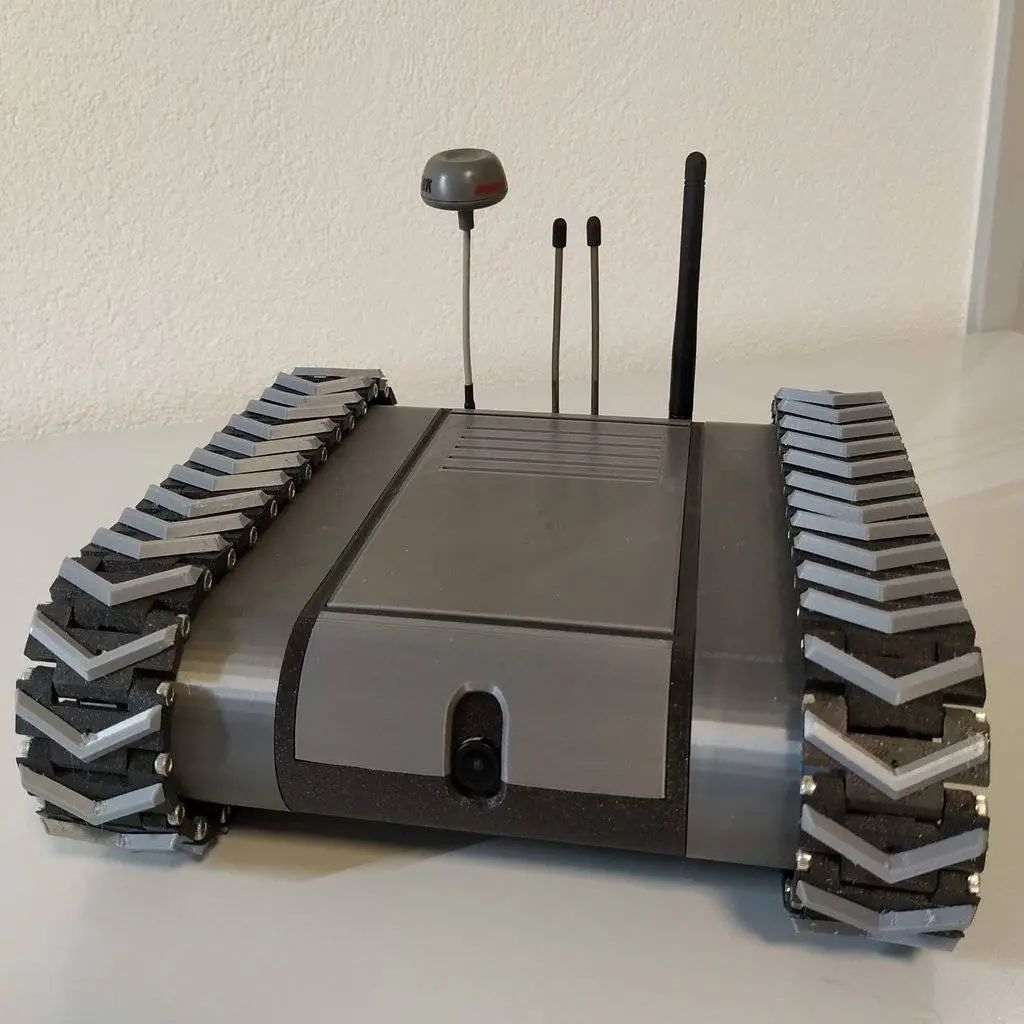
<span>[ID:3954729]</span> The FPV Rover V2.0 is an improved version, adjusted for specific hardware and personal preferences. Major changes include:
The inner frame’s left and right sides (inner_frame_left, inner_frame_right): ventilation holes have been removed to enhance structural strength.
The motor mount: redesigned to fit the hole layout of the Maxon motor (EC-i40 motor 473023).
The small gear: design changed to fit the 6mm shaft diameter of the Maxon motor (EC-i40 motor 473023).
FPV camera setup: more closely integrated with the main design, retaining the tilt function but removing the LED lights.
The top cover (body_top_lid) + GPS mounting bracket (gps_mounting_bracket): a small groove specifically designed for the M8Q GPS receiver, providing a bracket for easy fixing with two M3x8mm screws.
Thanks to markus_p for providing the STEP files for FPV_Rover V2.0.
Modeling and printing work has been completed, and attempts are being made to configure the Omnibus V6 Nano flight controller using ArduPilot.
This project will continue to be updated.
12. Tiny Trak – Mini FPV Tank with OSD for 1S and 2S
<span>[ID:5199090]</span> This tracked FPV tank has a compact structure, servo-driven, supports 1S or 2S battery power, and can optionally be equipped with OSD (on-screen display) functionality. The overall design is integrated, and once assembled, it does not need to be disassembled; charging and power on/off can be done using a “key” through the rear interface.
Even with just a 1S battery, the tank can operate normally, and it can later be upgraded to 2S power and OSD functionality.
Required Components:
•Hardware: Tracks (such as HEXNUB – Monster Trax for Mibro), servo extension cables, LiPo battery connectors, 684ZZ bearings, M2 and M4 screws, self-tapping screws, heat shrink tubing, double-sided foam tape.•1S Basic Configuration: Foxeer Razer Pico camera, Eachine Nano (V2) VTX video transmitter, FS90R/Tower Pro SG90 servos, ZOP 1S 850mAh battery, LED indicator light and matching resistor.•2S OSD Upgrade: Micro MinimOSD, Matek Micro BEC step-down module, USB to TTL serial converter, 2S battery (such as Hacker ECO-X 350 2S).
Assembly Steps:
1.OSD Configuration: Download Panzer_OSD.ino, Max7456.ino, and symbols.h files, place them in the same folder, and flash them into MinimOSD.2.Tank Assembly: Download the compressed package containing the circuit diagram and FrSky Taranis settings. Print all parts using the recommended print settings, paying attention to support settings. Sand the mating surfaces of the upper and lower chassis to ensure a tight fit.3.Insert the bearings into the idler wheels and secure them to the chassis with M4 screws, ensuring to add washers. Slide the servos into the chassis and secure them with M2 screws. Install the drive wheels on the servos.4.Weld the servos to the receiver (RX) and connect to the BEC. Then weld the servo connector that connects the upper and lower parts to the BEC and RX, and secure all components in the chassis. It is best to place the receiver between the servos and secure it with foam glue, while the BEC should be placed next to the receiver.5.Weld the camera to the VTX and OSD. Connect the VTX to MinimOSD. Calculate the resistor value needed for the LED indicator light and weld it to the OSD. Weld the female servo connector used as a port and the male servo connector used to connect the upper and lower parts to the OSD. Weld the male connector of the battery to the port and OSD.6.Slide the camera into the turret hole and secure it with foam glue. Place the LED into the hole and secure it with quick-drying glue. Secure the VTX and OSD inside the top with foam glue. Secure the female servo connector with quick-drying glue in the rear opening.7.Create a “key” by connecting the red and orange (or white) wires of the male servo connector and securing them with heat shrink tubing. Create a charging wire by connecting another male JR servo connector to the charging interface.8.Connect the battery, insert the “key” for frequency pairing, and then close the chassis with self-tapping screws.
Now you can use the “key” to start the tank without needing to open it for charging.
13. Fisheye Camera with IR-CUT Mount for Zerobot Pro – Raspberry FPV Robot

<span>[ID:3090600]</span> A fisheye camera mount designed for the ZeroBot Pro – Raspberry FPV robot, compatible with cameras featuring IR-CUT functionality. This camera integrates infrared night vision LED lights, which can automatically activate night vision mode, significantly improving nighttime imaging quality. Compared to other designs, this camera has increased sensor size and housing volume, but offers better night vision performance.
Be sure to keep the recording indicator light on; otherwise, the IR-CUT function will not work properly (this indicator light is used to enable or disable the IR-CUT). Do not use the “disable_camera_led=1” command in the “/boot/config.txt” file, as this will affect the normal operation of the IR-CUT function.
The mount design includes support structures to facilitate printing larger holes. It is recommended to print according to the orientation in the STL file and enable support material to ensure print quality.
14. Nano FPV Tank
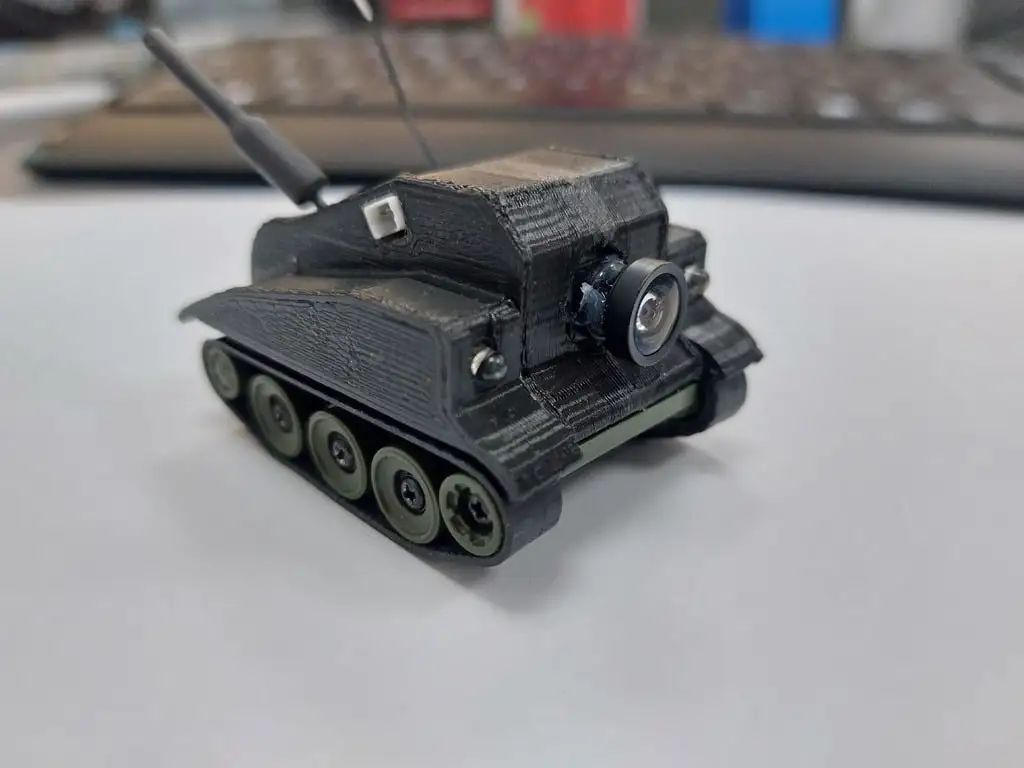
<span>[ID:6752216]</span> This Nano FPV Tank is a palm-sized micro remote-controlled tank, measuring only 5.5x4x3 cm, featuring proportional speed control and controllable LED lights. It is perfect for high-speed driving in the office or living room and can be maneuvered flexibly to reach hard-to-access corners. Even in dark environments, its high-brightness LED lights provide clear visibility. Tests show that it can run continuously for over 10 minutes on a full charge, with a camera transmission distance exceeding 130 meters (using a standard dipole antenna) and a remote control distance of over 300 meters.
This micro tank was originally designed for entertainment but can also serve as an excellent inspection robot, exploring places you never thought possible to reach.
Building this Nano FPV Tank requires the following equipment: Nano Tank (777-215 or similar model), Flysky FS2A four-channel receiver (or an equivalent receiver for your controller), two 1A bidirectional brushed ESCs, AIO FPV 5.8g camera, 100-300mAh lithium battery (must fit in a 27x20x10mm battery compartment), 3-pin PCB toggle switch, USB 1S lithium battery charger, JST-XH male connector (or a connector matching the charger), and 3D printed parts. Optional equipment includes: 3-5V 2A PWM to switch module (for controlling LEDs), two 3-5V LED lights, and JST-XH male connectors (or connectors matching your AIO camera, if you don’t want to hardwire).
Required tools include: Phillips screwdriver, model knife, small wire pliers, wire strippers, small file, drill (and electric drill, recommended 1mm or 1.5mm), soldering iron, solder wire, hot glue gun and glue sticks, quick-drying glue (or glue suitable for 3D printed plastics), various sizes of heat shrink tubing or electrical tape, and optional needle-nose pliers, tweezers, and double-sided tape (which can greatly facilitate the assembly process), and blue tack (to secure components and wires during soldering).
Multiple 3D printing files are provided, including a complete Nano FPV Tank with LED, the Nano FPV Tank body, the Nano FPV Tank side cabin with LED, the Nano FPV Tank side cabin without LED, and the top cover for the non-FPV version, extended cannon, and short cannon.
15. Mini FPV ROVER
<span>[ID:4890521]</span> This homemade tracked robot is an improved version of existing designs, with multiple optimizations for performance and functionality. Major improvements include: a redesigned top cover to ensure a perfect fit; an upgraded camera mount compatible with 19mm micro cameras, providing a 20° shooting angle, significantly enhancing image quality; a motor mount customized for specific gear motor models to ensure compatibility; and a slimmer body design for a more compact form.
Additionally, LED lights have been added for easier exploration in dark environments. The robot features a modular design, providing STL files for a non-LED version top cover.
Core Components:
•Drive System: Powered by Orlandoo OH35P01 gear motor (300RPM) and controlled by DORCRCMAN 3A micro brushed ESC.•FPV System: Equipped with Foxeer Micro Predator Naked camera and TBS Unify Pro32 nano video transmitter, along with a short line antenna to provide a high-quality first-person perspective experience. It is recommended to use Fatshark HDO video goggles and Rapidfire module, as well as Powerplay recorder.•Remote Control System: Compatible with FrSky Taranis X9D remote controller and FrSky X8R receiver (requires two PWM channels).•Power System: It is recommended to use Turnigy nano-tech 300mAh 2S lithium battery or other compatible 2S lithium batteries. Power connections use JST connectors.•Lighting System: If LED lighting is needed, an additional 5V BEC and 5V LED light strip need to be purchased.
Material Selection:
It is recommended to use ASA material for the main structure to prevent melting risks due to overheating of the video transmitter. Tracks are recommended to be printed using Ninjaflex Semiflex or other flexible materials like TPU.
Assembly Instructions:
Refer to the original design’s assembly instructions, noting the following differences: the tracks consist of 34 units, no drilling is required, and they can be secured directly with fine wire. The top cover does not need to be secured with magnets, but installation holes are reserved if needed. Use suitable adhesives like hot glue for fixation.
Circuit Connections:
The robot uses a 2S power supply, ensuring the receiver can handle this voltage. The video transmitter, camera, and ESC can all operate at 8.4V. Connect the battery to the receiver, then plug the ESC into channels 1 and 2, and connect the video transmitter and camera to the receiver. The camera provides a VSEN pin, which connects to the positive terminal of the receiver, allowing voltage to be displayed in the OSD. The LED lights require a 5V power supply, so a BEC is needed to step down the voltage to 5V.
Control of the tracked model can be achieved through channel mixing settings on the remote control. All modified FreeCAD files have been provided, encouraging users to improve and share.
Previous Issues:
“Remote-Controlled Car – Tank” 3D printed remote-controlled toy tank and tank chassis, freely modifiable, highly traversable, widely expandable, easy to maintain and replace tracks, the best choice for remote-controlled toys.
“Remote-Controlled Car – Tracked” 3D printed remote-controlled tracked vehicle, a fully terrain vehicle platform, exploration robot, intelligent robot development platform.
“Remote-Controlled Car – Off-Road” 3D printed remote-controlled off-road vehicle, boys can indulge in climbing mountains, crossing rivers, and muddy pits, freely creating without risk or penalties.
“Remote-Controlled Car – Racing” 3D printed remote-controlled racing car, born for speed, a childhood fantasy for many, four-wheel drive kids, speed and passion.
“Remote-Controlled Plane” 3D printed fixed-wing model aircraft that can be remotely controlled to fly, with solid technology, come try it, each is a fine product, each can keep you busy for a month.
“Fixed-Wing Remote-Controlled Plane” 3D printed model aircraft, easy to make, requires skill to control, but unbeatable endurance.
“Remote-Controlled Car” Adult toys, professional RC remote-controlled cars, fully 3D printed four-wheel drive car kits.
“Tank” Remote-controlled tank, tracked chassis, various modified remote-controlled tanks printed in 3D, much more fun than bought ones.
<span>If you cannot download the models due to network issues, you can join the group, and group friends have the bundled model source files to share for each issue.</span>
A “3D Printing Technology Exchange Group” has been established; if interested, you can join the group by clicking the ‘Join Group’ menu below the public account or replying “Join Group” to receive the group QR code. Since the group QR code is only valid for 7 days, if the group QR code expires, you can also add <span>daniel_cats</span> and he will add you to the group.
If everyone has any types they need, please leave a message, and I will select the types with more comments to produce a few more issues.
All model copyrights belong to the original authors; this is only for introduction and explanation, for learning purposes, without any profit motive. For specific model original copyrights and information, please check the original address.
Note: For more information on specific models, directly use the <span>T station ID</span> to check on <span>thingiverse</span>.