1. Hardware Configuration
One Raspberry Pi 3B+ board
One 16GB memory card
One card reader
One power cable
One Ethernet cable
One laptop
One mouse
One HDMI cable
One TV monitor
2. Software Configuration
1. Operating System: 2019-07-10-raspbian-buster
2. Remote Connection: PuTTY
3. Remote Desktop: TightVNC
4. System Imaging: Win32DiskImager
Install the above software (easily obtainable)
3. Operation Process
Step 1: Download 2019-07-10-raspbian-buster and use Win32DiskImager to write it to the memory card
Step 2: Insert the memory card, connect the hardware properly, and power on
Step 3: Complete the initialization settings, then power off and remove the memory card
Step 4: Copy the following two files to the root directory of the memory card
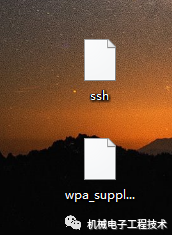
Files: ssh and wpa_supplicant.conf
The filessh is empty
The filewpa_supplicant.conf content is as follows
country=CN   //Copy these three lines ctrl_interface=DIR=/var/run/wpa_supplicant GROUP=netdevupdate_config=1
network={ssid="eaaaarth"    //WiFi name
psk="HX1aaas500ddddffg7082298"  //WiFi password
key_mgmt=WPA-PSK //WiFi encryption method
priority=2      //Connection priority, the larger the number, the higher the priority}
network={ssid="aRdaiaaa"psk="150070aaa82298="key_mgmt=WPA-PSK priority=1}
Remember to delete the comments during actual operation
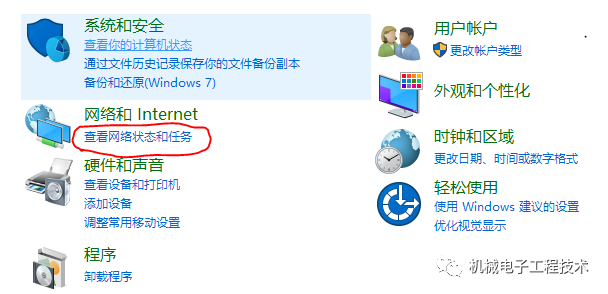
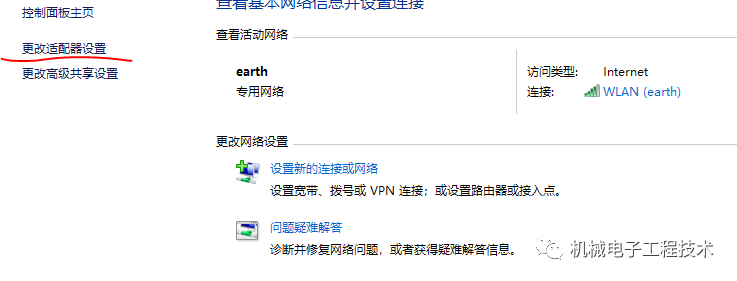
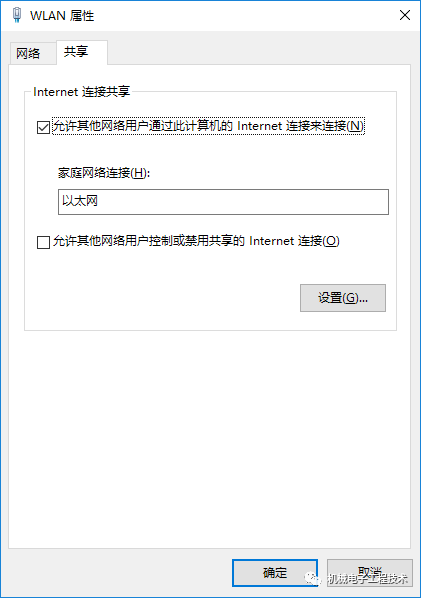
Step 5: Set up Internet sharing on the computer (Windows 10)
Start -> Control Panel -> View Network Status and Tasks -> Change Adapter Settings -> WLAN -> Properties -> Enable Sharing

Step 6: Insert the memory card, power on, and obtain the Raspberry Pi’s IP address
Press win+r to open the cmd command window
Enter the command
arp -a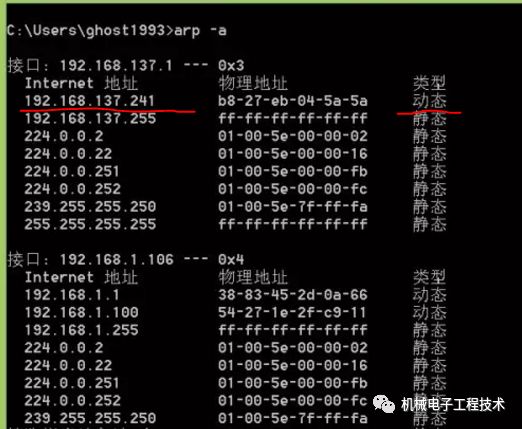
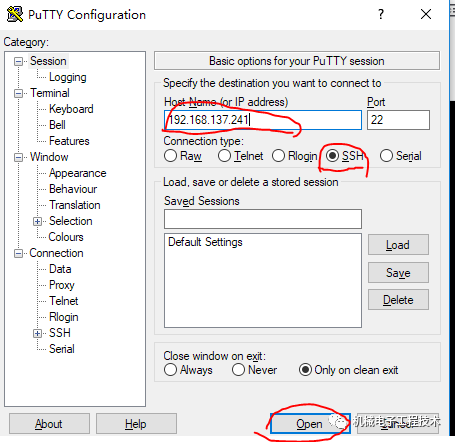
Step 7: Open PuTTY, enter the Raspberry Pi IP address, connect remotely, then enter username pi and password raspberry
Step 8: Start the VNC service and set it to start on boot
1. Enter the command:
sudo nano /etc/init.d/tightvncserver2. Enter the content:
#!/bin/sh### BEGIN INIT INFO# Provides: tightvncserver# Required-Start: $syslog $remote_fs $network# Required-Stop: $syslog $remote_fs $network# Default-Start: 2 3 4 5# Default-Stop: 0 1 6# Short-Description: Starts VNC Server on system start.# Description: Starts tight VNC Server. Script written by James Swineson.### END INIT INFO# /etc/init.d/tightvncserverVNCUSER='pi'case "$1" in start) su $VNCUSER -c '/usr/bin/tightvncserver :1' echo "Starting TightVNC Server for $VNCUSER" ;; stop) pkill Xtightvnc echo "TightVNC Server stopped" ;; *) echo "Usage: /etc/init.d/tightvncserver {start|stop}" exit 1 ;;esacexit 0After compiling, press Ctrl+O to save, then Ctrl+T to select the saved file as tightvncserver, finally Ctrl+X and press Enter to confirm exit, as shown in the figure below: (Note: VNCUSER=’pi’ indicates the Raspberry Pi username)
3. Enter the command
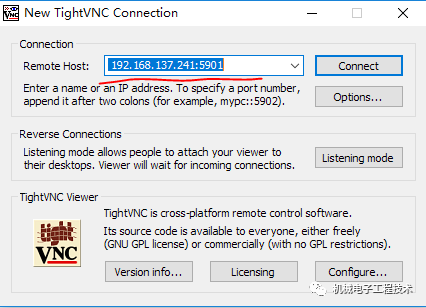
sudo chmod 755 /etc/init.d/tightvncserversudo update-rc.d tightvncserver defaultsStep 9: Use TightVNC to connect to the remote desktop
Step 10: Completed

4. Summary
When obtaining the Raspberry Pi’s IP on the computer side, execute the arp -a command twice before and after powering on, and compare to find the Raspberry Pi’s IP address. It is said to be a dynamic address on the network, but this is not absolute

Want to know more?
Quickly scan the code to follow us