As we all know, the Raspberry Pi is a “small but complete” microcomputer. When connected to various sensors and peripherals and programmed using languages such as Python (especially when associated with internet AI libraries), it can achieve functions such as automatic watering control, room temperature monitoring, face recognition, time-lapse photography, and home theater systems. However, for middle and primary school students who are beginners, directly using Python programming to develop module functions in Raspberry Pi can be relatively challenging. A better choice is to use the “block” programming on the Good Micro Robot website (http://www.gdwrobot.cn/), which is very similar to the Scratch programming model. By simply dragging the required functional modules to combine them in order, one can develop practical “maker” products such as automatic traffic light control, posture reminders, and dual-control lights.
There is a “CAMERA” CSI slot interface on the Raspberry Pi that connects to the official P5V04A SUNNY fixed-focus camera via a PFC soft ribbon cable. This setup can achieve basic functions such as taking photos and recording videos, as well as easily implementing extended functionalities like license plate recognition and text recognition.
1.Taking a Photo
The programming code is as follows:
Assign “ImagePath” to “take a photo”
Output debug information “ImagePath”
After setting the scene to be photographed (a medal), click the “Run” button. The log display area will show a prompt “/home/pi/imageTemp/image.jpg”; by remotely connecting to the Raspberry Pi’s /home/pi/imageTemp folder, you can view the image.jpg file, which is the photo just taken by the program (as shown in Figure 1). It is important to note that if the program is executed multiple times, it will continuously overwrite the image.jpg file.
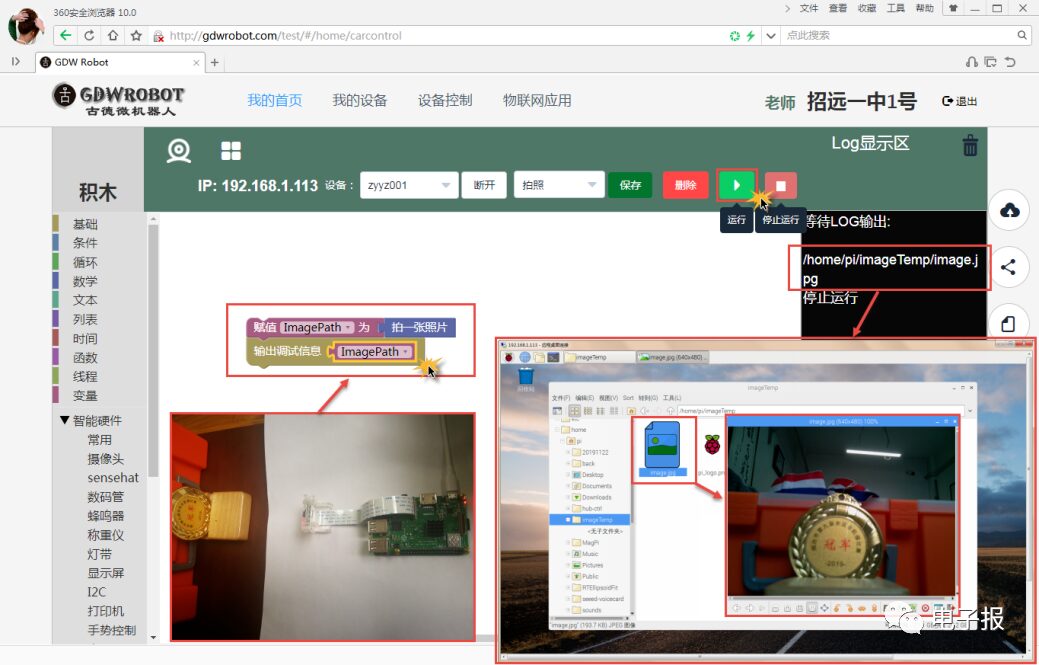
Figure 1
2.Recording a Video
The programming code is as follows:
Assign “MoviePath” to “record a ’10’ second video and save to path ‘/home/pi/imageTemp/video.mp4′”
Output debug information “MoviePath”
After setting the scene to be filmed (a DV playing video), click the “Run” button. After a few seconds, connect remotely to check, and there will be a video file named video.mp4 in the Raspberry Pi’s /home/pi/imageTemp folder; double-click to open it in the player to view the content, which is the scene just recorded (as shown in Figure 2).

Figure 2
3.Recognizing License Plate Information
The programming code is as follows:
Assign “ImagePath” to “take a photo”
Assign “License Plate” to “get the license plate information from the image ‘ImagePath'”
Output debug information “License Plate”
First, take a frontal photo of a car in the parking lot, print it, and place it in front of the Raspberry Pi camera (equivalent to carrying the Raspberry Pi and camera to photograph the license plate from the front); then click the “Run” button, and the photo taken will also be stored in the Raspberry Pi’s /home/pi/imageTemp/ directory (image.jpg file). The key point is that the log display area will show the recognized license plate information, such as “鲁FAN580” (as shown in Figure 3), correctly identifying the real license plate number.

Figure 3
4.Recognizing Text Information
Text recognition includes two experiments: printed text recognition and handwritten text recognition.
1) The programming code for printed text recognition is as follows:
Assign “ImagePath” to “take a photo”
Assign “Text Recognition” to “get the text information from the image ‘ImagePath'”
Output debug information “Text Recognition”
Find a segment of text information edited in Word, print it out, adjust the angle, and place it in front of the Raspberry Pi camera; click the “Run” button, and the printed text captured by the camera will be stored in the Raspberry Pi’s /home/pi/imageTemp/ directory, generating the image.jpg file. In the log display area, the text information “…… technicians score on the spot, test question……” will quickly appear (as shown in Figure 4), with a very high recognition rate. Except for one English word missing a letter, all other Chinese characters and numbers were recognized with 100% accuracy.
2) The programming code for handwritten text recognition is as follows:
Assign “ImagePath” to “take a photo”
Assign “Handwritten Text Recognition” to “get the handwritten text information from the image ‘ImagePath'”
Output debug information “Handwritten Text Recognition”
First, neatly write two sentences on paper: “The technology of automatic character recognition using computers is an important area of pattern recognition applications. Text Recognition: Text Recognition”, and similarly adjust the angle and place it in front of the Raspberry Pi camera; click the “Run” button, and the program will still generate the image.jpg file in the /home/pi/imageTemp/ directory (storing the captured handwritten text). The log area displays the recognized information as: “The technology of automatic character recognition using computers is an important area of pattern recognition applications. Text Recognition: [extKecoqnition” (as shown in Figure 5). The recognition rate for Chinese characters is 100%, but there were 3 errors in recognizing English letters: the letter “T” was recognized as the left bracket “[”, the letter “R” was recognized as the letter “K”, and the letter “g” was recognized as the letter “q”. This is largely related to different handwriting styles, but overall, the recognition effect is quite good.

Figure 4

Figure 5
Shandong Muxiaodong and Muxiaoxuan