When using the OneNET platform, if we develop our own applications, there will generally be a need to obtain the online and offline information of devices as well as the data points uploaded by the devices.
To meet the above requirements, we have the following two methods:
-
Use OneNET’s HTTP RESTful API to poll for device online and offline status as well as data points.
-
Use the data push service provided by OneNET to push device online and offline status and data points to our own server in real-time.
For the two methods above, you can choose one based on different application scenarios.
For example, I previously bought a connected robotic learning machine for my child. I bound the learning machine to my WeChat through the merchant’s official account. Once the learning machine is powered on, I receive a notification saying “Device Online” sent to my WeChat. This scenario is perfect for using the HTTP push service. (I suddenly have an idea; in the practical demonstration later, I can mimic this scenario for the demo.)
This article mainly explains how to use HTTP push service for multi-protocol products on the OneNET platform. During the demonstration in this article, I will use Python as the backend development language (friends who do not understand Python can ignore the Python source code), and you can develop using the language you are proficient in, as the steps and concepts are the same.

1. Introduction to HTTP Push Service
First, let’s take a look at some explanations from OneNET regarding HTTP push.
The OneNET platform provides data push functionality, allowing the platform to act as a client and send relevant information to the application server via HTTP/HTTPS requests.
It is worth noting that “relevant information” includes:
-
New data point messages from devices
-
Device online and offline messages
-
Device responses to downlink commands (limited to NB devices)
The OneNET push service provides data filtering functionality, allowing users to filter out large amounts of time-insensitive data such as frequent periodic reports from devices based on data stream templates, only pushing the real-time data that users care about, as shown in the following figure.
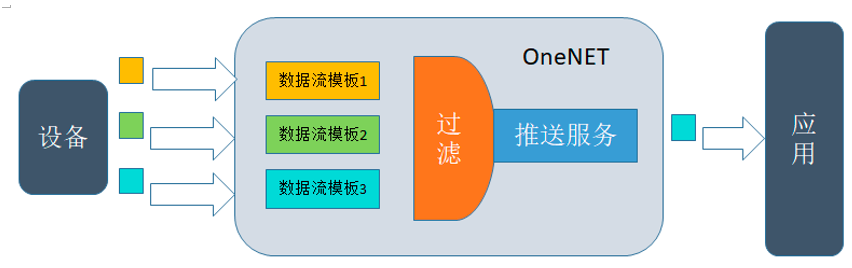
Figure OneNET Data Filtering Framework (from OneNET official)
Of course, the OneNET push service also provides data compression functionality, allowing users to set the compression method for the amount of data and time, merging multiple packets of single information messages within a certain time into a single JSON data package containing multiple pieces of information, which can greatly reduce the processing pressure on the application server, as shown in the following figure.
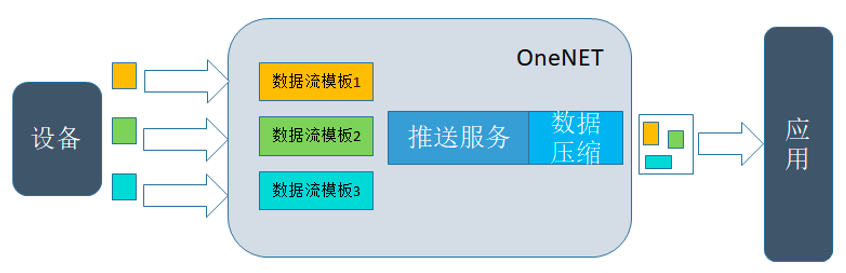
Figure OneNET Data Compression Framework (from OneNET official)
Next, let’s go directly to the demonstration. Here I will demonstrate based on MQTT protocol products (the usage method for other protocols is the same).

2. Creating Multi-Protocol Products
I won’t go into detail about how to create products and devices; the previous chapters have covered this in detail.
The following image shows an MQTT product I created for demonstration data pushing:

Click to enter the product details and create a new device, as shown below:

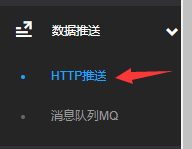
Click on “Data Push\HTTP Push” in the left list of the OneNET console
The control page for message pushing is as follows
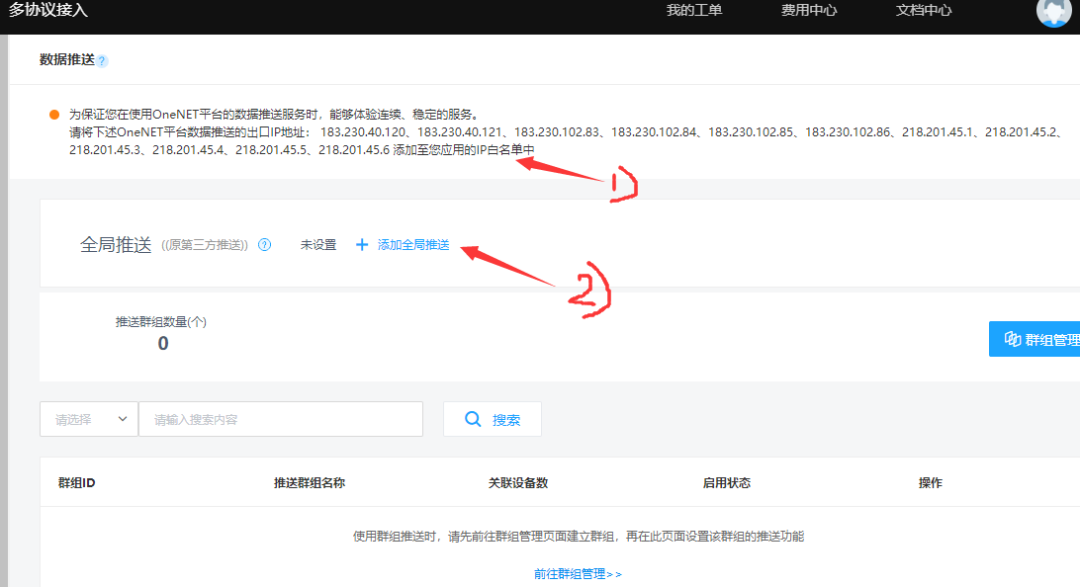
Next, we will first add a global push.

3. Data Push URL Verification
Adding a global push requires adding a URL that supports OneNET’s corresponding development rules. First, we need to prepare a URL that can be accessed normally, such as:
http://152.136.74.228:5000/he/data/push/global
You must ensure that this URL can be accessed normally,be accessed normally,be accessed normally!
At this point, my Python source code is:
from flask import Flask
from flask import request
import hashlib
import base64
app = Flask(__name__)

# OneNET global push link
@app.route("/he/data/push/global", methods=['GET'])
def he_data_push_global():
    return 'Hello IOT'

if __name__ == '__main__':
    app.run(host='0.0.0.0', debug=True)
Click “Add Global Push”
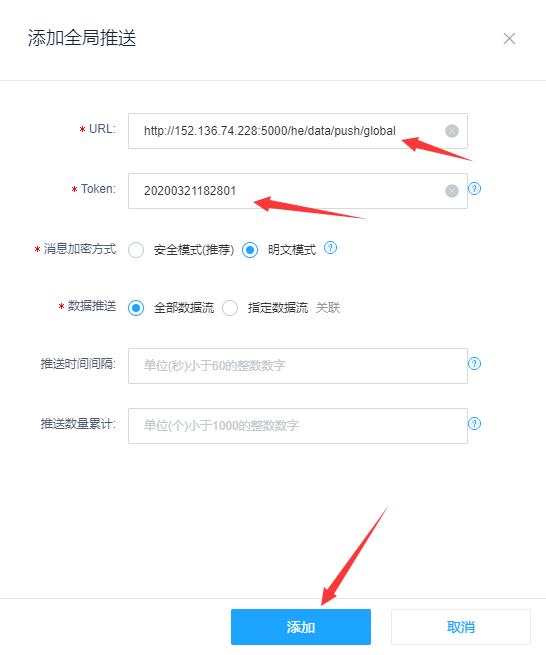
Fill in the relevant information:
URL:http://152.136.74.228:5000/he/data/push/global
Token:20200321182801
Message Encryption Mode: Plaintext Mode
Data Push: All Data Streams
Then click the “Add” button, and OneNET will pop up the following message:

The general meaning is “Authentication failed, Token verification failed”. Also, when you click the “Add” button, you can see that the URL you filled in will receive a request as follows:
GET /he/data/push/global?msg=LeoTAq&signature=/7hXrr3IpM538Z1uHvxSlA==&nonce=B0k7pDoe
You can see that the URL carries three parameters: msg, signature, and nonce. Now, this involves the URL verification issue of OneNET.
When using the push service, OneNET acts as a client, while the user’s third-party application acts as a server. The third-party application needs to support URL verification and data reception services.
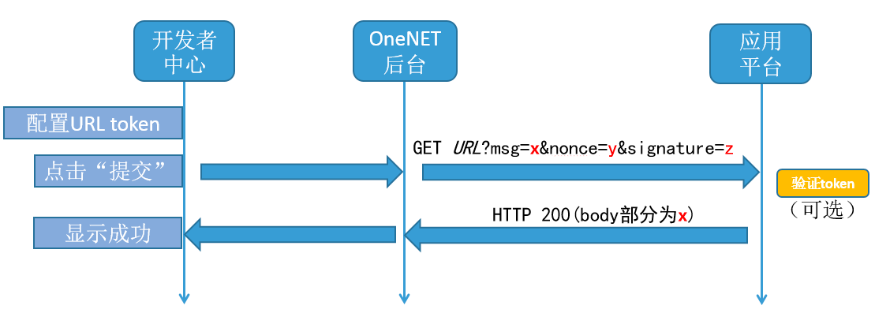
Figure OneNET URL Verification Flowchart
When the user completes the configuration on the configuration page and clicks “Add”, the OneNET platform sends an HTTP GET request to the specified URL for URL verification. The request format is as follows:
http://url?msg=xxx&nonce=xxx&signature=xxx
Where url is the URL filled in by the user on the configuration page, and nonce, msg, and signature are used for URL and token verification.
The token verification process is as follows:
1. Calculate MD5 with the token configured on the configuration page and the values of nonce and msg from the URL, and encode it as a Base64 string value.
2. Compare the Base64 string value obtained in the previous step with the value of the request parameter signature. If they are equal, it indicates that the token verification is successful.
3. If the token verification is successful, return the msg parameter value to indicate that the URL verification has passed.
However, OneNET has made a special note:
If the user does not want to verify the token, they can choose to skip the MD5 calculation process and directly return the msg parameter value.In other words, as long as your URL returns the msg value from the request, it means that the URL verification has passed. For now, we will not verify the token; we will keep it simple and directly retrieve and return the msg parameter from the URL. Once the process runs smoothly, we will then study the token verification issue.
Below, I modified the server-side Python code:
@app.route("/he/data/push/global", methods=['GET'])
def he_data_push_global():
    msg = request.args.get('msg') or None
    signature = request.args.get('signature') or None
    nonce = request.args.get('nonce') or None
    if not all([msg, signature, nonce]):
        return 'invalid parameter'
    return msg
Then click the “Add” button,

At this point, you can see that the global push URL has been added successfully.
Next, let’s take a look at the content of the data push.

4. Data Content
Typically, the data push content includes:
-
Device online and offline information
-
New data point messages from devices
The OneNET platform pushes data to the third-party platform URL address in the form of HTTP POST requests. After receiving the data, the third-party platform needs to return HTTP 200; otherwise, OneNET will consider the push invalid and retry.
The relevant information of the pushed data is placed in the body of the HTTP request in the form of a JSON string, with the meanings of each field as follows:
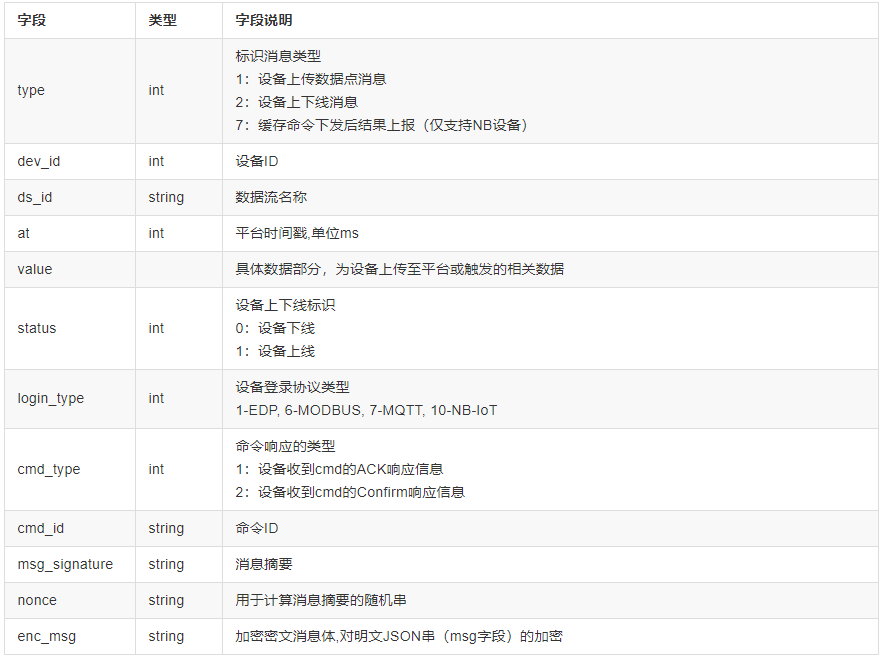
Table Data Push Body Fields (from OneNET documentation)
Since OneNET pushes data in POST form, we need to ensure that our server supports POST connections at the specified URL. I modified the server-side code as follows:
@app.route("/he/data/push/global", methods=['GET', 'POST'])
def he_data_push_global():
    if request.method == 'POST':
        print('**** Receive Post Data *****')
        print(request.data)
        return 'POST SUCCESS'
    msg = request.args.get('msg') or None
    signature = request.args.get('signature') or None
    nonce = request.args.get('nonce') or None
    if not all([msg, signature, nonce]):
        return 'invalid parameter'
    return msg
The server does not do much; it just prints the body data passed from the POST request.
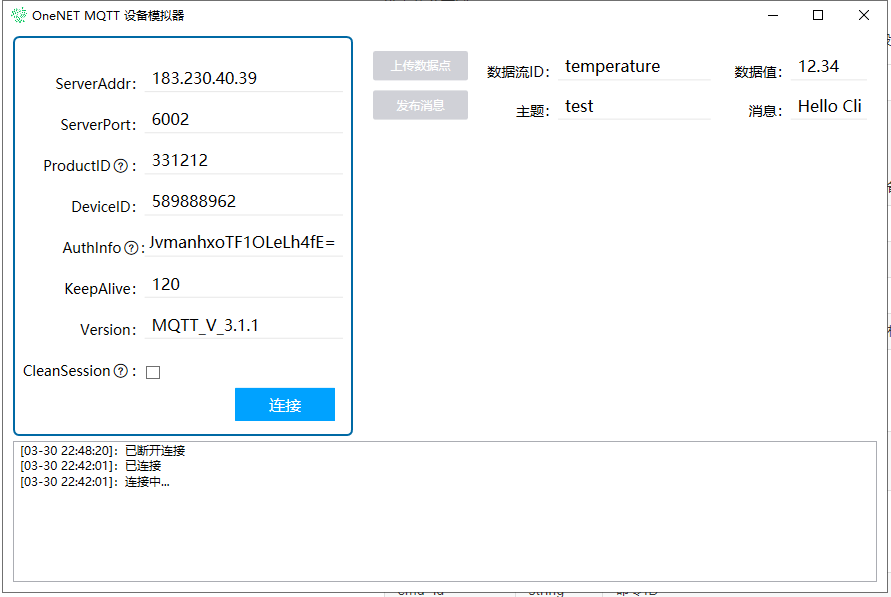
Now, let’s start the experiment. To make it easier for demonstration, I wrote a multi-protocol device simulator, and I will upload the latest version of this software to QQ group 940556740.
Example 1: MQTT Device Online
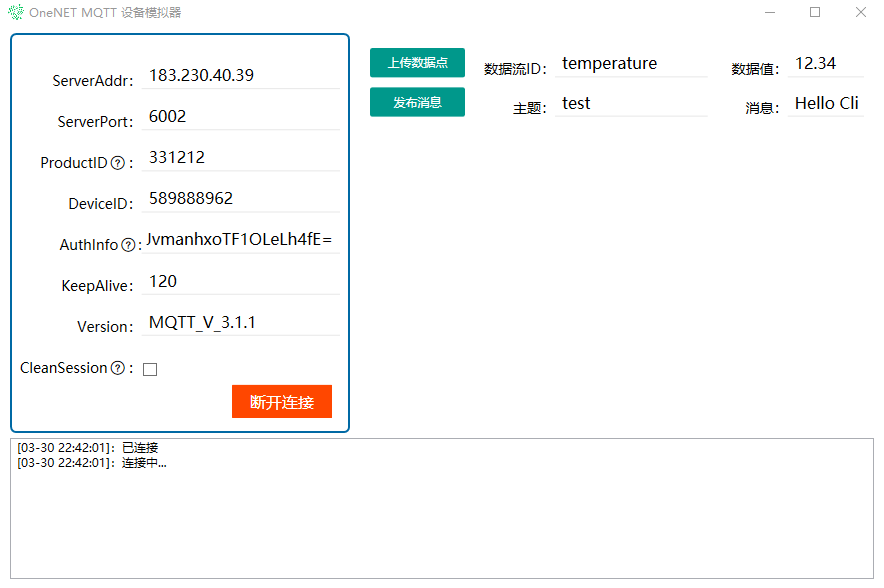
After the device goes online, the server receives the pushed data:

Comparing with the previous table, I organized and analyzed the body data as follows:
{ "msg": { "at":1585579321430, //timestamp "login_type":7, //device login protocol type 7-MQTT "type":2, //message type 2: device online and offline message "dev_id":589888962, //device ID "status":1 //device online and offline flag 1: device online }, "msg_signature":"1FtJkDnewfBiKFJKKheJPA==", //message digest "nonce":"w&INtJ9+" //random string used to calculate message digest}Example 2: MQTT Device Offline
After the device goes offline, the server receives the pushed data:

{ "msg": { "at":1585579700235, //timestamp "login_type":7, //device login protocol type 7-MQTT "type":2, //message type 2: device online and offline message "dev_id":589888962, //device ID "status":0 //device online and offline flag 1: device offline }, "msg_signature":"YPpafOSW1Byncd7xdXtF0Q==", //message digest "nonce":"iSX$ZVVD" //random string used to calculate message digest}Example 3: MQTT Device New Data Point
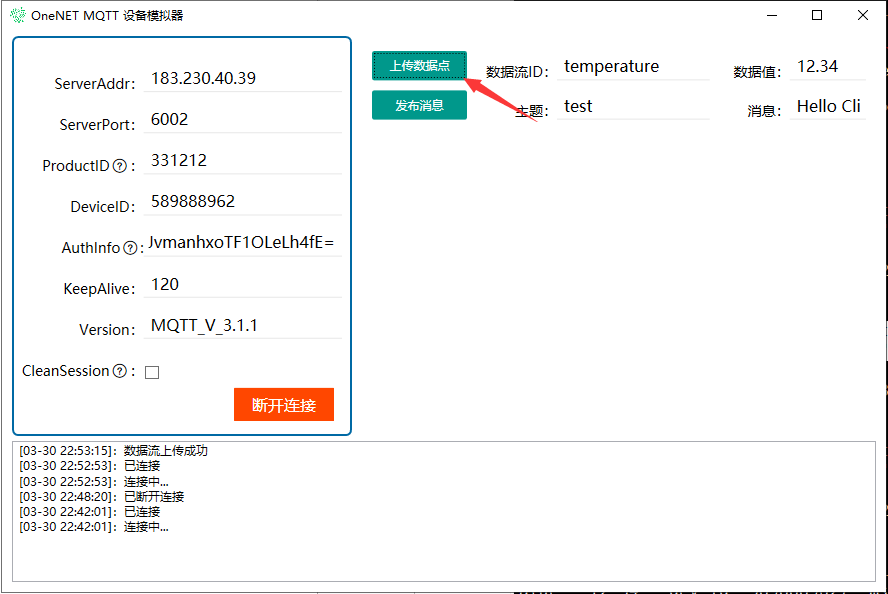
The server receives the pushed data as follows:

{ "msg": { "at":1585579995234, //timestamp "type":1, //message type 1: device online and offline message "ds_id":"temperature", //data stream name "value":"12.34", //data point "dev_id":589888962 //device ID }, "msg_signature":"h1oeGIrbyreHf6S81qet9w==", //message digest "nonce":"Mal9%W-E" //random string used to calculate message digest}The above three examples demonstrate the content of data pushing. After the server receives the pushed data, it can perform follow-up work based on different application scenarios. For example, as I mentioned at the beginning, we can completely push the device online and offline information to the customer’s WeChat client via WeChat service number (I must write such a practical project later).
Other protocol types can be verified using my device simulator.
At this point, the simplest data push process has been demonstrated. However, there is still one more thing that needs to be explained, which is the URL verification part.

5. URL Verification Continued
In section 3, I did not include token verification when adding the URL. In this section, I will add this functionality.
The token verification process of OneNET consists of the following four steps:
-
Step 1: Calculate MD5 with the token configured on the configuration page and the values of nonce and msg from the URL.
-
Step 2: Encode the calculated MD5 value as a Base64 string value.
-
Step 3: Decode the Base64 string value obtained in the previous step using URL Decode.
-
Step 4: Compare the value obtained after URL Decode with the request parameter signature value. If they are equal, it indicates that the token verification is successful, and the msg value is returned; otherwise, a custom value is returned.
Based on the above steps, I modified the server-side Python code as follows:
@app.route("/he/data/push/global", methods=['GET', 'POST'])
def he_data_push_global():
    if request.method == 'POST':
        print('**** Receive Post Data *****')
        print(request.data)
        return 'POST SUCCESS'
    msg = request.args.get('msg') or None
    signature = request.args.get('signature') or None
    nonce = request.args.get('nonce') or None
    if not all([msg, signature, nonce]):
        return 'invalid parameter'
    token = '20200321182801'    # Token filled in when adding URL
    # Step 1: Calculate MD5
    params_str = token + nonce + msg
    md5 = hashlib.md5(params_str.encode('utf-8')).digest()
    # Step 2: Encode as Base64 string value
    b64_str = base64.b64encode(md5)
    # Step 3: URL Decode the Base64 string value obtained in the previous step
    b64_str = b64_str.decode('utf-8')
    # Step 4: Compare the URL Decode value with the request parameter signature value
    if signature == b64_str:
        return msg
    return 'invalid token'
At this point, there are still group pushes and message encryption during pushes that have not been discussed. I won’t cover them in detail here due to the length of the article; I will explain them in the video recording later.