In Python desktop application development, Tkinter, as the built-in GUI library of Python, is the first choice for many developers. However, many beginners often encounter confusion when creating windows: how to precisely control the window size? How to set a personalized window title? Can the window position be customized? This article will help you thoroughly master the basic settings techniques of Python Tkinter windows through detailed code practice, making your upper computer development more professional and standardized.
Whether you are a beginner in Python development or a programmer looking to enhance the aesthetics of desktop application interfaces, these practical programming techniques will add significant value to your projects. Let’s start from the most basic window creation and gradually delve into advanced customization techniques.
🔍 Problem Analysis
In actual Python development projects, the appearance settings of the window directly affect user experience. Common requirements include:
Basic Requirements:
- Set appropriate window size to avoid being too large or too small
- Customize the window title to reflect application features
- Control the display position of the window on the screen
Advanced Requirements:
- Limit the maximum and minimum size of the window
- Prevent users from resizing the window
- Set a window icon to enhance professionalism
These seemingly simple settings actually involve several important methods in Tkinter. Mastering them can make your application interface more refined.
💡 Detailed Solution
🎯 Overview of Core Methods
Tkinter provides the following key methods to control window properties:
- `geometry()` to set the window size and position
- `title()` to set the window title
- `resizable()` to control whether the window can be resized
- `minsize()` and `maxsize()` to set the minimum and maximum size
- `iconbitmap()` to set the window icon
Let’s look at the specific usage of these methods through practical code.
🔥 Code Practical Exercise
1️⃣ Basic Window Settings
import tkinter as tk

def create_basic_window():
    """Create a basic window example"""
    root = tk.Tk()

    # Set window title
    root.title("My Python Application - Basic Version")

    # Set window size: width x height
    root.geometry("800x600")

    # Add some content
    label = tk.Label(root, text="Welcome to Python Tkinter!",
                    font=("Microsoft YaHei", 16))
    label.pack(pady=50)

    root.mainloop()

# Run example
create_basic_window()
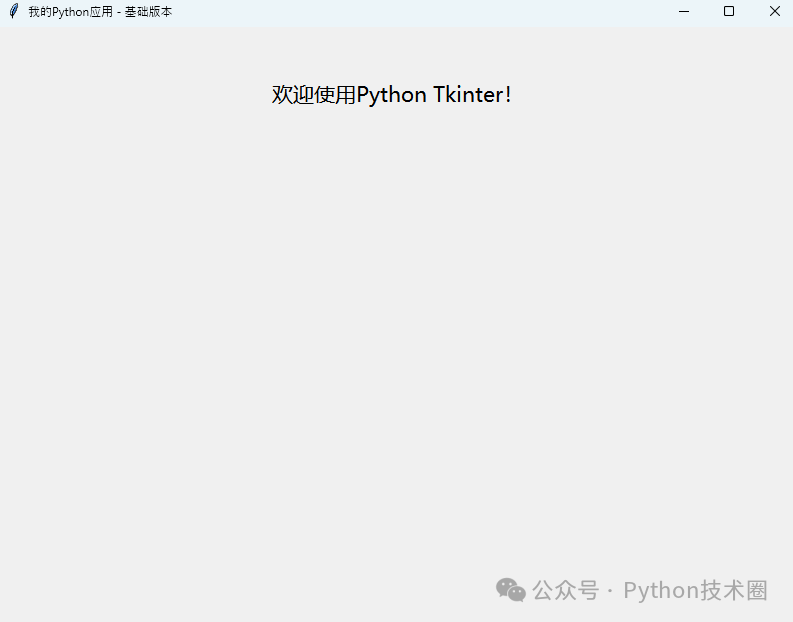
Key Knowledge Points:
<span>geometry("800x600")</span>: Creates a window that is 800 pixels wide and 600 pixels high- The size format is “width x height”, note that it is a lowercase letter x
2️⃣ Precisely Positioning the Window
import tkinter as tk

def create_positioned_window():
    """Create a window with position settings"""
    root = tk.Tk()
    root.title("Positioned Window Example")

    # Set window size and position: width x height + x offset + y offset
    # root.geometry("600x400+300+200")

    # It can also be displayed in the center
    # Get screen size
    screen_width = root.winfo_screenwidth()
    screen_height = root.winfo_screenheight()

    # Calculate center position
    window_width, window_height = 600, 400
    x = (screen_width - window_width) // 2
    y = (screen_height - window_height) // 2

    # Apply center position (comment out the fixed position setting above)
    root.geometry(f"{window_width}x{window_height}+{x}+{y}")

    label = tk.Label(root, text="The window has been positioned at the specified location",
                     font=("Arial", 14))
    label.pack(expand=True)

    root.mainloop()


create_positioned_window()
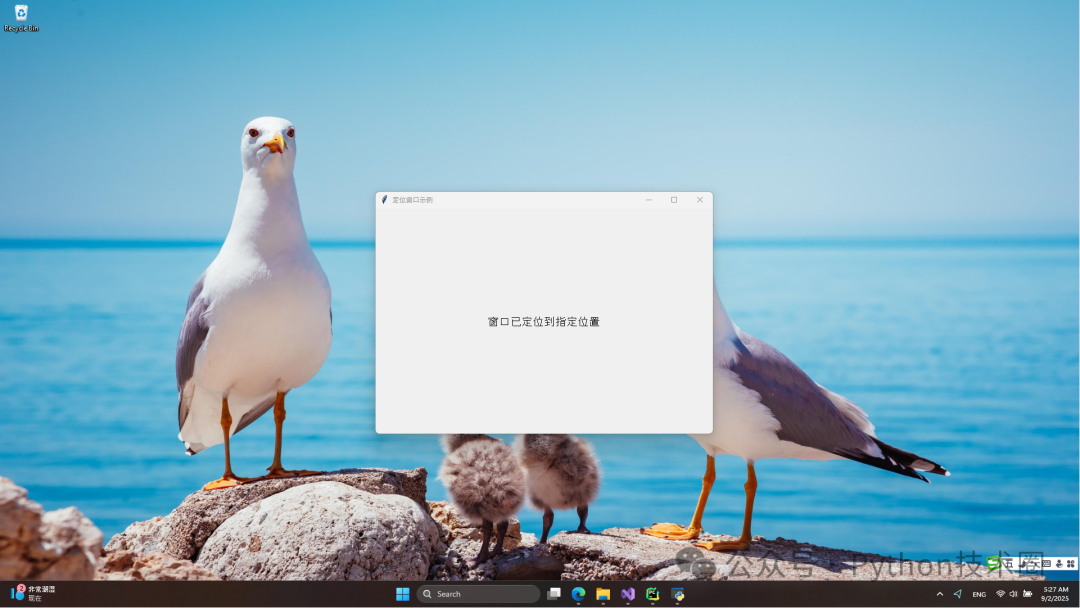
Practical Tips:
<span>+300+200</span>: The top left corner of the window is 300 pixels from the left of the screen and 200 pixels from the top- Using negative numbers can calculate the position from the right or bottom
<span>winfo_screenwidth()</span>and<span>winfo_screenheight()</span>get the screen size
3️⃣ Advanced Window Control
import tkinter as tk
from tkinter import messagebox


class AdvancedWindow:
    def __init__(self):
        self.root = tk.Tk()
        self.setup_window()
        self.create_widgets()

    def setup_window(self):
        """Advanced window settings"""
        # Basic settings
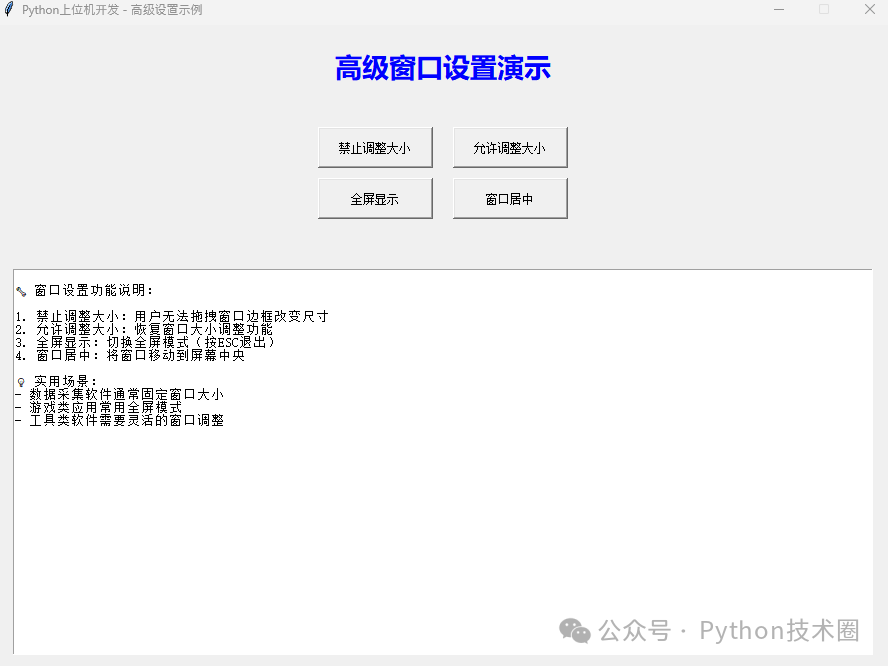
        self.root.title("Python Upper Computer Development - Advanced Settings Example")
        self.root.geometry("900x650+100+50")

        # Set minimum and maximum size
        self.root.minsize(600, 400)  # Minimum size
        self.root.maxsize(1200, 800)  # Maximum size

        # Set window icon (requires an ico file)
        # self.root.iconbitmap("app_icon.ico")

        # Window close event handling
        self.root.protocol("WM_DELETE_WINDOW", self.on_closing)

    def create_widgets(self):
        """Create interface controls"""
        # Title label
        title_label = tk.Label(self.root,
                               text="Advanced Window Settings Demonstration",
                               font=("Microsoft YaHei", 20, "bold"),
                               fg="blue")
        title_label.pack(pady=20)

        # Function button frame
        button_frame = tk.Frame(self.root)
        button_frame.pack(pady=20)

        # Various function buttons
        tk.Button(button_frame, text="Disable Resize",
                  command=self.disable_resize,
                  width=15, height=2).grid(row=0, column=0, padx=10)

        tk.Button(button_frame, text="Enable Resize",
                  command=self.enable_resize,
                  width=15, height=2).grid(row=0, column=1, padx=10)

        tk.Button(button_frame, text="Full Screen",
                  command=self.toggle_fullscreen,
                  width=15, height=2).grid(row=1, column=0, padx=10, pady=10)

        tk.Button(button_frame, text="Center Window",
                  command=self.center_window,
                  width=15, height=2).grid(row=1, column=1, padx=10, pady=10)

        # Information display area
        self.info_text = tk.Text(self.root, height=15, width=80)
        self.info_text.pack(pady=20, padx=20, fill="both", expand=True)

        # Insert some example information
        info = """
🔧 Window Setting Function Description:

1. Disable Resize: Users cannot drag the window border to change size
2. Enable Resize: Restore window resizing functionality
3. Full Screen: Switch to full screen mode (press ESC to exit)
4. Center Window: Move the window to the center of the screen

💡 Practical Scenarios:
- Data acquisition software usually has a fixed window size
- Game applications often use full screen mode
- Utility software requires flexible window adjustments
        """
        self.info_text.insert("1.0", info)

    def disable_resize(self):
        """Disable window resizing"""
        self.root.resizable(False, False)
        messagebox.showinfo("Tip", "Window resizing has been disabled")

    def enable_resize(self):
        """Enable window resizing"""
        self.root.resizable(True, True)
        messagebox.showinfo("Tip", "Window resizing has been enabled")

    def toggle_fullscreen(self):
        current_state = self.root.attributes('-fullscreen')
        if not current_state:
            # Temporarily remove size constraints
            self.root.minsize(1, 1)
            self.root.maxsize(self.root.winfo_screenwidth(), self.root.winfo_screenheight())
            self.root.attributes('-fullscreen', True)
            # Bind ESC key to exit fullscreen
            self.root.bind('', lambda e: self.toggle_fullscreen())
        else:
            # Restore size constraints
            self.root.attributes('-fullscreen', False)
            self.root.minsize(600, 400)
            self.root.maxsize(1200, 800)

    def center_window(self):
        """Center the window"""
        self.root.update_idletasks()
        width = self.root.winfo_width()
        height = self.root.winfo_height()

        screen_width = self.root.winfo_screenwidth()
        screen_height = self.root.winfo_screenheight()

        x = (screen_width - width) // 2
        y = (screen_height - height) // 2

        self.root.geometry(f"{width}x{height}+{x}+{y}")
        messagebox.showinfo("Tip", "The window has been centered")

    def on_closing(self):
        """Window close event handling"""
        if messagebox.askokcancel("Exit", "Are you sure you want to exit the application?"):
            self.root.destroy()

    def run(self):
        """Start the application"""
        self.root.mainloop()


# Run advanced window example
if __name__ == "__main__":
    app = AdvancedWindow()
    app.run()
4️⃣ Responsive Window Design
import tkinter as tk

class ResponsiveWindow:
    def __init__(self):
        self.root = tk.Tk()
        self.setup_responsive_window()
        self.create_responsive_layout()

    def setup_responsive_window(self):
        """Set up a responsive window"""
        self.root.title("Responsive Design Example")
        self.root.geometry("1000x700")

        # Set minimum size to ensure the interface does not get too small
        self.root.minsize(800, 500)

        # Bind window size change event
        self.root.bind('', self.on_window_resize)

        # Configure weights to allow components to adapt
        self.root.grid_columnconfigure(0, weight=1)
        self.root.grid_rowconfigure(1, weight=1)

    def create_responsive_layout(self):
        """Create a responsive layout"""
        # Top title area
        title_frame = tk.Frame(self.root, bg="#2c3e50", height=80)
        title_frame.grid(row=0, column=0, sticky="ew", padx=5, pady=5)
        title_frame.grid_propagate(False)  # Maintain fixed height

        title_label = tk.Label(title_frame,
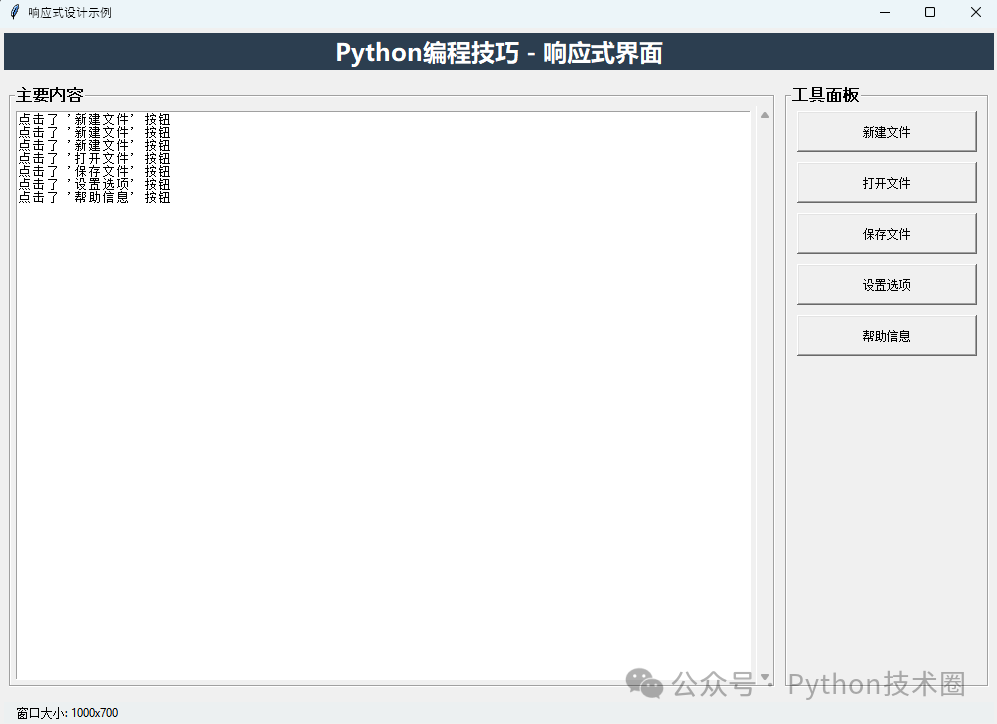
                              text="Python Programming Tips - Responsive Interface",
                              font=("Microsoft YaHei", 18, "bold"),
                              bg="#2c3e50", fg="white")
        title_label.pack(expand=True)

        # Main content area
        main_frame = tk.Frame(self.root)
        main_frame.grid(row=1, column=0, sticky="nsew", padx=5, pady=5)
        main_frame.grid_columnconfigure(0, weight=2)  # Left side weight 2
        main_frame.grid_columnconfigure(1, weight=1)  # Right side weight 1
        main_frame.grid_rowconfigure(0, weight=1)

        # Left content area
        left_frame = tk.LabelFrame(main_frame, text="Main Content",
                                  font=("Arial", 12, "bold"))
        left_frame.grid(row=0, column=0, sticky="nsew", padx=5, pady=5)

        # Right tool area
        right_frame = tk.LabelFrame(main_frame, text="Tool Panel",
                                   font=("Arial", 12, "bold"))
        right_frame.grid(row=0, column=1, sticky="nsew", padx=5, pady=5)

        # Add text area to the left
        self.text_area = tk.Text(left_frame, wrap=tk.WORD)
        scrollbar = tk.Scrollbar(left_frame, orient="vertical",
                               command=self.text_area.yview)
        self.text_area.configure(yscrollcommand=scrollbar.set)

        self.text_area.pack(side="left", fill="both", expand=True, padx=5, pady=5)
        scrollbar.pack(side="right", fill="y")

        # Add control buttons to the right
        buttons = ["New File", "Open File", "Save File", "Settings", "Help"]
        for i, btn_text in enumerate(buttons):
            tk.Button(right_frame, text=btn_text,
                     width=12, height=2,
                     command=lambda t=btn_text: self.button_click(t)).pack(
                     pady=5, padx=10, fill="x")

        # Status bar
        self.status_frame = tk.Frame(self.root, bg="#ecf0f1", height=30)
        self.status_frame.grid(row=2, column=0, sticky="ew", padx=5, pady=5)
        self.status_frame.grid_propagate(False)

        self.status_label = tk.Label(self.status_frame,
                                   text="Ready - Window Size: 1000x700",
                                   bg="#ecf0f1", anchor="w")
        self.status_label.pack(side="left", padx=10)

    def on_window_resize(self, event):
        """Callback when the window size changes"""
        if event.widget == self.root:
            width = self.root.winfo_width()
            height = self.root.winfo_height()
            self.status_label.config(text=f"Window Size: {width}x{height}")

    def button_click(self, button_text):
        """Button click event"""
        self.text_area.insert(tk.END, f"Clicked '{button_text}' button\n")
        self.text_area.see(tk.END)  # Scroll to the bottom

    def run(self):
        self.root.mainloop()

# Run responsive window example
responsive_app = ResponsiveWindow()
responsive_app.run()
🎯 Best Practice Recommendations
📊 Size Setting Recommendations
Common Window Sizes:
- Small Tools 400×300 ~ 600×450
- Standard Applications 800×600 ~ 1024×768
- Professional Software 1200×800 ~ 1440×900
# Automatically adjust based on screen ratio
import tkinter as tk

def get_optimal_size():
    root = tk.Tk()
    root.withdraw()  # Hide window

    screen_w = root.winfo_screenwidth()
    screen_h = root.winfo_screenheight()

    # Take 70% of the screen as window size
    optimal_w = int(screen_w * 0.7)
    optimal_h = int(screen_h * 0.7)

    root.destroy()
    return optimal_w, optimal_h
🔒 User Experience Optimization
def create_user_friendly_window():
    root = tk.Tk()
    root.title("User-Friendly Window Settings")

    # Remember the user's last window state (in actual applications, this can be done with a configuration file)
    last_geometry = "900x650+200+100"
    root.geometry(last_geometry)

    # Set reasonable minimum size to avoid overlapping interface elements
    root.minsize(600, 400)

    # Elegant close handling
    def save_and_quit():
        # Here you can save the current window position and size
        current_geometry = root.geometry()
        print(f"Saving window settings: {current_geometry}")
        root.destroy()

    root.protocol("WM_DELETE_WINDOW", save_and_quit)
    return root
🚀 Summary and Further Learning
Through the detailed explanation in this article, we have mastered the three core points of Python Tkinter window settings:
- Basic Settings Use the
<span>geometry()</span>method to precisely control window size and position, and<span>title()</span>to set a personalized title - Advanced Control Achieve professional-level window management through
<span>resizable()</span>,<span>minsize()</span>, and<span>maxsize()</span>methods - Responsive Design Combine event binding and weight configuration to create adaptive user interfaces
These programming techniques are not only applicable to simple Python development projects but are also very useful in complex upper computer development. Mastering window settings is the first step in creating professional desktop applications.
Further Learning Suggestions:
- Deepen your understanding of Tkinter layout managers (pack, grid, place)
- Learn about ttk themed widgets to enhance interface aesthetics
- Explore window management methods in other Python GUI libraries (PyQt, wxPython)