As a production engineer, we often deal with map images. A wafer map is generated after CP testing, showing the pass/fail dies on the wafer. The packaging factory needs this map to select the pass dies for packaging. Sometimes, due to different notch orientations, the upstream and downstream wafer maps need to be rotated 90° to match. Let’s explore how to write a simple script to achieve this.
01
—
What Does a Wafer Map Look Like?
Generally, map images are saved in Excel or TXT format. Taking a TXT format as an example:
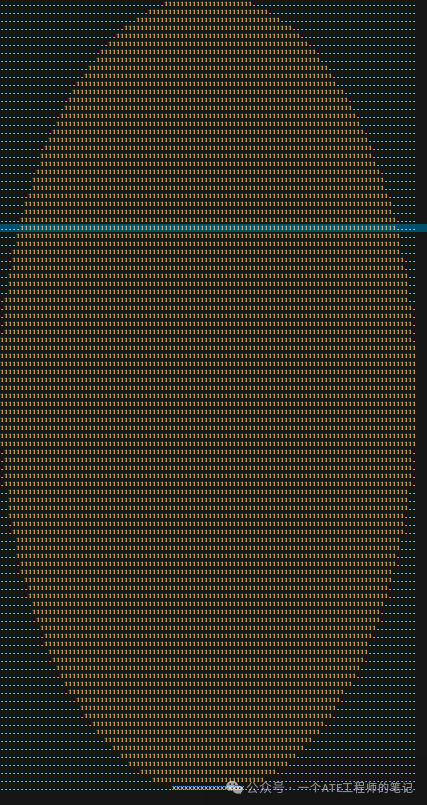
Inkless maps show pass and fail, while non-inkless maps show soft/hard bins.

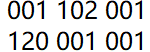
The objects we actually process are TXT files containing these bin information characters, and we need to ensure that the bin information remains correct after rotation.
02
—
How to Rotate a Wafer Map
To address this issue, the first algorithm that comes to mind is coordinates, because the wafer map itself is a two-dimensional coordinate system, and the coordinates of each die are unique. The coordinates of a point after rotation around a fixed point in a two-dimensional coordinate system are as follows:
Let point P(x,y) rotate around fixed point C(a,b) at angle θ, the new coordinates after rotation are P ′(x′ ,y′)
x′ = a+(x-a)⋅cosθ-(y−b)⋅sinθ
y′ = b+(x-a)⋅sinθ+(y−b)⋅cosθ
Clearly, this fixed point is the center of the wafer. We need to first determine the center’s location; this algorithm can be a bit cumbersome.
The second approach is to use matrices. Upon closer inspection of the wafer map, we find that although we are dealing with a circle, it is actually an M⋅N rectangle, with the non-wafer parts masked by special characters.

03
Using NumPy to Handle Matrix Problems
Rotating the map is equivalent to rotating a matrix. Using Python’s NumPy library, we can easily write a matrix rotation. Here’s an example:
import numpy as np
def sample():    org_coor= np.array(        [            (0, 3), (1, 3), (2, 3),            (0, 2), (1, 2), (2, 2),            (0, 1), (1, 1), (2, 1),            (0, 0), (1, 0), (2, 0),        ]    )    # Reshape the array to a 4x3 matrix    matrix= org_coor.reshape(4, 3, 2)    # Rotate the matrix 90 degrees counterclockwise    rotated_matrix = np.rot90(matrix, k=1, axes=(0, 1))    # Reshape the rotated matrix to a 3x4 matrix    rotated_coor = rotated_matrix.reshape(3, 4, 2)    for row in rotated_coor:        for point in row:            print(f"({point[0]}, {point[1]}),", end="") ##print defaults to newline; using end="" prevents newline     print("\n")
Printing the rotated coordinates rotated_coor
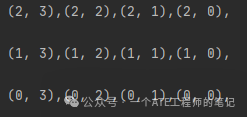
Let’s briefly explain the reshape() and rot90() functions:
① reshape(arr, newshape, order=’C’)
arr: The array to be changed, expressed implicitly in the above code as arr.reshape(), omitting this parameter.
newshape: (4,3,2) represents 4 rows, 3 columns, and 2 elements.
order: An optional parameter that determines the order of element filling.
‘C’ (default): Fill in row-major (C-style).
‘F’: Fill in column-major (Fortran-style).
‘A’: Preserve the original array’s order.
② def rot90(m, k=1, axes=(0, 1)):
Rotates the matrix 90 degrees around the plane specified by the axes parameter.
Rotation direction: from the first axis to the second axis direction.
m: Type: array The matrix to be rotated.
k: Type: integer Defaults to 1, representing the number of 90-degree rotations.
axes: Length-2-like array (x, y) axes specify the plane to rotate.
We only need to record the initial map’s bin character information and corresponding coordinates to determine where the dies should be in the new coordinates after rotation, thus generating a new map.
If anyone has better methods for handling such issues, feel free to leave a comment!