1. Design of Boss Position
1.1 Function of Boss Position: Typically, the boss position in plastic parts is used to support the PCBA, secure the PCBA or the plastic part itself, fix electronic components, or connect the front and back shells of the product. Its greatest advantage is that the height is easy to adjust. Therefore, under normal circumstances, we should try to use the plane formed by the end face of the boss as the support surface. The plane is formed by several ribs.
1.2 Draft Angle and Height of the Boss: When the boss height exceeds 10mm, it is usually ejected by the ejector pin, so its draft angle can be very small or 0 degrees. The inner hole can be set to 0 degrees, and the outer surface can be set to 0.25 degrees. When the height of the boss is less than 10mm, inserts may be used on the mold, and the draft angle can be set to 0.5 degrees for the inner hole and 1 degree for the outer surface. If height adjustment is desired, please indicate on the drawing to require the mold processing to consider height adjustment. Generally, the height of the M3 self-tapping screw boss should not exceed 30mm, as a height that is too great may cause the ejector pin to bend and deform due to the flow of glue.
1.3 Size of the Boss: Since the boss height greater than 10mm is usually ejected by the ejector pin, the outer and inner diameters of the boss are limited.
Common outer diameter series for ejector pins include: φ4.0, 4.5, 5, 6, 6.5, 7, 8, 10, 12.
Common ejector pin series include: 1.5, 2.0, 3.0, 3.5, 4.0, 4.5, 5.0.
The corresponding relationships are shown in the following table.
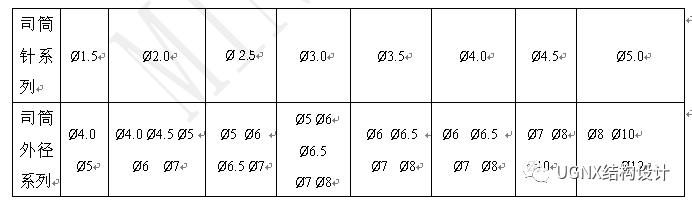
The inner diameter of the boss is obtained by grinding down the ejector pin. From the table above, we can see that we should not design a boss with a wall thickness less than 1.0mm, and it is best not to design a boss with an outer diameter that is not a standard value.
1.4 Treatment of the Base of the Boss: Two common issues can arise: shrinkage or shadow (or water marks). To prevent shrinkage, the base of the boss should have less glue, and the ejector pin should be lengthened. If shadows (or water marks) have appeared, more glue should be added to the base of the boss or the ejector pin should be shortened. Therefore, for a wall thickness of 3mm, if the boss diameter is greater than or equal to 6mm (for M3 self-tapping screws), to prevent shrinkage, less glue should be applied to the base of the boss during mold processing. If shadows appear during testing, then more glue can be added. (Note the requirement for the base of the boss, ensuring that the ejector pin surface and the volcano surface are not at the same height to reduce stress.)
1.5 Selection of Embedded Studs: If frequent disassembly or maintenance is required, embedded (thermal press) studs should be used, replacing self-tapping screws with ordinary screws. After thermal pressing or embedding, the glue column must not have cracking or overflowing glue.
1.1.1 Cracking Issues with Embedded Studs Connected to Plastic Parts:
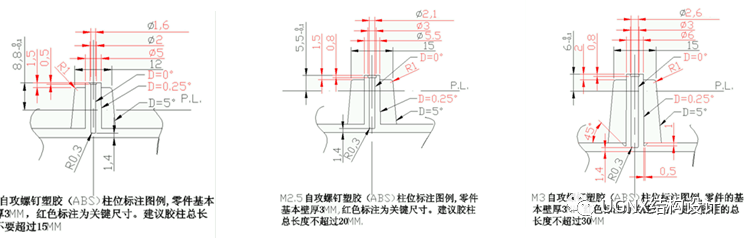
Due to the significant size change of embedded studs during cooling compared to the shrinkage of plastic parts, large internal stress can occur around the embedded studs, leading to cracking in the plastic parts, which is more severe for high-rigidity engineering plastics. Due to the large internal stress, it is generally prohibited to use embedded studs for PC, and PC+ABS is also not recommended, especially when the number of embedded studs exceeds 4, and when there are studs of different heights, leading to too many types of studs, which can easily result in errors. Additionally, prolonged placement can cause the material in the injection molding machine barrel to deteriorate due to excessive high temperature. Below is a list of M2, M2.5, M3, M4 self-tapping screw studs:
2. Design of Reinforcements
The role of reinforcements is to increase the strength of plastic parts and prevent deformation. Simply increasing the wall thickness to improve the strength of plastic parts is often unreasonable; firstly, it can easily lead to shrinkage, and secondly, it increases injection molding costs. Reinforcements should not be designed too thick, otherwise, shrinkage may occur at their base, nor too thin, as too thin may lead to uneven glue flow. The recommended thickness is: when the mold is processed with a large gate, the thickness at the base of the reinforcement should be less than half of the wall thickness. The top thickness of the rib should not be less than 1mm. When the mold is processed with a small gate, the thickness at the base of the reinforcement should be less than two-fifths of the wall thickness, and the top thickness of the rib should not be less than 0.8mm. Regarding the draft angle of reinforcements: for typical reinforcements, the draft angle on both sides can be taken according to the thickness requirements above. For reinforcements with special height requirements, a draft angle of 0.1-0.25 degrees can be taken on both sides, requiring inserts. If possible, adding boss positions to reinforcements can help with ejection. (As shown in the figure below)
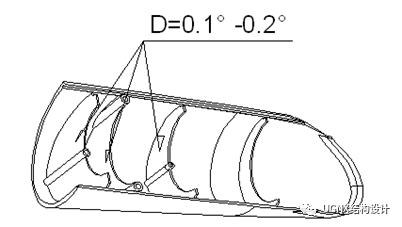
Reinforcements on Boss Positions: Glue columns must be designed with reinforcements where structural conditions allow. Since the reinforcements on the boss position are ejected together with the boss, they can be much taller than ordinary reinforcements, with their height being 1-3mm lower than the end face of the boss. At the same time, the reinforcements on the boss should be symmetrically processed to ensure minimal deformation of the boss. The shape is as shown in Figure 1, with a slope indicated as D=3-5 degrees.
3. Design of Decorative Seams, Stop Faces, Crossbones, and Snap Features
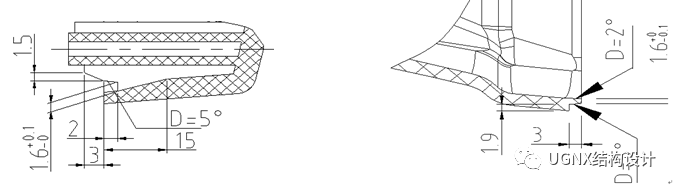
For industrial products, particularly fixed lighting products, if environmental conditions allow (for some products, especially those in dusty environments, decorative seams cannot be present), it is best to design decorative seams. The purpose of designing decorative seams is to compensate for the appearance defects caused by the deformation of plastic parts, and to ensure good fit between plastic parts for easy assembly and disassembly. The design of stop faces and crossbones is diverse, and it is recommended that the shapes of stop faces and crossbones be as shown in Figures 2 and 3. Special attention should be paid to ensure that glue reduction is uniform and gradual, and not abrupt; otherwise, shadows may easily form on the appearance surface.
3.1 Experience in Designing Stop Faces
3.1.1 Type 1 Stop Face
Edit Search Image
Please click to enter image description
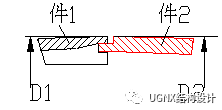
From an appearance perspective, it is recommended that part 1 be the front shell and part 2 be the back shell. If the front and back shells are not aligned after mold processing and require modification, it is recommended to add some material to the front shell, making the front shell larger than the back shell (D1>D2) to visually surpass the back shell being larger than the front shell (D2>D1). It is suggested that the front shell D1 be marked with positive tolerance and the back shell D2 with negative tolerance. This type of stop face has the characteristics of being visually appealing, with a large decorative seam, suitable for larger parts, while the outer shell may have shadows and slightly poorer sealing.
3.1.2 Type 2 Stop Face
Edit Search Image
Please click to enter image description
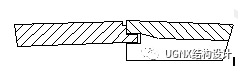
Good sealing, small decorative seam, aesthetically pleasing, suitable for small structures, but easy to show seams on large parts.
3.1.3 Type 3 Stop Face
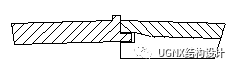
Poor tactile feedback, suitable for larger parts, helps cover dimensional errors between the front and back shells.
Edit Search Image
Please click to enter image description
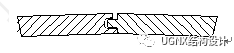
3.1.4 Type 4 Stop Face
Visually appealing, decorative seam can be large or small, excellent sealing (can add sealing strip), requires larger wall thickness, complex mold structure.
Edit Search Image
Please click to enter image description
3.1.5 Design of Snap Features Between Front and Back Shells
In the design of plastic parts, to simplify assembly and reduce the number of screws, the elasticity of plastic can be utilized to design snap features. There are many forms of snap features, and here we need to pay special attention to the connecting snap features between the front and back shells. The recommended forms of snap features are as follows:
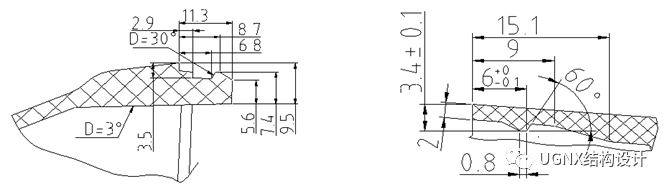 Figure 3 Figure 4
Structure shown in Figure 3 is generally made on the back shell, while the structure shown in Figure 4 is generally made on the front shell. Special attention should be paid to ensure that glue reduction is uniform and gradual, and not abrupt; otherwise, shadows or shrinkage may appear at the glue reduction points.
4. Design of Fillet
For plastic corner parts, except for sharp corners that are required for use, all other corners should adopt rounded transitions as much as possible, as sharp corners in plastic parts are prone to stress concentration, which can lead to cracking during stress or impact vibrations. Cracking can even occur during the demolding process. Generally, the following principles are recommended for processing rounded corners:
The two ends of the rib should have R>1mm.
For square holes opened in the middle of plastic parts, rounded corners should be made around the hole, with a radius greater than one-fourth of the wall thickness of the part.
For square parts that fit with holes in the plastic part, rounded corners should be made at all four corners.
For the base of columns that are particularly stressed, rounded corners should be made, approximately R0.5.
5. Design of Common Transparent Parts
Transparent Materials: There are many types of commonly used transparent materials. The ones we frequently use in design include transparent ABS, PC, and PMMA. Due to the poor flow properties of transparent materials, injection molding can easily lead to appearance issues, such as water marks forming on the tops of transparent keycaps. Products like lenses are prone to nail marks and snake patterns near the gate. Regarding these issues, please note during design: For components like transparent keycaps, the top thickness should be designed to be thicker than the surrounding areas. If the cavity is too deep, local glue reduction should be applied near the gate to allow glue to flow to the top of the part first, then to the surrounding areas. For decorative pieces and lenses, please reserve a wider (greater than 6-8mm) and thicker gate (greater than 1-1.5mm), and during mold processing, try to use a wide fan-shaped gate with short and thick flow channels.