Click the blue text
PLC Automation Exchange
Follow us
Precise control, efficient motion – creating an intelligent servo control system
In the field of industrial automation, servo motor control is one of the core technologies. Today, we will delve into how to use the Mitsubishi FX5U PLC to write a complete pulse axis control program using ST language, including comprehensive functions such as enabling, homing, jogging, and positioning, while integrating a touchscreen human-machine interface for comprehensive monitoring and parameter settings.
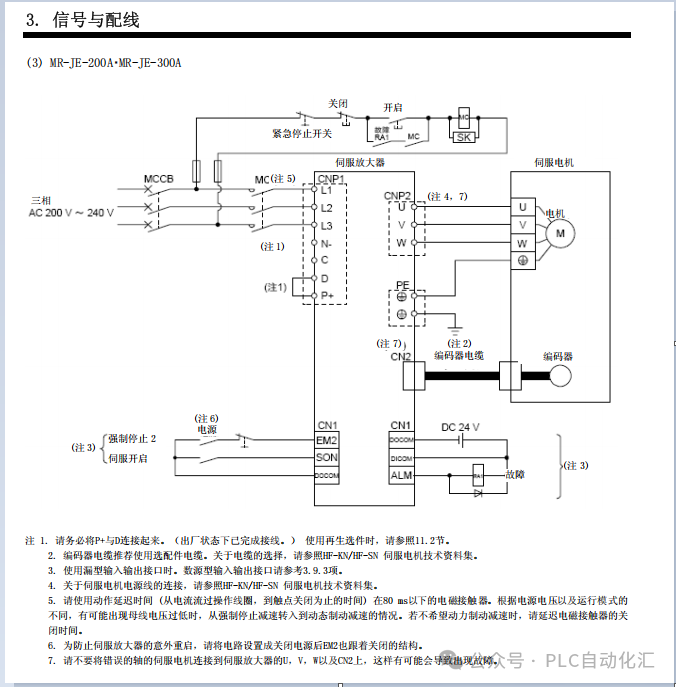
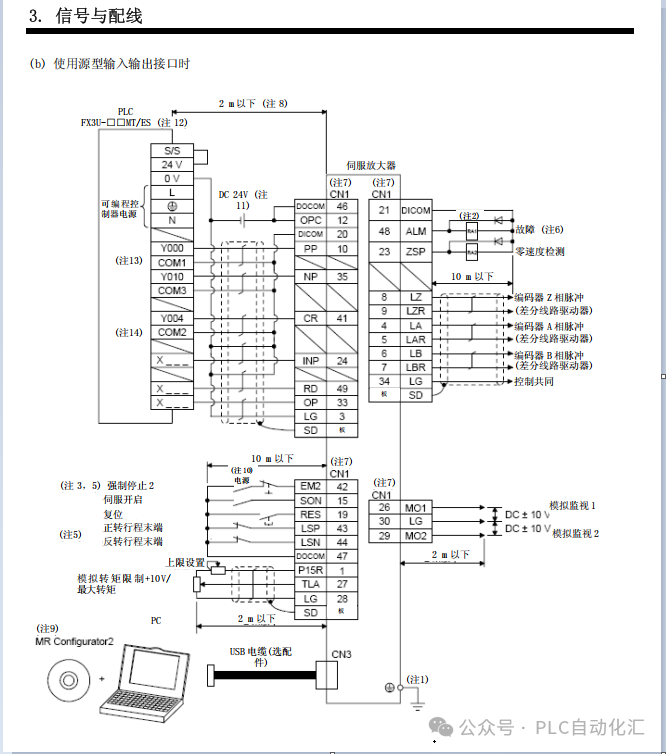
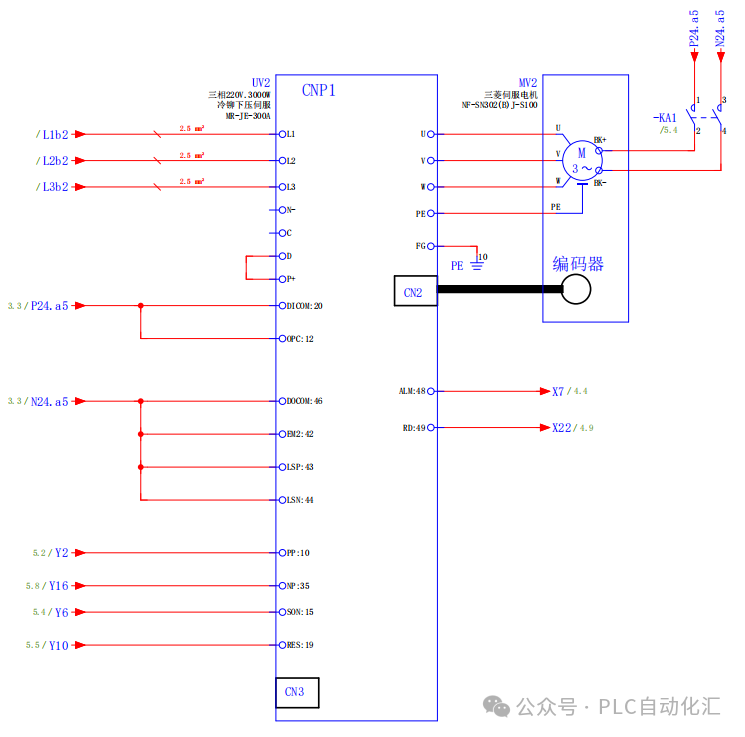
1. Hardware Configuration and Wiring Diagram
IO Allocation Table
| Signal Type | PLC Port | Function Description |
|---|---|---|
| Output Signal | Y0 | Pulse Output |
| Output Signal | Y4 | Direction Signal |
| Output Signal | Y10 | Servo Enable Output |
| Input Signal | X0 | Servo Ready |
| Input Signal | X1 | Homing Signal |
| Input Signal | X2 | Proximity Signal |
| Input Signal | X3 | Positive Limit Signal |
| Input Signal | X4 | Negative Limit Signal |
| Input Signal | X10 | Servo Alarm |
| Input Signal | X11 | Emergency Stop Signal (Normally Closed) |
 |
 |
 |
2. Complete Implementation of ST Language Program (with Detailed Comments)
The following is the complete ST language program, including touchscreen interface variables, emergency stop handling, and comprehensive status monitoring:
// Mitsubishi FX5U Pulse Axis Control Program (using built-in motion control instructions) // Axis Configuration: using Y0 as pulse output, Y4 as direction signal, Y10 as servo enable // Input Signals: X0 - Servo Ready, X1 - Homing Signal, X2 - Proximity Signal, X3 - Positive Limit, X4 - Negative Limit, X10 - Servo Alarm, X11 - Emergency Stop Signal // Global Variable Definition VAR_GLOBAL // Axis Status Variables (Touchscreen Monitoring) Axis_Enabled: BOOL; // Axis Enable Status Axis_Error: BOOL; // Axis Error Status Axis_Busy: BOOL; // Axis Busy Status Axis_Home_Done: BOOL; // Homing Completion Flag Axis_Servo_Ready: BOOL; // Servo Ready Status Axis_Servo_Alarm: BOOL; // Servo Alarm Status Axis_Emergency_Stop: BOOL; // Emergency Stop Status (Touchscreen Display) Axis_Position: LREAL; // Current Position (Touchscreen Display) // Motion Parameters (Touchscreen Settings) Axis_Target_Position: LREAL; // Target Position (Touchscreen Settings) Axis_Speed: LREAL := 50000.0; // Motion Speed (Touchscreen Settings) Axis_Accel: LREAL := 100000.0;// Acceleration (Touchscreen Settings) Axis_Decel: LREAL := 100000.0;// Deceleration (Touchscreen Settings) // Jog Parameters (Touchscreen Settings) Jog_Speed: LREAL := 20000.0; // Jog Speed (Touchscreen Settings) // Homing Parameters (Touchscreen Settings) Home_Speed_Slow: LREAL := 5000.0; // Homing Return Low Speed (Touchscreen Settings) Home_Speed_Fast: LREAL := 30000.0; // Homing Return High Speed (Touchscreen Settings) Home_Offset: LREAL := 0.0; // Homing Offset (Touchscreen Settings) // Operation Commands (Touchscreen Control) Cmd_Enable: BOOL; // Enable Command (Touchscreen Button) Cmd_Disable: BOOL; // Disable Command (Touchscreen Button) Cmd_Home: BOOL; // Homing Command (Touchscreen Button) Cmd_Jog_Forward: BOOL; // Jog Forward (Touchscreen Button) Cmd_Jog_Reverse: BOOL; // Jog Reverse (Touchscreen Button) Cmd_Move_Absolute: BOOL; // Absolute Positioning Command (Touchscreen Button) Cmd_Move_Relative: BOOL; // Relative Positioning Command (Touchscreen Button) Cmd_Stop: BOOL; // Stop Command (Touchscreen Button) Cmd_Reset: BOOL; // Error Reset Command (Touchscreen Button) // Motion Control Instruction Instances MC_Power_0: MC_POWER; // Servo Enable Instruction MC_Home_0: MC_HOME; // Homing Instruction MC_Jog_0: MC_JOG; // Jog Instruction MC_MoveAbsolute_0: MC_MOVEABSOLUTE; // Absolute Positioning Instruction MC_MoveRelative_0: MC_MOVERELATIVE; // Relative Positioning Instruction MC_Stop_0: MC_STOP; // Stop Instruction MC_Reset_0: MC_RESET; // Error Reset Instruction // Internal Use Variables Execute_Home: BOOL; // Execute Homing Execute_JogFwd: BOOL; // Execute Jog Forward Execute_JogRev: BOOL; // Execute Jog Reverse Execute_MoveAbs: BOOL; // Execute Absolute Positioning Execute_MoveRel: BOOL; // Execute Relative Positioning Execute_Stop: BOOL; // Execute Stop Execute_Reset: BOOL; // Execute Reset Last_Cmd_Home: BOOL; // Last Homing Command Status Last_Cmd_JogFwd: BOOL; // Last Jog Forward Command Status Last_Cmd_JogRev: BOOL; // Last Jog Reverse Command Status Last_Cmd_MoveAbs: BOOL; // Last Absolute Positioning Command Status Last_Cmd_MoveRel: BOOL; // Last Relative Positioning Command Status Last_Cmd_Stop: BOOL; // Last Stop Command Status Last_Cmd_Reset: BOOL; // Last Reset Command Status Axis_No: INT := 1; // Axis Number (set according to actual configuration) Error_Code: INT; // Error Code (Touchscreen Display) Error_Message: STRING[50]; // Error Message (Touchscreen Display) END_VARMain Program
// Main Program PROGRAM MAIN VAR // Local Temporary Variables Temp_Bool: BOOL; Temp_Error: BOOL; BEGIN // ==================== Input Signal Reading and Status Update ==================== // Read Servo Status Signals Axis_Servo_Ready := X0; // Servo Ready Signal (X0 Input) Axis_Servo_Alarm := X10; // Servo Alarm Signal (X10 Input) Axis_Emergency_Stop := NOT X11; // Emergency Stop Signal (X11 is Normally Closed, conducting under normal conditions, disconnecting during emergency) // ==================== Emergency Stop Handling ==================== // Emergency stop signal has the highest priority, and should immediately stop motion in any case IF Axis_Emergency_Stop THEN // Execute Emergency Stop MC_Stop_0( Axis := Axis_No, Execute := TRUE, Done => Temp_Bool, Busy => Temp_Bool, Error => Temp_Error, ErrorID => Error_Code ); // Disable all motion commands Execute_Home := FALSE; Execute_JogFwd := FALSE; Execute_JogRev := FALSE; Execute_MoveAbs := FALSE; Execute_MoveRel := FALSE; // Reset all command flags Cmd_Home := FALSE; Cmd_Jog_Forward := FALSE; Cmd_Jog_Reverse := FALSE; Cmd_Move_Absolute := FALSE; Cmd_Move_Relative := FALSE; // Set error status Axis_Error := TRUE; Error_Message := "Emergency stop triggered!"; // Directly return, do not execute subsequent logic RETURN; END_IF;Axis Enable/Disable Control/Error Reset// ==================== Axis Enable/Disable Control ==================== // Enable axis control (only when servo is ready and no alarm) IF Cmd_Enable AND NOT Axis_Enabled AND Axis_Servo_Ready AND NOT Axis_Servo_Alarm THEN MC_Power_0( Axis := Axis_No, Enable := TRUE, Enable_Positive := TRUE, Enable_Negative := TRUE, Status => Axis_Enabled, Busy => Temp_Bool, Error => Axis_Error, ErrorID => Error_Code ); Cmd_Enable := FALSE; // Reset command flag END_IF; // Disable axis control IF Cmd_Disable AND Axis_Enabled THEN MC_Power_0( Axis := Axis_No, Enable := FALSE, Status => Axis_Enabled, Error => Axis_Error, ErrorID => Error_Code ); Cmd_Disable := FALSE; // Reset command flag END_IF; // ==================== Error Reset Handling ==================== // Error reset command detection (rising edge triggered) IF Cmd_Reset AND NOT Last_Cmd_Reset AND Axis_Error THEN Execute_Reset := TRUE; END_IF; // Execute error reset IF Execute_Reset THEN MC_Reset_0( Axis := Axis_No, Execute := TRUE, Done => Temp_Bool, Busy => Temp_Bool, Error => Temp_Error, ErrorID => Error_Code ); // Clear flags after reset completion IF Temp_Bool THEN Execute_Reset := FALSE; Cmd_Reset := FALSE; Axis_Error := FALSE; END_IF; END_IF; // Save reset command status for next comparison Last_Cmd_Reset := Cmd_Reset;Homing Control// ==================== Homing Control ==================== // Homing command detection (rising edge triggered) IF Cmd_Home AND NOT Last_Cmd_Home AND Axis_Enabled AND NOT Axis_Error THEN Execute_Home := TRUE; END_IF; // Execute homing operation IF Execute_Home THEN MC_Home_0( Axis := Axis_No, Execute := TRUE, Position := Home_Offset, // Homing Offset BufferMode := 0, // Buffer Mode: 0 - Immediate Execution Done => Axis_Home_Done, // Homing Completion Flag Busy => Axis_Busy, // Axis Busy Status CommandAborted => Temp_Bool, // Command Aborted Flag Error => Axis_Error, // Error Status ErrorID => Error_Code // Error Code ); // Clear execution flag when homing is complete or error occurs IF Axis_Home_Done OR Axis_Error THEN Execute_Home := FALSE; Cmd_Home := FALSE; END_IF; END_IF; // Save homing command status for next comparison Last_Cmd_Home := Cmd_Home;Jog Control// ==================== Jog Control ==================== // Forward jog command detection (rising edge triggered) IF Cmd_Jog_Forward AND NOT Last_Cmd_JogFwd AND Axis_Enabled AND NOT Axis_Error AND Axis_Home_Done THEN Execute_JogFwd := TRUE; END_IF; // Reverse jog command detection (rising edge triggered) IF Cmd_Jog_Reverse AND NOT Last_Cmd_JogRev AND Axis_Enabled AND NOT Axis_Error AND Axis_Home_Done THEN Execute_JogRev := TRUE; END_IF; // Execute forward jog IF Execute_JogFwd THEN MC_Jog_0( Axis := Axis_No, JogForward := TRUE, JogBackward := FALSE, Velocity := Jog_Speed, // Jog Speed Acceleration := Axis_Accel, // Acceleration Deceleration := Axis_Decel, // Deceleration Busy => Axis_Busy, // Axis Busy Status Error => Axis_Error, // Error Status ErrorID => Error_Code // Error Code ); // Clear execution flag when jog command stops or error occurs IF NOT Cmd_Jog_Forward OR Axis_Error THEN Execute_JogFwd := FALSE; Cmd_Jog_Forward := FALSE; END_IF; END_IF; // Execute reverse jog IF Execute_JogRev THEN MC_Jog_0( Axis := Axis_No, JogForward := FALSE, JogBackward := TRUE, Velocity := Jog_Speed, // Jog Speed Acceleration := Axis_Accel, // Acceleration Deceleration := Axis_Decel, // Deceleration Busy => Axis_Busy, // Axis Busy Status Error => Axis_Error, // Error Status ErrorID => Error_Code // Error Code ); // Clear execution flag when jog command stops or error occurs IF NOT Cmd_Jog_Reverse OR Axis_Error THEN Execute_JogRev := FALSE; Cmd_Jog_Reverse := FALSE; END_IF; END_IF; // Save jog command status for next comparison Last_Cmd_JogFwd := Cmd_Jog_Forward; Last_Cmd_JogRev := Cmd_Jog_Reverse;Absolute/Relative Positioning Control // ==================== Absolute Positioning Control ==================== // Absolute positioning command detection (rising edge triggered) IF Cmd_Move_Absolute AND NOT Last_Cmd_MoveAbs AND Axis_Enabled AND NOT Axis_Error AND Axis_Home_Done THEN Execute_MoveAbs := TRUE; END_IF; // Execute absolute positioning IF Execute_MoveAbs THEN MC_MoveAbsolute_0( Axis := Axis_No, Execute := TRUE, Position := Axis_Target_Position, // Target Position Velocity := Axis_Speed, // Motion Speed Acceleration := Axis_Accel, // Acceleration Deceleration := Axis_Decel, // Deceleration Done => Temp_Bool, // Positioning Completion Flag Busy => Axis_Busy, // Axis Busy Status CommandAborted => Temp_Bool, // Command Aborted Flag Error => Axis_Error, // Error Status ErrorID => Error_Code // Error Code ); // Clear execution flag when positioning is complete or error occurs IF NOT Axis_Busy OR Axis_Error THEN Execute_MoveAbs := FALSE; Cmd_Move_Absolute := FALSE; END_IF; END_IF; // Save absolute positioning command status for next comparison Last_Cmd_MoveAbs := Cmd_Move_Absolute; // ==================== Relative Positioning Control ==================== // Relative positioning command detection (rising edge triggered) IF Cmd_Move_Relative AND NOT Last_Cmd_MoveRel AND Axis_Enabled AND NOT Axis_Error AND Axis_Home_Done THEN Execute_MoveRel := TRUE; END_IF; // Execute relative positioning IF Execute_MoveRel THEN MC_MoveRelative_0( Axis := Axis_No, Execute := TRUE, Distance := Axis_Target_Position, // Move Distance Velocity := Axis_Speed, // Motion Speed Acceleration := Axis_Accel, // Acceleration Deceleration := Axis_Decel, // Deceleration Done => Temp_Bool, // Positioning Completion Flag Busy => Axis_Busy, // Axis Busy Status CommandAborted => Temp_Bool, // Command Aborted Flag Error => Axis_Error, // Error Status ErrorID => Error_Code // Error Code ); // Clear execution flag when positioning is complete or error occurs IF NOT Axis_Busy OR Axis_Error THEN Execute_MoveRel := FALSE; Cmd_Move_Relative := FALSE; END_IF; END_IF; // Save relative positioning command status for next comparison Last_Cmd_MoveRel := Cmd_Move_Relative;Stop Control/Error Reset // ==================== Stop Control ==================== // Stop command detection (rising edge triggered) IF Cmd_Stop AND NOT Last_Cmd_Stop AND (Axis_Busy OR Execute_JogFwd OR Execute_JogRev) THEN Execute_Stop := TRUE; END_IF; // Execute stop operation IF Execute_Stop THEN MC_Stop_0( Axis := Axis_No, Execute := TRUE, Done => Temp_Bool, Busy => Temp_Bool, Error => Axis_Error, ErrorID => Error_Code ); // Clear all motion execution flags Execute_Stop := FALSE; Execute_JogFwd := FALSE; Execute_JogRev := FALSE; Execute_MoveAbs := FALSE; Execute_MoveRel := FALSE; // Reset all motion command flags Cmd_Stop := FALSE; Cmd_Jog_Forward := FALSE; Cmd_Jog_Reverse := FALSE; Cmd_Move_Absolute := FALSE; Cmd_Move_Relative := FALSE; END_IF; // Save stop command status for next comparison Last_Cmd_Stop := Cmd_Stop; // ==================== Position Feedback and Status Update ==================== // Get current position (needs to read the corresponding register based on actual configuration) // Here it is assumed that the current position is stored in D8340 (32-bit), please adjust according to PLC configuration in actual use Axis_Position := DINT_TO_LREAL(D8340); // ==================== Error Information Handling ==================== // Generate error information based on error code CASE Error_Code OF 0: Error_Message := "No Error"; 16#1001: Error_Message := "Axis Not Enabled"; 16#1002: Error_Message := "Axis Busy"; 16#1003: Error_Message := "Command Execution Error"; 16#1004: Error_Message := "Limit Switch Triggered"; 16#1005: Error_Message := "Homing Return Error"; 16#1006: Error_Message := "Servo Alarm"; 16#1007: Error_Message := "Emergency Stop Triggered"; ELSE Error_Message := CONCAT("Unknown Error: ", INT_TO_STRING(Error_Code)); END_CASE; // ==================== Output Control ==================== // Servo enable output control (only output when axis is enabled and no error) Y10 := Axis_Enabled AND NOT Axis_Error; END_PROGRAM3. Touchscreen Interface Design
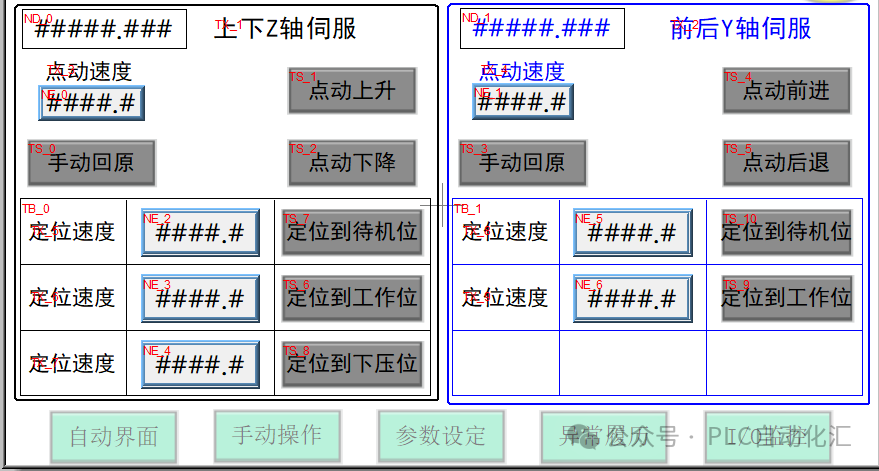
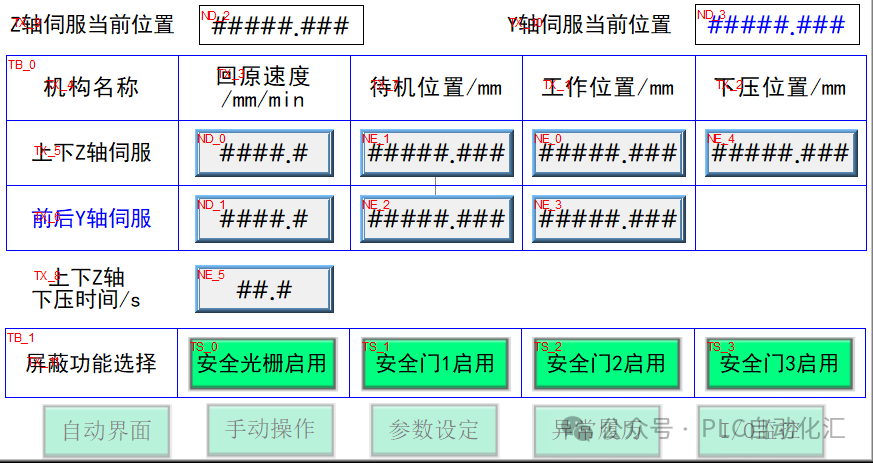
The touchscreen monitoring interface should include the following areas:
-
Status Display Area:
-
Servo Enable Status Indicator
-
Servo Ready Status Indicator
-
Servo Alarm Status Indicator
-
Emergency Stop Status Indicator
-
Axis Busy Status Indicator
-
Homing Completion Status Indicator
-
Current Position Real-time Display
-
Error Code and Information Display
Parameter Setting Area:
-
Target Position Setting
-
Motion Speed Setting
-
Acceleration/Deceleration Setting
-
Jog Speed Setting
-
Homing Parameter Settings (High Speed, Low Speed, Offset)
Operation Control Area:
-
Servo Enable/Disable Button
-
Homing Button
-
Forward Jog/Reverse Jog Button
-
Absolute Positioning/Relative Positioning Button
-
Emergency Stop Button
-
Error Reset Button
4. System Functional Features
-
Comprehensive Status Monitoring:
-
Real-time display of various statuses of the servo system
-
Intuitive display of error codes and information
-
Real-time update of current position
Emergency Stop Safety Protection:
-
Highest priority handling of emergency stop signals
-
Immediate stop of all motion during emergency stop
-
Clear display of emergency stop status
Flexible Parameter Settings:
-
All motion parameters can be set via the touchscreen
-
Parameter range limits and validity checks
-
Parameter saving and calling functions
Safety Protection Mechanisms:
-
Limit switch protection
-
Servo alarm detection
-
Emergency stop function
-
Automatic error handling
User-friendly Interface:
-
Intuitive and clear status indicator lights
-
Reasonable layout of operation buttons
-
Simple and convenient parameter settings
5. Application Considerations
-
System Debugging:
-
Perform homing operation first during the first run
-
Gradually adjust motion parameters to optimal values
-
Test the functionality of each limit switch
-
Verify the reliability of the emergency stop function
Safety Matters:
-
Ensure the emergency stop function works properly
-
Set reasonable soft limit protection
-
Regularly check the connection status of the servo system
-
Emergency stop button should use normally closed contacts
Maintenance:
-
Regularly check the status of the servo drive
-
Keep backups of PLC and touchscreen programs
-
Record parameter settings and modification history
-
Regularly test the emergency stop function
Conclusion
This article provides a detailed introduction to a complete Mitsubishi FX5U PLC pulse axis control system, from hardware wiring to software programming, and touchscreen interface design, offering a comprehensive solution. This system features high stability, ease of operation, and comprehensive functionality, particularly enhancing the emergency stop safety protection feature, making it widely applicable in various industrial automation scenarios.
Through this system, users can easily achieve precise control of servo motors, improving equipment automation levels and production efficiency. We hope this article can provide valuable references for your automation projects.
Welcome to follow our public account to learn more about industrial automation technology!
Copyright Statement: This article is an original article, please indicate the source when reprinting. Some images in the text are sourced from the internet, if there are copyright issues, please contact the author for deletion.
If you want to learn Siemens SCL programming, you can purchase the first book below; if you want to learn ladder diagrams, you can purchase the second book, which has detailed examples from basics to entry level.
Your support is the motivation for the author to create, thank you all, and wish you success in your work and happiness in your life!
Recommended Reading:
- Using all your strength! Nine-step guide to stable operation of Siemens PLC
- Siemens S7-1500 PLC Troubleshooting: Transforming into an industrial “doctor” to quickly “cure” production line downtime!
- [10 Years of Siemens PLC Veteran Upgrade Path] From screwing modules to mastering communication architecture: My blood and tears technology stack pit guide
- Three “weapons” of servo motors: Detailed explanation of position/speed/torque control (with Siemens SCL practical code)
- Core secrets of Siemens PLC programming: What are FB, FC, DB, OB? You will understand after reading this!
- Why can’t Siemens PLC engineers with a monthly salary of 20,000 stay? The “career burnout” behind high salaries is devouring this industry!
- Siemens PLC Programming: Ladder Diagram vs SCL, which one is for you? A comprehensive beginner’s guide + practical code!
- Say goodbye to “noodle code”! Siemens PLC step programming “three-step method”, double efficiency without pitfalls!
- Siemens SCL communication heartbeat monitoring: Industrial-grade heartbeat program practical guide
- Siemens 1200 and Weintek tag communication: Say goodbye to manual address filling, this “smart translator” makes debugging three times faster!
- Siemens SCL Practical: Step-by-step guide to writing station control function blocks
- Siemens S7-1200 Mixed Programming Practical: The golden combination rules of SCL and LAD
- Electrical automation encirclement: Ten years of hard work for this heartfelt industry experience summary
- Siemens SCL workstation control program: Start-stop control + three-color light + buzzer alarm
- Mitsubishi FX3U PLC Dual Pump Constant Pressure Water Supply Full Explanation: Intelligent switching between frequency conversion and power frequency + safety emergency stop system
- Electrical automation professional graduation guide:
- Employment direction, prospects, and salary analysis
- Electrical automation college graduates: Starting salary not inferior to undergraduates? Full disclosure of the technical counterattack roadmap!
- Siemens S7-200 SMART Free Port Communication Detailed Explanation: Introduction to Flexible Serial Communication Solutions
- Siemens SCL Full-Function Servo Control Ultimate Solution: 8 Motion Modes + 5 Safety Protections
- Let data speak! A scientific guide for choosing majors for science vs. liberal arts students (with employment salary & trend analysis)
Share to let more people see

Like
Collect
Share