Source: OReillyData
Author: Lukas Biewald
This article is 3900 words long, and is recommended to be read in 7 minutes.
Learn how to use Amazon Echo and Raspberry Pi to recognize visitors at your door.
Recently, when I was preparing to install a doorbell in my new house, I thought: why not make my doorbell tell me who is at the door?
Most of the DIY projects I undertake end up costing more than equivalent commercial products, even when I value my time at $0 per hour. I think this is likely related to supply chains and economies of scale. However, I enjoy the process of making these things myself much more. In this project, I built a door camera that is not only cheaper than my Dropcam but also includes some genuinely useful features that I have not seen in the market for some reason.
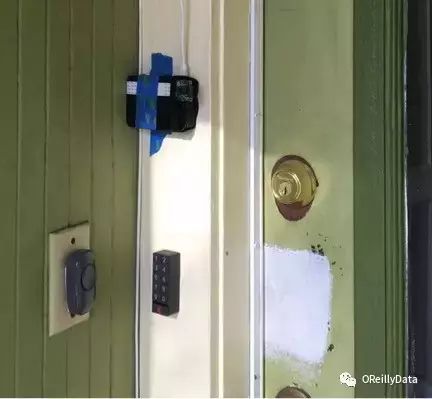
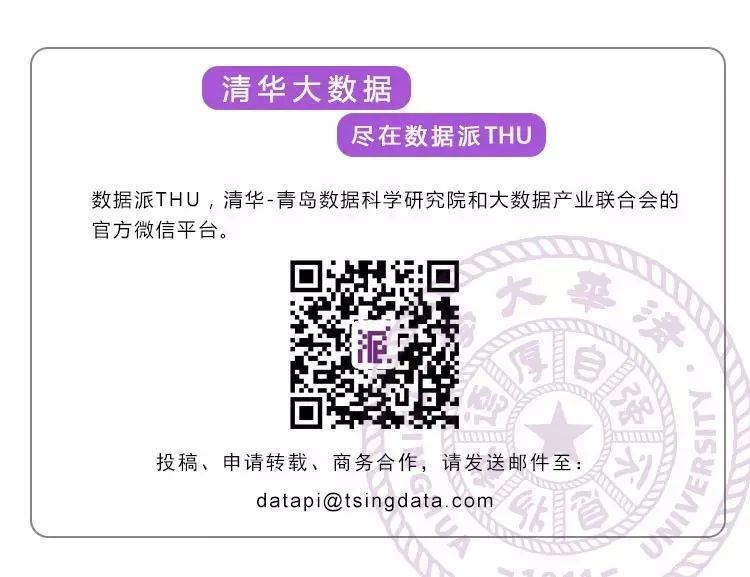
Figure 1: My front door has a doorbell, an August smart lock, and a Raspberry Pi for facial recognition.
Image courtesy of Lukas Biewald
We will build a security camera device based on Raspberry Pi that costs $60, which captures photos and uploads them to the cloud for facial recognition. You can also upload the data stream to Amazon S3, making it a complete Dropcam replacement. Nest charges $100 per year to save the last 10 days of video, but you can spend about $20 to keep a year’s worth of video files on S3. If you use Amazon Glacier, this cost drops to around $4.
Using Amazon ReKognition for Machine Learning
This tutorial will focus on the machine learning part—using Amazon’s new Rekognition service to recognize your visitors’ faces and then sending the recognition results to your Amazon Echo, so you always know who is at your door. To build a reliable service, we will also use one of Amazon’s coolest and most useful products: Lambda.
Components:
-
Amazon Echo Dot ($50)
-
Raspberry Pi 3 ($38) (This project can also use Raspberry Pi 2 with a wireless USB adapter)
-
Raspberry Pi compatible camera ($16)
-
Raspberry Pi case ($6)
-
16GB SD card ($8)
Total: $118
We will use Amazon’s S3, Lambda, and Rekognition services for facial matching. These services start free, and then you will only spend a few cents per month to recognize thousands of visitors at your door.
Setting Up the Raspberry Pi System
If you have completed any of my Raspberry Pi tutorials, you will be familiar with most of this tutorial.
First, download Noobs from the Raspberry Pi Foundation and follow the installation instructions. This mainly involves copying Noobs to the SD card, inserting the SD card into your board, then connecting the mouse, keyboard, and monitor to your board and following the installation instructions. These steps have become easier since the new desktop environment Pixel was released.
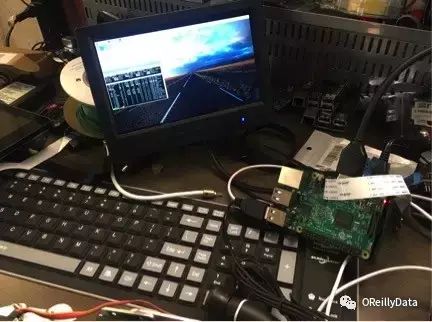
Figure 2: My Raspberry Pi connected to a mini monitor and keyboard.
Image courtesy of Lukas Biewald
Next, name your Raspberry Pi system something memorable so you can SSH into it. There is a good guide on howtogeek for this—you need to modify the /etc/hosts and /etc/hostname files and name your Raspberry Pi system. I like to name all of my security camera Raspberry Pis after characters from my favorite TV show, “It’s Always Sunny in Philadelphia,” so I named the front door camera “Dennis.” This way, I don’t need to remember an IP address; I can SSH into dennis.local anytime, even if the router resets.
Next, you should connect the camera to the Raspberry Pi board. Remember that the ribbon cable should face the Ethernet port—I’ve probably Googled this issue a hundred times. Note: If you want a wider field of view, you can buy a wide-angle camera; if you want to add night vision, you can buy an infrared camera.
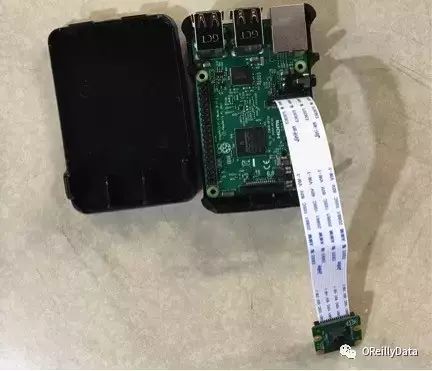
Figure 3: The Raspberry Pi with the camera and case ready for installation.
Image courtesy of Lukas Biewald
You may also want to put the whole device in a protective case to shield it from the elements. You will also need to connect the Raspberry Pi to power via a micro USB cable. (I’ve drilled a small hole in the wall to connect my Dropcam to an indoor power outlet, so I already have a USB cable in the right spot.)
So far, I have installed several such devices around the house. The camera ribbon cable is thin, allowing you to mount the Raspberry Pi indoors and run the cable through the door, as I did in my lab (garage).
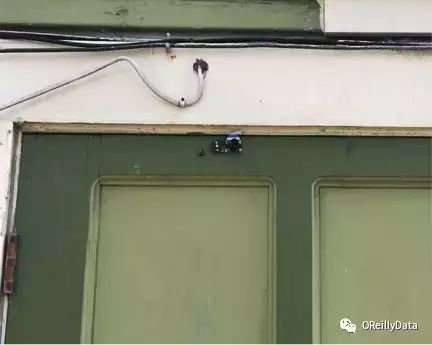
Figure 4: The camera on the Raspberry Pi protruding from my garage door.
Image courtesy of Lukas Biewald
Next, you need to install the RPi-Cam-Web interface. This is a very useful software that provides a continuous data stream from the camera over HTTP protocol. Please follow the installation instructions and choose NGINX as the web server. There is a very useful configuration file in /etc/raspimjpeg that can be used to configure many options.
Configuring Amazon S3 and Amazon Rekognition
If you haven’t created an AWS account yet, you need to do it now. You should first create an IAM user and grant that user access to S3, Rekognition, and Lambda (which we will use later).
Install the AWS command line interface:
sudo apt install awscli
Set your Raspberry Pi region to US East (as of the writing of this article, Rekognition is only available in this region)
Create a facial recognition group:
aws create-collection –collection-id friends
You can use the Unix shell script I wrote to quickly add your friends’ facial images:
aws s3 cp $1 s3://doorcamera > output
aws rekognition index-faces \
–image “{\”S3Object\”:{\”Bucket\”:\”doorcamera\”,\”Name\”:\”$1\”}}” \
–collection-id “friends” –detection-attributes “ALL” \
–external-image-id “$2”
Copy it to a file as a shell script. Or enter it in the command line, replacing $1 with the local filename of your friend’s image and $2 with your friend’s name.
Amazon’s Rekognition service uses machine learning to measure the distance between points on facial images and uses these points to match face images in its index. Therefore, you can train the system with just one image of your friend and still get good results.
Now you can test this facial recognition system with a similar script:
aws s3 cp $1 s3://doorcamera > output
aws rekognition search-faces-by-image –collection-id “friends” \
–image “{\”S3Object\”:{\”Bucket\”:\”doorcamera\”,\”Name\”:\”$2\”}}”
You will receive a large JSON file in return, which contains not only the matching results but also other information about the image, including gender, emotion, facial hair, and a bunch of other interesting things.
{
“FaceRecords”: [
{
“FaceDetail”: {
“Confidence”: 99.99991607666016,
“Eyeglasses”: {
“Confidence”: 99.99878692626953,
“Value”: false
},
“Sunglasses”: {
…
Next, we can write a Python script to download an image from our Raspberry Pi camera and check for faces. In fact, I used a second Raspberry Pi to achieve this, but running it on the same machine would be easier. You just need to look at the /dev/shm/mjpeg/cam.jpg file, and you will see the image file corresponding to the camera.
Whichever way you choose, we need to expose this interface functionality in the web server for later use. I used Flask as my web server.
from flask import Flask, request
import cameras as c
app = Flask(__name__)
@app.route(‘/faces/<path:camera>’)
def face_camera(camera):
data = c.face_camera(camera)
return “,”.join(data)
if __name__ == ‘__main__’:
app.run(host=’0.0.0.0′, port=5000)
I have put the parsing code (and all other code mentioned in this article) on github.com/lukas/facerec.
If you have made it this far, you now have something very interesting to play with. I found that Amazon services are excellent at recognizing my friends. The only part that seems a bit tricky is recognizing my emotions (though that might be more my problem than Amazon’s).
In fact, I sewed one of the Raspberry Pi cameras into a plush toy and placed a very creepy face-recognizing teddy bear sentinel on my desk.
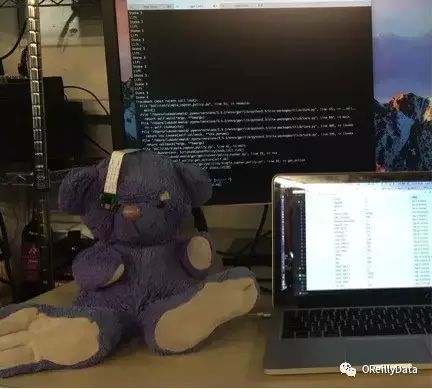
Figure 5: The face-recognizing teddy bear Freya.
Image courtesy of Lukas Biewald
The face recognition camera works with Amazon Echo
Amazon’s Echo makes high-quality voice commands very simple and has a perfect interface for this kind of project. Unfortunately, the best way to use Echo is to have it communicate directly with a stable web service, but we want to place the Raspberry Pi camera behind the router firewall on a local network—this makes configuration a bit tricky.
We will connect Echo to an AWS Lambda service, which will communicate with our Raspberry Pi system through an SSH tunnel. This may be a bit complicated, but it is the simplest way.
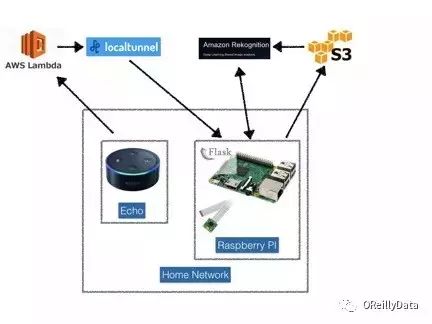
Figure 6: Architecture diagram. Image courtesy of Lukas Biewald
Exposing HTTP Face Recognition API via SSH Tunnel
So far, we have built a small web application for facial recognition, and we need to make it accessible to the outside world. As long as we have a web server somewhere, we can configure an SSH tunnel. However, there is a sweet little application called localtunnel that does all this for us, and you can easily install it:
npm install -g localtunnel
I like to wrap it in a small script to keep it alive and prevent it from crashing. Please change MYDOMAIN to something meaningful to you:
until lt –port 5000 -s MYDOMAIN; do
echo ‘lt crashed… respawning…’
sleep 1
done
Now you can ping your server by visiting http://MYDOMAIN.localtunnel.me.
Creating an Alexa Skill
To use our Echo, we need to create a new Alexa Skill. Amazon has a great getting started guide, or you can go directly to the Alexa developer portal.
First, we need to set an intent:
{
“intents”: [
{
“intent”: “PersonCameraIntent”,
“slots”: [
{
“name”: “camera”,
“type”: “LIST_OF_CAMERAS”
}
]
}]}
Then we give Alexa some sample utterances:
PersonCameraIntent tell me who {camera} is seeing
PersonCameraIntent who is {camera} seeing
PersonCameraIntent who is {camera} looking at
PersonCameraIntent who does {camera} see
Next, we need to give Alexa an endpoint, for which we will use a Lambda function.
Configuring a Lambda Function
If you’ve never used a Lambda function, this article is a win for you! A Lambda function is a simple way to define a unified API for a simple function on Amazon servers, and you only pay when it is called.
Alexa Skills are a perfect use case for Lambda functions, so Amazon has set up a template that is available for Alexa Skills. When Alexa matches one of our listed PersonCameraIntents, it will call our Lambda function. Change MYDOMAIN to the domain name used in your local tunnel script, and everything will run smoothly.
You can also use other interesting aspects from the metadata sent by Amazon Rekognition. For instance, it can guess facial expressions, so I use it to determine whether the visitor at my door is a happy visitor or an angry one. You can also have Echo tell you whether the visitor has a beard, is wearing sunglasses, and other features:
def face_camera(intent, session):
card_title = “Face Camera”
if ‘camera’ in intent[‘slots’]:
robot = intent[‘slots’][‘camera’][‘value’]
try:
response = urlopen(‘http://MYDOMAIN.localtunnel.me/faces/%s’ % robot)
data = response.read()
if (data== “Not Found”):
speech_output = “%s didn’t see a face” % robot
else:
person, gender, emotion = data.split(“,”)
if person == “” or person is None:
speech_output = “%s didn’t recognize the person, but ” % robot
else:
speech_output = “%s recognized %s and ” % (robot, person)
if gender == “Male”:
speech_output += “he “
else:
speech_output += “she “
speech_output += “seems %s” % emotion.lower()
except URLError as e:
speech_output = “Strange, I couldn’t wake up %s” % robot
except socket.timeout, e:
speech_output = “The Optics Lab Timed out”
else:
speech_output = “I don’t know what robot you’re talking about”
should_end_session = False
return build_response({}, build_speechlet_response(
card_title, speech_output, None, should_end_session))
When you talk to Alexa, it actually parses your speech to find an Intent and runs a Lambda function. That function will call an external server and communicate with your Raspberry Pi through the SSH tunnel. The Raspberry Pi will grab an image from the camera and upload it to S3, then run a deep learning inference algorithm to match it against your friend’s facial image and send the parsed results to your Echo. Then Echo will talk to you. But the whole process happens very quickly! To see it for yourself, check out my video:
You can apply the same technology and extend it to many cool aspects. For example, I put the code from my “Robot Raspberry Pi/TensorFlow project” onto my robots. Now they can talk to me and tell me what they see. I am also considering using this GitHub project to connect the Raspberry Pi to my August lock, so my door will automatically open for my friends or automatically lock against an angry visitor at the door.
This article originally appeared in English: “Build a talking, face-recognizing doorbell for about $100”.
Author Bio

Lukas Biewald
Lukas Biewald is the founder and CEO of CrowdFlower. CrowdFlower, founded in 2009, is a data enrichment platform that helps businesses acquire on-demand human labor to collect, generate training data, and participate in human-machine learning cycles. After earning a bachelor’s degree in mathematics and a master’s degree in computer science from Stanford University, Lukas led the search relevance team at Yahoo Japan. He then went to Powerset, working as a senior data scientist. Powerset was acquired by Microsoft in 2008. Lukas has also been named one of the 30 Under 30 by Forbes magazine. Lukas is also an expert Go player.

Check out the bottom menu of the official account for surprises!
For enterprises and individuals joining organizations, please check “Federation”
For past wonderful content, please check “Search in the account”
To join volunteers or contact us, please check “About Us”