This article introduces how to build a secure camera system with remote image upload functionality using inexpensive and practical technology components and services such as Raspberry Pi 4, Python, Flask, and Render in just a few hours.
Nowadays, there are many smart surveillance cameras on the market, often acting as a black box for home security, leaving us unaware of their internal workings. If we want to explore further, we need to leverage knowledge of the Internet of Things to build our own monitoring system. Below, I will discuss in depth how to construct an IoT security camera from aspects such as client-side, dashboard UI, and server-side, starting with hardware assembly and software deployment.
We hope the newly created home smart camera monitoring system can achieve the following four aspects:
1. The system will take pictures of detected moving objects through the motion detection module.
2. Images can be saved to a remote server.
3. By accessing the server’s dashboard, we can view all events, including photos and timestamps.
4. Save the most recent 20 events in a sliding window format and clean up all old events.
What Components Are Needed?
A Raspberry Pi 4, a motion detection sensor, a camera module, and various small components from the bill of materials (BOM).
-
A server-side Render.com account for deploying, saving, and displaying camera images.
-
Git, Python 3, and a code editor.
Configuring the Raspberry Pi
Step 1: Insert a reliable power supply for the Raspberry Pi. It is best to use the official version specified in the BOM. After all, there have been reports of some older Raspberry Pi 4 models having compatibility issues with certain USB-C cables and power supplies.
Step 2: Install Raspberry Pi OS. Obtain relevant guides and tools from the official website, including how to use an SD card, etc.
Since a graphical interface is not needed, we can install the Raspberry Pi OS Lite version, which is for advanced users only. However, if you are new to Raspberry Pi development, you can also choose the 64-bit version of Raspberry Pi OS with a desktop.
Step 3: Test the PIR motion sensor to detect and capture moving objects in the room. Note that the sensor has three wires, two for power (+5V and ground), and the third for reading values from the sensor: if the sensor detects movement, it reads 1; otherwise, it reads 0.
Please use the pinout command to view a complete description of each pin on the Raspberry Pi.
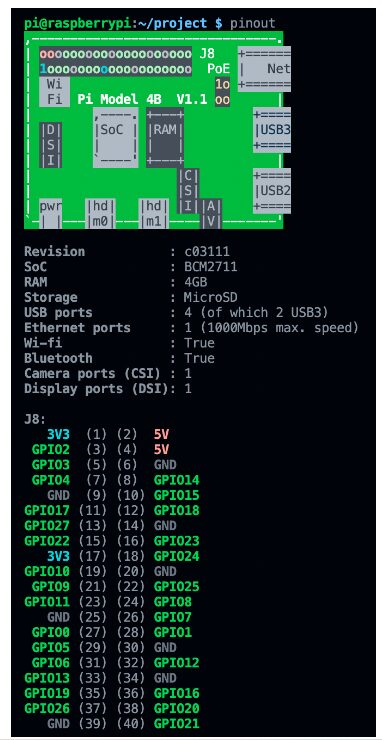
In this example, we connect the sensor’s ground wire with a black wire to the board’s ground (PIN 6), a red wire to +5V (PIN 2), and the signal wire to one of the GPIO (PIN 11). The following two images show the assembly effect. Of course, if you are unsure which wire corresponds to where, please remove the cover from the sensor and check the labels on the PCB carefully.
To detect motion, we need to read the values from the PIR via software and send notifications. The Python version on GitHub provides a simple version for such applications; please refer to the following code snippet:
from gpiozero import MotionSensor
from datetime import datetime
from signal import pause
pir = MotionSensor(17)
def capture():
timestamp = datetime.now().isoformat()
print('%s Detected movement' % timestamp)
def not_moving():
timestamp = datetime.now().isoformat()
print('%s All clear' % timestamp)
pir.when_motion = capture
pir.when_no_motion = not_moving
pause()
Note that since our motion detector is connected to GPIO17 (which corresponds to pin 11 on the physical board), we pass the value of 17 to MotionSensor() and start it by running python pir_motion_sensor.py to adjust the PIR timing.
To avoid being triggered too frequently by motion, the internal timer prevents the system from continuously sending motion signals. Therefore, there is a risk that the sensor may detect motion each time but may not notify the system.
Since the timer range is 0-255 seconds (255 is fully clockwise, 0 is fully counterclockwise), in my experience, it is sufficient to set the timer between 7-10 seconds, and the potentiometer can be turned counterclockwise to nearly horizontal. Similarly, for the sensitivity potentiometer, clockwise indicates higher sensitivity. Its corresponding command output will show as follows:
Plain Text
pi@raspberrypi:~/raspberry-pi-security-camera-client $ python pir_motion_sensor.py
2022-04-21T15:35:35.275947 Detected movement
2022-04-21T15:35:41.607265 All clear
Swipe left and right to view the complete code
With the Raspberry Pi powered off and disconnected from any power source, we will install the camera on the right side. After completing this, please restart the Raspberry Pi and ensure that you have the latest camera stack.
Then, please open the console and enter the following:
Please select the “Interface Options” menu.
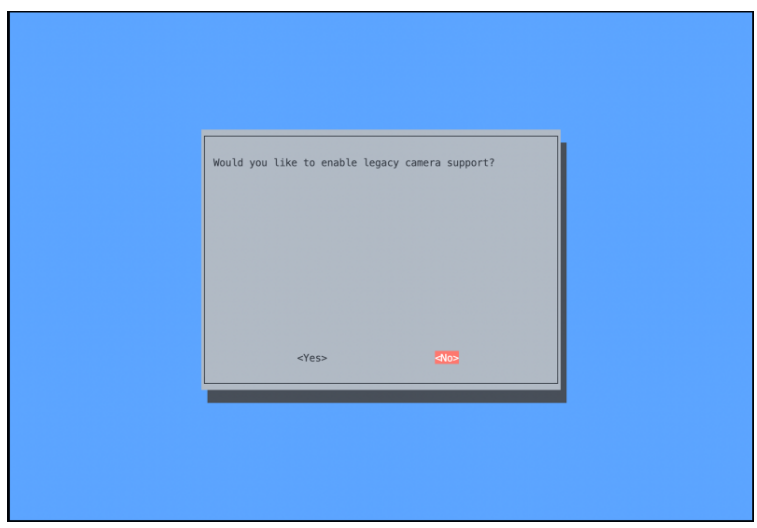
Select “Enable/Disable Legacy Camera Support” and ensure it is disabled.
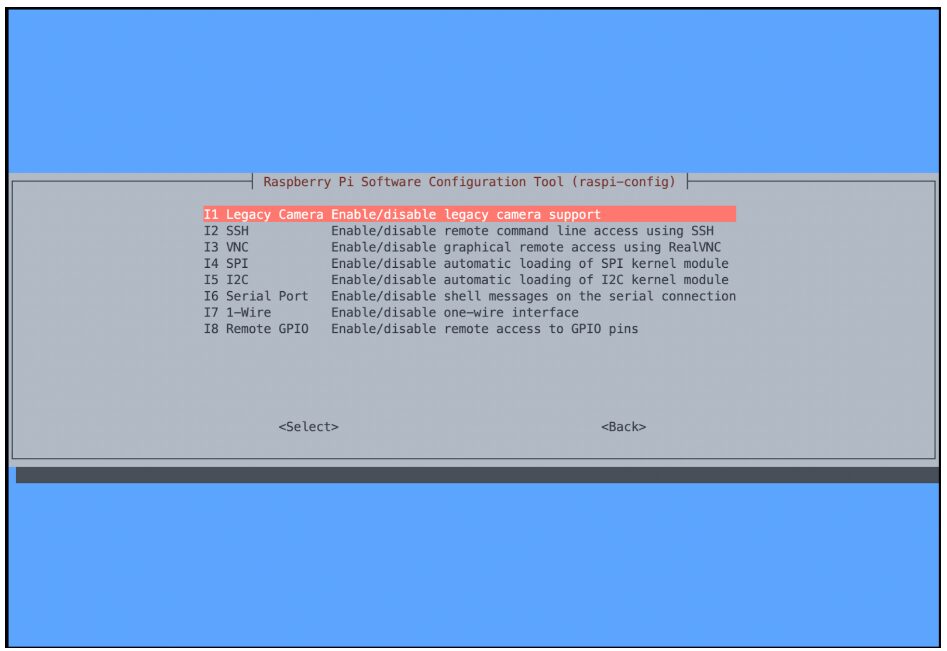
Finally, save and restart.
Picamera2 is the modern Python port of libcamera. Its corresponding old project, Picamera, while based on a different system, has gained wide acceptance.
To test the camera, I created a short script using Picamera2. Given that the Picamera2 project is still in preview, installation is not straightforward. Below, we run the example_picamera2.py script to verify if the camera is set up correctly:
$ python example_picamera2.py
The specific content of example_picamera2.py is as follows:
from gpiozero import MotionSensor
from picamera2.picamera2 import *
from datetime import datetime
from signal import pause
pir = MotionSensor(17)
camera = Picamera2()
camera.start_preview(Preview.NULL)
config = camera.still_configuration()
camera.configure(config)
def capture():
camera.start()
timestamp = datetime.now().isoformat()
print('%s Detected movement' % timestamp)
metadata = camera.capture_file('/home/pi/%s.jpg' % timestamp)
print(metadata)
camera.stop()
def not_moving():
timestamp = datetime.now().isoformat()
print('%s All clear' % timestamp)
pir.when_motion = capture
pir.when_no_motion = not_moving
pause()
Swipe left and right to view the complete code
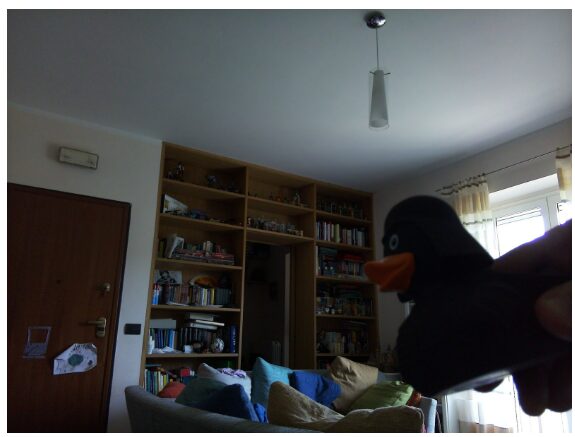
Every time the motion-detecting PIR sensor detects movement, this file will execute a snapshot and place the image in the /home/pi directory, keeping the filename consistent with the time the camera captured the image. The following image is captured by my camera:
So far, we have only completed half of the project, as all of this is implemented locally without remote monitoring through the Internet of Things, let alone preventing someone from accessing our Raspberry Pi, removing the SD card, and taking away the monitoring records.
Writing Client Code and Testing Locally
Next, we prepare to implement the following software logic on the client:
1. Set up the camera using Picamera2.
2. Initialize the motion sensor.
3. When motion is detected, read events and call the following functions:
a. Capture an image and save it to a file on the local file system.
b. Upload the image to a remote server.
c. If the upload is successful, delete the local file to avoid filling up all the space on the Raspberry Pi.
4. When no motion is detected due to a timeout (in this example, 6-7 seconds), start reading events and timestamp it with an “All clear” message.
5. Wait for the next event.
Below is the corresponding high-level code:
def init(settings):
  camera = setup_camera()
  pir = MotionSensor(settings.get('PIR_GPIO'))
  pir.when_motion = picture_when_motion(pir, camera, settings)
  pir.when_no_motion = not_moving
pause()
Swipe left and right to view the complete code
Among them, the most complex function is picture_when_motion. When the device transitions from a non-motion state to a motion state, when_motion will begin to execute. We can set it to accept no other parameters or only a single mandatory parameter. I will convert it into a function with the following code and create a callback to return it.
def picture_when_motion(pir, camera, settings):
  setup_path(settings.get('IMG_PATH'))
  def capture_and_upload_picture():
      if camera:
          file_path = capture(camera, settings.get('IMG_PATH'))
          server_settings = settings.get('SERVER')
          uploaded = upload_picture(file_path, server_settings)
          if uploaded:
              cleanup(file_path)
      else:
          print("Camera not defined")
  return capture_and_upload_picture
Swipe left and right to view the complete code
The capture function in the above code is similar to the function used to test the camera earlier, while the upload_picture function is the core of transforming the software from local to IoT applications. Let’s analyze it:
def upload_picture(file_path, server_settings):
if server_settings.get('base_url'):
url = urljoin(server_settings.get('base_url'), 'upload')
if server_settings.get('user') and server_settings.get('password'):
user = server_settings.get('user')
password = server_settings.get('password')
files = {'file': open(file_path, 'rb')}
print('Uploading file %s to URL: %s' %(file_path, url))
try:
  r = requests.post(url, files=files, auth=HTTPBasicAuth(user, password))
  image_path = r.json().get('path')
except e:
  print(e)
if not image_path or not r.ok:
  print('Error uploading image')
  return False
print('Image available at: {}'.format(image_path))
return True
Swipe left and right to view the complete code
Ideally, we let the server accept the payload file sent as a POST request using username and password authentication. The corresponding command is:
curl \
-F "file=@/home/user/Desktop/test.jpg" \
http://localhost:5000/upload
Since they are released under the open-source MIT license, you can freely copy them and execute them using python main.py.
Creating a Server to Store Images
For the server that stores images, we hope:
-
Support Python code, especially Flask.
-
No RDBMS or complex database, just use the file system to store images.
-
Provide a simple REST API with the following endpoints:
-
/upload to upload images.
-
/ to get a list of all images.
-
/cleanup to delete old images.
-
/download/<name> to download a single image.
-
-
Allow Raspberry Pi to upload files based on authentication.
-
-
Support secure environment variables for storing user credentials.
-
Low cost (no more than a few dollars/month).
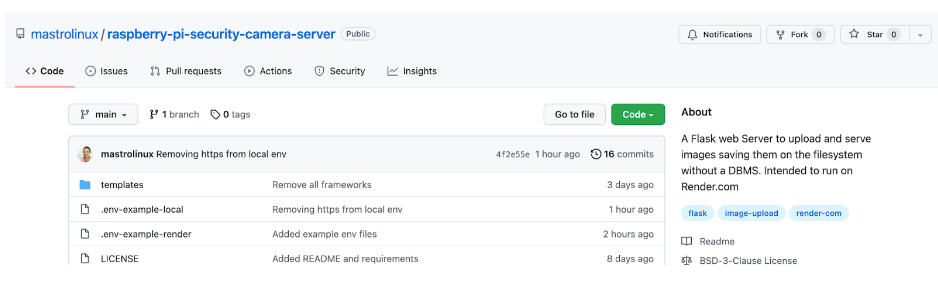
GitHub provides instructions for running the code locally or on a server.
Flask is a simple and flexible Python framework for quickly creating web applications centered around REST APIs. At the same time, we can put the main code in the main.py file.
First, we need to initialize the Flask application and declare the authentication method. For this, I will declare a function named setup to read various available environment variables on the local machine. Meanwhile, I will also create a .env file that contains all environment variables.
Next, I declare a verify_password function to validate the password provided to the server.
Then, I support the upload of new files via the upload_file function, which accesses the /upload endpoint to store images in the file system, as follows:
def upload_file():
if request.method == 'POST':
# check if the post request has the file part
if 'file' not in request.files:
flash('No file part')
return redirect(request.url)
file = request.files['file']
# If the user does not select a file, the browser submits an
# empty file without a filename.
if file.filename == '':
flash('No selected file')
return redirect(request.url)
if file and allowed_file(file.filename):
filename = secure_filename(file.filename)
file.save(os.path.join(app.config['UPLOAD_FOLDER'], filename))
return jsonify(success=True, filename=filename, path=urljoin(request.host_url, url_for('download_file', name=filename)))
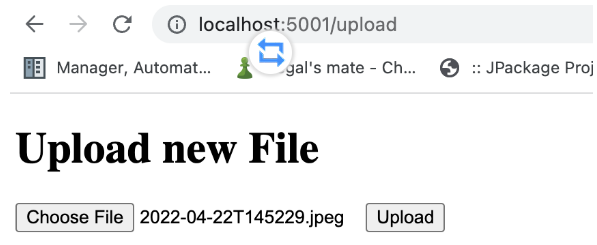
return '''
<!doctype html>
<title>Upload new File</title>
<h2>Upload new File</h2>
<form method=post enctype=multipart/form-data>
<input type=file name=file>
<input type=submit value=Upload>
</form>
'''
Swipe left and right to view the complete code
This function works effectively in both GET and POST modes. In POST mode, we can upload files from text clients or other applications; in GET mode, we can use a browser.
Although you can test the server directly in Raspberry Pi 4, it will be easier to configure and start it if you have a Linux or Mac system. In this example, we first need to create a .env file and place it in the same directory as the application. The .env file will store the following necessary information for the server:
-
The key for managing Flask sessions
-
The upload folder for saving images
-
The maximum size of acceptable images
-
The username and password for authentication
-
The endpoint URL of the server itself
Below is the content of the .env-example-local file. You can use it as a template, copy it, rename it, and modify it as needed.
SECRET_KEY='change-this-to-something-unlikely-to-guess'
UPLOAD_FOLDER = './img'
MAX_CONTENT_LENGTH = 16000000
USERNAME = 'admin'
PASSWORD = 'change-this-to-your-unique-password'
SERVER='http://127.0.0.0:5001/'
Swipe left and right to view the complete code
By running python main.py, the server will start and enter active debug mode so we can observe what happens in the background.
$ python main.py
* Serving Flask app 'main' (lazy loading)
* Environment: production
WARNING: This is a development server. Do not use it in a production deployment.
Use a production WSGI server instead.
* Debug mode: on
* Running on all addresses (0.0.0.0)
WARNING: This is a development server. Do not use it in a production deployment.
* Running on http://127.0.0.1:5001
* Running on http://192.168.123.228:5001 (Press CTRL+C to quit)
* Restarting with stat
* Debugger is active!
* Debugger PIN: 332-932-829
Swipe left and right to view the complete code
Let’s first test uploading files using CURL. You can also use tools like Postman for testing. Suppose you want to upload an image from the path /Users/luca/Pictures/image.jpeg, please use the following command:
curl \
-F "file=@/Users/luca/Pictures/image.jpeg" \
-u 'admin:password' \
'http://127.0.0.1:5001/upload'
Swipe left and right to view the complete code
The following image shows that the upload image request has been successfully processed.
Deploying the Server to Render
Now, we can push the server to a real, stable, and secure environment. We hope:
-
To store images directly on disk without configuring a database.
-
To avoid retaining too many images on the server, run an API via Cronjob to periodically keep only the last 20 images.
-
Simply use keys and variables based on the .env file.
Registering and Configuring the First Service
Before registering on the platform, I recommend that you fork the existing GitHub repository by clicking the “fork” button at the top right of the screen.
Next, you can complete registration on GitHub.
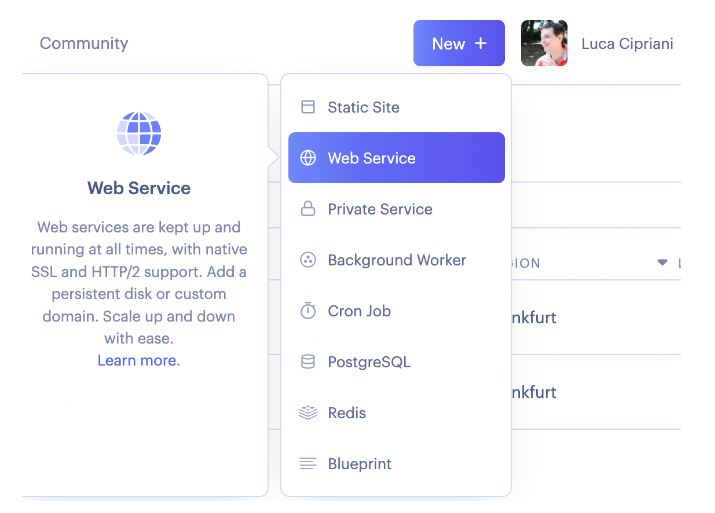
Then, select “New Web Service” from the dashboard.
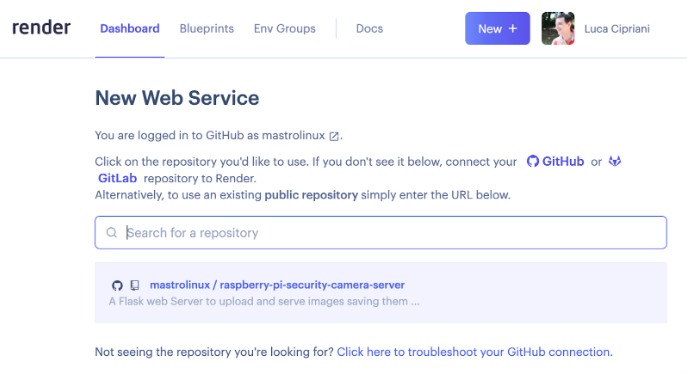
And search for the recently forked repository (repo).
To configure the server, you can first select a free starter plan and later purchase permanent disks as needed. This will involve the following parameters:
-
-
-
Region: Choose one closest to you
-
-
Build Command pip install -r requirements.txt
-
Start Command gunicorn main:app
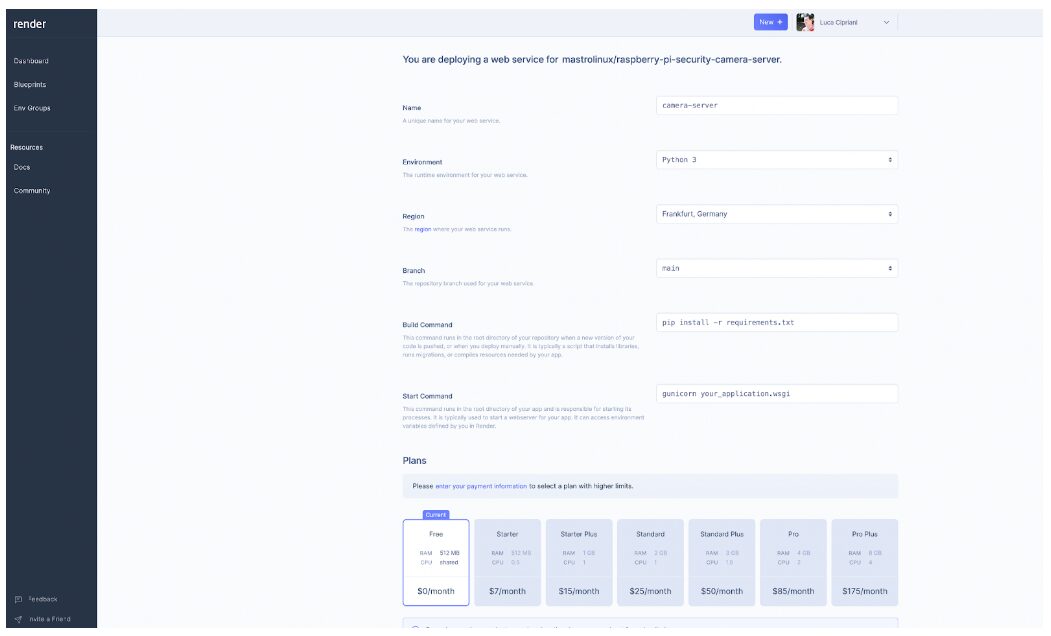
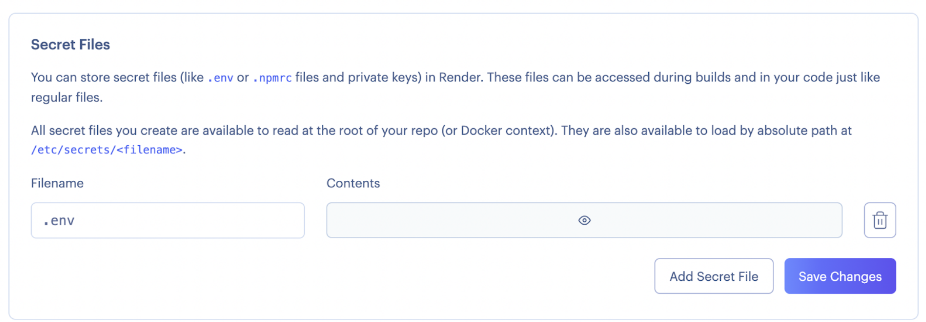
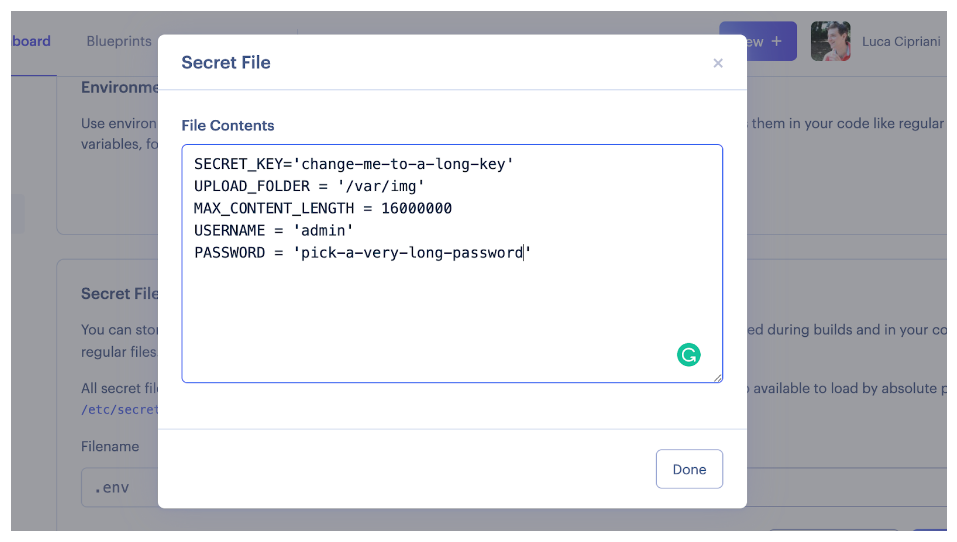
Now let’s go to the advanced part of the interface to set up the key file. You can name it .env and paste the following text content (you can change it as needed):
Creating permanent disks on Render is not difficult; we can fully use the interface to complete it. You just need to click on the disk section on the left, choose a name and mount path for it. For example:
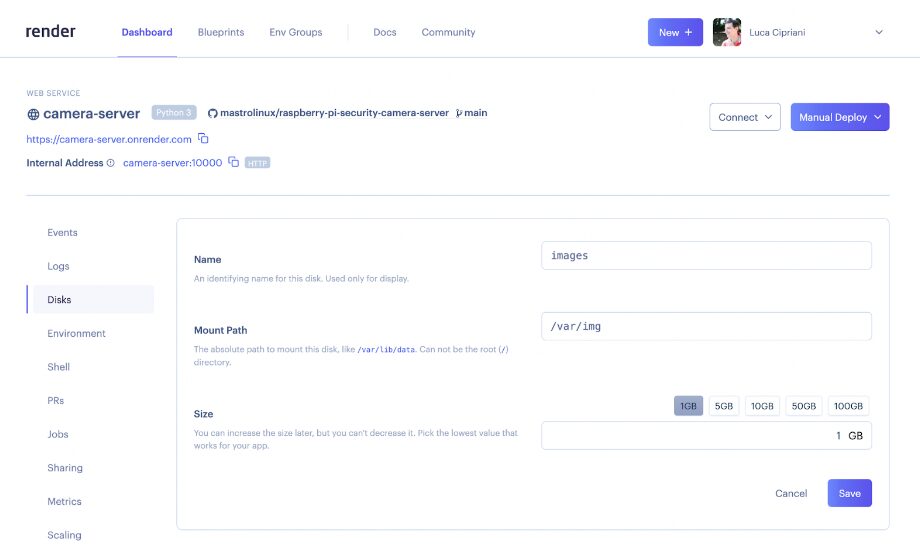
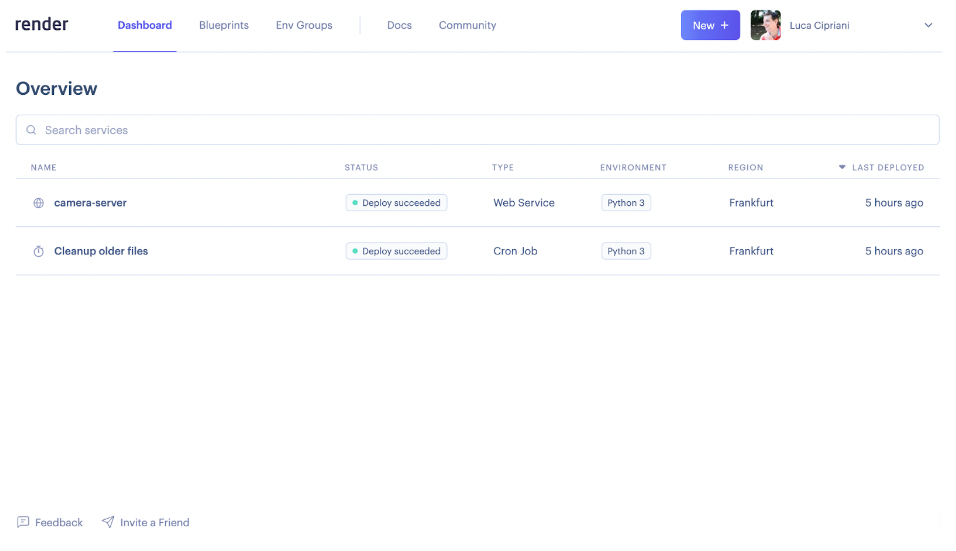
We will receive notifications about its status in the “Events” tab.
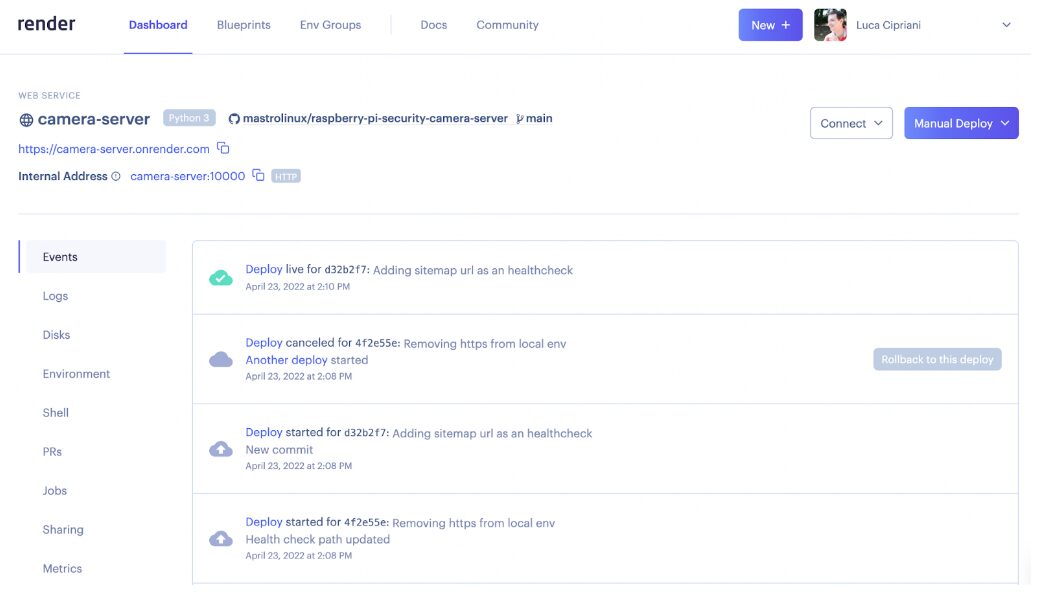
If we click on a specific event, we will be able to see all the details.
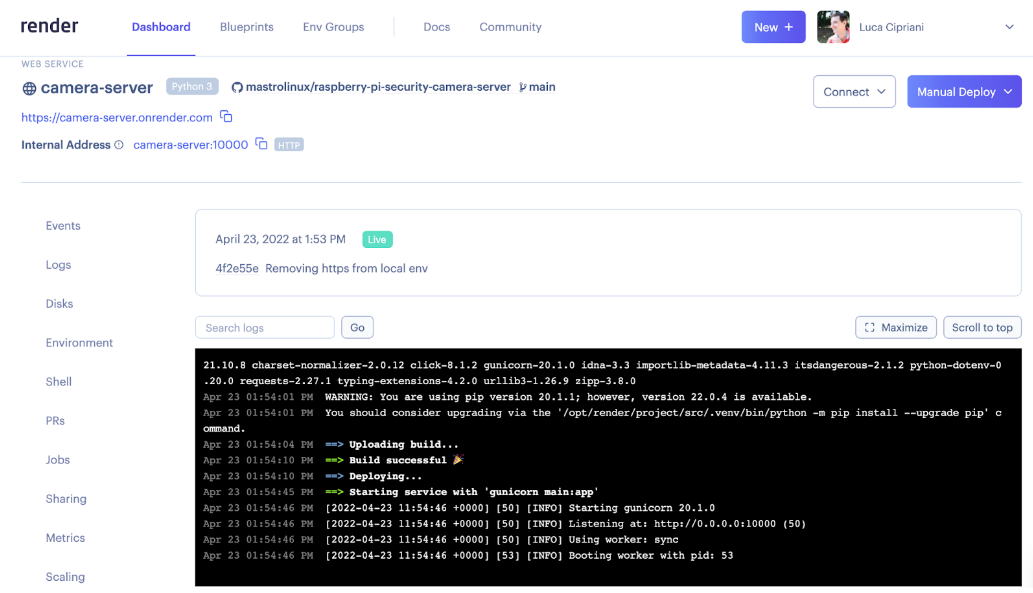
Once completed, you will see the server’s URL at the top of the page.
Now, it’s time to start uploading some real images from our Raspberry Pi client. First, we need to change the .env file in the Raspberry client. Below is the information of the environment variables:
PIR_GPIO=17
USERNAME='admin'
PASSWORD='change-me-with-a-real-password-please'
API_SERVER='https://your-api-address.onrender.com/'
IMG_PATH='img'
Swipe left and right to view the complete code
Next, please start the main.py service using Python 3.
If you move within the area of the PIR sensor, the camera will take pictures and upload them to the server. We can download the photos by obtaining the URL of the images.
Regularly Cleaning Images
To avoid storing too many images on the server, I arbitrarily set it to keep a maximum of 20 images. For this, we need to create an additional Cronjob service to periodically call the API.
First, I created a server route named /cleanup that calls the keep_last_images() function. The function is defined as follows:
$ curl-v -d '{"keep": "20"}' -H "Content-Type: application/json" -u 'username:password' -X POST http://127.0.0.1:5001/cleanup/
Swipe left and right to view the complete code
This function sorts the images by creation time and keeps the number of images indicated in the POST request payload. Please test the execution effect of CURL with the following command:
$ curl-v -d '{"keep": "20"}' -H "Content-Type: application/json" -u 'username:password' -X POST http://127.0.0.1:5001/cleanup/
Swipe left and right to view the complete code
By periodically (e.g., weekly) calling the function above, we will be able to clean up all images older than the most recent 20.
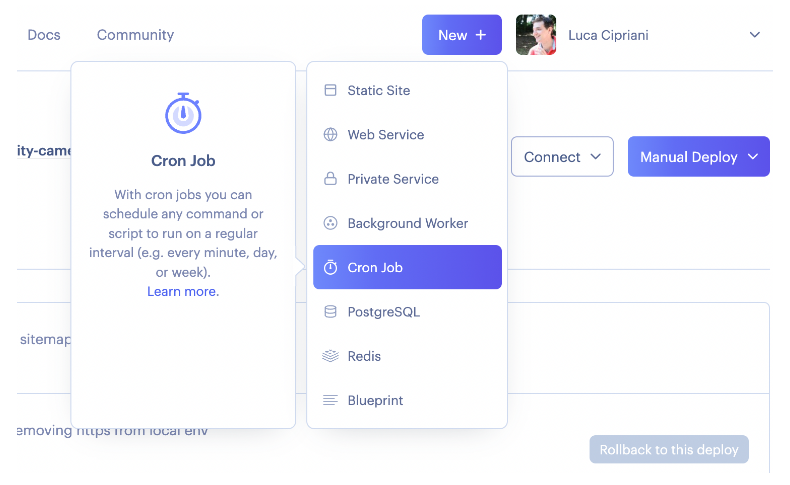
Next, I created a new Cronjob service in the Render dashboard.
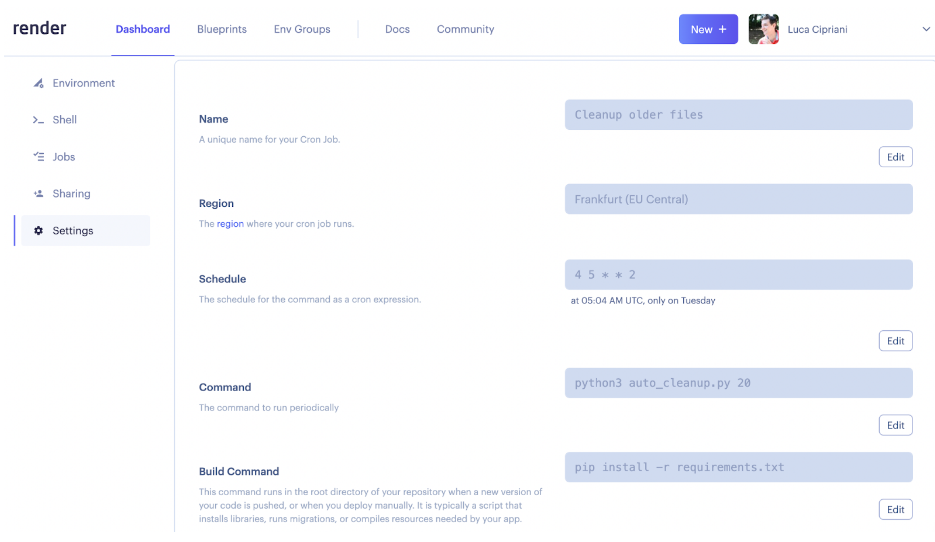
Below are the settings for the Cronjob:
-
-
-
Schedule: 4 5 * * 2 (I used https://crontab.guru/ to create the correct string.)
-
Command: Python 3 auto_cleanup.py 20 (the last parameter is the number of images to keep)
-
Build Command: pip install -r requirements.txt (this is required to install all dependencies)
-
-
Automatic Deployment: Yes
-
Cronjob Failure Notification: Relevant notification settings for user accounts
To test its effect, we can manually trigger its execution on the Cronjob without waiting for the real schedule, i.e., click the “Trigger Run” button at the top of the page. The Render interface dashboard will display the following information:
Creating a Dashboard for Events
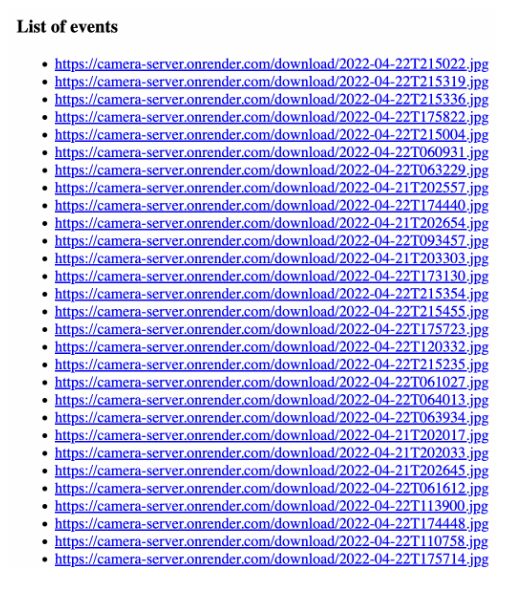
To implement secure management of the camera, we can use the list_files() function to query the file system and list all image files by creation date. Please refer to the following code snippet:
# List endpoint, get an HTML page listing all the uploaded files link
@app.route('/')
@auth.login_required
def list_files():
  files = get_list_of_img_path(path=app.config['UPLOAD_FOLDER'], reverse=True)
  images_url = []
  for file in files:
      images_url.append(urljoin(request.host_url, url_for('download_file', name=os.path.basename(file))))
  return render_template('imglist.html', images_url=images_url)
Swipe left and right to view the complete code
The above function will call the operating system-related API and return a list of files sorted by creation time. It will then use the jinja template to return the data to the imglist.html file. The basic part of that file is:
<ul>
{% for image in images_url %}
<li><a href="{{image}}">{{image}}</a></li>
{% else %}
<li>No images uploaded yet</li>
{% endfor %}
</ul>
It will produce the following list:
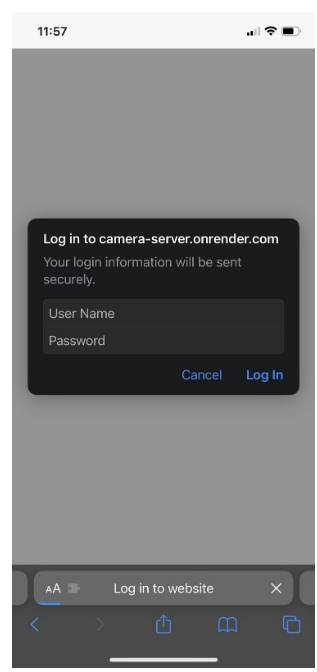
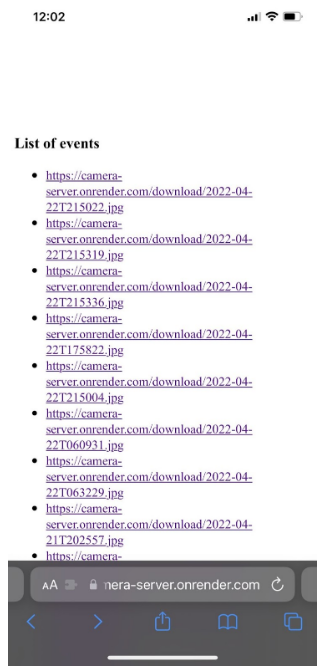
Viewing Your Dashboard While Away
The benefits of IoT lie not only in securely storing images remotely but also in avoiding data loss due to someone stealing or damaging your Raspberry Pi. That is, you can access and log in to Render’s full URL from anywhere in the world using the username and password recorded in the server’s .env file to view photo data and capture moving things in front of the device in a timely manner. The following set of photos is from my home camera. The last one records my partner testing the camera.

In the above text, I introduced how to create a cheap and practical IoT camera application in an end-to-end manner, from hardware setup to server deployment. You can use technology components and services like Raspberry Pi 4, Python, Flask, and Render to build a secure camera with remote image upload functionality in just a few hours.
Original link:
https://dzone.com/articles/iot-security-camera-with-rasbperry-and-render
Chen Jun (Julian Chen), 51CTO community editor, with over ten years of experience in IT project implementation, skilled in managing internal and external resources and risks, focusing on disseminating knowledge and experience in network and information security; continuously sharing cutting-edge technology and new knowledge through blogs, topics, and translations; frequently conducting information security training and lectures both online and offline.
Fan Benefits
Scan the code to follow the video number, and private message “666“
Receive technical journals