When using a Linux system in a domestic environment, it is common to encounter restrictions when accessing GitHub, slow code fetching speeds, or even being unable to pull code at all. This can severely impact work efficiency, especially during daily development or deployment processes when timely access to required repositories is crucial. Similar issues often arise when pulling Docker images.To overcome these limitations, I chose to configure a proxy using Xray on domestic servers/Linux systems. By utilizing traffic splitting through the proxy, I can efficiently access both domestic and overseas networks, allowing access to foreign resources while maintaining normal access to domestic networks.In this setup, I am using the Ubuntu Linux system, and the proxy employs the Vmess protocol.First, you need to manually download the Xray installation package to your local computer.
https://github.com/XTLS/Xray-core/releases/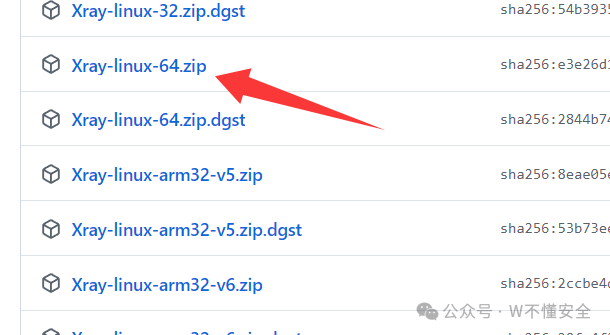 Then upload it to the Ubuntu server/local Linux and extract it.To install Xray:
sudo apt update
sudo apt install -y unzip
unzip Xray-linux-64.zip -d xray
cd xray
sudo mv xray /usr/local/bin/
sudo mv geoip.dat geosite.dat /usr/local/share/xray/
sudo mkdir -p /usr/local/etc/xray
Next, create a configuration directory:
mkdir -p /etc/xrayPaste the following configuration code directly into the command line:
# Create configuration file (using cat command)
sudo cat > /etc/xray/config.json << 'EOF'
{
  "log": {
    "access": "/var/log/xray/access.log",
    "error": "/var/log/xray/error.log",
    "loglevel": "info"
  },
  "inbounds": [
    {
      "port": 10809,
      "listen": "127.0.0.1",
      "protocol": "socks",
      "settings": {
        "udp": true
      }
    },
    {
      "port": 10810,
      "listen": "127.0.0.1",
      "protocol": "http",
      "settings": {}
    }
  ],
  "outbounds": [
    {
      "protocol": "vmess",
      "settings": {
        "vnext": [
          {
            "address": "your_server_IP",
            "port": your_port,
            "users": [
              {
                "id": "your_UUID",
                "alterId": 0,
                "security": "auto"
              }
            ]
          }
        ]
      },
      "streamSettings": {
        "network": "tcp"
      }
    },
    {
      "protocol": "freedom",
      "tag": "direct"
    },
    {
      "protocol": "blackhole",
      "tag": "blocked"
    }
  ],
  "routing": {
    "domainStrategy": "IPIfNonMatch",
    "rules": [
      {
        "type": "field",
        "domain": ["geosite:github", "geosite:google"],
        "outboundTag": "proxy"
      },
      {
        "type": "field",
        "ip": ["geoip:cn"],
        "outboundTag": "direct"
      }
    ]
  }
}
EOF
Then execute this command to start:
/usr/local/bin/xray -config /etc/xray/config.jsonIf an error occurs, it is clear that the configuration file specifies log paths “/var/log/xray/access.log” and “/var/log/xray/error.log”, but the system does not have this directory. Solution: Create the log directory.
mkdir -p /var/log/xray
touch /var/log/xray/access.log
touch /var/log/xray/error.log
chown -R root:root /var/log/xray
Then restart.If there are no obvious errors, it means the startup was successful.To avoid blocking other commands, we can create a temporary process to run it in the background.
nohup /usr/local/bin/xray -config /etc/xray/config.json > /tmp/xray.log 2>&1 &If there are no errors and it outputs a number, it indicates success. Check the process
ps -ef | grep xray This confirms that there are no errors and it has started successfully.To close the process, use the command:
pkill -f xrayI have written a script to test whether the proxy is effective.
#!/bin/bash
# Domestic test website
CN_TEST_URL="https://api.myip.la"
# International test website
INT_TEST_URL="https://ifconfig.me"
# HTTP proxy port
HTTP_PROXY="127.0.0.1:10810"
# SOCKS5 proxy port
SOCKS_PROXY="127.0.0.1:10809"
echo "=============================="
echo "Testing Xray proxy status"
echo "=============================="
# 1. Test domestic website (not using proxy)
echo -n "Domestic website IP: "
curl -s $CN_TEST_URL | head -n 1
echo
# 2. Test international website via HTTP proxy
echo -n "International website (ifconfig.me) IP via HTTP proxy: "
curl -s -x http://$HTTP_PROXY $INT_TEST_URL
echo
# 3. Test international website via SOCKS5 proxy
echo -n "International website (ifconfig.me) IP via SOCKS5 proxy: "
curl -s -x socks5h://$SOCKS_PROXY $INT_TEST_URL
echo "=============================="
echo "Testing complete"
echo "=============================="Usage:Save the script:
nano check_proxy.shPaste the above script content and save it.Grant execute permissions:
chmod +x check_proxy.shExecute the script:
./check_proxy.shThe expected result is that the domestic test shows your domestic IP, and the international test shows your proxy IP.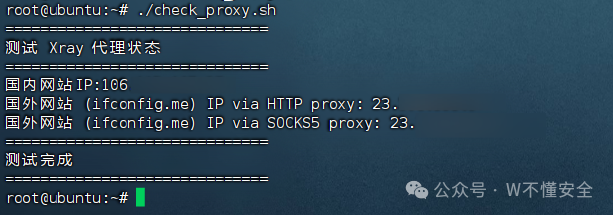
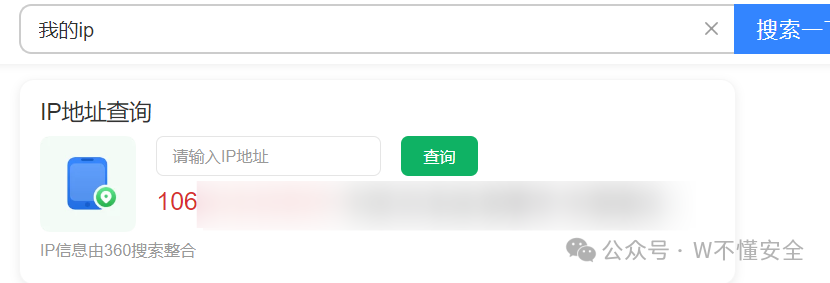 My proxy IP is undoubtedly the IP of my overseas server, confirming that all previous steps were successful.Next, during file or image pulls, running commands directly will not work; we need to specify the proxy to pull through it, otherwise, it will still use domestic traffic.Here, I will demonstrate using Docker installation and image pulling as an example.Set the proxy environment variables
export HTTP_PROXY="http://127.0.0.1:10810"
export HTTPS_PROXY="http://127.0.0.1:10810"
export NO_PROXY="127.0.0.1,localhost"
The <span><span>127.0.0.1,localhost</span></span> is used to ensure local connections do not go through the proxy.Update apt and install dependencies
sudo apt update
sudo apt install -y ca-certificates curl gnupg lsb-release
Add Docker’s official GPG Key
sudo mkdir -p /etc/apt/keyrings
curl -fsSL https://download.docker.com/linux/ubuntu/gpg | sudo gpg --dearmor -o /etc/apt/keyrings/docker.gpg
Set up the Docker repository
echo \
  "deb [arch=$(dpkg --print-architecture) signed-by=/etc/apt/keyrings/docker.gpg] https://download.docker.com/linux/ubuntu \
  $(lsb_release -cs) stable" | sudo tee /etc/apt/sources.list.d/docker.list > /dev/null
Update apt and install Docker
sudo apt update
sudo apt install -y docker-ce docker-ce-cli containerd.io docker-buildx-plugin docker-compose-plugin
Verify Docker installation
docker --versionMake Docker default to use the proxyFrom now on, Docker will use the Xray HTTP proxy for pulling images. This step is optional but recommended.Create a configuration file:
sudo mkdir -p /etc/systemd/system/docker.service.d
sudo nano /etc/systemd/system/docker.service.d/http-proxy.conf
Write the following:
[Service]
Environment="HTTP_PROXY=http://127.0.0.1:10810"
Environment="HTTPS_PROXY=http://127.0.0.1:10810"
Environment="NO_PROXY=127.0.0.1,localhost"
Then reload systemd and restart Docker:
sudo systemctl daemon-reexec
sudo systemctl restart docker
Now Docker will default to using the proxy for pulling images.Let’s try pulling an image, here I will pull Portainer-ce for testing.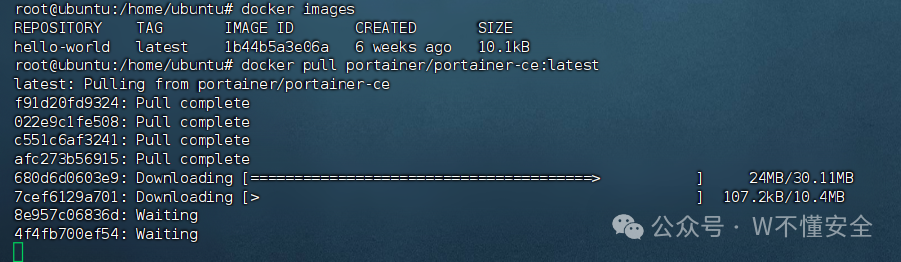 The pull completed quickly, taking only a few seconds.This concludes the content for this session.Please follow for more updates.