STM32 I2C EEPROM Read and Write
I2C EEPROM is an old friend of microcontroller engineers. Today, we will talk about how to drive I2C EEPROM using the STM32 HAL library, focusing on the common 24C02 chip. But don’t rush, grab a cup of coffee, and let’s take our time.
Basic Knowledge of I2C EEPROM
EEPROM (Electrically Erasable Programmable Read-Only Memory) is a type of memory that can be electrically erased and reprogrammed. It is often used to store small amounts of data that need to be updated frequently.
I2C EEPROM refers to EEPROM chips that communicate through the I2C interface. The 24C02 is one such chip, with a storage capacity of 256 bytes (2Kbit).
The basic principle of I2C communication is:
- 1. The master (in this case, STM32) sends a start signal
- 2. Sends the slave address + read/write bit
- 3. Sends the internal address of the memory
- 4. Sends/receives data
- 5. Sends a stop signal
Sounds complicated? Don’t worry, the HAL library has already wrapped it for us, making it quite simple to use.
Hardware Connection
First, let’s take a look at the hardware connection diagram:
STM32      24C02
PB6(SCL) - SCL
PB7(SDA) - SDA
3.3V     - VCC
GND      - GND
Note: Don’t forget to add a pull-up resistor of about 4.7k on the SDA and SCL lines! This is a necessary condition for the I2C bus.
Code Implementation
Now, let’s see how to write the code.
First is the I2C initialization:
I2C_HandleTypeDef hi2c1;

void MX_I2C1_Init(void)
{
  hi2c1.Instance = I2C1;
  hi2c1.Init.ClockSpeed = 100000;
  hi2c1.Init.DutyCycle = I2C_DUTYCYCLE_2;
  hi2c1.Init.OwnAddress1 = 0;
  hi2c1.Init.AddressingMode = I2C_ADDRESSINGMODE_7BIT;
  hi2c1.Init.DualAddressMode = I2C_DUALADDRESS_DISABLE;
  hi2c1.Init.OwnAddress2 = 0;
  hi2c1.Init.GeneralCallMode = I2C_GENERALCALL_DISABLE;
  hi2c1.Init.NoStretchMode = I2C_NOSTRETCH_DISABLE;
  if (HAL_I2C_Init(&hi2c1)  != HAL_OK)
  {
    Error_Handler();
  }
}
This code sets the I2C communication speed to 100kHz and uses 7-bit addressing mode. These parameters are sufficient for the 24C02.
Next is the write function:
HAL_StatusTypeDef EEPROM_Write(uint16_t DevAddress, uint16_t MemAddress, uint8_t *pData, uint16_t Size)
{
  return HAL_I2C_Mem_Write(&hi2c1, DevAddress, MemAddress, I2C_MEMADD_SIZE_8BIT, pData, Size, 1000);
}
And the read function:
HAL_StatusTypeDef EEPROM_Read(uint16_t DevAddress, uint16_t MemAddress, uint8_t *pData, uint16_t Size)
{
  return HAL_I2C_Mem_Read(&hi2c1, DevAddress, MemAddress, I2C_MEMADD_SIZE_8BIT, pData, Size, 1000);
}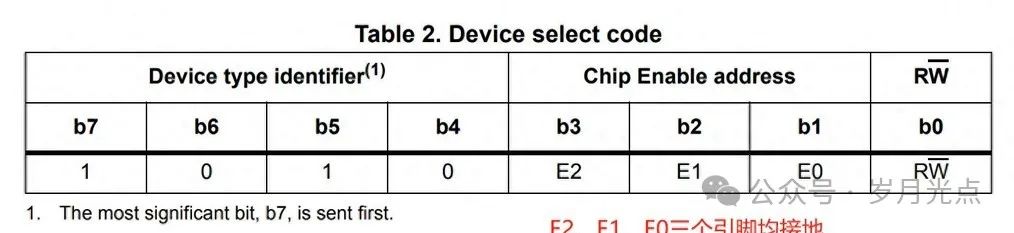
Here’s a pitfall: You may have noticed that the DevAddress parameter is 16 bits, but the address of the 24C02 is only 7 bits. In fact, the HAL library will handle this automatically; we just need to left-shift the 7-bit address by one. For example, the device address for the 24C02 is 0x50, so we pass 0xA0.
Usage example:
uint8_t WriteBuffer[] = "Hello, EEPROM!";
uint8_t ReadBuffer[20];

// Write data
EEPROM_Write(0xA0, 0x00, WriteBuffer, sizeof(WriteBuffer));

// Wait for write to complete
HAL_Delay(5);

// Read data
EEPROM_Read(0xA0, 0x00, ReadBuffer, sizeof(WriteBuffer));
Note: EEPROM writing takes time, so make sure to wait appropriately before reading.
Common Issues
- 1. Write Failure
- • Check power and connections
- 2. Incorrect Data Read
- • Confirm that the I2C timing is correct
- • Check if the device address is correct
- 3. Communication Timeout
- • Check if the starting address and length read are correct
- • Try lowering the I2C communication speed
Real Application Cases
EEPROM is often used to store configuration information and calibration data for devices. For example, I once made a temperature calibrator that used the 24C02 to store calibration parameters. Each time it powered on, it would read these parameters from the EEPROM, ensuring that calibration data would not be lost even in case of power failure.
Conclusion
Using I2C EEPROM is not difficult; the key is to understand the basic principles of I2C communication. With the support of the HAL library, we don’t even need to worry about the low-level details of I2C. However, it is important to understand both the ‘how’ and the ‘why.’ I recommend that interested friends delve deeper into the specifics of the I2C protocol.
Practical Suggestion: Try writing a simple “electronic diary” program that reads the last diary entry from EEPROM each time it powers on, allowing users to add new content and save it back to EEPROM. This can deepen understanding of EEPROM read and write operations.
Remember, in embedded development, what you learn on paper is always shallow; true understanding comes from hands-on practice. Hands-on practice is the best way to improve!