**The Jetson Nano 2GB is a high-performance, cost-effective embedded platform from NVIDIA. Although small, it is powerful, but unfortunately, it lacks native Android system support. Currently, to experience Android on the Jetson platform, one can run an Android system in a virtual machine or use a platform like Anbox. Anbox is developed based on containers and can provide native support for running Android programs. Today, we will try compiling and deploying Anbox on the Jetson Nano, with basic steps referenced from the NVIDIA forum article [Anbox on Jetson Nano], adjusted as needed.
-
Recompile and Flash the Jetson Nano 2GB Kernel
This section refers to L4T Kernel Customization.
Anbox relies on two drivers: binder and ashmem. The latest kernel version for the Jetson Nano 2GB is 4.9.201, and these two drivers are already included in the Jetson Nano’s kernel but are not enabled by default. Initially, I attempted to load these two drivers as modules without recompiling the kernel. The binder loaded successfully, but ashmem failed to load. The reason is that these two drivers cannot be compiled as loadable modules in version 4.9. In other words, they must be compiled with the entire kernel source code. To be safe, I chose to recompile the entire kernel and enable driver support, consistent with the operations in the forum.
1.1 Environment Preparation
A Jetson Nano 2GB device that has been flashed with the image and completed the startup initialization, refer to Getting Started with Jetson Nano 2GB Developer Kit.
It is recommended to use Ubuntu 18.04 as the development machine for Jetson development, and for cross-compilation, use Linaro GCC 7. The kernel source code can be obtained using the scripts provided by Jetpack via git, or downloaded manually. Here we will use manual download [L4T Driver Package (BSP) Sources].
Unzip the Cross-Compilation Toolchain
mkdir $HOME/l4t-gcc
cd $HOME/l4t-gcc
tar Jxvf /PATH_TO_DOWNLOADS/gcc-linaro-7.3.1-2018.05-x86_64_aarch64-linux-gnu.tar.xz
Unzip the L4T BSP Source Package and Kernel
mkdir $HOME/l4t-source
cd $HOME/l4t-source
tar jxvf /PATH_TO_DOWNLOADS/public_sources.tbz2
cd Linux_for_Tegra/source/public
tar jxvf kernel_src.tbz2
1.2 Compile and Flash the Kernel
At the end of the $HOME/l4t-source/Linux_for_Tegra/source/public/kernel/kernel-4.9/arch/arm64/configs/tegra_defconfig file, add:
Anbox Configuration
CONFIG_ANDROID=y
CONFIG_ANDROID_BINDER_IPC=y
CONFIG_ANDROID_BINDER_IPC_SELFTEST=y
CONFIG_ASHMEM=y
Compile the kernel:
Set Environment Variables
export CROSS_COMPILE=
$HOME/l4t-gcc/gcc-linaro-7.3.1-2018.05-x86_64_aarch64-linux-gnu/bin/aarch64-linux-gnu-
export LOCALVERSION=-tegra-anbox # This environment variable changes the generated kernel suffix
export KERNEL_SOURCE=
$HOME/l4t-source/Linux_for_Tegra/source/public/kernel/kernel-4.9
export KERNEL_OUT=$KERNEL_SOURCE/img_out # Image output dir
export KERNEL_MODULES_OUT=$KERNEL_SOURCE/mod_out # Modules output dir
Compile the Kernel
cd $TEGRA_KERNEL_SRC_DIR
make -C $KERNEL_SOURCE ARCH=arm64 O=$KERNEL_OUT tegra_defconfig
make -C $KERNEL_SOURCE ARCH=arm64 O=$KERNEL_OUT -j<n> zImage
make -C $KERNEL_SOURCE ARCH=arm64 O=$KERNEL_OUT -j<n> modules
make -C $KERNEL_SOURCE ARCH=arm64 O=$KERNEL_OUT -j<n> dtbs #
make -C $KERNEL_SOURCE ARCH=arm64 O=$KERNEL_OUT INSTALL_MOD_PATH=$KERNEL_MODULES_OUT modules_install
After compilation, we obtain the kernel image: $KERNEL_OUT/arch/arm64/boot/Image and the corresponding kernel module folder: $KERNEL_MODULES_OUT/lib/modules/4.9.201-tegra-anbox.
Update the kernel and modules to the development board:
To normally update the kernel, the root filesystem needs to be redone, which takes a long time. Here we adopt a quick verification scheme:
Prepare the system on the development board, power it on, connect the USB cable to the development machine, and ensure the development machine can access the development board via the address 192.168.55.1.
Use ssh to copy the kernel image and module folder to the development board. At this point, all operations on the host are complete, and all subsequent operations are on the development board. Back up the original image /boot/Image to /boot/Image.backup:
Host Execution
scp $KERNEL_OUT/arch/arm64/boot/Image [email protected]:~/
scp -R $KERNEL_MODULES_OUT/lib/modules/4.9.201-tegra-anbox [email protected]:~/
ssh [email protected] # Log into the development board
Execution on the Development Board
sudo cp /boot/Image /boot/Image.backup # Backup original kernel
sudo mv ~/Image /boot/Image # Update kernel
sudo mv ~/4.9.201-tegra-anbox /lib/modules/ # Copy kernel modules
sudo update-initramfs -c -k 4.9.201-tegra-anbox # Update initramfs
cd /boot/
sudo ln -sf initrd.img-4.9.201-tegra-anbox initrd.img
After completion, edit /boot/extlinux/extlinux.conf, remove LABEL backup and the following comments, similar to this:
TIMEOUT 30
DEFAULT primary
MENU TITLE L4T boot options
LABEL primary
MENU LABEL primary kernel
LINUX /boot/Image
INITRD /boot/initrd
APPEND ${cbootargs} quiet root=/dev/mmcblk0p1 rw rootwait rootfstype=ext4 console=ttyS0,115200n8 console=tty0 fbcon=map:0 net.ifnames=0
When testing a custom kernel, it is recommended that you create a backup of
the original kernel and add a new entry to this file so that the device can
fallback to the original kernel. To do this:
1, Make a backup of the original kernel
sudo cp /boot/Image /boot/Image.backup
2, Copy your custom kernel into /boot/Image
3, Uncomment below menu setting lines for the original kernel
4, Reboot
LABEL backup
MENU LABEL backup kernel
LINUX /boot/Image.backup
INITRD /boot/initrd
APPEND ${cbootargs}
Update permissions:
Create /etc/udev/rules.d/99-anbox.rules file with the following content:
KERNEL==”ashmem”, NAME=”%k”, MODE=”0666″
KERNEL==”binder”, NAME=”%k”, MODE=”0666″
Then execute:
sudo udevadm control –reload-rules && udevadm trigger
Reboot the development board and confirm that the current working kernel version is 4.9.201-tegra-anbox, and that the devices /dev/ashmem and /dev/binder exist.
-
Update libsdl2 Library
The original post mentioned that the libsdl2 library in version 18.04 (the development board system version) has a bug, so it needs to be updated. I didn’t check what the specific issue was, but here we choose to follow this operation:
Install Dependencies
sudo apt install dot2tex build-essential cmake cmake-data debhelper dbus google-mock libboost-dev libboost-filesystem-dev libboost-log-dev libboost-iostreams-dev libboost-program-options-dev libboost-system-dev libboost-test-dev libboost-thread-dev libcap-dev libsystemd-dev libegl1-mesa-dev libgles2-mesa-dev libglm-dev libgtest-dev liblxc1 libproperties-cpp-dev libprotobuf-dev lxc-dev pkg-config protobuf-compiler
Download libsdl Source Code
mkdir libsdl-source && cd libsdl-source
wget https://launchpad.net/ubuntu/…
wget https://launchpad.net/ubuntu/…
wget https://launchpad.net/ubuntu/…
Compile deb Package
dpkg-source -x libsdl2_2.0.9+dfsg1-1ubuntu1.19.04.1.dsc
cd libsdl2-2.0.9+dfsg1/
dpkg-buildpackage -rfakeroot -b -uc -us
cd ..
Install deb
sudo dpkg -i libsdl2-2.0-0_2.0.9+dfsg1-1ubuntu1.19.04.1_arm64.deb libsdl2-dev_2.0.9+dfsg1-1ubuntu1.19.04.1_arm64.deb libsdl2-doc_2.0.9+dfsg1-1ubuntu1.19.04.1_all.deb
-
Compile and Install Anbox
Download Anbox source code, compile and install:
git clone https://github.com/HarleyPato…
mkdir -p anbox-arm64/build && cd anbox-arm64/build
cmake .. && make && sudo make install
sudo cp /usr/local/bin/anbox /usr/bin/
Download Android image:
wget http://anbox.postmarketos.org…
mv android-7.1.2_r39-anbox_arm64-userdebug.img /var/lib/anbox/android.img
Obtain the configuration files using the deb package released by Anbox:
mkdir anbox-deb && cd anbox-deb
wget http://ports.ubuntu.com/pool/…
ar x anbox_0.0~git20191115-1build1_arm64.deb
tar Jxvf data.tar.xz
sudo cp ./lib/systemd/system/anbox-container-manager.service /lib/systemd/system/
sudo cp ./usr/lib/systemd/user/anbox-session-manager.service /usr/lib/systemd/usr/
In the /lib/systemd/system/anbox-container-manager.service file, comment out these two lines:
ExecStartPre=/sbin/modprobe ashmem_linux
ExecStartPre=/sbin/modprobe binder_linux
In the /usr/lib/systemd/user/anbox-session-manager.service file, add before ExecStart:
Environment=”DISPLAY=:0″
Start the Anbox service:
sudo systemctl unmask anbox-container-manager.service
sudo systemctl start anbox-container-manager.service
sudo systemctl enable anbox-container-manager.service
systemctl –user unmask anbox-session-manager.service
systemctl –user start anbox-session-manager.service
systemctl –user enable anbox-session-manager.service
Check the Anbox status:
sudo systemctl status anbox-container-manager.service
systemctl –user status anbox-session-manager.service
The result should be similar to the image below: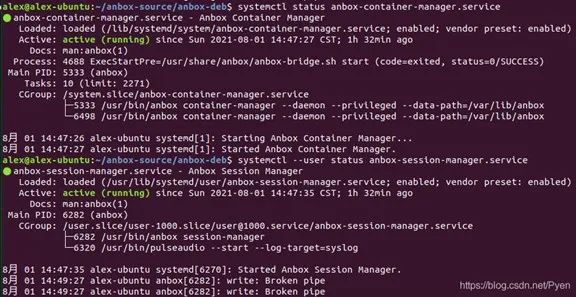
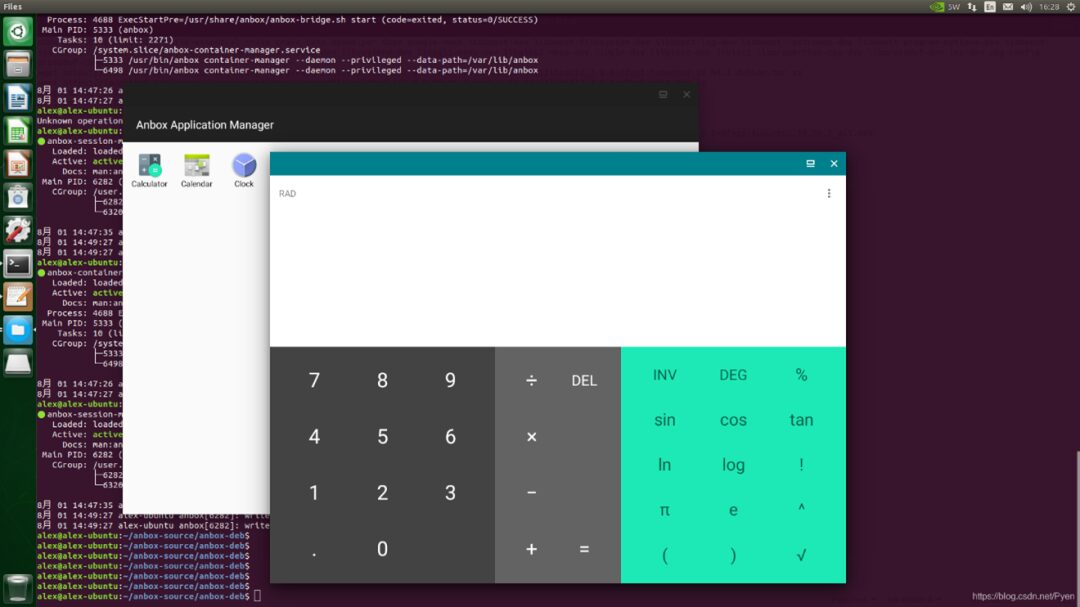
At this point, all installations are complete. Reboot the development board, start Anbox, and you will see the Android interface. You can install apk files into the Anbox Android environment using adb install and run them.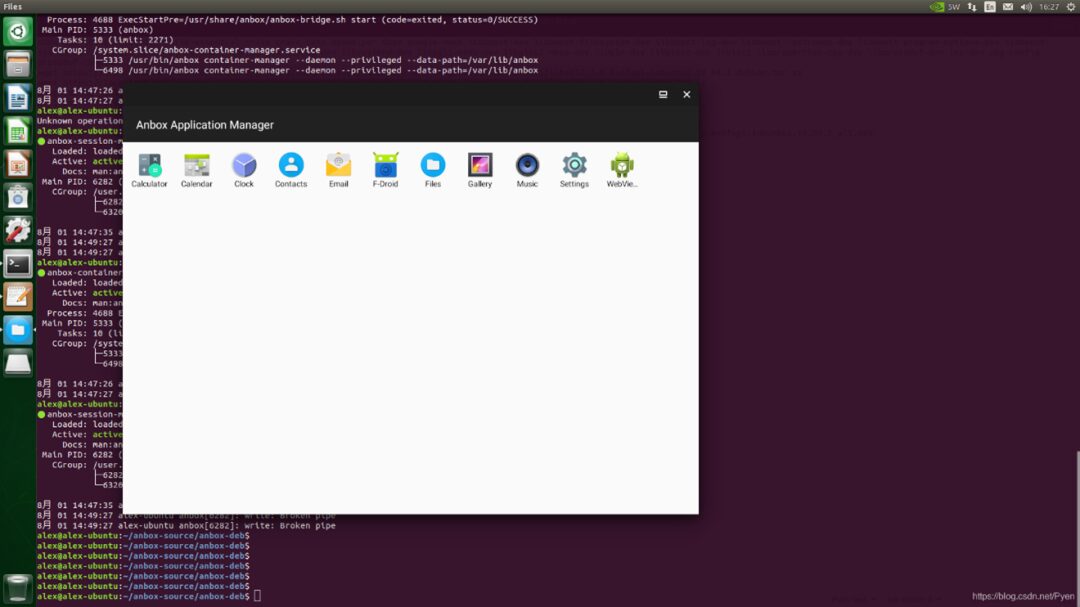
The article is transferred from:Technical Community
Author:NVIDIA Embedded Systems
Copyright belongs to the original author, if there is any infringement, please contact for deletion
END
About Anxin Education

Anxin Education is an innovative education platform focusing on AIoT (Artificial Intelligence + Internet of Things), providing comprehensive AIoT education solutions from primary and secondary schools to higher education institutions.
Anxin Education relies on Arm technology to develop the ASC (Arm Smart Interconnection) curriculum and talent cultivation system. It has been widely applied in university-industry-research cooperation and K-12 STEM education, dedicated to cultivating talents in the intelligent interconnection field that meet the needs of the times.