Original by Interogativ Guo Yipu, Compiled by Quantum Bit Report | Public Account QbitAI
The NVIDIA Jetson Nano, as the cheapest hardware from NVIDIA, costs only $99.
Seeing it cheap makes you want to grab it, but how do you play with it once you have it?
Building robots, creating small cars, or DIYing a voice-controlled curtain at home all require some wheels first.
If the framework you are using is PyTorch, you better install Fast.ai as well.
Fast.ai is a very user-friendly deep learning library built on PyTorch, originating from the MOOC platform Fast.ai. With just one API, it includes all common deep learning applications.
So, after getting the Jetson Nano, how do you deploy the wheels? A user named Interogativ shared a guide on running PyTorch 1.0 and Fast.ai 1.0 on it in the Fast.ai forum, and Quantum Bit has compiled the full text as follows:
The NVIDIA Jetson Nano, equipped with an ARM Cortex A57 processor and 4GB of memory, can run both CUDA and PyTorch, making this development board incredibly valuable.
Of course, you can also run the latest versions of PyTorch and Fast.ai as of April 2019 on it. Here is the guide. This guide is only suitable for Python 3. If you have no Linux experience, do not know how to use SSH, or do not understand the principles of IP networking or what an IP address is, it is not recommended to use this guide for installation.
Hardware and Software Preparation
1. Spend $99 to buy an NVIDIA Jetson Nano, which is now available in China, of course, it will be a bit more expensive than $99 (665 RMB).
2. A 64GB Micro SD card, ensure it is class 10 or higher.
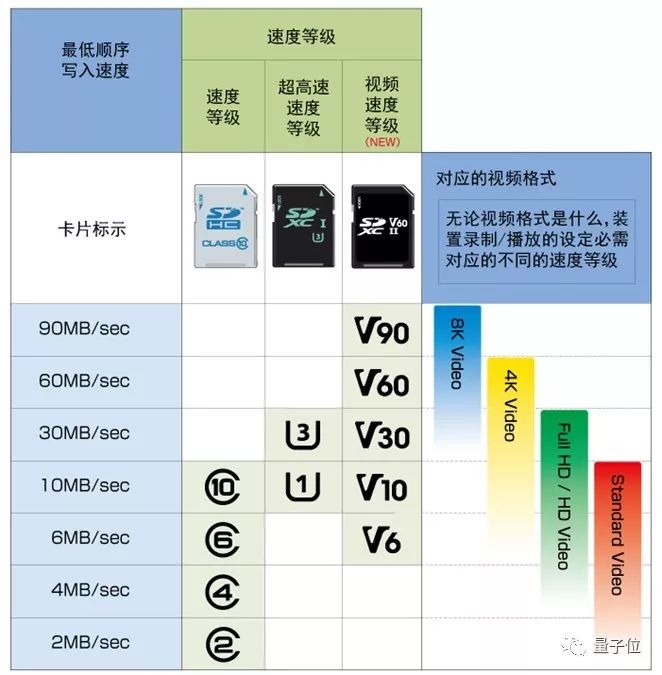
△ SD card speed grade, from the SD Association website
3. A USB keyboard, the kind used with desktop computers.
4. A 2.5Amp power supply with a Micro-USB plug.
5. An HDMI or DisplayPort cable and a monitor.
6. Network connection: Ethernet cable, wireless router, or HUB. This board does not support built-in wireless, so please ensure you can use wired networking.
7. A PC that can insert Micro SD cards; if you cannot insert SD cards, you will need to prepare a card reader.
8. Software for creating SSH terminals on your PC, as well as software for transferring files via SSH. If you are using Windows, I recommend Tera Term (free) and WinSCP (free); download links are at the end of the article.
9. Download these zip files to your PC. Please refer to the end of the article for download links. Inside are scripts written by the author Interogativ, including:
setup_swapfile.sh fastai_jetson.sh setup_jupyter.sh jetson_headless.sh jupyter_notebook_config.py
Of course, remember your storage path.
Unboxing
When your new board arrives, ignore the paper rack that comes with it. Find some anti-static foam or other anti-static materials and place your board on it.

Go to the end of the article and copy the link to the NVIDIA developer site Jetson Nano developer kit guide into your browser. Follow the steps outlined there to ensure:
1. Download the NVIDIA zip file that contains the SD card image.
2. Follow the instructions to install these files onto the SD card.
3. Insert the SD card into the Nano, plug in the USB keyboard, monitor, and network cable.
4. Power on and accept various licensing agreements.
5. Set a username and password; don’t forget it.
After Connecting to the Network
1. In the network settings, find your Nano’s IPV4 address, write it down, or if you understand IP networking, set a static IP address.
2. Open an SSH session with the Jetson Nano using a PC terminal program.
3. Use file transfer software to send the previously downloaded zip files to the user home directory on the Nano.
4. Connect your PS and Nano’s IP address through SSH.
5. From the console or through the SSH connection, set execute permissions for the scripts you just downloaded:
chmod +x fastai_jetson.sh
chmod +x jetson_headless.sh
chmod +x setup_swapfile.sh
chmod +x setup_jupyter.sh
Setting Up Swap File
The Nano has only 4GB of RAM (shared with GPU), and you need to set up a swap file. If you already have one, skip this step. You can run setup_swapfile.sh from the terminal session:
./setup_swapfile.shEnsure this step is only done once because the script does not check if it has been set. You can perform the following command to check if the swap file is set:
freeAt this point, you should see an 8GB swap file created.
Installing PyTorch and Fast.ai
If you want to install the standard Fast.ai and PyTorch right now, go ahead, but you probably won’t be able to.
At this moment, the standard pip command does not work at all, but if you simply run the fastai_jetson.sh script, you can install both. This process takes several hours, so don’t hold your breath.
./fastai_jetson.shInstalling Jupyter Notebook
After installing Fast.ai, it will tell you:
Done with part1 – now logout, login again and run setup_jupyter.shThis is because the Jupyter installation does not export the shell variables needed to run. So now, close all terminals, SSH sessions, etc., and reboot the Nano from the graphical interface. After rebooting, open a terminal from the graphical interface and:
1. Ensure your downloaded jupyter_notebook_config.py file is in the Nano’s home directory.
2. Run ./setup_jupyter.sh.
./setup_jupyter.shThis will also take a while, so no need to hold your breath here.
The last step of this script requires a Jupyter password; remember:
It is not the Jupyter login password! It is not the Jupyter login password! It is not the Jupyter login password!
It is just a separate password that you can use to log into the Jupyter notebook from any PC on your network; remember it after setting it.
The default Jupyter notebook installation can only be logged into from the console or graphical interface. The modified jupyter_notebook_config.py file and script installation allow you to log in from any computer on your network.
To run the Jupyter notebook, open a terminal or SSH instance and run:
jupyter notebookIf it does not run, it may be because you did not log out and log back in again.
Now you can run PyTorch and Fast.ai.
But if you are like me and do not need to use the graphical interface on the Nano and want to use all the memory for running programs, read on.
About Python, Pip, and VirtualEnv
Some experienced Python users are accustomed to virtual environments (virtualenv, conda), which require you to activate “source activate” before installing or running software. We haven’t installed that yet, and one side effect is that the pip and Python commands will automatically run Python 3 or pip 3 in the active environment.
You must use pip3 and Python3 to run pip and Python, respectively. So, if you are running some notebooks that use !python xyz, it will not work unless you change the code to !python3 xyz.
Storage space is not everything, but it is definitely very important:
In the past, say in 2010, 4GB of memory was quite large. If you are not running GPU on this board, it is enough for a laptop to run well (8GB of swap file helps a lot). However, if you want to run CUDA, you cannot run it on swap disk, so it occupies every byte of the 4GB.
Therefore, to save some storage space, give up the graphical interface and operate through SSH using a remote console.
Now, if you are ready, find the last script jetson_headless.sh, run it to uninstall the graphical interface, and clean up over 300MB of unnecessary packages.
After running, reboot, and you will have console access to Nano, now the machine only occupies about 378MB of memory, leaving about 3.6GB of space to run PyTorch and Fast.ai.
1. Run
./jetson_headless.sh2. Reboot and connect to Nano via SSH.
Finally, it is worth noting that this article was published in April 2019, and this method can install PyTorch 1.0 and Fast.ai 1.0. If future versions are updated or you need to install other things, feel free to check the original git repo~
Links
Original guide: https://forums.fast.ai/t/share-your-work-here/27676/1274
Tera Term: https://ttssh2.osdn.jp/index.html.en
WinSCP: https://winscp.net/eng/docs/lang:chs
Zip file download link: https://gist.github.com/interogativ/4f5669dad3f9252a5709dc6844e12a29/archive/50845f5e9e8994eec78a4b27c6f23e4822ba00d7.zip
NVIDIA developer site Jetson Nano developer kit guide: https://developer.nvidia.com/embedded/learn/get-started-jetson-nano-devkit
— End —
Event Registration | Multimodal Video Person Recognition

Subscribe to AI Insights for AI Industry News

Join the Community
Quantum Bit AI community is recruiting! The Quantum Bit community includes: AI discussion group, AI+ industry group, AI technology group;
Students interested in AI are welcome to reply with the keyword “WeChat group” in the dialogue interface of the Quantum Bit public account (QbitAI) to get the entry method. (The technical group and AI+ industry group require review, and the review is strict; please understand.)

Quantum Bit QbitAI · Author on Toutiao
v’ᴗ’ v Tracking AI technology and product updates