Introduction
The handheld teaching pendant is a portable operating device, typically composed of a shell, internal circuit board, control panel (such as buttons, knobs, display, etc.), and connection cables, used to achieve specific control or operation functions. In mechanical equipment, handheld teaching pendants are often used for remote control and operation, enhancing work efficiency and safety. In industrial automation control systems, it serves as a human-machine interface to input and feedback complex control commands.
The handheld teaching pendants ZHD400X and ZHD500XB developed by Zhengyundong are introduced in this article to help users understand the hardware interfaces and usage of these products.

1
Product Overview
ZHD400X and ZHD500XB are network display touch screen teaching boxes, which must be used in conjunction with controllers that support ZHMI functions.
The ZHD400X handheld teaching box comes with a 24V power supply, features an 800*480 resolution true color display, 18 buttons, and an emergency stop switch.
ZHD400X Teaching Box Features
(2) Drawing function: Chinese and English characters, straight lines, arcs, images.
(3) Equipped with an emergency stop button.
(4) Contains 18 buttons, button functions can be customized.
(5) RJ45 crystal head (with 3m connection cable), USB interface.
(6) Supports HMI configuration protocol.
(7) Applicable to various mechanical or robotic control.
(8) Supports touch screen, can be used in combination with buttons and touch.

ZHD400X Teaching Box
ZHD500XB Teaching Box Features
(2) Drawing function: Chinese and English characters, straight lines, arcs, images.
(3) Equipped with an emergency stop button, key selection switch, and handwheel.
(4) Contains 16 buttons, button functions can be customized.
(5) RJ45 crystal head, USB interface.
(6) Supports HMI configuration protocol.
(7) Applicable to various mechanical or robotic control.
(8) Supports touch screen, can be used in combination with buttons and touch, and can use a stylus for easier operation in some scenarios.
(9) 1024*600 resolution touch screen.

2
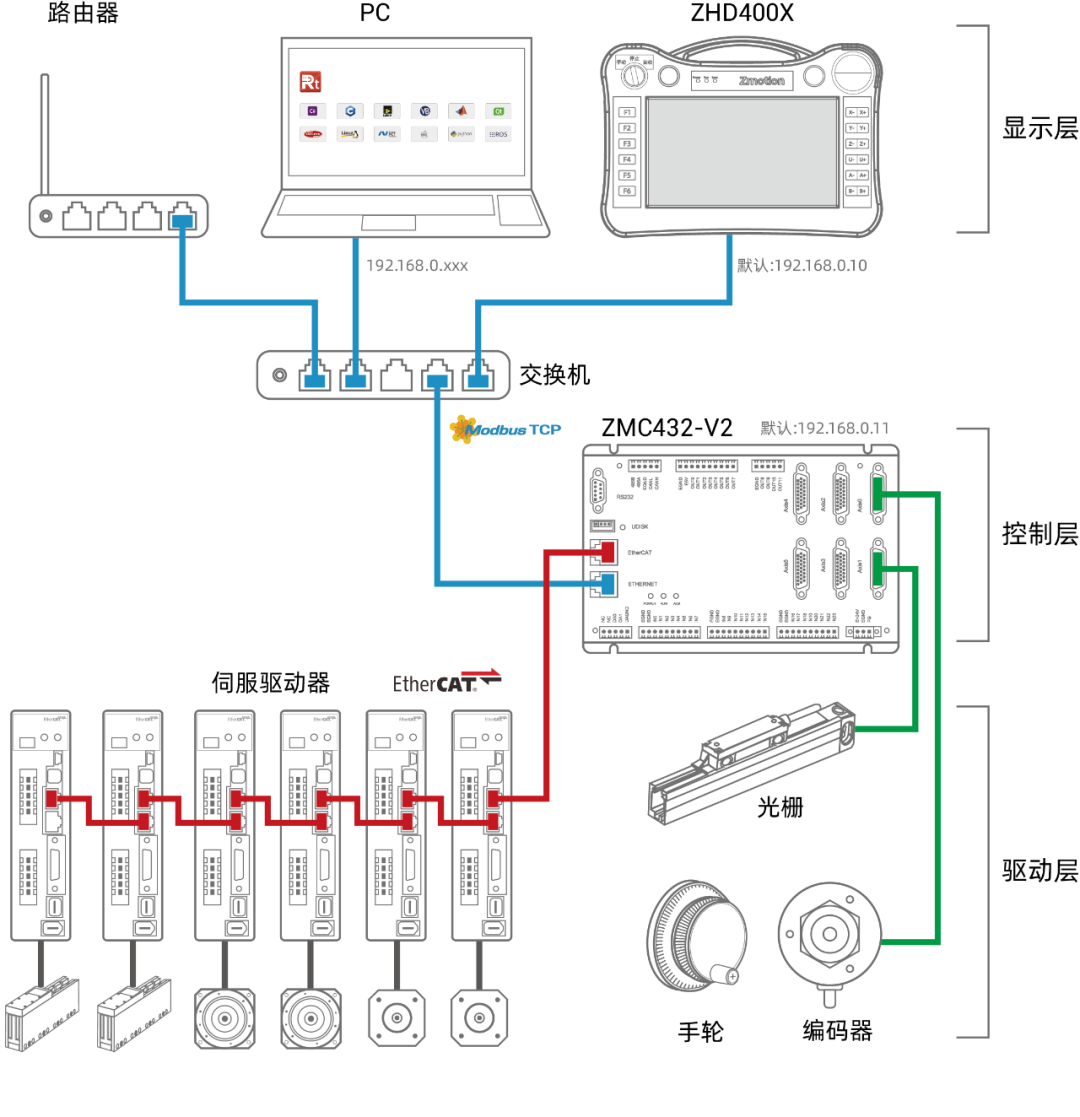
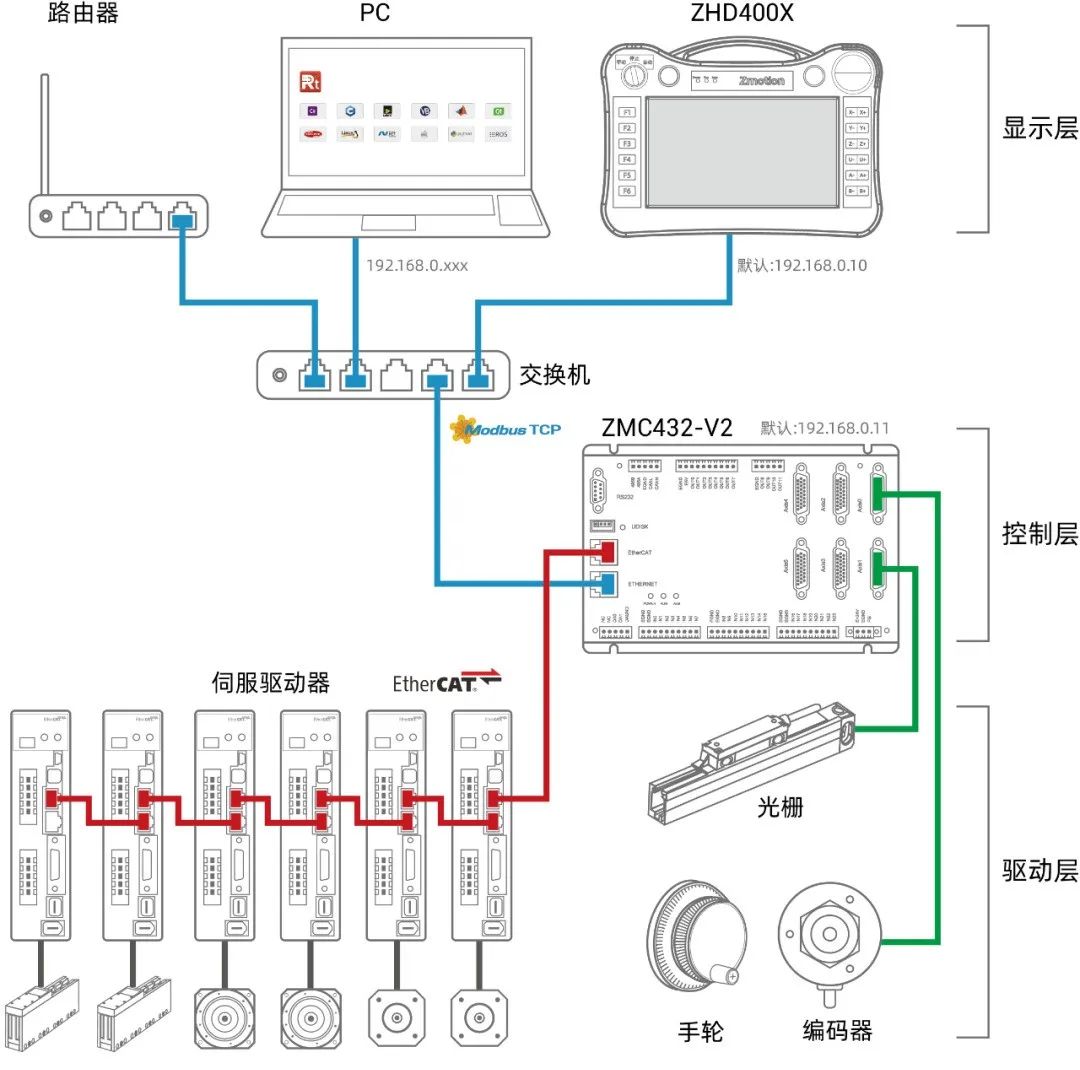
ZHD400X System Configuration
3
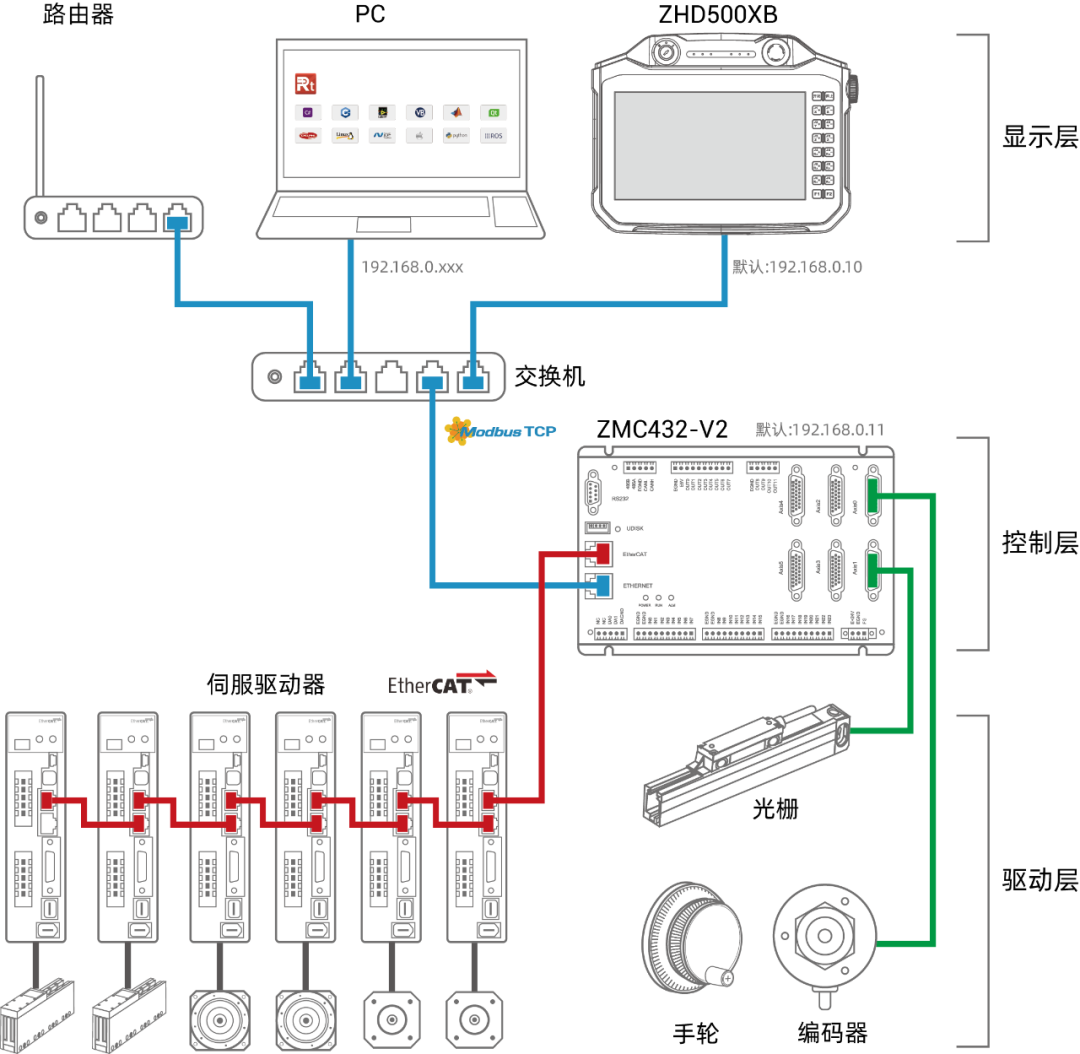
ZHD500XB System Configuration
4
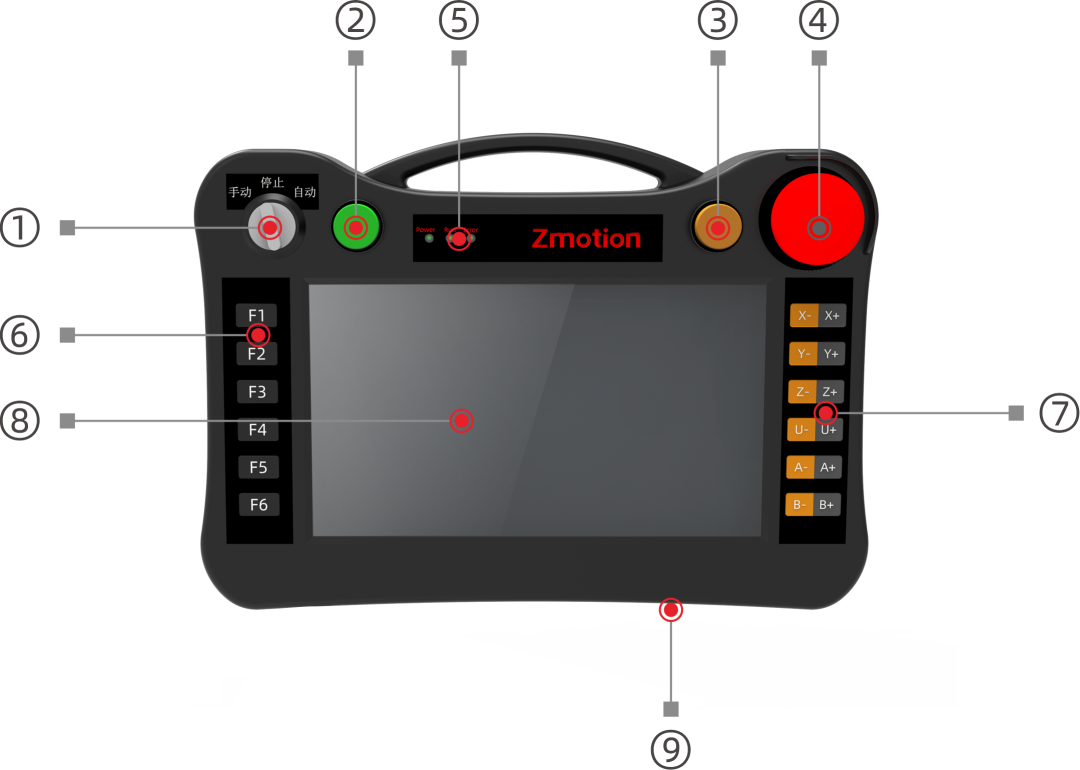
ZHD400X Interface Definition
|
Serial Number |
Interface |
Description |
|
① |
Mode Selection Switch |
Switch between manual/stop/automatic modes |
|
② |
Start Button |
Press this button to start the program |
|
③ |
Pause Button |
Press this button to pause the program |
|
④ |
Emergency Stop Button |
Press to stop axis movement, rotate the button clockwise to release emergency stop |
|
⑤ |
Status Light |
Power indicator light: lights up when power is on |
|
Run indicator light: lights up during normal operation |
||
|
Error warning light: lights up when there is an operational error |
||
|
⑥ |
Function Key |
Used in conjunction with physical button coding |
|
⑦ |
Axis Movement Key |
Used in conjunction with physical button coding |
|
⑧ |
Display Screen (Touch Screen) |
800*480 resolution touch screen |
|
⑨ |
USB Interface |
Reserved function |
5
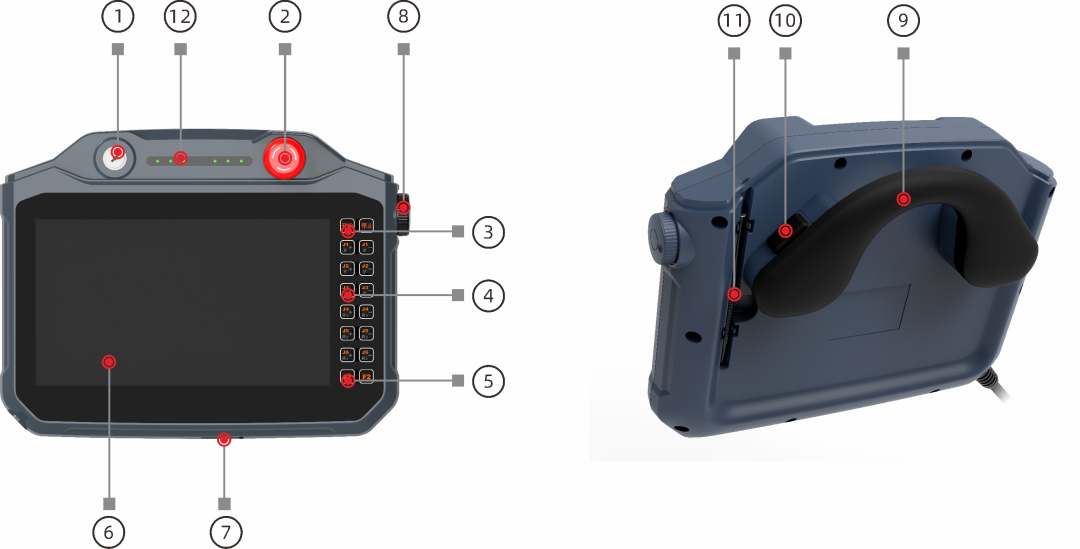
ZHD500XB Interface Definition
|
Serial Number |
Interface |
Description |
|
① |
Key Selection Switch |
Switch between Mode I/Mode 0/Mode II |
|
② |
Emergency Stop Button |
Press to stop axis movement, rotate the button clockwise to release emergency stop |
|
③ |
Start/Stop Button |
Press this button to run/pause the program |
|
④ |
Axis Movement Key |
Used in conjunction with physical button coding |
|
⑤ |
Function Key |
Used in conjunction with physical button coding |
|
⑥ |
Display Screen (Touch Screen) |
1024*600 resolution touch screen/10.1-inch TFT display |
|
⑦ |
USB Interface |
Reserved function |
|
⑧ |
Handwheel |
Rotary encoder, supports forward, reverse, and downward pressing |
|
⑨ |
Multi-grip Handle |
Grip according to operating habits |
|
⑩ |
Enable Key |
Not supported by default, needs evaluation for purchase |
|
⑪ |
Touch Pen |
Used for clicking the touch screen |
|
⑫ |
Status Light |
S1: Reserved, customizable |
|
S2: Reserved, customizable |
||
|
S3: Reserved, customizable |
||
|
Power indicator light: lights up when power is on |
||
|
Run indicator light: lights up during normal operation |
||
|
Error warning light: lights up when there is an operational error |
6
Physical Buttons
When a button is pressed, the teaching box automatically sends the physical button to the controller, and the controller program can detect the physical button. If virtual buttons are needed, a button conversion table must be used in the configuration. Specific usage can refer to the “RTHmi Programming Manual”.
1. Mode Selection Switch
|
ZHD400X |
ZHD500XB |
Button Coding |
|
Manual |
Mode I |
1 |
|
Stop |
Mode 0 |
No fixed key code |
|
Automatic |
Mode II |
2 |
2. Start (Begin)/Pause (Stop)/Emergency Stop Button
|
ZHD400X |
ZHD500XB |
Button Coding |
|
Start Button |
Start Button |
3 |
|
Pause Button |
Stop Button |
4 |
|
Emergency Stop Button |
Emergency Stop Button |
5 |
|
ZHD500XB |
Button Coding |
|
Handwheel |
8 |
4. Enable Key (Optional for ZHD500XB)
|
Key Position |
Function |
Switch Operation |
Switch Contact |
Button Coding |
|
1 |
Zero Position |
None |
Closed |
None |
|
2 |
Enable |
Press |
Open |
6 |
|
3 |
Disable (De-enable) |
Fully Pressed |
Closed |
7 |
5. Panel Buttons
|
ZHD400X |
ZHD500XB |
Button Coding |
|
F1-F6 |
F1-F2 |
Global Const key_f1 = 11 ‘Function Key F1 Global Const key_f2 = 12 ‘Function Key F2 Global Const key_f3 = 13 ‘Function Key F3 Global Const key_f4 = 14 ‘Function Key F4 Global Const key_f5 = 15 ‘Function Key F5 Global Const key_f6 = 16 ‘Function Key F6 |
|
X- X+ |
X- X+ |
Global Const key_X– = 24 ‘Axis Movement Key Global Const key_X+ = 25 ‘Axis Movement Key |
|
Y- Y+ |
Y- Y+ |
Global Const key_Y– = 34 ‘Axis Movement Key Global Const key_Y+ = 35 ‘Axis Movement Key |
|
Z- Z+ |
Z- Z+ |
Global Const key_Z– = 44 ‘Axis Movement Key Global Const key_Z+ = 45 ‘Axis Movement Key |
|
U- U+ |
Rx- Rx+ |
Global Const key_U–(Rx–)= 54 ‘Axis Movement Key Global Const key_U+(Rx+) = 55 ‘Axis Movement Key |
|
A- A+ |
Ry- Ry+ |
Global Const key_A–(Ry–)= 64 ‘Axis Movement Key Global Const key_A+(Ry+) = 65 ‘Axis Movement Key |
|
B- B+ |
Rz- Rz+ |
Global Const key_B–(Rz–)= 74 ‘Axis Movement Key Global Const key_B+(Rz+) = 75 ‘Axis Movement Key |
7
Usage Instructions
1. Power On
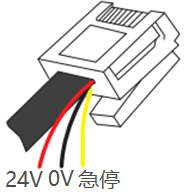
Connect the red wire from the crystal head of the network cable on one end of the ZHD400X/ZHD500XB to the positive DC24V, and the black wire to the negative DC24V.
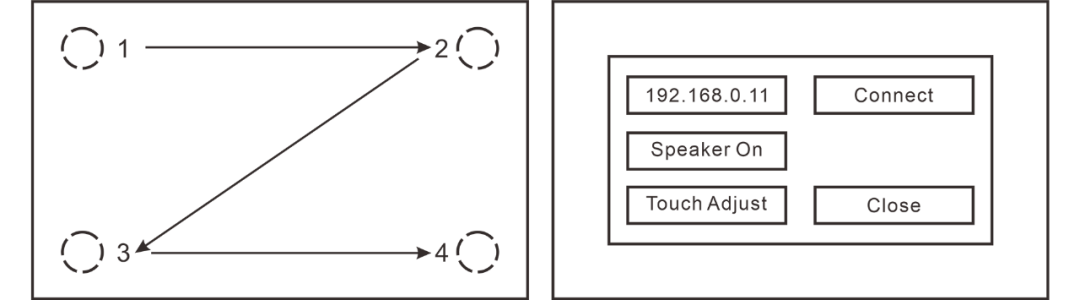
(1) Method 1: Continuously click in a “Z” shape from the upper left, upper right, lower left, lower right, upper left, upper right, lower left, lower right until the settings window pops up to wake the screen, as shown in the figure, and perform touch calibration (Touch Adjust), modify the controller IP, operate the speaker (Speaker On), etc.
(2) Method 2: After connecting to RTSys/ZDevelop, trigger calibration through the TOUCH_ADJUST command.
(3) Method 3: When not connected to RTSys/ZDevelop, press the 16 (F6) button on ZHD400X and continue to hold down the 11 (F1) button; for ZHD500XB, press the 11 (F1) button and continue to hold down the 12 (F2) button.
Follow the English instructions on the display screen (Touch crosshair to calibrate), track the “crosshair” icon on the screen and click in order to operate.
The following video is from the Motion Assistant
Teaching Video
1. Connect the controller to the PC using the network/serial port, use RTSys/ZDevelop software to download the program to ROM for power-off storage. After successful program download, the connection between the controller and PC can be disconnected.
ZHD400X Connection Method

ZHD500XB Connection Method
1. Use a switch to connect the teaching box, controller, and PC together (refer to “System Configuration Diagram”), ensuring all three are on the same subnet.
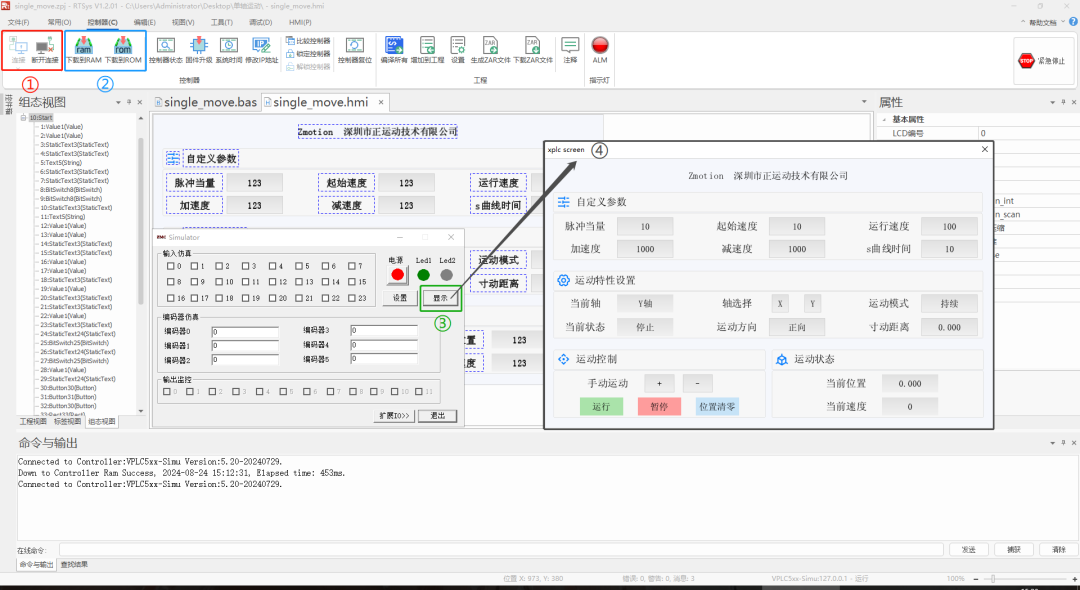
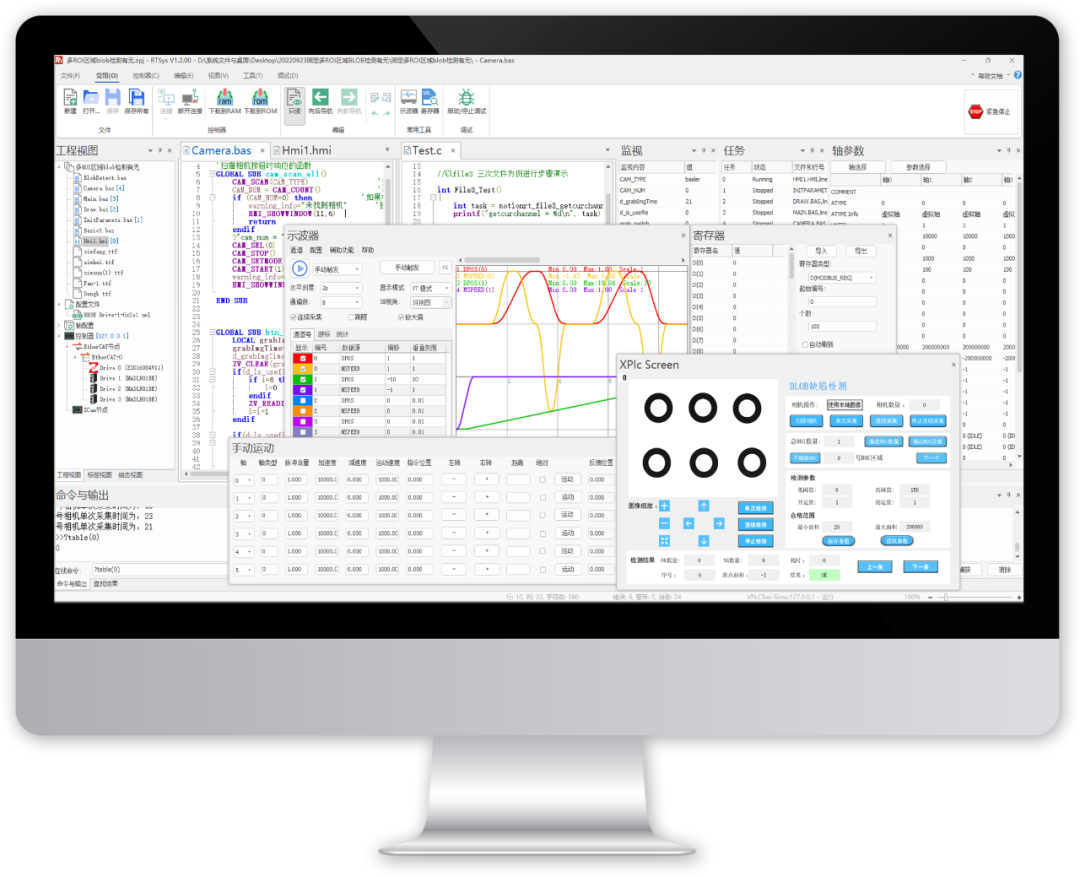
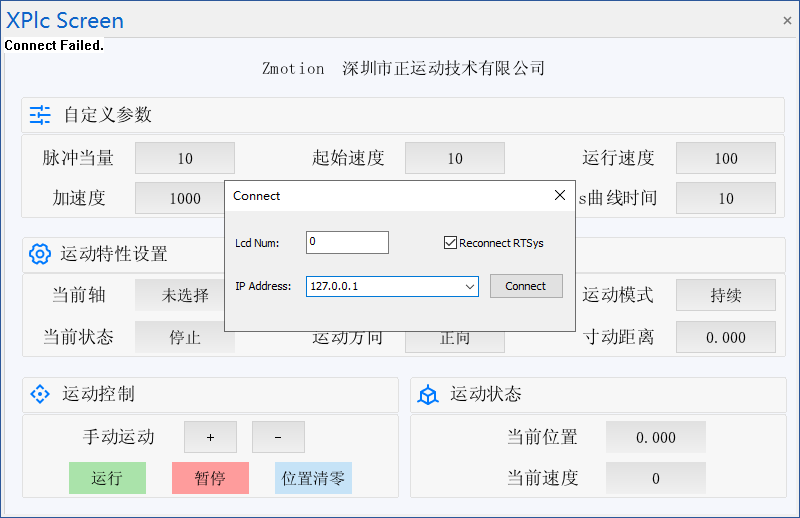
Method 2: After opening the project in RTSys and connecting to the simulator, download the HMI program to RAM/ROM, open Xplc Screen in “Tools”-“Plugins”, click anywhere to pop up the connection interface, select the simulator IP to connect, and once connected successfully, you can display and operate the HMI interface.
This time, the quick start guide for the EtherCAT motion controller with the handheld teaching pendant from Zhengyundong is shared here.Thank you for your attention.
About Zhengyundong Technology
Shenzhen Zhengyundong Technology Co., Ltd. was established in 2013, focusing on the research of pure domestic motion control technology and the development of general motion control software and hardware platforms and products. It is a national high-tech enterprise and a specialized and innovative “little giant” enterprise.
Zhengyundong Technology gathers outstanding talents from companies such as Huawei and ZTE. Striving for innovation, the company currently holds more than fifty intellectual properties including patents and copyrights. While adhering to independent innovation, it actively collaborates with major universities and research institutes to cooperate in the research of basic motion control technologies, making it one of the fastest-growing enterprises in the domestic industrial control field, and one of the few enterprises that fully master core motion control technologies and real-time industrial control software platform technologies.
Zhengyundong Technology has research and development branches in Zhongshan, Wuhan, and Shanghai, in addition to its main R&D center. To better serve customers, it has established two regional service centers in Suzhou and Dongguan, as well as sales and technical service agencies in Foshan, Xiamen, Qingdao, Xi’an, Wuhan, Chengdu, Tianjin, and Zhengzhou.
After years of development and application with numerous partners, Zhengyundong Technology’s products are widely used in fields such as 3C electronics, semiconductors, new energy, robotics, packaging and printing, textile and clothing, laser processing, medical and pharmaceutical, CNC machine tools, and traditional processing.