As a popular chip for high-performance ARM64 platforms, the RK3588 stands out with its powerful computing capabilities and rich interfaces, making it a preferred hardware choice for embedded development and desktop experiences. Meanwhile, Deepin 25, as a benchmark for domestic desktop systems, has gained wide recognition for its smooth interaction and comprehensive ecosystem. When these two meet, how can we achieve stable adaptation? Many developers face confusion during system construction, kernel configuration, and flashing stages.
To address this, Deepin community user @Kang Chengcheng has brought us this practical guide filled with valuable content, covering two construction schemes, a complete process, and multi-scenario flashing instructions. From basic configuration to practical implementation, this guide breaks down the entire process, allowing both beginners and experienced users to quickly get started with adapting RK3588 to Deepin 25.

1. Core Configuration
This project is primarily built on the following components.
-
Hardware Platform: RK3588
- Operating System: Deepin 25
- Kernel Version: 6.1.118 sourced from the Armbian repository: https://github.com/armbian/linux-rockchip
- GPU Driver: panthor
- Codec: Supported
- Multimedia Framework: gstreamer
- Project Repository: https://gitee.com/KDarkmoon/deepin-rockchip.git https://github.com/K2528358037/deepin-rockchip.git
- Reference Resources: Deepin root filesystem project: https://github.com/deepin-community/deepin-rootfs
- Auxiliary Tutorial: How to port Deepin 25 on Orange Pi 5Plus

2. System Construction Process (Two Schemes)
Construction Script Description
We provide a series of automated scripts to simplify the construction process:
-
mk-base-rootfs.sh: Build the base filesystem (without desktop environment and kernel);
-
mk-deepinv25-rootfs.sh: Install desktop environment, browser, kernel, and create user;
-
mk-rootfs-img.sh: Integrate overlay files and package to generate Deepin root filesystem image;
-
mk-deepinv25-image.sh: Combine kernel root filesystem and U-Boot to generate a flashable image.
1
Scheme One: Build Based on RK Official SDK
(Recommended for beginners, stronger compatibility)
Step 1: Environment Preparation
- Compile RK SDK to generate U-Boot, Recovery, and other basic components;
- Download Armbian 6.1 kernel to the SDK directory.
Step 2: Kernel Configuration
- Replace the SDK default kernel configuration with the content from deepin-config;
- Execute
<span><span>./build.sh kernel</span></span>to compile the kernel; - Execute
<span><span>./build.sh kernel-modules</span></span>to compile the kernel modules; - Copy the module files from the output/kernel-modules directory generated by the SDK to the overlay directory of the Deepin system.
Step 3: System Assembly
- Run
<span><span>mk-base-rootfs.sh</span></span>to obtain the base filesystem; - Run
<span><span>mk-deepinv25-rootfs.sh</span></span>to install the desktop, browser, and deb packages in the packages directory (you can add additional deb files to the packages directory); - Run
<span><span>mk-rootfs-img.sh</span></span>to generate the root filesystem image; - Link or copy the image to the SDK’s rockdev directory and rename it to
<span><span>rootfs.img.</span></span>
Step 4: Final Packaging
- Adjust partition size (optional): If the rootfs partition is insufficient, modify the rootfs partition configuration in the parameter.txt file;
- Execute
<span><span>./build.sh updateimg</span></span>to generate a standard RK partition format update.img, waiting for flashing.
2
Scheme Two: Build Armbian Style Partition Firmware
(Flexible adaptation to multiple storage media)
Step 1: Boot Configuration
- Refer to the “Deepin 25 Porting Tutorial on Orange Pi 5Plus” for compiling U-Boot and Kernel files;
- Modify the device tree name in
<span><span>boot/extlinux/extlinux.conf </span></span>to match your board’s name (currently default rk3588s-rock-5a.dtb), ensuring that the kernel and device tree information in the file matches the actual build files.
Step 2: System Installation
- Run
<span><span>mk-base-rootfs.sh</span></span>to obtain the base filesystem; - Prepare kernel deb packages: Copy the Kernel’s deb files to the packages directory (or install manually later using chroot);
- Run
<span><span>mk-deepinv25-rootfs.sh</span></span>to install the desktop and software packages.
Step 3: Image Installation
- Copy the compiled
<span><span>u-boot-rockchip.bin </span></span>to the same directory as<span><span>mk-deepinv25-image.sh </span></span>and rename it to<span><span>u-boot.bin;</span></span> - Run
<span><span>mk-deepinv25-image.sh</span></span>to automatically package and generate a flashable image.

3. Flashing Preparation (Including Tools + Steps)
Tool Preparation
-
Core Tools: rkdevtool (RK partition flashing), balenaetcher (USB/NVMe flashing);
-
Auxiliary: Board, data cable (USB-Type-C, etc.), storage media (emmc/USB/NVMe/TF card).
1
Scenario One: RK Partition Flashing
(Corresponding to the update.img generated in Scheme One)
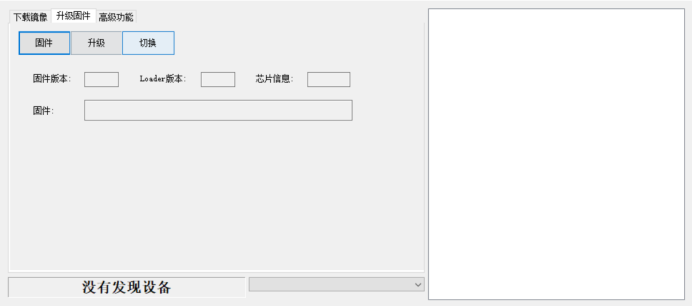
- Put the board into maskroom/loader mode (usually by long-pressing the Loader button on the board while connecting the data cable to the computer);
- Open rkdevtool, click the “Firmware” button, and load the generated update.img;
- Once the device connection is confirmed, click “Upgrade” and wait for the flashing to complete (do not disconnect during this process).
2
Scenario Two: Armbian Partition Firmware Flashing
(Corresponding to the img generated in Scheme Two)
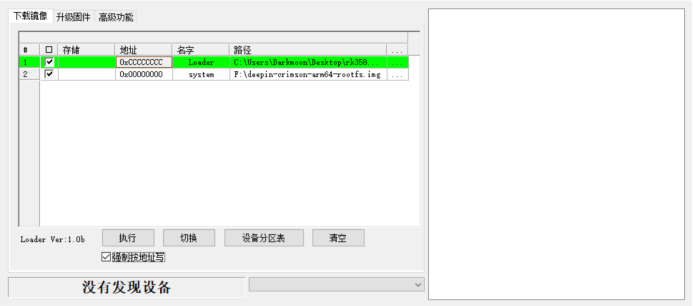
EMMC Flashing: Use RKDevTool or other compatible tools to write directly.
USB/NVME Boot:
- Create an img file with an offset of 32k using u-boot.bin, “dd if=./u-boot.bin of=./u-boot.img bs=32k seek=1 conv=notrunc”, and flash u-boot.img to emmc/flash/TF card (ensure the boot guide is normal);
- Open balenaetcher, select the img file generated in Scheme Two, and choose the target USB/NVMe drive;
- Click “Flash!” and wait for the flashing to complete.
Note: If the USB/NVMe does not boot, check if the USB/PCIe interface is correctly enabled in U-Boot.

By following the above steps, you can successfully run the Deepin 25 system on the RK3588 development board. Whether as a development platform or for daily use, this brings a complete Deepin desktop experience to the ARM64 platform.
Thanks again to Kang Chengcheng for the contribution and sharing! If you encounter any issues during the practice or have any suggestions for our tutorial, feel free to communicate with us in the Deepin community forum.
Project Repository: https://gitee.com/KDarkmoon/deepin-rockchip.git https://github.com/K2528358037/deepin-rockchip.git
Note: This technical solution is contributed by Deepin community developers, please indicate the source when reprinting.
Past Selections | Selection in the past