▲Clickthe blue text to set【Star】 for “Schlumberger Digital and Integrated Group” to avoid getting lost in information.
Following the instructions in the previous article “Modeling and Simulation of Asphaltene Fluid in Multiflash: Part Two – Model Definition”, after completing the model setup and fluid characterization, you can proceed to calibrate the asphaltene model using existing experimental data.
The Multiflash software calibrates the model in two phases as follows:
(1) Calibrate pseudo-component properties: Calibrate the properties of the pseudo-components using PVT experimental data;
(2) Calibrate asphaltene model parameters: Calibrate the asphaltene model parameters using asphaltene experimental data.
Various PVT experimental data can be used in Multiflash to calibrate pseudo-component properties, with a strong recommendation to perform bubble point pressure calibration, especially for light crude oil. If no experimental data is available, you may skip the calibration of pseudo-component properties, but the accuracy of subsequent calculations will be reduced.
In practice, always use the best available experimental data to calibrate the asphaltene model parameters. For detailed methods, refer to “Modeling and Simulation of Asphaltene Fluid in Multiflash: Part One – Model Preparation”. Even if you do not have asphaltene data, it is advisable not to use the default asphaltene model parameters; at the very least, calibrate the model parameters in conjunction with reservoir conditions.
When using the “Match Asphaltene Data” tool under the “Asphaltene” menu in conjunction with bubble point pressure for model calibration, Multiflash will use the same calibration process as in the “PVT Lab Tests” function. You can navigate to Asphaltene>Match Asphaltene Data, click on Bubble Point Tuning Options to adjust calibration parameters and fitting ranges.
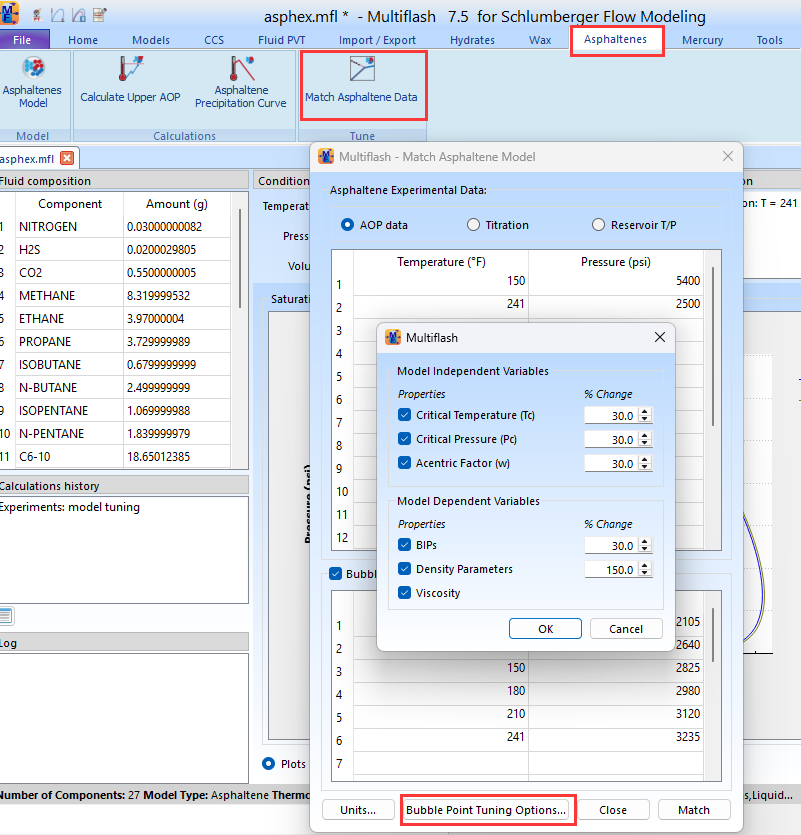
Based on the above premise, the steps for calibrating the asphaltene model are as follows:
1. Ensure that you have completed the fluid characterization process according to the instructions in “Modeling and Simulation of Asphaltene Fluid in Multiflash: Part Two – Model Definition”;
2. In the Asphaltenes function area, click on “Match Asphaltene Data”;
3. Input your experimental data, as shown in the example data table below:
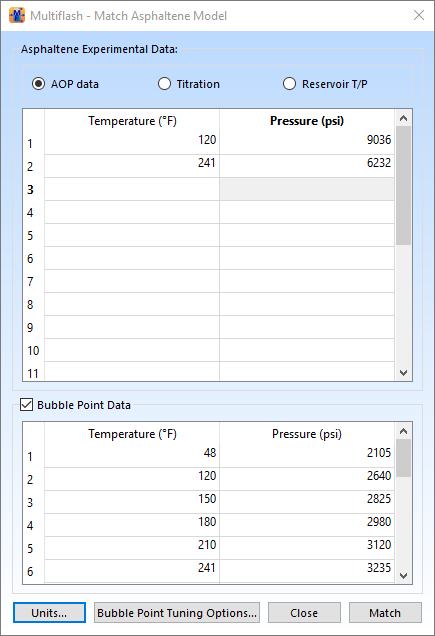
For optimal data, you can refer to the table below to obtain data in order of priority from the field or laboratory. If you have no experimental data,Multiflash will automatically calculate model data based on data in the database using relevant equations. Therefore, to ensure model accuracy, it is not recommended to perform model calculations without experimental data.
|
Available Data |
RecommendedActions |
|
Two or more asphaltene initial precipitation pressure (AOP) data; Bubble point data is recommended but not mandatory. |
1) In the AOP Data option, input all available AOP data points. 2) Check the Bubble point data (located in the Match Asphaltene Models interface) and input available bubble point data (if any). |
|
One asphaltene precipitation starting point (AOP) data. |
1) When the measured temperature of the asphaltene initial precipitation pressure (AOP) does not match the reservoir temperature, and experiments confirm that no asphaltene precipitation occurs during the pressure drop at reservoir temperature, the reservoir saturation pressure and reservoir temperature combination can be considered as a second AOP point for that fluid. Note: If experiments have confirmed the presence of asphaltene precipitation under reservoir conditions, this method is not applicable, and model calibration should be completed based on a single AOP data. 2) In the AOP Data option, input this AOP data point. 3) If no asphaltene precipitation occurs during the pressure drop at reservoir temperature, then in the AOP Data option, input the reservoir saturation pressure and reservoir temperature as the second AOP data point. 4) Check the Bubble point data and input available bubble point data (if any). |
|
Asphaltene starting point titration data. |
1) In the Titration option, input titration values: titration amount (note the units), solvent used, and experimental pressure and temperature conditions. Multiple starting point data can be input. 2) Check the Bubble point data and input available bubble point data (if any). |
|
Reservoir conditions. |
1) In the Reservoir T/P option, input reservoir temperature and reservoir pressure. 2) Check the Bubble point data and input available bubble point data (if any). 3) If only the reservoir temperature is available, input that temperature only; Multiflash will estimate the reservoir pressure based on the assumption that “the reservoir pressure is approximately 2.5 times the saturation pressure at reservoir temperature”. Note: Considering reservoir conditions as the basis for the asphaltene initial precipitation point (AOP) is proposed by de Boer et al. (SPE 24987, 1992), under the premise that asphaltenes are in a near-saturated state under reservoir conditions. |
4. Click on Match;
5. In the pop-up “Match Asphaltene Data” message box, click OK.
6.Model calibration results: Multiflash will display a phase diagram containing AOP, along with predicted results, fitted results, and input experimental data.
There are several points to note:
(1) If all the above asphaltene data is available, the priority is asphaltene AOP data, followed by titration data, and finally reservoir conditions;
(2) After matching, only the data set used for matching will be saved in the Multiflash file with the suffix .mfl;
(3) During the calibration process, the system will adjust the binary interaction parameters (BIP) between asphaltene and resin to reproduce the measured asphaltene starting point data. After calibration is complete, you can view these interactions in Models> View/Edit BIPs and save them in the MFL file for future analysis without needing to recalibrate.
— END —
Author: Chen Jiyun Editor: Yu Ting