1. What is a CPU Instruction Set
The CPU instruction set is a collection of basic instructions stored within the CPU, which defines all operations that the CPU can execute. It is a list of inherent hardware functionalities of the CPU and serves as a bridge for communication between software and hardware. It is important to note that different instruction set architectures (such as x86 and ARM) are incompatible with each other. By examining the instruction set extensions (flags) supported by the CPU, users can understand the advanced capabilities of their CPU, such as whether it can efficiently run games, professional software, or virtual machines. Operating systems and applications are optimized for specific instruction set extensions during development to maximize performance. If the CPU does not support a certain instruction set, it cannot benefit from performance optimizations based on that instruction set.
2. Types of Instruction Set Architectures
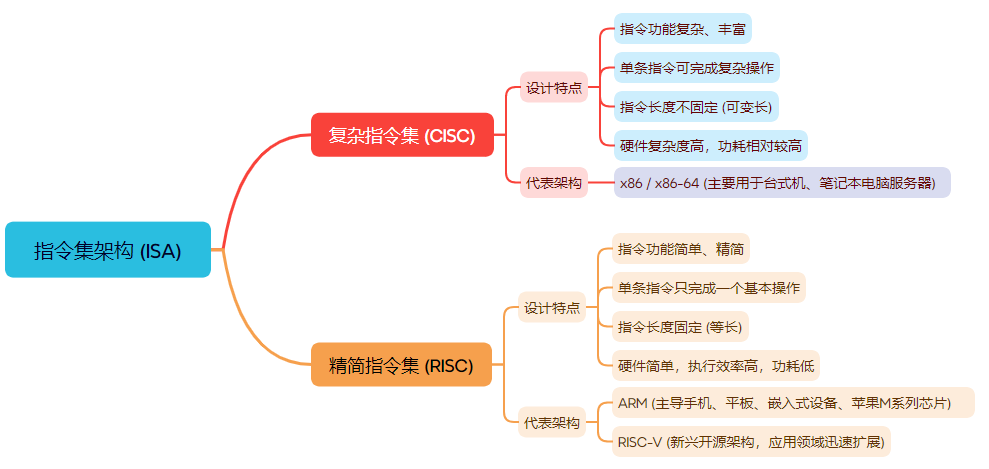
Instruction set architectures are mainly divided into two types based on the complexity, length, and execution method of instructions: Complex Instruction Set Computer (CISC) and Reduced Instruction Set Computer (RISC).
3. How to View CPU Instruction Set
The CPU instruction set is essentially a collection of functionalities supported by the processor, such as hardware virtualization support, which is part of the instruction set. This information is stored at the operating system level, and ordinary users can view it without special permissions.
3.1 Using the <span><span>/proc/cpuinfo</span></span> File
$ cat /proc/cpuinfo | grep flags
[root@rhel79-lab ~]# cat /proc/cpuinfo | grep flags
flags  : fpu vme de pse tsc msr pae mce cx8 apic sep mtrr pge mca cmov pat pse36 clflush mmx fxsr sse sse2 ss ht syscall nx pdpe1gb rdtscp lm constant_tsc arch_perfmon nopl xtopology tsc_reliable nonstop_tsc eagerfpu pni pclmulqdq ssse3 fma cx16 pcid sse4_1 sse4_2 x2apic movbe popcnt tsc_deadline_timer aes xsave avx f16c rdrand hypervisor lahf_lm abm 3dnowprefetch invpcid_single ssbd ibrs ibpb stibp ibrs_enhanced fsgsbase tsc_adjust bmi1 avx2 smep bmi2 invpcid rdseed adx smap clflushopt xsaveopt xsavec xgetbv1 arat md_clear spec_ctrl intel_stibp flush_l1d arch_capabilities
flags  : fpu vme de pse tsc msr pae mce cx8 apic sep mtrr pge mca cmov pat pse36 clflush mmx fxsr sse sse2 ss ht syscall nx pdpe1gb rdtscp lm constant_tsc arch_perfmon nopl xtopology tsc_reliable nonstop_tsc eagerfpu pni pclmulqdq ssse3 fma cx16 pcid sse4_1 sse4_2 x2apic movbe popcnt tsc_deadline_timer aes xsave avx f16c rdrand hypervisor lahf_lm abm 3dnowprefetch invpcid_single ssbd ibrs ibpb stibp ibrs_enhanced fsgsbase tsc_adjust bmi1 avx2 smep bmi2 invpcid rdseed adx smap clflushopt xsaveopt xsavec xgetbv1 arat md_clear spec_ctrl intel_stibp flush_l1d arch_capabilities
flags  : fpu vme de pse tsc msr pae mce cx8 apic sep mtrr pge mca cmov pat pse36 clflush mmx fxsr sse sse2 ss ht syscall nx pdpe1gb rdtscp lm constant_tsc arch_perfmon nopl xtopology tsc_reliable nonstop_tsc eagerfpu pni pclmulqdq ssse3 fma cx16 pcid sse4_1 sse4_2 x2apic movbe popcnt tsc_deadline_timer aes xsave avx f16c rdrand hypervisor lahf_lm abm 3dnowprefetch invpcid_single ssbd ibrs ibpb stibp ibrs_enhanced fsgsbase tsc_adjust bmi1 avx2 smep bmi2 invpcid rdseed adx smap clflushopt xsaveopt xsavec xgetbv1 arat md_clear spec_ctrl intel_stibp flush_l1d arch_capabilities
[root@rhel79-lab ~]#
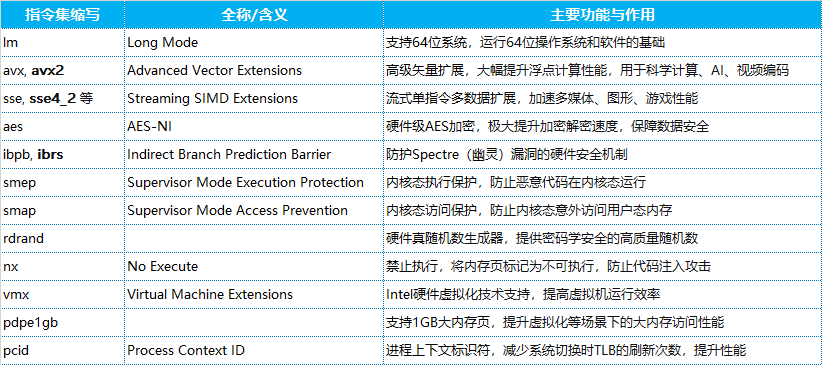
The above command filters the <span>flags</span> field to query instruction set-related information, which can be interpreted as shown in the table below:
3.2 Using the lscpu Command
$ lscpu
[root@rhel79-lab ~]# lscpu
Architecture:          x86_64
CPU op-mode(s):        32-bit, 64-bit
Byte Order:            Little Endian
CPU(s):                4
On-line CPU(s) list:   0-3
Thread(s) per core:    1
Core(s) per socket:    2
Socket(s):             2
NUMA node(s):          1
Vendor ID:             GenuineIntel
CPU family:            6
Model:                 165
Model name:            Intel(R) Core(TM) i3-10105 CPU @ 3.70GHz
Stepping:              3
CPU MHz:               3696.002
BogoMIPS:              7392.00
Hypervisor vendor:     VMware
Virtualization type:   full
L1d cache:             32K
L1i cache:             32K
L2 cache:              256K
L3 cache:              6144K
NUMA node0 CPU(s):     0-3
Flags:                 fpu vme de pse tsc msr pae mce cx8 apic sep mtrr pge mca cmov pat pse36 clflush mmx fxsr sse sse2 ss ht syscall nx pdpe1gb rdtscp lm constant_tsc arch_perfmon nopl xtopology tsc_reliable nonstop_tsc eagerfpu pni pclmulqdq ssse3 fma cx16 pcid sse4_1 sse4_2 x2apic movbe popcnt tsc_deadline_timer aes xsave avx f16c rdrand hypervisor lahf_lm abm 3dnowprefetch invpcid_single ssbd ibrs ibpb stibp ibrs_enhanced fsgsbase tsc_adjust bmi1 avx2 smep bmi2 invpcid rdseed adx smap clflushopt xsaveopt xsavec xgetbv1 arat md_clear spec_ctrl intel_stibp flush_l1d arch_capabilities
[root@rhel79-lab ~]#
The output includes architecture type (32/64-bit), core topology, and instruction set flags (as shown in the boxed section of the image above).
4. What is NUMA Functionality?
NUMA (Non-Uniform Memory Access), in Chinese, is called 非统一内存访问, which is a computer memory design architecture used for multiprocessor systems.
To understand NUMA, it is best to first understand the mainstream architecture that preceded it: UMA.
4.1 Traditional UMA Architecture
In UMA architecture, all processors (CPU cores) access memory through a single shared system bus. Regardless of how far a CPU core is physically from the memory, the speed of accessing any memory address is consistent. Therefore, UMA is also referred to as “uniform memory access” or “symmetric multiprocessing”.
- Advantages: Simple and easy to manage.
- Disadvantages: When the number of CPU cores is very high, all cores access memory through a single bus, which can become a significant performance bottleneck, leading to decreased system efficiency.
4.2 NUMA Architecture
To address the scalability issues of UMA, NUMA architecture was proposed. In a NUMA system:
- Nodes: The entire system is divided into multiple nodes. Each node contains a set of CPU cores and a segment of local memory allocated to those cores.
- Local Access: When a CPU core accesses its own node’s local memory, the speed is very fast, with low latency.
- Remote Access: When a CPU core needs to access memory from other nodes (referred to as remote memory), it must do so through interconnect links between nodes (such as AMD’s Infinity Fabric or Intel’s QPI/UPI), which is slower and has higher latency than accessing local memory.
This is the meaning of “non-uniform”: the memory access time depends on the location of the memory relative to the CPU core that issued the request.
5. Why is NUMA Important?
Performance: For applications optimized for NUMA systems (such as large databases, scientific computing, and virtualization platforms), properly managing memory allocation can significantly enhance performance. If most memory accesses by a program can be completed on the local node rather than frequently accessing remote memory, its execution speed will be much faster.
Scalability: The NUMA architecture allows manufacturers to build systems with a large number of CPU cores and massive memory without encountering the bus bottleneck issues of UMA. Modern multiprocessor servers and high-end workstation CPUs adopt NUMA architecture.
6. How to Configure NUMA Functionality Off
The configuration steps are as follows:
1) Check NUMA Support
[root@rhel79-lab ~]# numactl --hardware
available: 1 nodes (0)
node 0 cpus: 0 1 2 3
node 0 size: 7802 MB
node 0 free: 1213 MB
node distances:
node   0
  0:  10
[root@rhel79-lab ~]#
2) Kernel Parameter Configuration
Edit the <span>/etc/default/grub</span> file and add to <span>GRUB_CMDLINE_LINUX</span>:
numa=on/off # Enable or disable NUMA functionality
[root@rhel79-lab ~]# vim /etc/default/grub
[root@rhel79-lab ~]# cat /etc/default/grub
GRUB_TIMEOUT=5
GRUB_DISTRIBUTOR="$(sed 's, release .*$,,g' /etc/system-release)"
GRUB_DEFAULT=saved
GRUB_DISABLE_SUBMENU=true
GRUB_TERMINAL_OUTPUT="console"
GRUB_CMDLINE_LINUX="crashkernel=auto rhgb quiet numa=off"
GRUB_DISABLE_RECOVERY="true"
[root@rhel79-lab ~]#
3) Execute Compilation
[root@rhel79-lab ~]# grub2-mkconfig -o /etc/grub2.cfg
Generating grub configuration file ...
Found linux image: /boot/vmlinuz-3.10.0-1160.el7.x86_64
Found initrd image: /boot/initramfs-3.10.0-1160.el7.x86_64.img
Found linux image: /boot/vmlinuz-0-rescue-6eca8b554d4143f29cb82146485b9e76
Found initrd image: /boot/initramfs-0-rescue-6eca8b554d4143f29cb82146485b9e76.img
done
[root@rhel79-lab ~]#
Note: The specific operations may vary slightly between different Linux distributions.