1. Root User (Super Administrator)
Whether it is Windows, macOS, or Linux operating systems, a multi-user permission management system is employed. In the Linux system, the account with the highest privileges is called root (super administrator).
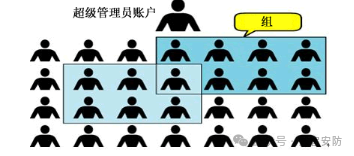
The root user has the highest level of system operation permissions, while ordinary users’ permissions are usually subject to multiple restrictions.
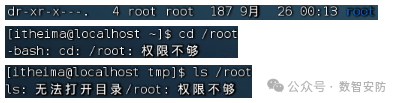
Operation example: Creating a folder in the root directory as an ordinary user

After switching to the root user, continue to try
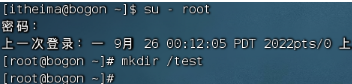
Ordinary users typically have full operational permissions within their `HOME` directory. However, once they exceed the `HOME` directory, in most system paths, ordinary users are only granted read and execute permissions, without modification permissions.
su and exit commands
As mentioned earlier, you can switch to the root account using the `su` command. This command comes from the English term “Switch User” and is used to switch user accounts.
Syntax format:
bash
su [-] [username]
Option description:
Indicates whether to load environment variables after switching users, it is recommended to add
– Parameter `username`: specifies the target user to switch to. If omitted, it defaults to switching to the root account
After switching users, you can return to the previous user account using the `exit` command, or use the shortcut key `Ctrl+D` to achieve the same operation.
Permission rules:
1. Ordinary users need to verify the target account password (e.g., switching to root)
2. The root user can switch to other accounts without password verification
sudo command
With the root password, you can switch to the root account using the `su` command to obtain the highest privileges. However, for system security reasons, it is not recommended to operate with the root account for an extended period to avoid potential system damage risks.
At this time, you can use the `sudo` command to grant temporary root execution permissions to ordinary commands.
Syntax format:
bash
sudo command
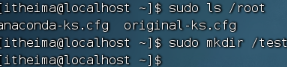
By adding the `sudo` prefix before the command to be executed, you can temporarily grant that command root permissions.
Note that not all users have `sudo` privileges; ordinary users need to be configured for sudo authentication.
Configuring ordinary user sudo authentication
Switch to the root account and execute the `visudo` command, which will automatically open the configuration file through the vi editor:
bash
/etc/sudoers
Add the corresponding configuration entry at the end of the file:

Where the last NOPASSWD:ALL indicates that using the sudo command does not require entering a password
Finally, save with wq (or press Ctrl + X to exit the editor)
Switch back to ordinary user
2. User and User Group Management
Users and User Groups
The Linux system supports the following functions:
Configuring multiple users
Configuring multiple user groups
Users can join multiple user groups
The Linux permission control is divided into two levels:
User-level permission control
User group-level permission control
For example, for a specific file, user permission control or user group permission control can be implemented.
Therefore, it is necessary to master the basic commands for user and user group management in Linux to lay the foundation for subsequent permission control learning.
User Group Management
The following commands must be executed with root user privileges.
Create user group: `groupadd [group_name]`
Delete user group: `groupdel [group_name]`
Example: Create a user group named itcast: `groupadd itcast`
User Management
The following commands must be executed with root user privileges.
Create user: `useradd [-g -d] [username]`
Option `-g`: specifies the user group to which the user belongs; if not specified, the system creates a group with the same name and automatically joins it; if specified, the group must already exist; if there is a group with the same name, `-g` must be used.
Option `-d`: specifies the user’s HOME directory path; if not specified, the default path is `/home/[username]`.
Delete user: `userdel [-r] [username]`
Option `-r`: deletes the user’s HOME directory; if not used, the directory is retained.
View the user’s group: `id [username]`
Parameter: The username can be omitted; if omitted, it views the current user’s information.
Modify the user’s group: `usermod -aG [group] [username]`
To add the specified user to the specified user group.
getent command
Using the `getent` command, you can view system user information.
Syntax: `getent passwd`
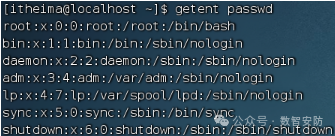

There are 7 pieces of information, which are: Username: Password(x): User ID: Group ID: Description (useless): HOME directory: Execution terminal (default bash)
Using the getent command, you can also see which user groups are currently in the system: Syntax: getent group
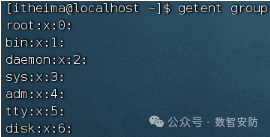

Contains 3 pieces of information, group name: group authentication (displayed as x): group ID
3. Viewing Permission Control
Understanding Permission Information
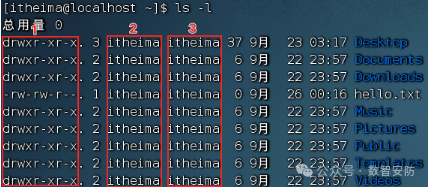
By using ls -l, you can view the content in a list format and display permission details
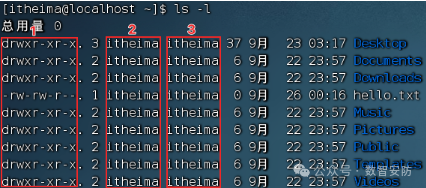
1, indicates the permission control information of files and folders;
2, indicates the user to whom the file or folder belongs;
3, indicates the user group to which the file or folder belongs.
Let’s analyze the first number, permission details The permission details are divided into 10 slots
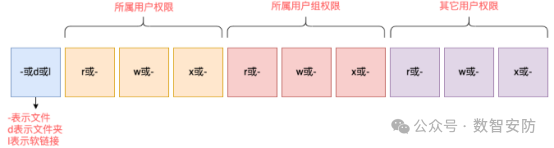
For example: drwxr-xr-x, indicates:
This is a folder, the first letter d indicates
The permissions of the owning user (upper right corner figure number 2) are: has r, has w, has x, rwx
The permissions of the owning user group (upper right corner figure number 3) are: has r, no w, has x, r-x (- indicates no permission)
The permissions of other users are: has r, no w, has x, r-x
rwx
So, what does rwx represent?
r represents read permission
w represents write permission
x represents execute permission
For files and folders, the meaning of rwx has slight differences:
r, for files can view file content
For folders, can view folder content, such as ls command
w, for files means can modify this file
For folders, can create, delete, rename, etc. within the folder
x, for files means can execute the file as a program
For folders, means can change the working directory to this folder, i.e., cd into
Case
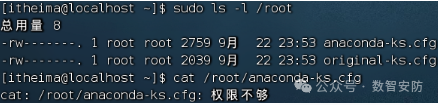
The current user itheima, not the file owner and user group, locks the last three permissions as:
No read permission
4. Modifying Permission Control – chmod, chown
1. chmod
We can use the chmod command to modify the permission information of files and folders.
Note that only the owning user of the file or folder or the root user can modify it.
Syntax: chmod [R] permissions file or folder
Options: -R, apply the same operation to all contents within the folder
Example:
chmod u=rwx,g=rx,o=x hello.txt, changes the file permissions to: rwxr-x–x
Where: u represents user permissions, g represents group permissions, o represents other user permissions
chmod -R u=rwx,g=rx,o=x test, sets the permissions of the folder test and all contents within it to: rwxr-x–x
In addition, there is a shorthand: chmod 751 hello.txt
Changes the permissions of hello.txt to 751
Permission numeric codes
Permissions can be represented by 3 digits, the first digit represents user permissions, the second represents group permissions, the third represents other user permissions.
The details of the numbers are as follows: r is 4, w is 2, x is 1, can be:
0: No permissions, i.e., —
1: Only x permission, i.e., –x
2: Only w permission, i.e., -w-
3: Has w and x permissions, i.e., -wx
4: Only r permission, i.e., r–
5: Has r and x permissions, i.e., r-x
6: Has r and w permissions, i.e., rw-
7: Has all permissions, i.e., rwx
So 751 represents: rwx(7) r-x(5) –x(1)
Case
Change the permissions of hello.txt to: r-x–xr-x, the numeric code is:
chmod 515 hello.txt
Change the permissions of hello.txt to: -wx-w-rw-, the numeric code is:
chmod 326 hello.txt
The permissions represented by numbers 123 are:
–x-w–wx
2. chown
Using the chown command, you can modify the owning user and user group of files and folders
Ordinary users cannot modify the ownership of files or groups belonging to other users, so this command is only applicable to root users.
Syntax: chown [-R] [user] [:] [user group] file and folder
Options, -R, applies the same rules to all contents within the folder, similar to chmod
Options, user, modifies the owning user
Options, user group, modifies the owning user group
: is used to separate user and user group
Example:
chown root hello.txt, changes the owning user of hello.txt to root
chown :root hello.txt, changes the owning user group of hello.txt to root
chown root:itheima hello.txt, changes the owning user of hello.txt to root, and the user group to itheima
chown -R root test, changes the owning user of the folder test to root and applies the same rules to all contents within the folder
————–END——————-
This article is complete
Follow the QR code below for more technical information
Statement: Quality content is valuable for sharing with everyone. Some content is sourced from the internet. If there is any infringement, please inform us, and we will handle it promptly. Cooperation and communication: 18560233830