

How to use Conda installed R in RStudio on a Linux server with multiple users

Note:
All processes require administrator privileges.

01
First, install RStudio
1. Check the server system version to confirm which version of RStudio to install. Choosing the wrong version may lead to issues (at least that’s what I found).
cat /etc/redhat-releaseCentOS Linux release 7.9.2009 (Core)CentOS Linux 7.9.2009 (Core) is built from the source code of Red Hat Enterprise Linux 7.9. It is the last update version of the CentOS 7 series. I don’t understand why our group’s server is still on CentOS 7 after 25 years, but it’s fine as long as it works.
2. Install R (RStudio dependency), this is mandatory. I didn’t perform this process because R is already installed on the server. If you haven’t installed it, make sure to do so first.
which R↵/usr/local/bin/R # If installed, it will return the path; if not, install it.# Install EPEL repository (provides R packages)#sudo yum install -y epel-release# Install R (latest stable version under CentOS 7, version may vary with EPEL updates)#sudo yum install -y R# Verify R installation success (if version number is displayed, it’s normal)#R –version3. Download the RPM package for RStudio, find the version link from the official website.
If your server is Red Hat 8 or 9, you can get it from
https://posit.co/download/rstudio-server/
There are even installation steps for R.
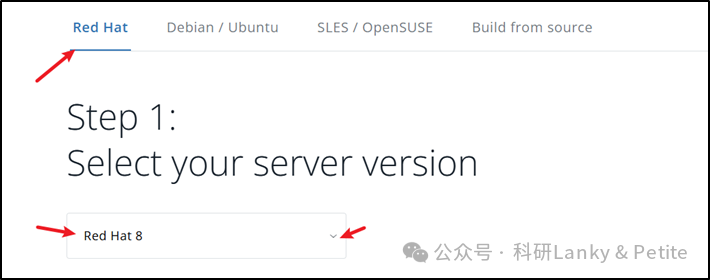
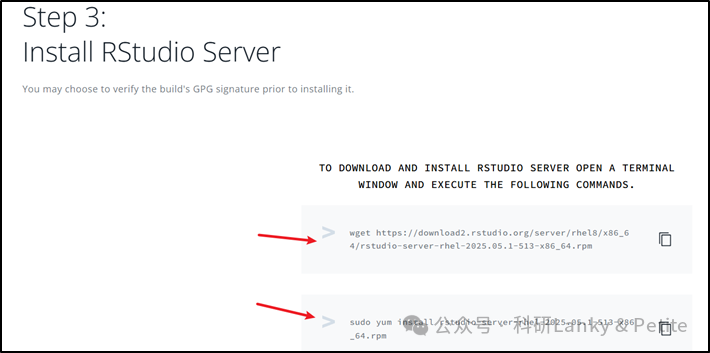
If your server is also CentOS 7, then get it from
https://dailies.rstudio.com/rstudio/
Versions after 2023.6 are available there.
wget https://s3.amazonaws.com/rstudio-ide-build/electron/centos7/x86_64/rstudio-2023.06.2-561-x86_64.rpm # Or another version, I don’t know which to choose; this file can be downloaded to any directory without affecting the installation location.sudo yum install rstudio-2023.06.2-561-x86_64.rpmDuring installation, I encountered an error due to a missing dependency library, and I resolved it cautiously as I was worried about damaging the server.
/usr/lib/rstudio-server/bin/rserver: error while loading shared libraries: libssl.so.1.1: cannot open shared object file: No such file or directory
RStudio Server version 2023.09.1 depends on the OpenSSL 1.1 library file (libssl.so.1.1). Why RStudio Server 2023.09.1? Because I initially tried this version and encountered this error. After resolving the error, I still couldn’t install and use it smoothly, so I switched to a more compatible version. I’m not sure if other versions will have this error, but I recorded the resolution process.
The default OpenSSL version provided by CentOS 7 is 1.0.2, and some PHP extensions or other software depend on version 1.1 or higher. If it’s too low, it will report the error libssl.so.1.1: cannot open shared object file: No such file or directory. There are also errors when executing openssl version, which are consistent with the above, due to the incorrect location of the OpenSSL library or the absence of version 1.1 or higher.
Step 1: Compile and install OpenSSL 1.1.x (keep the original steps but correct the configuration)
# Download and extract (using 1.1.1g as an example, it is recommended to use the latest stable version 1.1.1w)wget https://github.com/openssl/openssl/releases/download/OpenSSL_1_1_1w/openssl-1.1.1w.tar.gztar -xvf openssl-1.1.1w.tar.gz# Enter the download directorycd /home/LLL/software/RStudio# Extract (will generate source directory openssl-1.1.1w)tar -xvf openssl-1.1.1w.tar.gzStep 2: Enter the source directory and configure the installation path
# Enter the extracted source directorycd openssl-1.1.1w# Configure installation path (specify as /usr/local/openssl to avoid interfering with the system default OpenSSL) ./config shared --prefix=/usr/local/openssl --openssldir=/usr/local/opensslStep 3: Compile and install (requires sudo privileges)
# Compile (-j4 means using 4 cores for acceleration, can be adjusted according to the server CPU core count)make -j4# Install (requires administrator privileges, copies files to /usr/local/openssl)sudo make installStep 4: Configure dynamic link library (resolve system recognition issues)# Create configuration file to inform the system of the OpenSSL library locationsudo tee /etc/ld.so.conf.d/openssl-1.1.1.conf <<EOF/usr/local/openssl/lib64EOF# Refresh the system dynamic link cache to make the newly installed libssl.so.1.1 effectivesudo ldconfigOr
1. Create a configuration file (with root privileges):
sudo vim /etc/ld.so.conf.d/openssl-1.1.conf
2. Add the path in the file (only one line):
/usr/local/openssl/lib
Save and exit (in vim, press Esc, type :wq and hit Enter).
Step 3: Update the dynamic linker cache
Let the system recognize the newly added path:
sudo ldconfig # Update system library cache
After completing the above, try installing RStudio again.
sudo LD_LIBRARY_PATH=/usr/local/openssl/lib64 rpm -ivh rstudio-2023.06.2-561-x86_64.rpm
4. Configure RStudio Server
sudo vi /etc/rstudio/rserver.conf # Create and open this file, add contentwww-port=8787 or some other number like 8989
rsession-which-r= /usr/local/bin/R # This path is obtained from the previous which R
# vi or vim editing usage: press i to enter insert mode, you can input, delete, or paste content, then press ESC to exit input mode, then :wq to save and exit
5. Start RStudio Server and check the service status
# Start RStudio Server servicesudo systemctl start rstudio-server # Set to start on boot (optional)sudo systemctl enable rstudio-server # Check service status (if it shows "active (running)" then it’s successful)sudo systemctl status rstudio-serversudo vi /etc/rstudio/rserver.conf6. Then enter http://IP address:8787/ in the browser to access the RStudio login page, indicating successful installation. You can try logging in with your username and password.
###
Next, let’s talk about the R issue in conda. Many complex R packages are difficult to install via install.packages, but it’s easy with conda or mamba. Therefore, my idea is to install conda on the system, create an environment to install R, and then set that path as the specified R path in RStudio.
02
Installing with conda/mamba
1. First, check if conda or mamba is already installed on the system
which conda # Check the path of the conda executablewhich mamba # Check the path of the mamba executableAfter obtaining the path, check if it includes the user’s personal directory (e.g., /home/lipeiting/, which is your username directory) or the system global directory (e.g., /opt/, /usr/local/, /shared/, etc.). If the system is not installed, then install it.
2. Install conda
Mamba is an “upgraded version” of conda, rewritten in C++, solving the slow dependency resolution problem of conda, and the commands are fully compatible (you can use mamba install instead of conda install). It is recommended to install Mambaforge directly (which includes mamba and a minimal distribution of conda, pre-installed with the conda-forge channel, suitable for bioinformatics scenarios).
# Download Mambaforge (x86_64 architecture Linux version, conda-forge channel, includes mamba)
sudo wget https://github.com/conda-forge/miniforge/releases/download/25.3.0-1/Miniforge3-25.3.0-1-Linux-x86_64.sh# Run the installation script, specify installation path /opt/mambaforge, accept the agreement (-b -p)sudo bash /tmp/mambaforge.sh -b -p /opt/mambaforge # Set installation directory permissions (admin can read and write, other users can only read, to avoid ordinary users tampering)sudo chmod -R 755 /opt/mambaforge # 755: root can read, write, execute; other users can only read, execute3. Global initialization (recommended, multi-user sharing of mamba)
Let all users automatically load mamba environment variables upon login (through scripts in the /etc/profile.d/ directory, system-level configuration):
# Create global environment variable scriptsudo nano /etc/profile.d/mamba.sh # Write the following content (specify the bin directory path of mambaforge)export PATH="/opt/mambaforge/bin:$PATH" # Grant execution permissionssudo chmod +x /etc/profile.d/mamba.sh # Take effect immediately (current terminal), other users need to log in againsource /etc/profile.d/mamba.sh Execute the following command, if the version number is output, the installation is successful:mamba –version4. Key configurations after installation (must be done by the administrator)
To avoid permission issues or channel priority issues during subsequent use, the administrator needs to configure mamba’s global settings (effective for all users):
# Set conda-forge as the default channel (most complete for bioinformatics packages)sudo mamba config --set channel_priority strict # Strict channel priority to avoid dependency conflictssudo mamba config --add channels conda-forge # Add conda-forge channel (main source for bioinformatics packages)sudo mamba config --add channels bioconda # Add bioconda channel (for bioinformatics specific packages)03
Installing R under conda
1. Install R
sudo mamba create -y -p /opt/conda/envs/shared_r_pkgs \ -c conda-forge \ r-base=4.2.3# Activate the environment
mamba activate /opt/conda/envs/shared_r_pkgs2. Install R packages via mamba
First, confirm the ownership and permission settings of the directory (requires sudo privileges):
sudo ls -ld /opt/conda/envs/shared_r_pkgs# It may only belong to the root group user
If the environment needs to be shared among multiple users (e.g., team collaboration), it is recommended to create a shared user group and grant group write permissions:
# Create shared group (e.g., conda-users, only execute once)sudo groupadd conda-users# Add the current user to the shared groupsudo usermod -aG conda-users xxxxx # Any user who needs to use RStudio# Change the ownership of the environment directory to the shared group and grant group write permissionssudo chown -R :conda-users /opt/conda/envs/shared_r_pkgs # Only change the groupsudo chmod -R g+w /opt/conda/envs/shared_r_pkgs # Grant write permissions to the groupInstall R packages
sudo mamba install -y -c conda-forge r-devtools=2.4.5 # Used for subsequent verification of whether RStudio is correctly configured with conda's R04
Replace the R path in RStudio
1. Edit the configuration file:
Open the /etc/rstudio/rserver.conf file with sudo privileges. This file may not exist by default, and you may need to create it.
sudo vi /etc/rstudio/rserver.confSpecify the path of R:
Add the following line in the file. The key is to use the rsession-which-r parameter to point to the absolute path of the R executable in your Conda environment.
# Server Configuration Filersession-which-r=/opt/conda/envs/shared_r_pkgs/bin/Rrsession-ld-library-path=/opt/conda/envs/shared_r_pkgs/libwww-port=8787If the file has other configurations, just add this line.
Save and exit the editor, as previously described for using vi.
2. Restart RStudio Server:
The most reliable way to make the configuration effective is to restart the entire RStudio Server service.
sudo systemctl restart rstudio-server
Or, depending on your system, it may also be:
sudo service rstudio-server restart
3. Verify the solution
After completing the above steps, please run the following commands in RStudio to verify:
# Should return the path of the Conda environmentR.home()# Should be able to load installed packageslibrary(devtools)# Check R versionversion4. Error when installing R packages with install.packages
Warning in install.packages : ‘lib=”/opt/conda/envs/shared_r_pkgs/lib/R/library”‘ is not writable. Would you like to use a personal library instead? (yes/No/cancel) yes. Do you want to create a user-defined library ‘NA’ to install packages? (yes/No/cancel) yes. Error in install.packages : Unable to create ‘NA’
The error message indicates:
The shared library directory /opt/conda/envs/shared_r_pkgs/lib/R/library is not writable for the current user.
When trying to use a personal library, R cannot determine or create the personal library path.
Solution
# 1. Change the ownership of the library directory to the conda-users groupsudo chown -R :conda-users /opt/conda/envs/shared_r_pkgs/lib/R/library# Set group write permissionssudo chmod -R g+w /opt/conda/envs/shared_r_pkgs/lib/R/library# Set setgid bit to ensure new files inherit group permissionssudo chmod g+s /opt/conda/envs/shared_r_pkgs/lib/R/library# 4. Ensure all users who need to install packages are in the conda-users group# Add users to the group (replace username with the actual username)sudo usermod -a -G conda-users usernameSummary
Now members of the conda-users group (if someone wants to use RStudio, add them to this group using the above command) can use RStudio normally and install R packages through install.packages in RStudio, but only administrators can install R packages through sudo mamba install -y -c conda-forge r-devtools=2.4.5. If a user encounters difficulties installing R packages with install.packages, they can request the administrator to install them via mamba using sudo /opt/conda/envs/shared_r_pkgs/bin/mamba install -c conda-forge -n shared_r_pkgs r-package-name.
This article is for academic exchange and reference only, and does not represent the position of any institution. It is not independently created by me; most of the content is organized from multiple inquiries to AI and searching for others’ articles. My level is limited, and if there are any inappropriate or infringing parts, please contact the editor (WeChat ID: _liyeya) for deletion or modification. Thank you for your understanding and support!