1 The Development Prospects of IT Automation
1.1 The Origin of IT Automation
Currently, many enterprises have transitioned their IT operations from manual management to computer management. However, many of these enterprises are still in a “semi-automated” operational state. This is because their IT operations still require intervention from IT personnel only after IT failures occur. The main issues are as follows:
1.IT operations personnel are too passive, leading to low efficiency.
2.Lack of a complete and efficient IT operations mechanism.
3.Lack of effective IT operations technical tools.
IT automation was created to address the low efficiency of IT operations in most enterprises. Moreover, IT automation is a key point for optimizing IT and its digital transformation. In today’s rapidly changing IT environment, there is a need to scale at unprecedented speeds, which requires IT automation.
IT automation involves using specific software to create reusable instructions and processes, thereby replacing or reducing human interaction with IT systems. The automation software operates within the constraints of these instructions, tools, and frameworks, allowing tasks to be executed with minimal human intervention.
1.2 Applications of IT Automation
In theory, any IT task can achieve a certain degree of automation. Therefore, automation can be integrated and applied to various aspects, such as network automation, infrastructure, cloud provisioning, standard operating environments, and application deployment and configuration management, among others.
The functionality and applications of automation can further extend to specific technologies (such as containers), methodologies (such as DevOps), and broader fields (such as cloud, edge computing, security, testing, and monitoring/alerting).
1.3 Trends in IT Automation Development
The future development of automation will certainly see further improvements, with more powerful intelligent capabilities being built into these automation systems. They will expand to include more components of the IT software stack. Imagine automating bare-metal recovery, middleware, software applications, security, updates, notifications, failover, predictive analytics, and decision-making without direct supervision and excessive human interaction.
In enterprises, when your IT department staff are on break, the automation system can automatically detect and report security risks, patch, test, and deploy. Your system can self-repair, gather relevant information to investigate potential attacks and their sources, and notify relevant personnel in a timely manner, all without consuming operational time. This is good news for everyone, and some of these functionalities have already become a reality.
1.4 Advantages of IT Automation
In the era of information explosion, enterprises face a large number of alert messages, such as those from databases, network traffic, servers, etc. IT operations personnel cannot immediately determine the root cause of problems among the numerous alerts, which requires them to make configuration changes and checks one by one. The workload is enormous when the number of devices is large, and such changes and checks often occur daily in IT operations, consuming a lot of operational resources. Therefore, transitioning from manual operations to a certain degree of automated management is an important trend in IT operations development.
Firstly, IT operations automation can improve the controllability of processes, allowing for personalized processes based on business needs, leading to a profound analysis and understanding of enterprise processes, thereby improving and optimizing related processes.
Secondly, IT automation can enhance transparency, enabling users to clearly see the operational status of all process nodes, effectively improving the business assurance capabilities of enterprises.
Lastly, after using automated monitoring in operations systems, automated monitoring tools reduce the workload of IT operations personnel and represent a cost-saving measure.
2 Introduction to Red Hat Ansible
2.1 Introduction to Ansible
IT automation has many uses or use cases. When you start combining various use cases, you can ultimately realize the advantages of IT automation. Or further integrate them into a single system. This is where the Red Hat Ansible automation platform comes into play.
The Red Hat Ansible automation platform is software launched by Red Hat for automating provisioning, configuration, management, and deployment. Ansible utilizes playbooks, which are Ansible’s automation instructions and language, to perform these activities. Playbooks can describe the strategies or steps you want to implement in a general IT process.
Ansible is simple, convenient, easy to learn, and powerful compared to other tools. Ansible has configuration files, supports multithreading, and does not require scripting.
2.2 Basic Architecture of Ansible
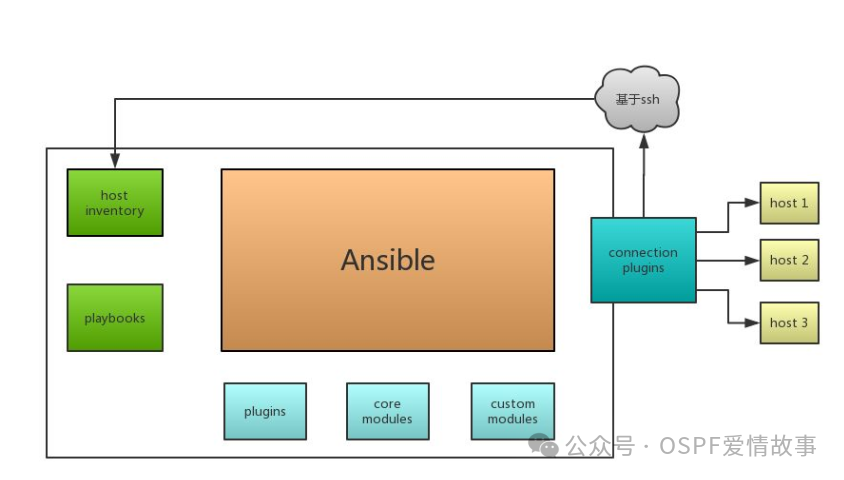
Figure 2.2-1 Basic Structure of Ansible
·Core: ansible
·Core Modules: These are the modules that come with Ansible, connecting to hosts to perform operations.
·Custom Modules: If the core modules are insufficient to complete a certain function, custom modules can be added.
·Plugins: Complements the functionality of modules.
·Playbooks: Ansible’s task configuration files, defining multiple tasks within a playbook, executed automatically by Ansible.
·Connector Plugins: Ansible connects to various hosts based on connector plugins. Although Ansible uses SSH to connect to hosts, it also supports other connection methods, hence the need for connector plugins.
·Host Inventory: Defines the hosts managed by Ansible.
2.3 Applications of Ansible
·Automated deployment applications.
·Automated configuration management.
·Automated continuous delivery.
·Automated management of AWS cloud servers.
2.4 Advantages of Ansible
1.Ansible integrates the advantages of many established operations tools; essentially, it can achieve the functionalities of pubbet and saltstack.
2.Lightweight, no need to install agents on clients; updates only need to be performed once on the control machine.
3.Ansible is a lightweight tool that does not require starting services; it is simply a tool that can easily achieve distributed scaling.
4.No need to install a separate client; it only utilizes the existing SSHD service (protocol); no server is required.
5.Ansible has a rich set of functional modules, supporting various automation scenarios.
6.Since it is written in Python, maintenance is simpler.
3 Setting Up a Red Hat Ansible Enterprise Environment
3.1 Learning Requirements
This experiment requires mastering basic Linux commands, as well as some configuration files of the Linux operating system, firewall configurations, and yum source configurations, etc.;
Since it involves Ansible software, it is also necessary to understand the relevant operational commands, configuration files, host inventory, etc.
[1] Ansible Configuration Files:
(1) Ansible configuration file /etc/ansible/ansible.cfg (generally kept as default).
(2) Inventory = /etc/ansible/hosts (host list configuration file).
(3) Library = /usr/share/my_modules (directory for storing library files).
(4) Remote_tmp = $HOME/.ansible/tmp (directory for storing temporary py command files on remote hosts).
(5) Local_tmp = $HOME/.ansible/tmp (local temporary command execution directory).
(6) Forks = 5 (default concurrency).
(7) Sudo_user = root (default sudo user).
(8) Ask_sudo_pass = True (whether to ask for SSH password each time an Ansible command is executed).
(9) Host_key_checking = False (check the host_key of the corresponding server; it is recommended to uncomment this).
(10) Log_path = /var/log/ansible.log (log file).
[2] Common Ansible Commands:
Common Ansible commands can be viewed by directly typing ansible + tab key in the command line.

Figure 3.1-1 Common Ansible Commands
While there are many specific Ansible commands, the ones used are relatively few. Below are the commonly used Ansible commands:
(1) /usr/bin/ansible: Main program, temporary command execution tool.
(2) /usr/bin/ansible-doc: View configuration documentation, module functionality viewing tool.
(3) /usr/bin/ansible-galaxy: Download and upload excellent code or Roles modules from the official platform; connects to https://galaxy.ansible.com to download corresponding roles, including operations such as ansible-galaxy list (list all installed playbooks in galaxy), ansible-galaxy install geerlingguy.redis (install playbook), ansible-galaxy remove geerlingguy.redis (remove playbook).
(4) /usr/bin/ansible-playbook: Customize automation tasks, orchestration playbook tool.
(5) /usr/bin/ansible-pull: Remote command execution tool.
(6) /usr/bin/ansible-vault: File encryption tool, used to manage the encryption and decryption of yml files, including operations such as ansible-vault encrypt .yml (encrypt yml file), ansible-vault decrypt .yml (decrypt yml file), ansible-vault view yml (view file content), ansible-vault edit .yml (edit encrypted file), ansible-vault rekey .yml (change password), ansible-vault create .yml (create new yml file).
(7) /usr/bin/ansible-console: Execution tool for user interaction based on Console interface.
[3] Common Ansible Modules (with some annotations):
·Command: When executing commands on remote hosts, the default module can ignore the -m option, meaning you can use ansible -m command or ansible -m; since this module does not support $VARNAME < > | & etc., the Shell module is needed to implement it.
·Shell is similar to Command, executing commands using shell; its invoked bash can execute complex commands. Even if using shell may fail, the solution is to write it to a script, copy it to remote execution, and then pull the required results back to the executing machine, i.e., ansible -m shell.
Script: Run scripts; ansible websrvs -m script -a ‘f1.sh’
Copy: Copy files from the server to the client; if the target file exists, it defaults to overwrite, but here it specifies to back up first;
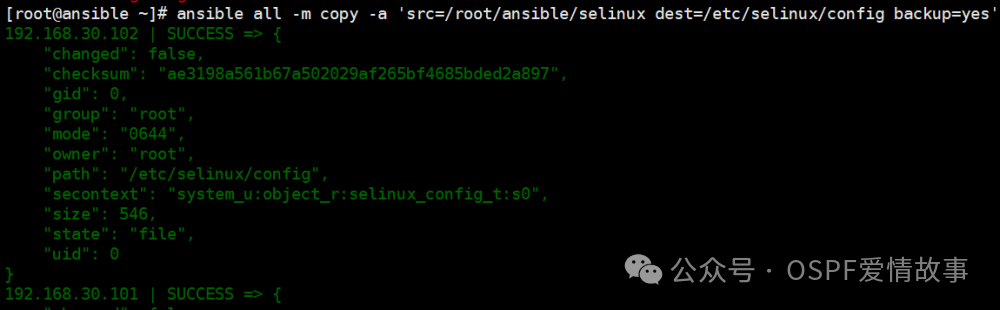
Figure 3.1-2 Using the Copy Module (1)
You can use the copy module to create and write text files simply.
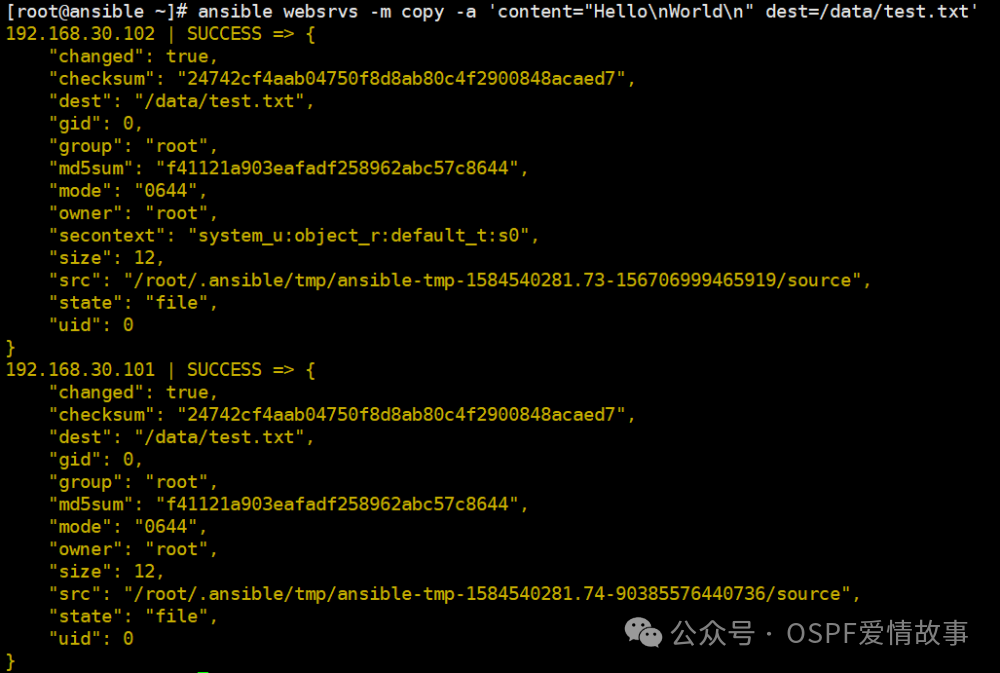
Figure 3.1-3 Using the Copy Module (2)
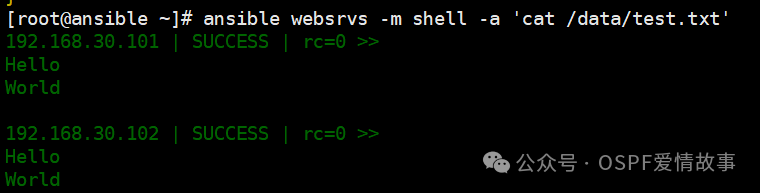
Figure 3.1-4 Using the Copy Module (3)
·Fetch: Reads files from the client to the server, the opposite of copy; directories can be tarred first, e.g., ansible websrvs -m fetch -a ‘srv=/root/data/a.sh dest=/data/script’.
·File: Set file attributes, e.g., ansible websrvs -m file -a ‘path=/root/a.sh owner=wang mode=755’, ansible websrvs -m file -a ‘srv=/data/test.txt dest=/etc/fstab-link state=link’.
·Hostname: Manage hostnames, e.g., ansible node1 -m hostname -a ‘name=websrv’.
·Cron: Scheduled tasks, supporting time minute, hour, day, month, weekday, e.g., to add a scheduled task, delete a task: ansible all -m cron -a ‘name=warning state=absent’.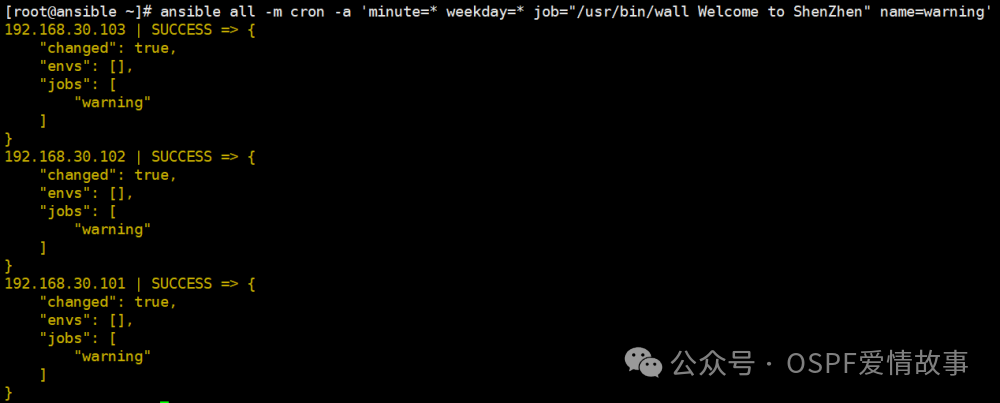
Figure 3.1-5 Using the Cron Module
·Yum: Manage packages, e.g., ansible all -m yum -a ‘name=httpd state=latest’ (install httpd service, state can be omitted), ansible all -m yum -a ‘name=httpd state=absent’ (remove httpd).
·Service: Manage services, e.g., ansible websrvs -m service -a ‘name=httpd state=stopped (stop service)/started (start service)/reloaded (reload service)/restart (restart service)’.
·User: Manage users, e.g., ansible all -m user -a ‘name=user1 comment=”test user” uid=2048 home=/app/user1 group=root’ (add user), ansible all -m user -a ‘name=user1 state=absent remove=yes’ (delete user and home directory data).
·Group: Manage groups, e.g., ansible all -m group -a ‘name=testgroup system=yes’ (add group), ansible all -m group -a ‘name=testgroup state=absent’ (delete group).
[4] Comparison of Ansible Playbook and Shell Scripts
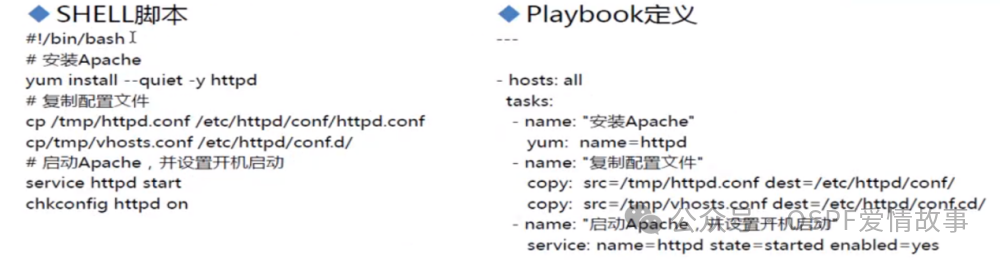
Figure 3.1-6 Comparison of Ansible Playbook and Shell Scripts
[5] Workflow of Ansible Playbook:
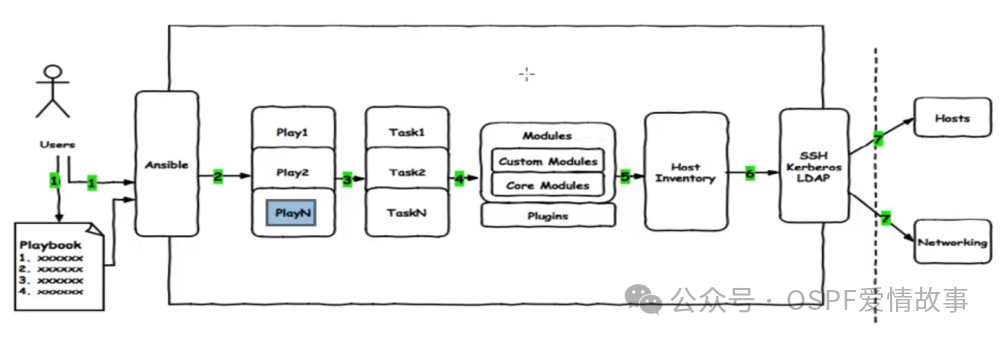
Figure 3.1-7 Workflow of Ansible Playbook
In a playbook, you can write many plays, and users can call this playbook. Calling the playbook actually executes the corresponding Ansible command, which calls each play inside; of course, each play may have its own tasks, and the tasks have a sequence just like scripts; during the execution of tasks, they will also call the corresponding modules (underlying modules, development modules, or core modules, etc.) or plugins; then, during the execution of tasks, it will check the corresponding host inventory to see which hosts in the inventory need to execute the tasks defined in the playbook; during execution, it still needs to use SSH service to connect to the managed hosts.
[6] The Role of the Roles Directory
/roles/project/: Project name, with the following subdirectories:
·Files/: Directory for storing files called by copy or script modules.
·Templates/: Directory where the template module looks for required template files.
·Tasks/: Defines tasks, the basic element of a role, which should contain at least one file named main.yml; other files need to be included in this file.
·Handler/: Should contain at least one file named main.yml; other files need to be included in this file.
·Var/: Defines variables, which should contain at least one file named main.yml; other files need to be included in this file.
·Meta/: Defines special settings and dependencies for the current role, which should contain at least one file named main.yml; other files need to be included in this file. (Not commonly used)
·Default/: Used to set default variables in the main.yml file in this directory. (Not commonly used)
3.2 Deployment Planning
First, you need to install the VMware Workstation virtual machine and have the relevant ISO image files for CentOS 7 and CentOS 6. This experiment requires installing four virtual machines: one for the Ansible server and the other three as hosts (one of which runs CentOS 6). Ansible software needs to be installed, and all four virtual machines need to be configured with the same IP subnet. Therefore, I will configure the Ansible server to 192.168.30.7/24, and the other three to 192.168.30.101/24, 192.168.30.102/24, and 192.168.30.103/24;
Install Ansible software on the host at 192.168.30.7/24.
3.3 Environment Setup
Install the CentOS 6 and CentOS 7 operating systems. First, in the VM, select New Virtual Machine Wizard -> Custom Mode -> select the path of the virtual machine’s ISO image file -> fill in the username and password for the virtual machine -> choose the storage path for the virtual machine files -> processor configuration, using the default configuration for the virtual machine’s memory -> select “Use Network Address Translation (NAT)” for the network type -> I/O controller type, disk type, select disk, disk space, and specify disk file operations can all be kept as default.
The above operations are the same for CentOS 6 and CentOS 7, only the selected ISO image files are different, and the other operations are the same.
It is important to note that when selecting the network type “Use Network Address Translation (NAT)”, you need to check your “Virtual Network Editor” to see if your NAT mode corresponds to VMnet 8, which is the desired subnet. If not, you can modify the subnet you assigned or directly modify the subnet IP and subnet mask of VMnet 8.
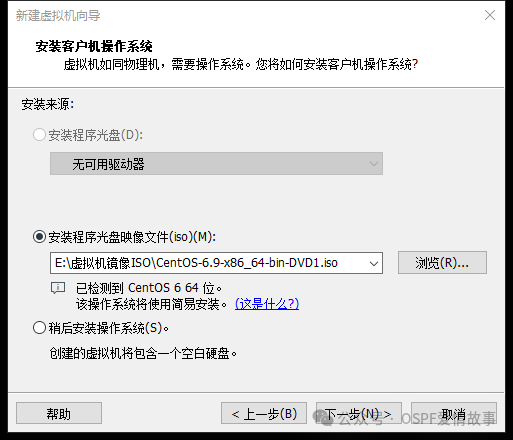
Figure 3.3-1 Environment Setup (1)
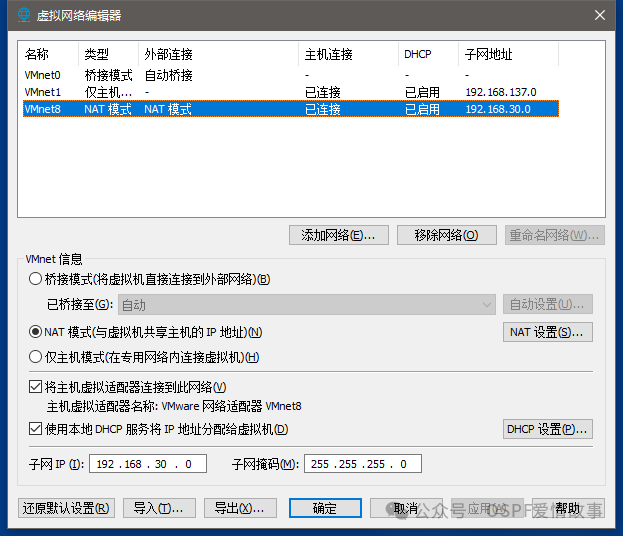
Figure 3.3-2 Environment Setup (2)
3.4 Configuring the Network
In configuring the network, since it is a Linux operating system, you need to modify the configuration files, specifically the network configuration file located at /etc/sysconfig/network-scripts/ corresponding to the network card. If you do not know the corresponding network card, you can use the command ip addr to view the virtual network information. Here, I first modified the hostname:
Table 3.4-1 Host Configuration
|
Operating System |
Host IP/Network Mask |
Hostname |
|
CentOS 7 (Install Ansible) |
192.168.30.7/24 |
Ansible |
|
CentOS 7 |
192.168.30.101/24 |
Node1 |
|
CentOS 7 |
192.168.30.102/24 |
Node2 |
|
CentOS 6 |
192.168.30.103/24 |
Node3 |
To modify the hostname, the command in CentOS 6 is vim /etc/sysconfig/network to edit the network file and modify the hostname line (restart to take effect);
In CentOS 7, the command to modify the hostname is hostnamectl set-hostname ansible (node1, node2); subsequently, modify the corresponding virtual machine’s IP address with the command vim /etc/sysconfig/network-scripts/ifcfg-ens33 to edit that file.

Figure 3.4-2 /etc/sysconfig/network-scripts/ifcfg-ens33
In the file, modify and add the following code at the end:
BOOTPROTO=”static” (modified part, the following is the added part)
IPADDR=192.168.30.7
NETMASK=255.255.255.0 (or PREFIX=24)
GATEWAY=192.168.30.2
DNS1=0.0.0.0
DNS2=114.114.114.114
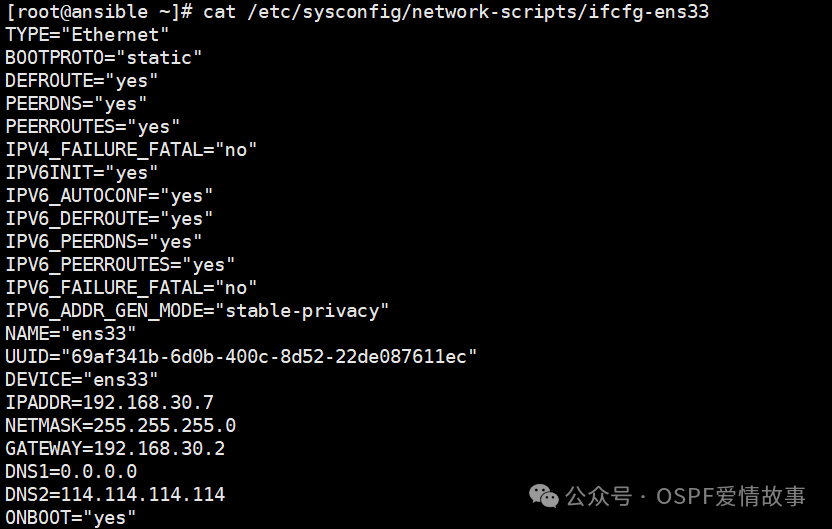
Figure 3.4-3 Modifying /etc/sysconfig/network-scripts/ifcfg-ens33 (1)
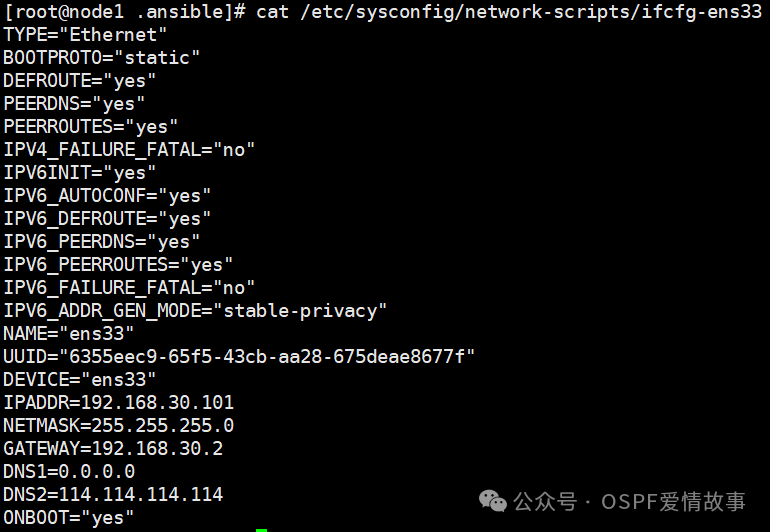
Figure 3.4-4 Modifying /etc/sysconfig/network-scripts/ifcfg-ens33 (2)
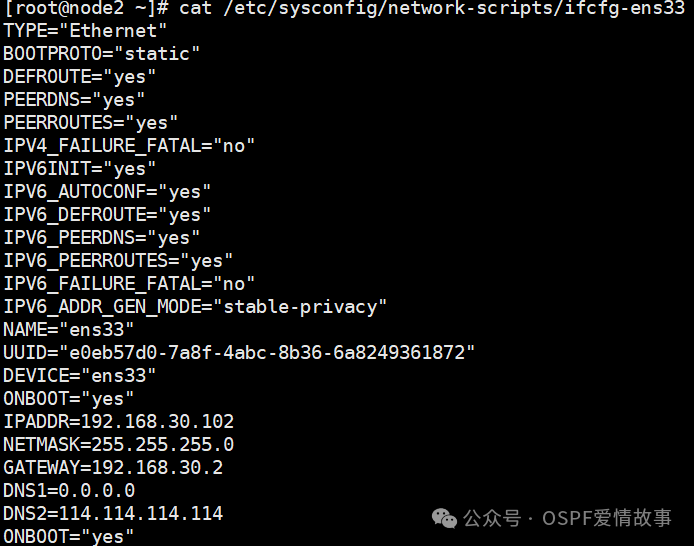
Figure 3.4-5 Modifying /etc/sysconfig/network-scripts/ifcfg-ens33 (3)
The operations for the other virtual machines are the same, just change IPADDR= (to the corresponding IP address). In CentOS 6, my virtual network card is /etc/sysconfig/network-scripts/ifcfg-eth0;
After modifying the network configuration file, you need to restart the network service, e.g., in CentOS 6, enter the following command: service network restart, while in CentOS 7, enter the following command: systemctl restart network.
After configuring the network, you need to configure the yum source, with the yum source configuration file located at /etc/yum.repos.d/CentOS-Base.repo. First, back up the original CentOS-Base.repo with the command: cp /etc/yum.repos.d/CentOS-Base.repo /etc/yum.repos.d/CentOS-Base.repo.bak.
Then edit that file with the command: vim /etc/yum.repos.d/CentOS-Base.repo.
Here, I configured an Aliyun yum. The specific configuration for Aliyun yum is documented on CSDN, so I will not delve into it here.
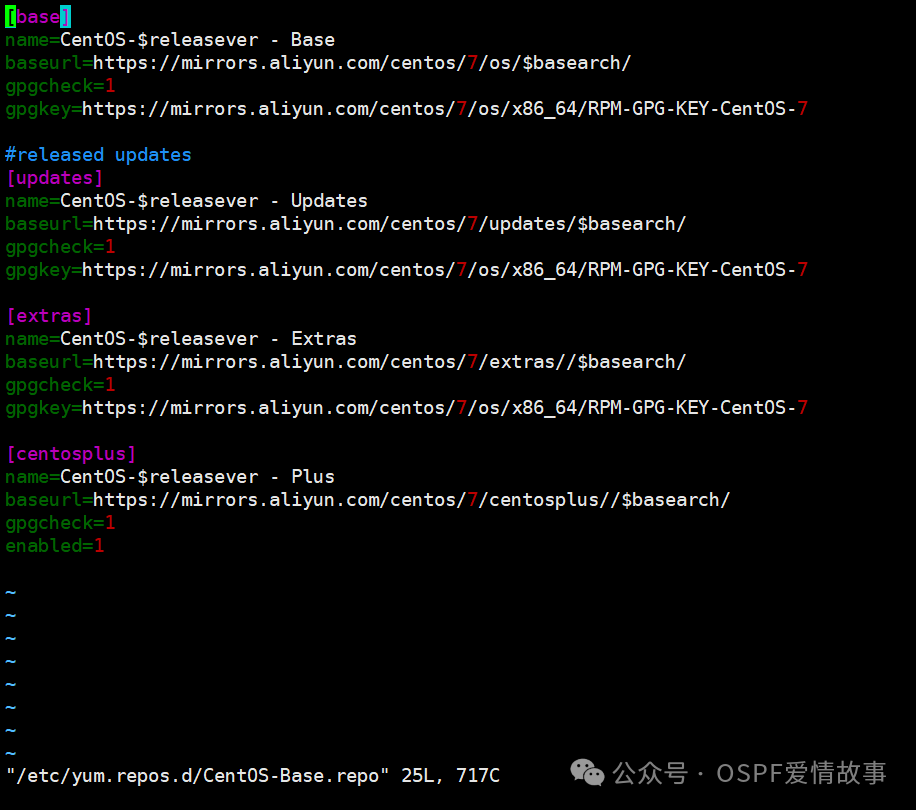
Figure 3.4-7 Configuring Yum Source
After editing the yum configuration file, perform operations on the yum service: yum clean all, yum repolist.
rpm –import /etc/pki/rpm-gpg/RPM-GPG-KEY-CentOS-7 (to avoid installation interruptions due to unverified external sources, you can import the verification key). I performed the yum source operations in both CentOS 7 and CentOS 6.
Install Ansible software on the virtual machine at 192.168.30.7/24.
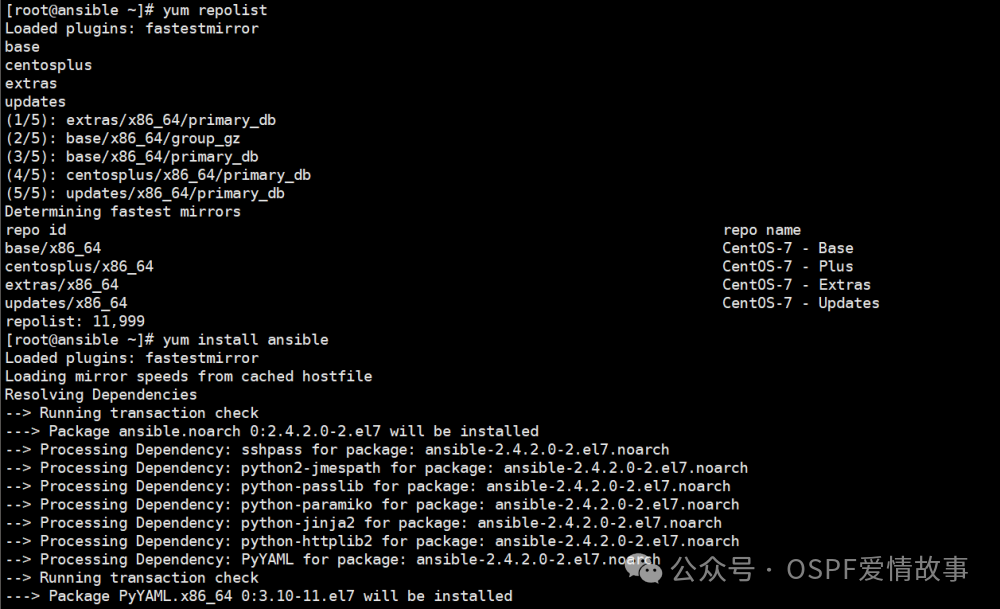
Figure 3.4-8 yum repolist
To verify whether Ansible is successfully installed on the virtual machine at 192.168.30.7, you can enter the following command: ansible –version to check if the installation is complete.

Figure 3.4-9 ansible –version
3.5 Debugging and Optimization
After installing Ansible, the system is set to start automatically on boot. Therefore, there is no need to perform operations for automatic startup. However, in the formal use of Ansible software, a series of preparatory and debugging optimization operations are required, specifically the following:
(1) First, allow the Ansible server host (192.168.30.7) to SSH connect to node1 (192.168.30.101), node2 (192.168.30.102), and node3 (192.168.30.103). Of course, the firewall needs to be turned off for convenience in subsequent operations.

Figure -1 ssh 192.168.30.102

Figure 3.5-2 ssh 192.168.30.101

Figure 3.5-3 ssh 192.168.30.103
(2) Second, configure the Ansible file, setting up several commonly used groups. The editing command is vim /etc/ansible/hosts, and you can add the following content.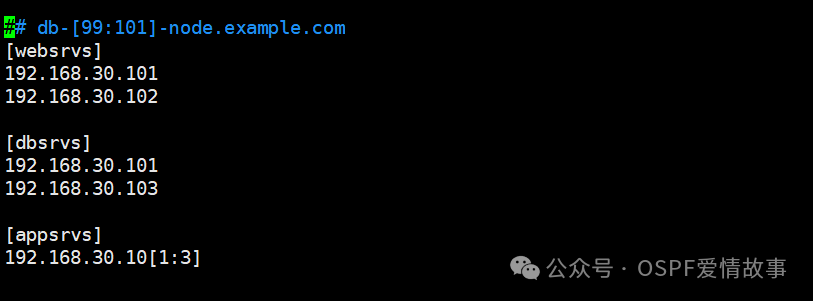
Figure 3.5-4 vim /etc/ansible/hosts
(3) Third, to know some configuration names, execute the commands: ansible websrvs -m setup | grep “cpu”; ansible all -m setup -a ‘filter=”*distribution*”‘; among the required names are: ansible_distribution_major_version (system version); ansible_processor_vcpus (number of CPUs).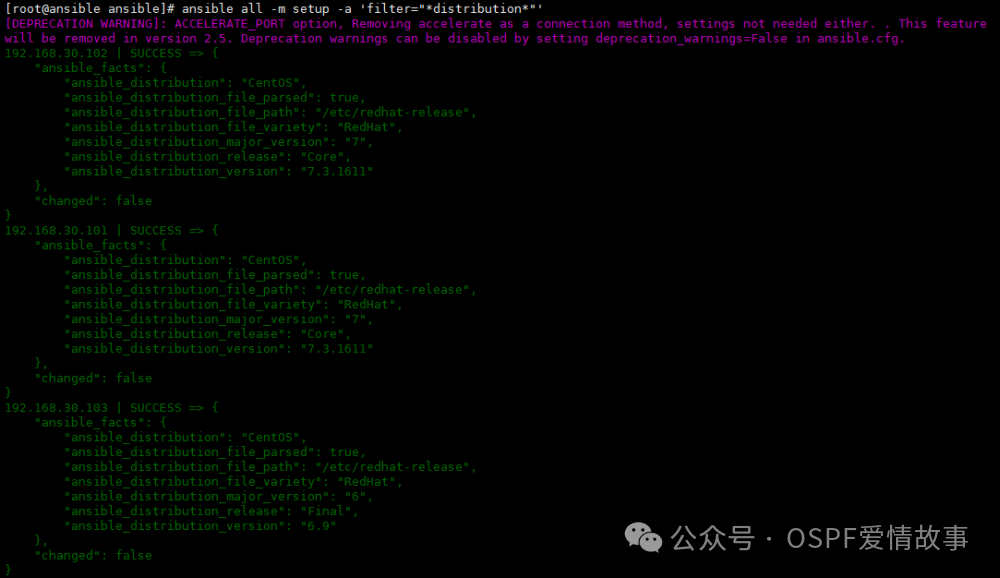
Figure 3.5-5 ansible all -m setup -a ‘filter=”*distribution*”‘