Set Programmer Zilong as starred to read quality articles in real-time
Hello everyone, I am Zilong, focusing on sharing AI tools and breaking down AI side jobs to make earning money easier.
1. Introduction to MQTT
MQTT (Message Queuing Telemetry Transport) is an IoT communication protocol developed by IBM. OASIS (Organization for the Advancement of Structured Information Standards) has announced MQTT as the preferred emerging messaging protocol for IoT. According to the official MQTT website, MQTT is defined as an IoT interconnection protocol for communication between machine-to-machine (M2M) devices, and it is a “lightweight” communication protocol based on the publish/subscribe model. As a low-overhead, low-bandwidth instant messaging protocol, it has a wide range of applications in IoT, small devices, and mobile applications.
In the MQTT protocol, there are three identities: Publisher, Broker (Server), and Subscriber. Both the message publisher and subscriber are clients, while the message broker is the MQTT server, and a message publisher can also be a subscriber.
2. Working Principle of MQTT
MQTT is a communication protocol based on the publish-subscribe model, where MQTT clients publish or subscribe to messages through topics, and the MQTT Broker centrally manages message routing, ensuring end-to-end message delivery reliability based on the predefined Quality of Service (QoS) levels.
MQTT Client
Any application or device running an MQTT client library is an MQTT client. For example, an instant messaging application using MQTT is a client, various sensors reporting data using MQTT are clients, and various MQTT testing tools are also clients.
MQTT Broker
The MQTT Broker is a key component responsible for handling client requests, including establishing connections, disconnecting, subscribing, and unsubscribing, while also forwarding messages. An efficient and powerful MQTT Broker can easily handle massive connections and millions of messages throughput, helping IoT service providers focus on business development and quickly build reliable MQTT applications.
Publish-Subscribe Model
The publish-subscribe model differs from the client-server model in that it decouples the client sending messages (publisher) from the client receiving messages (subscriber). Publishers and subscribers do not need to establish a direct connection; instead, they rely on the MQTT Broker to handle message routing and distribution.
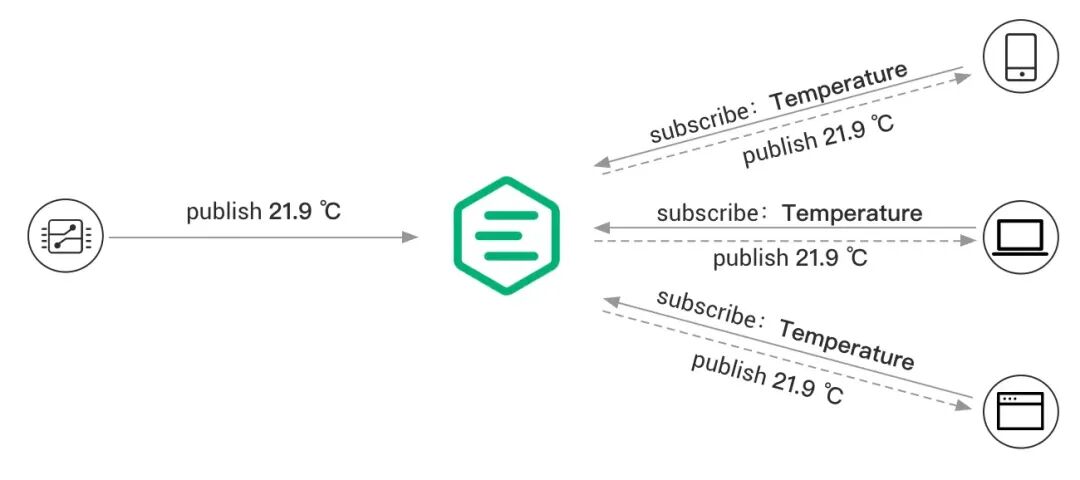
The diagram below illustrates the MQTT publish/subscribe process. A temperature sensor connects to the MQTT Broker as a client and publishes temperature data to a specific topic (e.g., <span>Temperature</span>). Upon receiving the message, the MQTT Broker is responsible for forwarding it to the subscriber clients subscribed to the corresponding topic (<span>Temperature</span>).
Topics
The MQTT protocol forwards messages based on topics. Topics are distinguished by <span>/</span>, similar to URL paths, for example:
chat/room/1

sensor/10/temperature

sensor/+/temperature
MQTT topics support the following two wildcards:<span>+</span> and <span>#</span>.
<span>+</span>: Represents a single-level wildcard, for example,<span>a/+ </span>matches<span>a/x</span>or<span>a/y</span>.<span>#</span>: Represents a multi-level wildcard, for example,<span>a/#</span>matches<span>a/x</span>,<span>a/b/c/d</span>.
Note: Wildcard topics can only be used for subscription, not for publishing.
QoS
MQTT provides three Quality of Service (QoS) levels to ensure message reliability in different network environments.
- QoS 0: Message is delivered at most once. If the current client is unavailable, the message will be lost.
- QoS 1: Message is delivered at least once.
- QoS 2: Message is delivered exactly once.
3. Workflow of MQTT
After understanding the basic components of MQTT, let’s take a look at its general workflow:
- The client establishes a connection with the Broker using the TCP/IP protocol, optionally using TLS/SSL encryption for secure communication. The client provides authentication information and specifies the session type (Clean Session or Persistent Session).
- The client can publish messages to a specific topic or subscribe to topics to receive messages. When the client publishes a message, it sends the message to the MQTT Broker; when the client subscribes to messages, it receives messages related to the subscribed topic.
- The MQTT Broker receives the published messages and forwards these messages to the clients subscribed to the corresponding topics. It ensures reliable message delivery based on the QoS level and stores messages for disconnected clients based on the session type.
4. Getting Started with MQTT
This tutorial implements the Java subscriber role.
5. Adding Dependencies
<properties>
        <maven.compiler.source>8</maven.compiler.source>
        <maven.compiler.target>8</maven.compiler.target>
        <grpc.version>1.6.1</grpc.version>
        <protobuf.version>3.21.12</protobuf.version>
    </properties>


    <dependencies>
        <dependency>
            <groupId>org.eclipse.paho</groupId>
            <artifactId>org.eclipse.paho.client.mqttv3</artifactId>
            <version>1.2.5</version> <!-- It is recommended to use a newer version -->
        </dependency>
        <dependency>
            <groupId>io.grpc</groupId>
            <artifactId>grpc-netty</artifactId>
            <version>${grpc.version}</version>
            <scope>provided</scope>
        </dependency>
        <dependency>
            <groupId>io.grpc</groupId>
            <artifactId>grpc-protobuf</artifactId>
            <version>${grpc.version}</version>
            <scope>provided</scope>
        </dependency>
        <dependency>
            <groupId>io.grpc</groupId>
            <artifactId>grpc-stub</artifactId>
            <version>${grpc.version}</version>
            <scope>provided</scope>
        </dependency>
        <dependency>
            <groupId>com.google.protobuf</groupId>
            <artifactId>protobuf-java</artifactId>
            <version>${protobuf.version}</version>
        </dependency>

        <dependency>
            <groupId>com.google.protobuf</groupId>
            <artifactId>protobuf-java-util</artifactId>
            <version>3.21.12</version> <!-- The version number should match your protobuf-java -->
        </dependency>
    </dependencies>


    <build>
        <extensions>
            <extension>
                <groupId>kr.motd.maven</groupId>
                <artifactId>os-maven-plugin</artifactId>
                <version>1.5.0.Final</version>
            </extension>
        </extensions>
        <plugins>
            <plugin>
                <groupId>org.xolstice.maven.plugins</groupId>
                <artifactId>protobuf-maven-plugin</artifactId>
                <version>0.5.0</version>
                <configuration>
                    <protocArtifact>com.google.protobuf:protoc:${protobuf.version}:exe:${os.detected.classifier}</protocArtifact>
                    <pluginId>grpc-java</pluginId>
                    <pluginArtifact>io.grpc:protoc-gen-grpc-java:${grpc.version}:exe:${os.detected.classifier}</pluginArtifact>
                </configuration>
                <executions>
                    <execution>
                        <goals>
                            <goal>compile</goal>
                            <goal>compile-custom</goal>
                        </goals>
                    </execution>
                </executions>
            </plugin>
        </plugins>
    </build>
6. Creating Entities
After the developer <span>MQTT</span> client goes through the <span>proto buffer</span> deserialization step, it will obtain a complete <span>JSON</span>.
Therefore, we need to create Java entity classes from the <span>proto</span> files.
.proto File Syntax Highlighting
You need to install the Protobuf Support plugin.
Click on “File” –> “Settings” –> “Plugins” in IntelliJ, as shown below:
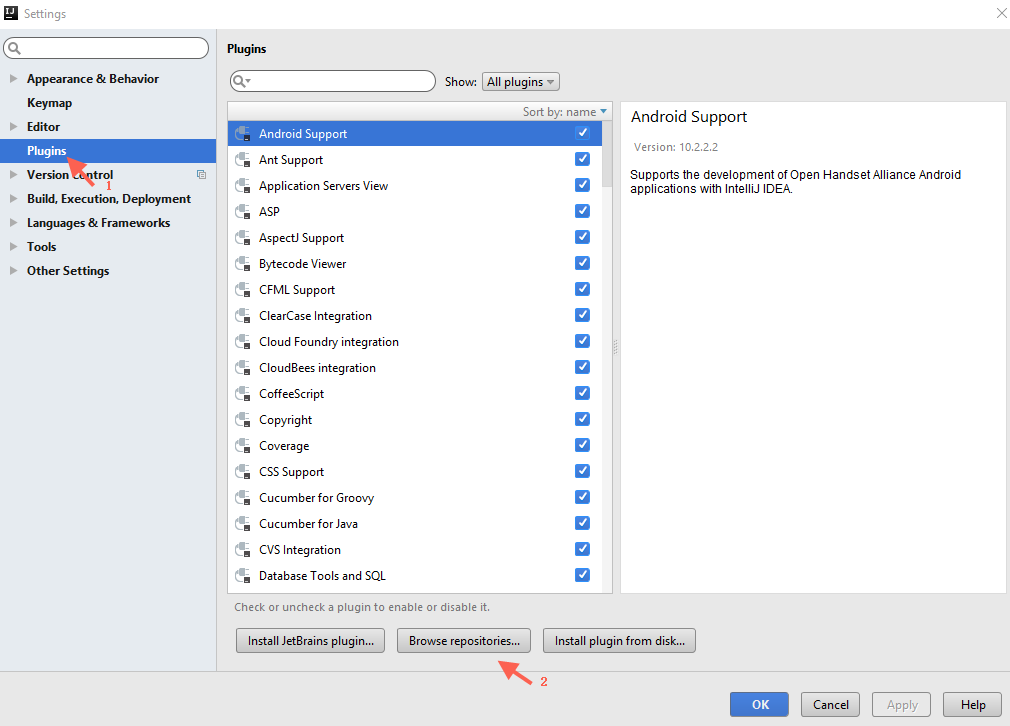
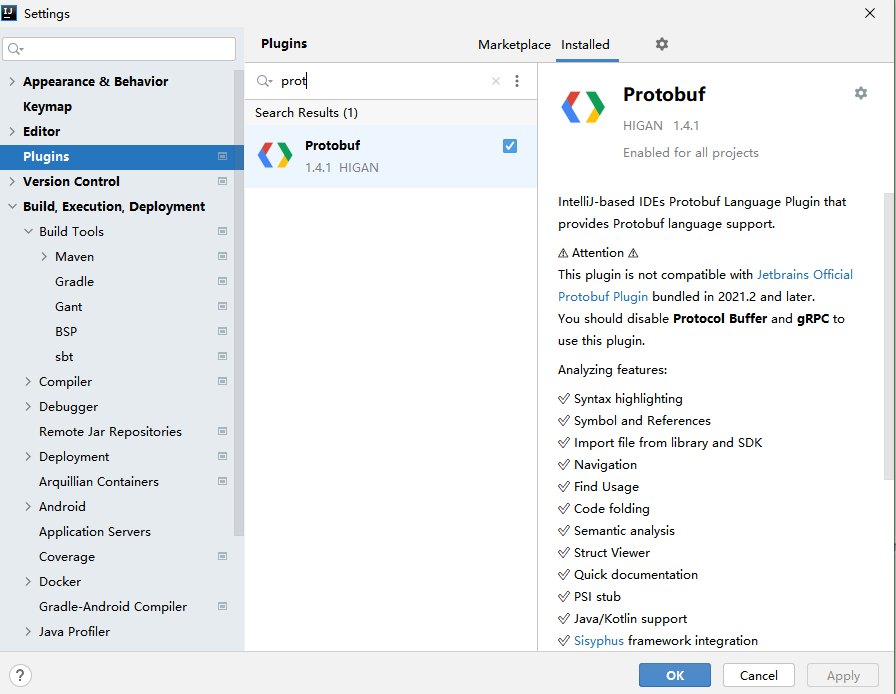
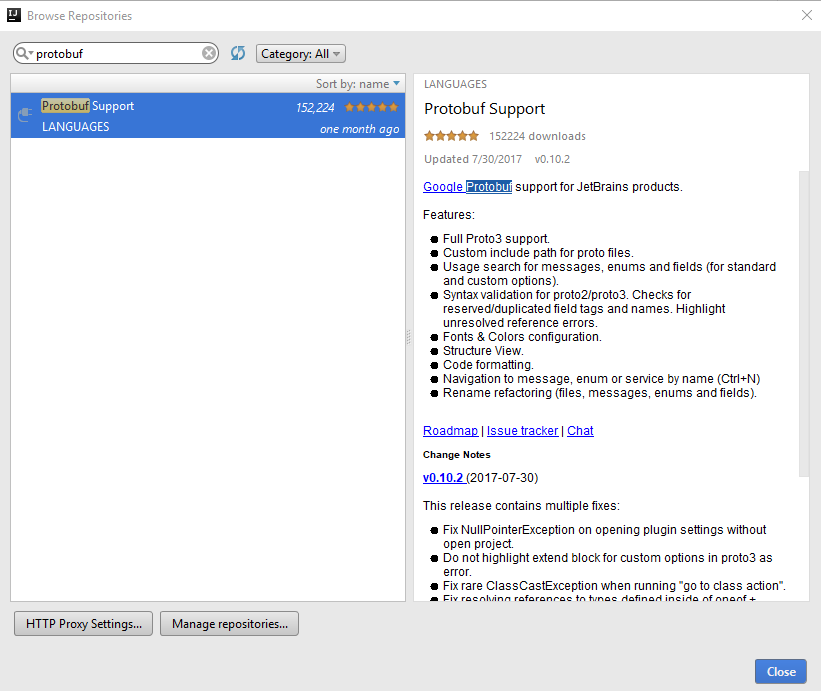
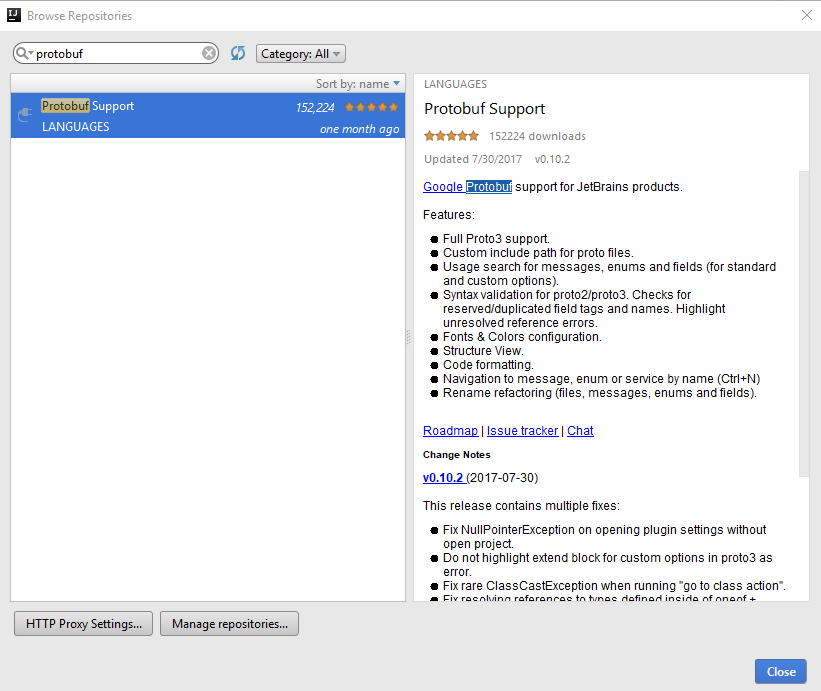
After installation, restart IntelliJ IDEA, and check the .proto file; you will find that syntax highlighting is now supported.
Convert the .proto file into Java classes.
The general approach is to execute the protoc command to convert the .proto file into Java classes:
protoc.exe -I=d:/tmp --java_out=d:/tmp d:/tmp/monitor_data.proto
However, the gRPC official recommends a more elegant approach, which can be easily done using Maven.
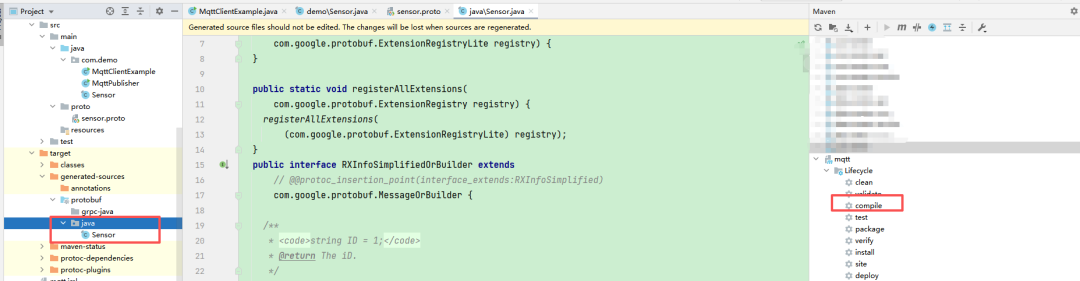
Using the Maven compile command, you can see the generated Java classes based on the .proto file in the target directory.
You need to include the dependencies mentioned above in the pom file.
Create a new package called proto and create a sensor.proto file inside it.
After running the Maven compile command, the Java entity classes will be generated in the target directory, and then move them to the src directory.
7. Subscribing to Topics
public class MqttClientExample {

    // --- Please modify the following configuration according to your actual situation ---
    private static final String BROKER_URL = "ssl://ip:2883";
    private static final String USERNAME = "xxxx";
    private static final String PASSWORD = "xxxx";
    private static final String CA_CERT_PATH = "C:\Users\0000\Downloads\caCert.pem"; // CA certificate provided by RisingHF
    private static final String CLIENT_ID = "JavaClient-" + System.currentTimeMillis(); // Ensure unique client ID
    private static final String TOPIC_TO_SUBSCRIBE = "user/500/device/8cf95720001797f6/uplink";
    private static final String TOPIC_TO_PUBLISH = "actuator/command";
    // ------------------------------------

    private static MqttClient mqttClient;

    public static void main(String[] args) {
        try {
            // 1. Create MQTT client instance
            mqttClient = new MqttClient(BROKER_URL, CLIENT_ID, new MemoryPersistence());

            // 2. Set connection options
            MqttConnectOptions connOpts = new MqttConnectOptions();
            connOpts.setUserName(USERNAME);
            connOpts.setPassword(PASSWORD.toCharArray());

            // Set whether to clear the session after disconnecting
            connOpts.setCleanSession(true);

            // If it is an SSL/TLS connection (broker URL starts with ssl://)
            if (BROKER_URL.startsWith("ssl")) {
                // Load CA certificate
                SSLContext sslContext = createSslContext(CA_CERT_PATH);
                connOpts.setSocketFactory(sslContext.getSocketFactory());
                System.out.println("SSL/TLS configured");
            }

            // 3. Set callback function
            // This callback function will handle received messages, connection status changes, etc.
            mqttClient.setCallback(new MqttCallback() {

                @Override
                public void connectionLost(Throwable cause) {
                    // Called when the connection is lost
                    System.out.println("Connection lost: " + cause.getMessage());
                    cause.printStackTrace();
                }

                @Override
                public void messageArrived(String topic, MqttMessage message) throws Exception {
                    // Called when a message is received
                    System.out.println("\nMessage received:");
                    System.out.println("  Topic: " + topic);
                    byte[] payload = message.getPayload();

                    com.syjdly.Sensor.DeviceUplink sensorData = deserializeProtobuf(payload);

                    System.out.println("  Content: " + JsonFormat.printer().print(sensorData));

                    System.out.println("  QoS: " + message.getQos());
                }

                @Override
                public void deliveryComplete(IMqttDeliveryToken token) {
                    // Called when the message is published and acknowledged
                    try {
                        System.out.println("\nMessage published successfully: " + token.getMessage());
                    } catch (MqttException e) {
                        e.printStackTrace();
                    }
                }
            });

            // 4. Connect to Broker
            System.out.println("Connecting to: " + BROKER_URL);
            mqttClient.connect(connOpts);
            System.out.println("Connection successful!");

            // 5. Subscribe to topic
            System.out.println("Subscribing to topic: " + TOPIC_TO_SUBSCRIBE);
            // QoS 0: At most once
            // QoS 1: At least once
            // QoS 2: Exactly once
            mqttClient.subscribe(TOPIC_TO_SUBSCRIBE, 0);
            System.out.println("Subscription successful!");

            // Keep the main thread running to receive messages
            // In actual applications, you may have a more complex event loop
            System.out.println("\nClient is running, press Enter to exit...");
            System.in.read();

            // 7. Disconnect
            mqttClient.disconnect();
            System.out.println("Disconnected");

        } catch (MqttException me) {
            // Handle MQTT related exceptions
            System.out.println("MQTT Exception:");
            System.out.println("  Reason Code: " + me.getReasonCode());
            System.out.println("  Message: " + me.getMessage());
            System.out.println("  Local Message: " + me.getLocalizedMessage());
            System.out.println("  Cause: " + me.getCause());
            me.printStackTrace();
        } catch (Exception e) {
            // Handle other exceptions, such as certificate loading failures
            e.printStackTrace();
        }
    }

    private static com.demo.Sensor.DeviceUplink deserializeProtobuf(byte[] payload) throws InvalidProtocolBufferException {

        return Sensor.DeviceUplink.parseFrom(payload); // Call the generated parseFrom method
    }

    /**
     * Create and configure SSLContext to load CA certificate
     */
    private static SSLContext createSslContext(String caCertPath) throws Exception {
        CertificateFactory cf = CertificateFactory.getInstance("X.509");
        X509Certificate caCert = (X509Certificate) cf.generateCertificate(new FileInputStream(caCertPath));

        KeyStore keyStore = KeyStore.getInstance(KeyStore.getDefaultType());
        keyStore.load(null);
        keyStore.setCertificateEntry("caCert", caCert);

        TrustManagerFactory tmf = TrustManagerFactory.getInstance(TrustManagerFactory.getDefaultAlgorithm());
        tmf.init(keyStore);

        SSLContext sslContext = SSLContext.getInstance("TLSv1.2");
        sslContext.init(null, tmf.getTrustManagers(), null);

        return sslContext;
    }

This completes the subscription to the MQTT broker.
That’s all for today’s sharing. If you found it helpful, please help with a quick three-step action:Like, Share, and Follow and Comment. Your feedback is very important to me!