0. Introduction
Recently, I worked on a project using CLION for building, which uses CMakeLists.txt for management. To enhance my learning, I found a comprehensive introductory article by an expert, which includes both text and code. This article summarizes the key points I learned from it. The original author’s GitHub address: https://github.com/wzpan/cmake-demo.
1. Single Source File
The syntax of CMakeLists.txt is quite simple, consisting of commands, comments, and whitespace, where commands are case-insensitive. The content after the symbol # is considered a comment. Commands consist of the command name, parentheses, and parameters, which are separated by spaces.
First, create a main.cpp file:
#include <iostream>

int main() {
    std::cout << "Hello, World!" << std::endl;
    return 0;
}
Write your first CMakeLists.txt:
cmake_minimum_required(VERSION 3.10)
project(cmakeLearn)
add_executable(main main.cpp)-
cmake_minimum_required: Specifies the minimum version of CMake required to run this configuration file; -
project: The parameter value iscmakeLearn, indicating that the project name iscmakeLearn. -
add_executable: Compiles the source file namedmain.cppinto an executable namedcmakeLearn.
Now, let’s check the path:
light@city:~/CLionProjects/cmakeLearn$ ls
CMakeLists.txt  main.cpp
Enter the following command to run cmake:
cmake .CMake process:
light@city:~/CLionProjects/cmakeLearn$ cmake .
-- The C compiler identification is GNU 5.5.0
-- The CXX compiler identification is GNU 5.5.0
-- Check for working C compiler: /usr/bin/cc
-- Check for working C compiler: /usr/bin/cc -- works
-- Detecting C compiler ABI info
-- Detecting C compiler ABI info - done
-- Detecting C compile features
-- Detecting C compile features - done
-- Check for working CXX compiler: /usr/bin/c++
-- Check for working CXX compiler: /usr/bin/c++ -- works
-- Detecting CXX compiler ABI info
-- Detecting CXX compiler ABI info - done
-- Detecting CXX compile features
-- Detecting CXX compile features - done
-- Configuring done
-- Generating done
-- Build files have been written to: /home/light/CLionProjects/cmakeLearn
After cmake, a Makefile is generated:
light@city:~/CLionProjects/cmakeLearn$ ls
CMakeCache.txt  cmake_install.cmake  main.cpp
CMakeFiles      CMakeLists.txt       Makefile
Then execute make:
light@city:~/CLionProjects/cmakeLearn$ make
Scanning dependencies of target main
[ 50%] Building CXX object CMakeFiles/main.dir/main.cpp.o
[100%] Linking CXX executable main
[100%] Built target main
Execute the program:
light@city:~/CLionProjects/cmakeLearn$ ./main
Hello, World!
2. Multiple Source Files
2.1 Same Directory, Multiple Source Files
Add the following line to the CMakeLists.txt from section 1:
# Find all source files in the current directory
# and save the names to the DIR_SRCS variable
aux_source_directory(. DIR_SRCS)
If there are many local source files, it would be tedious to add them all, so we use aux_source_directory. CMake will assign the filenames of all source files in the current directory to the variable DIR_SRCS, and then indicate that the source files in the DIR_SRCS variable need to be compiled into an executable named Demo.
This avoids the following situation:
# Specify the target to generate
add_executable(Demo main.cc MathFunctions.cc xx.cc ....cc)
Summary:
-
aux_source_directory(. DIR_SRCS)
Find all source files in the current directory and save the names to the DIR_SRCS variable.
2.2 Multiple Directories, Multiple Source Files
The directory structure is as follows:
./Demo3
    |
    +--- main.cc
    |
    +--- math/
          |
          +--- MathFunctions.cc
          |
          +--- MathFunctions.h
In this case, we need to write a CMakeLists.txt file in both the project root directory Demo3 and the math directory.
For convenience, we can first compile the files in the math directory into a static library and then call it from the main function.
The difference from the CMakeLists in section 2.1 is that it adds:
# Add math subdirectory
add_subdirectory(math)
# Add link library
target_link_libraries(Demo MathFunctions)
Thus completing:
-
Adding subdirectory
-
Adding link library
Finally, specify the link library name in the subdirectory:
CMakeLists.txt in the subdirectory:
# Find all source files in the current directory
# and save the names to the DIR_LIB_SRCS variable
aux_source_directory(. DIR_LIB_SRCS)
# Generate link library
add_library (MathFunctions ${DIR_LIB_SRCS})
Summary:
-
add_library(MathFunctions ${DIR_LIB_SRCS})
Compile the source files in the src directory into a static link library.
3. Custom Compile Options
CMake allows adding compile options for the project, enabling the selection of the most suitable compile scheme based on the user’s environment and needs.
For example, the MathFunctions library can be set as an optional library. If this option is ON, the mathematical functions defined by this library will be used for calculations; otherwise, the standard library’s mathematical functions will be called.
The differences in this section from section 2 are as follows:
(1) Add a configuration header file to handle CMake’s settings for the source code
# Add a configuration header file to handle CMake's settings for the source code
configure_file (
  "${PROJECT_SOURCE_DIR}/config.h.in"
  "${PROJECT_BINARY_DIR}/config.h"
  )
The configure_file command is used to add a configuration header file config.h, which is generated by CMake from config.h.in. Through this mechanism, we can control the code generation by pre-defining some parameters and variables.
For example: modify main.cc:
#include "config.h"
...
...
...
#ifdef USE_MYMATH
  #include "math/MathFunctions.h"
#else
  #include
#endif
This determines whether to call the standard library or the MathFunctions library based on the predefined value of USE_MYMATH.
We modified main.cc to reference a config.h file, which pre-defines the value of USE_MYMATH. However, we do not directly write this file; to facilitate importing configurations from CMakeLists.txt, we write a config.h.in file:
#cmakedefine USE_MYMATHThus, CMake will automatically generate the config.h file based on the settings in the CMakeLists configuration file.
Here we use ccmake for visual compile options, install on Ubuntu:
sudo apt-get install cmake-curses-guiRun ccmake . and:
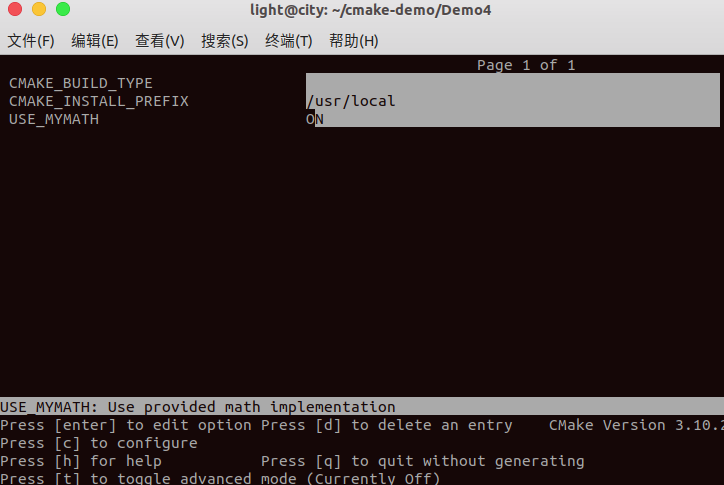
Use hjkl to control direction, the enter key can modify the option. After modification, press c to complete the configuration, then press g to confirm the generation of Makefile. Other operations of ccmake can refer to the instructions provided at the bottom of the window.
Now, let’s look at the content of the config.h file:
USE_MYMATH is ON
#define USE_MYMATHUSE_MYMATH is OFF
/* #undef USE_MYMATH */(2) Whether to include the MathFunctions library
# Whether to include the MathFunctions library
if (USE_MYMATH)
  include_directories ("${PROJECT_SOURCE_DIR}/math")
  add_subdirectory (math)
  set (EXTRA_LIBS ${EXTRA_LIBS} MathFunctions)
endif (USE_MYMATH)
The option command adds a USE_MYMATH option, with a default value of ON.
(3) Whether to use our own MathFunctions library
# Whether to use our own MathFunctions library
option (USE_MYMATH
       "Use provided math implementation" ON)
This decides whether to use the MathFunctions library we wrote based on the value of the USE_MYMATH variable.
4. Installation and Testing
4.1 Installation
Previously, when compiling some source code programs, we would first run make and then make install, which installs some header files and static/dynamic libraries to the specified directory.
In CMake, this can be done similarly, as follows:
First, add the following two lines in the math/CMakeLists.txt file:
# Specify the installation path for the MathFunctions library
install (TARGETS MathFunctions DESTINATION bin)
install (FILES MathFunctions.h DESTINATION include)
This specifies the installation path for the MathFunctions library. Then, similarly modify the root directory’s CMakeLists file, adding the following lines at the end:
# Specify installation path
install (TARGETS Demo DESTINATION bin)
install (FILES "${PROJECT_BINARY_DIR}/config.h"
         DESTINATION include)
With the above customization, the installation can be done as follows:
light@city:~/cmake-demo/Demo5$ sudo make install
[ 50%] Built target MathFunctions
[100%] Built target Demo
Install the project...
-- Install configuration: ""
-- Installing: /usr/local/bin/Demo
-- Installing: /usr/local/include/config.h
-- Installing: /usr/local/lib/libMathFunctions.a
-- Installing: /usr/local/include/MathFunctions.h
Thus, the installation work is completed.
4.2 Testing
CMake provides a testing tool called CTest. All we need to do is call a series of add_test commands in the CMakeLists file at the project root.
Start testing:
# Enable testing
enable_testing()
(1) Test without help information
# Test if the program runs successfully
add_test (test_run Demo 5 2)
(2) Test with help information
# Test 2 raised to the power of 10
add_test (test_2_10 Demo 2 10)
set_tests_properties (test_2_10)
 PROPERTIES PASS_REGULAR_EXPRESSION "is 1024")
Where PASS_REGULAR_EXPRESSION is used to test if the output contains the following string.
5. Support for gdb
Enabling gdb support in CMake is also easy; you just need to specify the -g option under Debug mode:
set(CMAKE_BUILD_TYPE "Debug")
set(CMAKE_CXX_FLAGS_DEBUG "$ENV{CXXFLAGS} -O0 -Wall -g -ggdb")
set(CMAKE_CXX_FLAGS_RELEASE "$ENV{CXXFLAGS} -O3 -Wall")
6. Adding Version Number
In the project, add a version number:
set (Demo_VERSION_MAJOR 1)
set (Demo_VERSION_MINOR 0)
This specifies the major and minor version numbers of the current project.
If you want to retrieve this information in the code, you can modify the config.h.in file to add two predefined variables:
// the configured options and settings for Tutorial
#define Demo_VERSION_MAJOR @Demo_VERSION_MAJOR@
#define Demo_VERSION_MINOR @Demo_VERSION_MINOR@
The main program calls and prints:
printf("%s Version %d.%d\n",
        argv[0],
        Demo_VERSION_MAJOR,
        Demo_VERSION_MINOR);
7. Generating Installation Packages
How to configure to generate installation packages for various platforms, including binary and source installation packages. To accomplish this task, we need to use CPack, which is also a tool provided by CMake specifically for packaging.
We will do the following three tasks:
-
Import the InstallRequiredSystemLibraries module to later import the CPack module;
-
Set some CPack-related variables, including copyright information and version information, where the version information uses the version number defined in the previous section;
-
Import the CPack module.
The corresponding CMakeLists.txt is as follows:
# Build a CPack installation package
include (InstallRequiredSystemLibraries)
set (CPACK_RESOURCE_FILE_LICENSE
  "${CMAKE_CURRENT_SOURCE_DIR}/License.txt")
set (CPACK_PACKAGE_VERSION_MAJOR "${Demo_VERSION_MAJOR}")
set (CPACK_PACKAGE_VERSION_MINOR "${Demo_VERSION_MINOR}")
include (CPack)
Now, here’s how to use it:
Enter cpack ., you can also specify binary and source installation packages:
-
Generate binary installation package:
cpack -C CPackConfig.cmake-
Generate source installation package
cpack -C CPackSourceConfig.cmakeCPack installation:
light@city:~/cmake-demo/Demo8$ cpack -CPackConfig.cmake
CPack: Create package using STGZ
CPack: Install projects
CPack: - Run preinstall target for: Demo8
CPack: - Install project: Demo8
CPack: Create package
CPack: - package: /home/light/cmake-demo/Demo8/Demo8-1.0.1-Linux.sh generated.
CPack: Create package using TGZ
CPack: Install projects
CPack: - Run preinstall target for: Demo8
CPack: - Install project: Demo8
CPack: Create package
CPack: - package: /home/light/cmake-demo/Demo8/Demo8-1.0.1-Linux.tar.gz generated.
CPack: Create package using TZ
CPack: Install projects
CPack: - Run preinstall target for: Demo8
CPack: - Install project: Demo8
CPack: Create package
CPack: - package: /home/light/cmake-demo/Demo8/Demo8-1.0.1-Linux.tar.Z generated.
This will create three different format binary package files in the local directory:
light@city:~/cmake-demo/Demo8$ ls Demo8*
Demo8-1.0.1-Linux.sh  Demo8-1.0.1-Linux.tar.gz  Demo8-1.0.1-Linux.tar.Z
Choose one for installation, for example, sh:
sh Demo8-1.0.1-Linux.sh
Usage:
light@city:~/cmake-demo/Demo8$ ./Demo8-1.0.1-Linux/bin/Demo 5 2
Now we use our own Math library.
5 ^ 2 is 25