Cover Image The Chengdu Contemporary Art Museum opened to the public last year, featuring a wide eaves roof that resembles traditional Sichuan residences and the surrounding mountains, and can also be used for outdoor activities.
Debugging Ideas
Taking the RK3588 debugging of the OV13850 camera as an example.
Step 1: Confirm the Power-Up Timing of the Module is Normal
If the camera chip ID can be recognized normally, it indicates that the power-up timing is correct, and the module can communicate with the RK3588 via I2C.
dmesg | grep 13850
Unable to read chip ID comparison

If the power-up timing is abnormal, first resolve the I2C communication issue (Embedded Sharing #19: Debugging Ideas for Embedded Peripherals – I2C Device Section), then proceed to the next debugging step.
Step 2: Confirm if the Driver is Registered Successfully
If the sensor has been registered as an entity, it indicates successful registration.
media-ctl -d /dev/media0 -p | grep 13850
Step 3: Confirm if Video is GeneratedX
Check the generated device nodes as follows.
v4l2-ctl --list-devices
Check supported formats
v4l2-ctl --list-formats-ext -d /dev/video0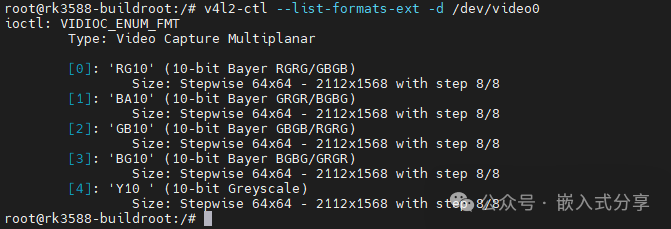
Step 4: Check if Captured Images Have Output
Capture the data stream without saving images, only refreshing the frame rate (this method is commonly used for debugging to confirm if MIPI outputs data).
v4l2-ctl --verbose -d /dev/video0 --set-fmt-video=width=1920,height=1080,pixelformat='BG10' --stream-mmap=4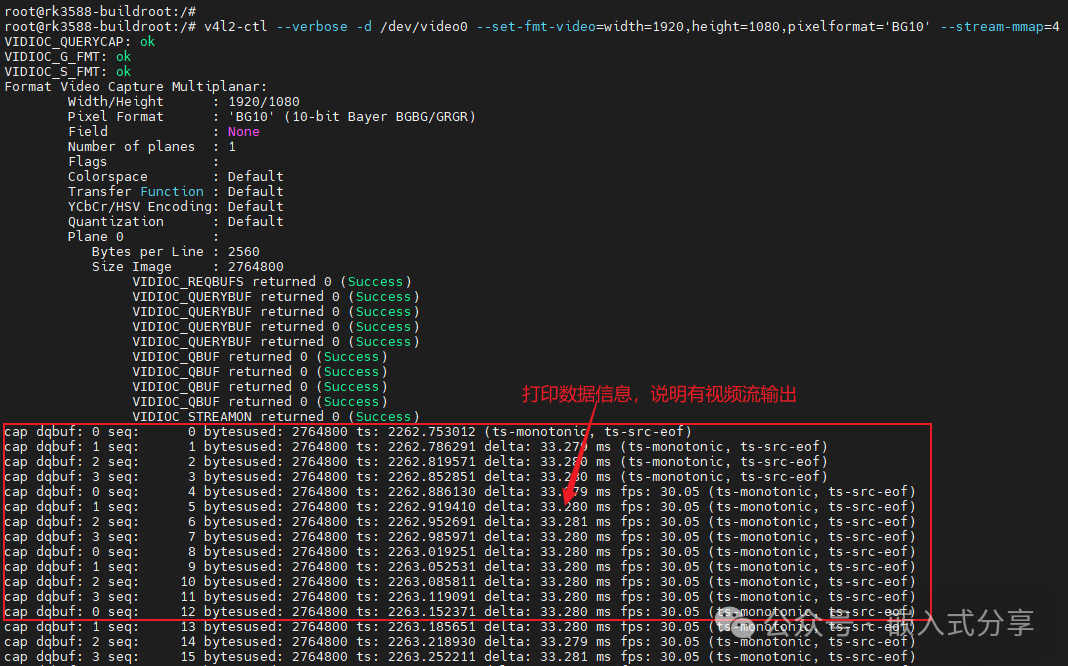
If raw video data can be captured normally, the gst-launch-1.0 command can be used to obtain image data for screen preview.
gst-launch-1.0 v4l2src device=/dev/video55 ! videoconvert ! video/x-raw,format=NV12,width=640,height=480,framerate=60/1 ! waylandsinkTroubleshooting Ideas
(1) Sensor ID Cannot Be Recognized, I2C Communication Failure
Please troubleshoot in the following order:
-
Is the sensor’s 7-bit I2C slave ID correct, or has it been mistakenly written as 8-bits?
-
Is there an output from mclk, and is the voltage amplitude correct? mclk is generally 24MHz, but can also be 27MHz.
-
Does the power-up timing of the sensor meet the requirements, including avdd, dovdd, dvdd, power down, reset, etc.?
(2) No Frame Data Received, No ISP/MIPI Errors Seen
- Check if there are any MIPI errors in the kernel log, for example, using dmesg | grep MIPI to see if there are any error messages.
- Check if there are any I2C read/write failures for the sensor in the kernel log; if the sensor fails to configure registers, it may not initialize correctly and enable output.
- Measure the MIPI clk and data lines to see if there is any output. If not, it is recommended to analyze from the sensor initialization and hardware aspects.
- If there is MIPI signal output but no errors and no data received, please check the parameters that need to be set for MIPI (such as sensor resolution, output format, etc.).
- Ensure that I2C communication is correct, and that the sensor’s register initialization list has been fully written to the sensor. In the sensor driver, the last function to enable MIPI output is s_stream(); please ensure that before this function, especially s_power(), MIPI signal output is not enabled. This is because before s_stream(), the MIPI controller is not yet ready to receive data, and outputting data before s_stream() may cause the MIPI protocol header SOT signal to be lost. It is also possible to switch the camera sensor’s clock lane from continue mode to no continue (this requires familiarity with the driver).
(3) It is common to encounter situations where capturing raw data returns no data, and the serial port does not report errors, but an error of select timeout occurs during image capture.
This phenomenon can be troubleshot as follows:
- Check the status of DPHY. According to the TRM manual, check the stopstate of DPHY to determine if data has been received, for example, check RK3588 CSI0: io -4 -l 0x100 0xfdd30000. You need to read the above register continuously 10 times; if MIPI signals are recognized, the corresponding stopstate will fluctuate between 0 and 1.
- Measure the MIPI signal. Use an oscilloscope to measure whether there is output from the MIPI channel signal.
- Confirm the sensor registers.
- Confirm that the sensor MIPI output registers are normal; you can use I2C tools to read them, and it is recommended to use i2ctransfer.
- Ensure that the chip’s sleep and reset pin levels are normal.
Welcome to follow “Embedded Sharing“, for continuous updates!#EmbeddedSharing#PathToFinancialFreedom#ShortEssay