Source: ittbank

Embedded products, like ordinary electronic products, must follow some basic processes during development, which is a journey from requirement analysis to overall design, detailed design, and finally to product completion. However, compared to ordinary electronic products, the development process of embedded products has its uniqueness. It involves both embedded software and embedded hardware, which are not typically involved in the development of ordinary electronic products. The specific R&D process for embedded products is shown in the figure below:
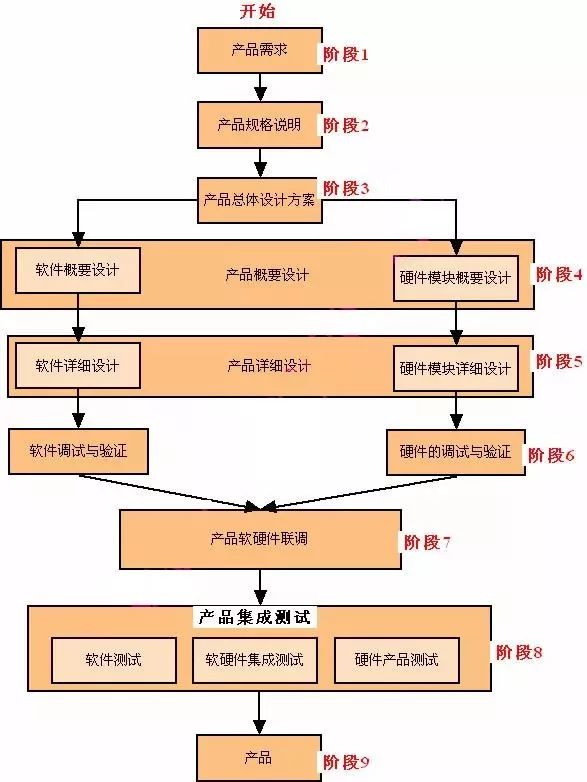
Next, we will discuss in detail each stage of the embedded product development process.
Stage 1: Product Requirements
In this stage, we need to clarify where the product requirements come from. For a successful product, we need to meet certain requirements. Only when the requirements are clear can our product development goals be defined. During the product requirement analysis phase, we can obtain product requirements through the following means:
1) Market analysis and research, mainly to see what the market demands, and what the cutting-edge technologies are (from the perspective of developing a product);
2) Customer research and user positioning, obtaining the most accurate product requirements from a wide range of market customers (pay attention to market analysis, product lifecycle, and ease of upgrades);
3) Profit orientation (cost budgeting);
4) If it is an outsourced project, we need our clients to provide the product requirements (obtain directly from the client and have them sign an agreement);
When a project is completed, if the client suddenly adds requirements or features, it will severely delay your project timeline, dramatically increase costs, and the tested product may need to be retested entirely. The original design may no longer meet current requirements, so it is best to confirm the requirements with the client before starting the project and sign an agreement; otherwise, no matter how hard you work day and night, you will end up with an unmanageable mess!
Stage 2: Product Specification
In the previous stage, we collected all the product requirements. In the product specification stage, our task is to refine all the requirements into specific product specifications. For example, for a simple USB to serial cable, we need to determine the product specifications, including:
-
Product appearance;
-
Supported operating systems;
-
Interface types and supported standards;
And so on. Remember, once the product specification is formed, we must strictly adhere to it during the subsequent development process. Without a 200% reason, product requirements cannot be changed arbitrarily. Otherwise, the product development process will inevitably become an endless cycle.
The “Product Specification” is mainly considered from the following aspects:
-
What hardware interfaces are needed for the product;
-
What environments the product will be used in, its size, and power consumption. If it is a consumer product, considerations of aesthetics and portability are also required to determine the board size and whether it is waterproof;
-
Product cost requirements;
-
Performance parameters of the product (for example, a switch, if it is at a hundred megabit rate, used for homes and general companies; if it is for an entire province’s switching needs, then the design rate will definitely be above hundreds of thousands of megabits). Therefore, different product performance parameters will affect our design considerations, and naturally, the product specifications will differ;
-
Compliance with national standards, international standards, or industry standards;
Stage 3: Overall Product Design
After completing the product specifications, we need to understand the feasible options available for this product. We compare several options, taking into account cost, performance, development cycle, and development difficulty, and ultimately choose the most suitable overall design scheme for our product.
In this stage, in addition to determining the specific implementation scheme, we also need to comprehensively consider the product development cycle, the man-month workload, the resources or external assistance needed, and the risks and coping strategies that may be encountered during the development process, thereby forming the entire project plan to guide our entire development process.
Stage 4: Product Outline Design
The product outline design is mainly a further refinement based on the overall design scheme, focusing specifically on both hardware and software:
Hardware Module Outline Design
The hardware module outline design mainly starts from the hardware perspective, confirming the overall architecture of the system and dividing various modules by function, determining the approximate implementation of each module. First, we must select the CPU based on the peripheral functions we need and the tasks the product needs to accomplish (Note: Once the CPU is determined, the surrounding hardware circuits must refer to the design circuits provided by the CPU manufacturer). Then, according to the product’s functional requirements, we select chips, such as whether to use external AD or internal AD, what communication methods to adopt, what external interfaces to have, and most importantly, to consider electromagnetic compatibility.
Generally, the lifespan of a CPU is 5-8 years, so when considering selection, be cautious not to choose a CPU that is about to be discontinued to avoid the situation where a product, after 1 to 2 years of hard development, is completed but the CPU is discontinued, necessitating a new development. Many companies fail because of this.
Software Module Outline Design
The software module outline design stage mainly involves dividing the entire system into functional modules according to system requirements, defining the interfaces between various functional modules, and the main data structures within the modules.
Stage 5: Detailed Product Design
Hardware Module Detailed Design
This involves specific circuit diagrams and some specific requirements, including the mutual design of PCB and casing dimensions. Next, we need to complete the entire hardware design based on the guidance of the hardware module detailed design document, including schematic diagrams and PCB layout.
Software Module Detailed Design
Function function interface definition, where the function interface completes functionality, data structures, global variables, and the calling flow of various functional function interfaces during task completion. After completing the software module detailed design, we enter the specific coding phase, completing the entire system’s software coding under the guidance of the software module detailed design.
It is crucial to note that the module detailed design document must be completed before the software enters the actual coding phase, and the hardware enters the specific schematic diagram and PCB implementation phase. This approach minimizes the need for repeated modifications during the design process, thereby improving development efficiency. Do not rush to start the actual design steps without completing detailed design.
Stages 6 & 7: Product Debugging and Verification
This stage mainly involves adjusting hardware or code, correcting existing issues and bugs to ensure normal operation, and striving to meet the product functional requirements as specified in the product specifications.
Hardware Section:
-
Visually inspect the PCB board for short circuits, wrongly soldered components, or missed soldering;
-
Test whether the resistance of each power supply to ground is normal;
-
Power on and test whether the power supply is normal;
-
Debug hardware modules by sub-modules, using oscilloscopes, logic analyzers, etc.
Software Section:
Verify whether individual software functions are implemented and whether the entire product functionality is realized.
Stage 8: Testing
Function testing (if testing fails, there may be bugs);
Stress testing (if testing fails, there may be bugs or unreasonable parameter design);
Performance testing (product performance parameters should be extracted for future customer reference; this is part of your product features);
Other specialized tests: including industrial-grade testing, such as anti-interference testing, product lifespan testing, moisture resistance testing, high and low-temperature testing (some products may not function properly or may stop working at extreme temperatures). Some electronic components may exhibit abnormal parameters at specific temperatures, leading to product failures or malfunctions; some devices may not even start at temperatures below zero; while others may experience physical changes in capacitance or resistance at high temperatures, affecting product quality. This leads to a discussion of the differences between industrial-grade products and consumer products. Industrial-grade products must avoid these anomalies and special issues, as some products may work in deep seas, extremely cold caves, scorching deserts, or on bumpy equipment like cars; or may need to prevent lightning strikes. Therefore, this is the distinction between industrial-grade products and consumer products, as consumer products do not require such extensive testing.
Stage 9: Product
After the complete testing and verification in the previous stage, we arrive at this stage, where we obtain our successfully developed product. At this stage, we can compare the actual product with the initially formed product specifications to see whether the product fully complies with the original specifications after a complete development process, or how many modifications were made along the way due to issues found in the specifications.
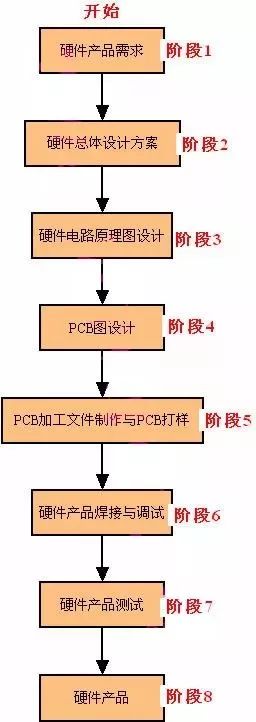
Appendix: Embedded Hardware Development Process
Previously, we detailed the R&D process for embedded products, and in this section, we will specifically explain the development process for the hardware part of embedded products. We hope that through this section, everyone can gain a deeper understanding of the embedded hardware development process, and in future learning and work, become more standardized and improve development skills. The embedded hardware development process generally consists of the following stages:
Embedded hardware products vary greatly; CPUs range from simple 4-bit/8-bit microcontrollers to 32-bit ARM processors and other dedicated ICs. Additionally, depending on different product requirements, peripheral circuits also differ. Each hardware development process must consider various factors based on actual needs to choose the most suitable solution.
Hardware Stage 1: Hardware Product Requirements
Like ordinary embedded product requirements, Stage 1: Product Requirements.
Hardware Stage 2: Hardware Overall Design Scheme
A hardware development project may have requirements from many aspects, such as market product needs or performance enhancement requirements. Therefore, as hardware designers, we need to actively understand and analyze various requirements, and based on the functions the system needs to complete, choose the most suitable hardware scheme.
In this stage, we need to analyze the feasibility of the entire system design, including the procurement availability of major components in the scheme, product development investment, estimated project development cycle, risk assessment, etc., and proactively select countermeasures for potential problems during the development process to ensure the successful completion of the hardware.
Hardware Stage 3: Hardware Circuit Schematic Design
Once the system scheme is determined, we can begin related design work. The schematic design mainly includes the overall design and detailed design of the system, ultimately producing detailed design documents and hardware schematics.
Schematic design and PCB design are two of the main tasks for designers. During the schematic design process, we need to plan internal hardware resources, such as system storage space and the implementation of various peripheral circuit modules. Additionally, the main peripheral circuits of the system, such as power supply and reset, must be carefully considered. In high-speed designs or special applications, EMC/EMI considerations must also be accounted for.
The power supply is fundamental to ensuring the normal operation of the hardware system. The design must analyze in detail: the power input that the system can provide; the power output required by the board; the current required by each power supply; power circuit efficiency; allowable fluctuations for each power supply; and the power-up sequence required by the entire power system.
To ensure stable and reliable system operation, the design of the reset circuit is also very important. Considerations must include how to prevent the system from resetting abnormally under external interference, how to ensure timely resets during system operation anomalies, and how to reset reasonably to guarantee a complete system reset. These are all factors to consider during schematic design.
Similarly, the design of the clock circuit is also a crucial aspect. A poorly designed clock circuit may cause data loss in communication products, generate significant EMI, or even lead to system instability.
In schematic design, one should adopt a “borrowed wisdom” approach! Currently, chip manufacturers generally provide reference design schematics, so utilize these resources as much as possible, making your own adjustments based on a thorough understanding of the reference designs.
Hardware Stage 4: PCB Design
The PCB design stage involves converting the schematic design into a physically manufacturable PCB layout. The mainstream PCB design software includes PADS, Cadence, and Protel.
PCB design, especially high-speed PCB design, needs to consider EMC/EMI, impedance control, signal quality, etc., placing higher demands on PCB designers. To verify whether the designed PCB meets the requirements, PCB simulation may be necessary, and adjustments should be made based on simulation results to complete the overall design.
Hardware Stage 5: PCB Fabrication File Generation and PCB Prototyping
Once the PCB layout is completed, we need to generate fabrication files recognizable by the fabrication plant, commonly referred to as photoplot files, to be submitted for PCB prototyping. Generally, 1-4 layer boards can be completed within a week.
Hardware Stage 6: Hardware Product Soldering and Debugging
After receiving the prototyped PCB, we need to check whether the PCB aligns with our design expectations, whether there are any obvious short circuits or discontinuities. Once verified, we need to have the previously procured components soldered onto the PCB by the manufacturer (if the PCB circuit is not complex, components can also be hand-soldered to speed up the process).
Once the PCB is soldered, before debugging, it is essential to carefully check for visible short circuits, solder bridges, or incorrect component placements, and measure the resistance from each power supply to ground to check for short circuits. This helps avoid damaging the board by powering it on prematurely. Maintain a calm mindset during debugging; encountering problems is entirely normal. The goal is to compare and analyze thoroughly, progressively eliminating possible causes until successful debugging is achieved.
Commonly used debugging tools during hardware debugging include multimeters, oscilloscopes, and logic analyzers, which are used to test and observe signal voltage and quality, ensuring signal timing meets requirements.
Hardware Stage 7: Hardware Product Testing
After successful hardware debugging, we need to test each requirement against the product specification to confirm compliance. If requirements are not met, debugging and modifications are necessary until compliance is achieved (generally evaluated against the requirement specification document, excluding obvious errors in the requirement specification).
Hardware Stage 8: Hardware Product
The hardware we ultimately developed is successful. A complete hardware product that meets product requirements does not solely indicate a successful development process; we must also complete the project on schedule and with high quality to truly reflect a successful product development process.