Dynamic DNS (DDNS) is a service that allows users to automatically update DNS records when their IP address changes. Typically, Internet Service Providers assign dynamic IP addresses to home or small office networks, meaning the IP address changes periodically. If you run a service that needs to be accessed externally (such as a home server or gaming console), changes in the IP address can prevent external access to your service.The working principle of DDNS is as follows:Dynamic IP Monitoring: DDNS client software runs on your device, regularly checking if your public IP address has changed. Updating DNS Records: When a change in the IP address is detected, the client automatically updates the new IP address to the DNS server of the DDNS service provider. Domain Resolution: External requests are resolved through the domain provided by the DDNS service to your current IP address, ensuring that even if the IP address changes, the service remains accessible.Common DDNS service providers include No-IP, DynDNS, and Cloudflare. I primarily use DDNS for Wake On LAN and remote gaming streaming via Moonlight+Sunshine.DDNS-GO is an open-source dynamic DNS solution that helps users access home network services through DDNS, enabling internal network penetration. DDNS-GO supports various operating systems, including Linux (various distributions, including Feiniu fnOS), Windows, macOS, and routers using OpenWRT, including main and secondary routers. DDNS-GO is compatible with multiple DNS service providers, such as Cloudflare, Aliyun DNS (AliDNS), GoDaddy, and DNSPod, making it very flexible. It also supports both IPv4 and IPv6 dynamic address acquisition and configuration, providing a simple web management interface for easy configuration and monitoring of dynamic DNS services.This content is applicable not only to OpenWRT systems but also to other similar systems like Feiniu fnOS when using the DDNS-GO plugin.Configuring IPv6 DDNS for Local Network DevicesPrerequisitesThe DDNS service provider used in this configuration tutorial is Cloudflare, and you need to have your own domain name bound to Cloudflare.Additionally, your devices on the local network must be able to obtain a public IPv6 address. For reference, see the tutorial on IPv6 coexisting with secondary routers: Achieving a perfect balance between policy routing and native addresses.I personally recommend installing the DDNS-GO service on the secondary router (secondary gateway) because our IPv6 RA (Router Advertisement) server is also on this device. If installed on the main router, it may not be able to obtain the complete IPv6 neighbor list. If the main router has RA server mode enabled, installation can also be done on the main router.Installing luci-app-ddns-goMost repositories provide the luci-app-ddns-go plugin, which can be installed through System – Packages, or you can install it via SSH with the following commands.
opkg update
opkg install luci-app-ddns-go
After successful installation, refresh the router management page, and you should see DDNS-GO under the Services tab. If not, you can log out of the router management page and log back in. Configuring the luci-app-ddns-go PluginThe luci-app-ddns-go plugin provides a visual luci web interface for configuring and managing the core of ddns-go in OpenWRT. It does not directly handle DDNS detection, updates, and domain resolution services. Only after configuring and starting the luci-app-ddns-go plugin can you proceed with DDNS configuration.
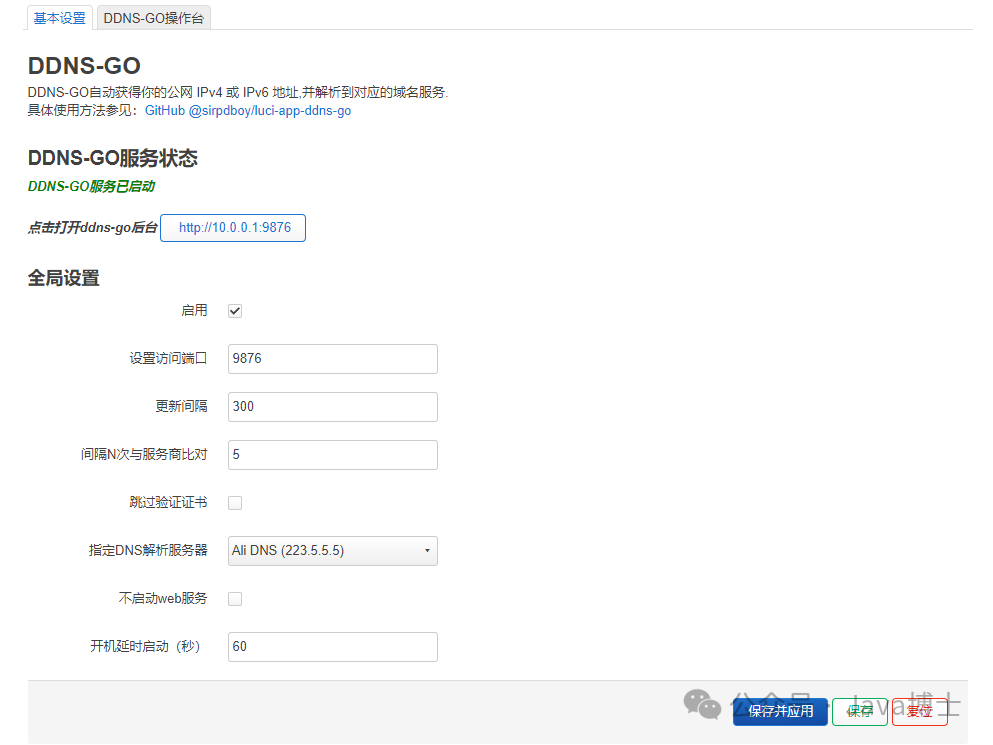 Check the box to enable.If you need to customize the access port for ddns-go, you can modify the settings; I will keep it unchanged.Specify the DNS resolution server; you can choose Aliyun DNS or Tencent DNS. If your router is also proxied, you can select foreign DNS or set your own custom DNS.Other options can remain unchanged.Save and apply.Once you see that the DDNS-GO server has started, it indicates success, and you can access it via http://router_ip_address:9876.The first login requires setting an admin account and password; just follow the prompts to configure.Configuring the DDNS ServiceAccess the User API Tokens page on Cloudflare: User API Tokens – Cloudflareor go to Account – Appearance – API Tokens in the upper right corner to enter the User API Tokens page.We need to create an API token for DDNS-GO to use for modifying the resolution address of the corresponding domain name.Click to create a token, select the DNS editing area, and click the template to use.
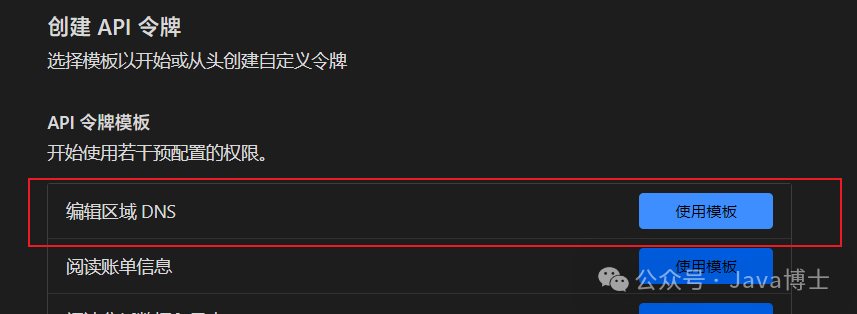 In the resource area – specific area – select the domain you have bound from the dropdown.
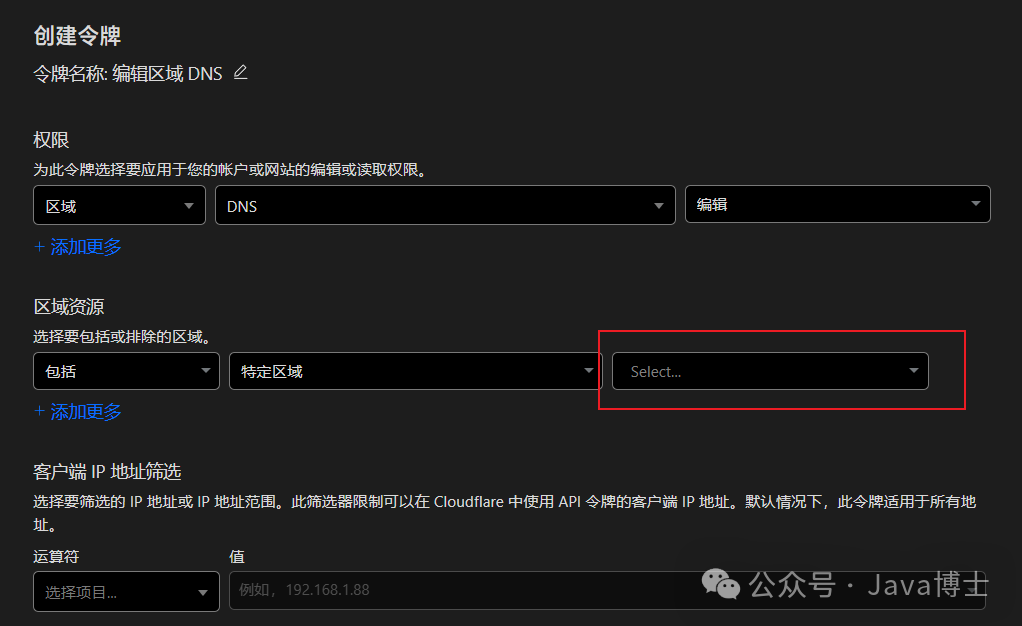 Then click continue to display the summary – create token to see the API token string, and copy it to a safe place.Configuring the Router’s Local DDNS DomainIf your router does not need to configure a DDNS domain, you can skip this part.Access the DDNS-GO web interface via http://router_ip_address:9876.
 DNS Provider:Select CloudflareToken: Enter the API token we just obtained.TTL: Leave it unchanged; it will only take effect after an IP change.IPv4 Section:Domain: Enter the domain you wish to use, for example, I wrote home.xxxx.com.Leave other settings unchanged.IPv6 Section:Check the box to enable.Get IP Method: Leave it unchanged.Domain: Enter the same domain as IPv4.Then scroll down to the bottom, click save, and then click the logs in the upper right corner to check the operation status:
2024/08/30 09:43:25 You can use 'sudo ./ddns-go -s install' to install service
2024/08/30 09:43:25 Listen on :9876
2024/08/30 09:43:43 Config file has been saved to: /etc/ddns-go/ddns-go-config.yaml
2024/08/30 09:43:44 "Remote: [REDACTED]:[REDACTED]" login successfully
2024/08/30 10:41:58 "Remote: [REDACTED]:[REDACTED]" login successfully
2024/08/30 11:14:13 Config file has been saved to: /etc/ddns-go/ddns-go-config.yaml
2024/08/30 11:14:13 Get IPv4 from https://myip4.ipip.net failed
2024/08/30 11:14:13 Exception: Get "https://myip4.ipip.net": dial tcp4: lookup myip4.ipip.net on [REDACTED]:53: no such host
2024/08/30 11:14:13 Get IPv6 from https://myip6.ipip.net failed
2024/08/30 11:14:13 Exception: Get "https://myip6.ipip.net": tls: failed to verify certificate: x509: certificate has expired or is not yet valid: current time 2024-08-30T11:14:13+08:00 is after 2024-03-22T23:59:59Z
2024/08/30 11:14:15 Added domain [REDACTED] successfully! IP: [REDACTED]
2024/08/30 11:14:16 Added domain [REDACTED] successfully! IP: [REDACTED]
Seeing “added domain xxxxxx successfully” indicates that the addition was successful. Wait a moment for the DNS resolution broadcast to complete, and you can access this domain:port publicly.Configuring DDNS Domains for Other Local Network ClientsAgain, if you are providing IPv6 RA service for the local network through a secondary router (secondary gateway), you need to install DDNS-GO on the secondary router (secondary gateway); otherwise, you will not be able to obtain the complete IPv6 routing list and bind DDNS domain names for clients.Configuring the DDNS domain for local network clients is actually similar to the process for configuring the router’s local DDNS. The Cloudflare API Token used is still the one we applied for above.In the DDNS-GO management page, click Add in the upper right corner.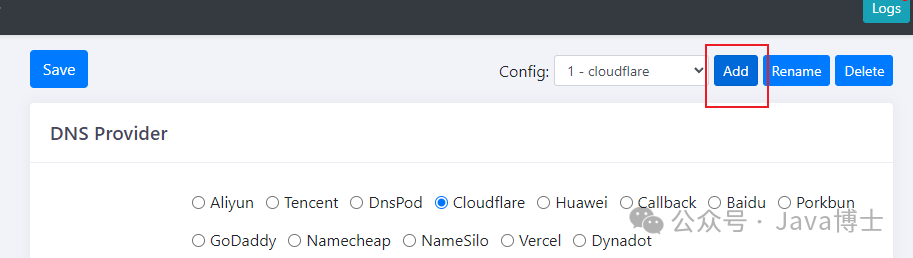 DNS Provider:Select CloudflareToken: Enter the API Token we obtained above.TTL: Select Auto.IPv4 Section:Uncheck the enable button. We only have one public IPv4 address, which has already been assigned to the router’s local use, so we will not configure IPv4 here.IPv6 Section:Check to enable.Get IP Method: Select the last option, By Command, which is command mode.Enter the following command to extract the IPv6 address of a specific local network device; note that the MAC address should be in lowercase, and if copied from Windows, replace – with :.
ip -6 neigh | awk '/client_mac_address/{print $1}' | awk '/240/'## By checking the IPv6 neighbor list, filter out the IPv6 address that matches the MAC address and extract the address starting with 240.Then scroll down to the bottom, click save, and then click the logs in the upper right corner to check the operation status:Seeing “added domain xxxxxx successfully” indicates that the addition was successful. Wait a moment for the DNS resolution broadcast to complete, and you can access this domain:port publicly.