When it comes to inverter communication, there are analog control, communication control, and terminal control. This article will guide you through the understanding of Modbus-RTU communication between the S7-1200 PLC and the HD20 inverter. Speaking of the Modbus-RTU communication protocol, I believe everyone is familiar with it, as it is the most commonly used serial communication protocol. Let’s delve into it.
1. Learning Objectives
This article utilizes the S7-1200 PLC MODBUS RTU library instructions and the basic operations of the Weintek touch screen. Through this article, everyone will gain an understanding of the MODBUS RTU library instruction communication and its application, as well as the basic applications of the Weintek touch screen.
1. One HD20 inverter from Haipu Mont.
2. One S7-200SMART PLC ST40.
3. One 485 communication cable.
4. One motor.
5. One Weintek TK8071ip touch screen.
2. Control Requirements
Communication control between S7-1200 PLC and Haipu Mont HD20 inverter using MODBUS RTU, including how to start, stop, forward, reverse, set frequency, and read voltage on the touch screen.
3. Wiring Instructions
1. Power connection to L1 and L3N (220V), power L1/L2/L3N (380V).
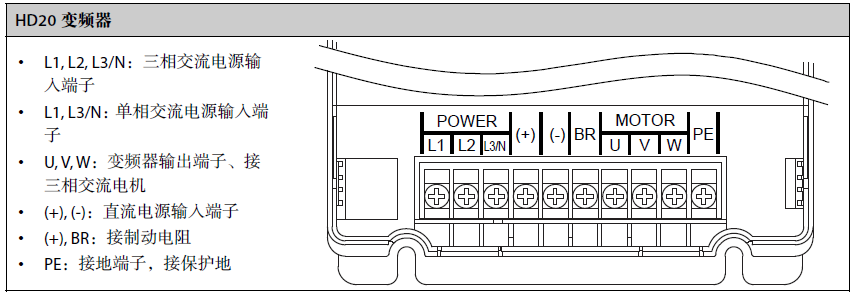
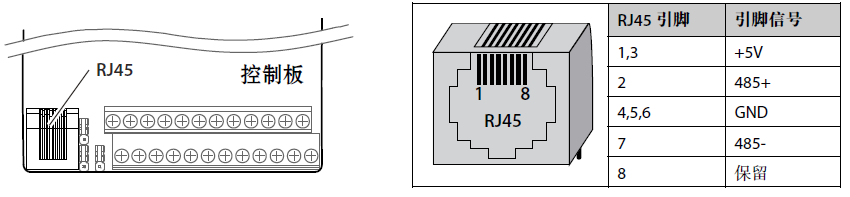
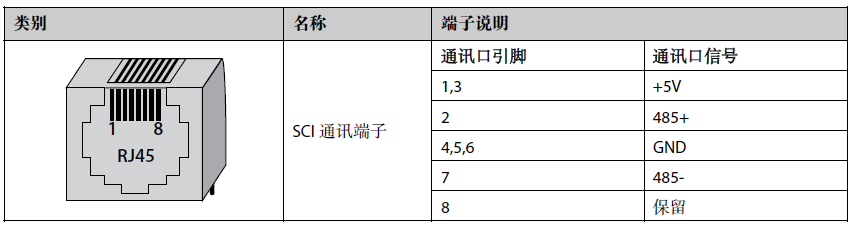
2. Use RJ45 network cable connectors to wire as shown in the following image. For PLC, use 3 positive and 8 negative, for the inverter, use 2 positive and 7 negative.
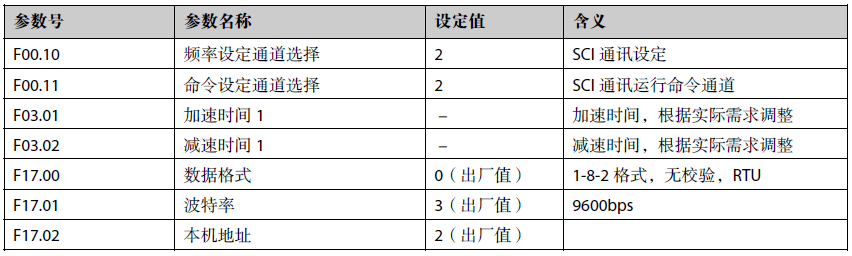
4. Setting Inverter Parameters
F00.10 set to 2 (frequency communication set to 2).
F00.11 set to 2 (command communication set to 2).
F17.00 set to 1 (1 stop bit, 8 data bits, even parity).
F17.01 set to 3 (baud rate 9600).
F17.02 set to 2 (inverter station address 2).

5. Writing PLC Program
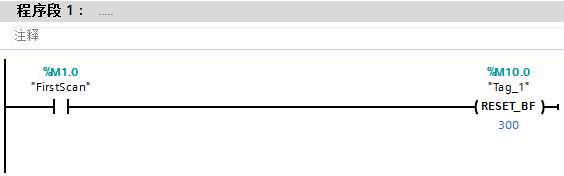
Step 1: (Power on initialization using M address).
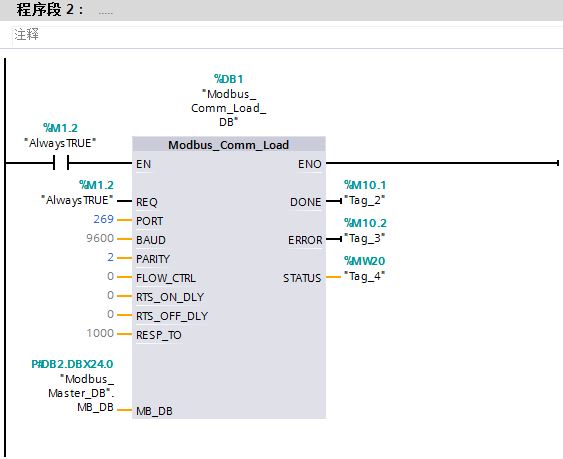
Step 2: (Modbus_comm_Load = configuration communication port function instruction, set communication baud rate, parity, and other parameters).
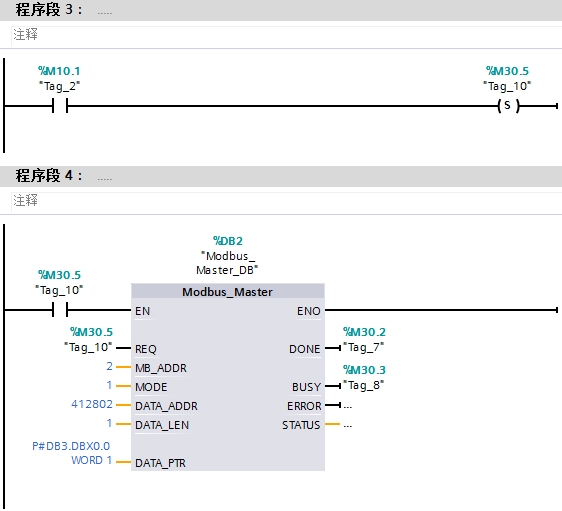
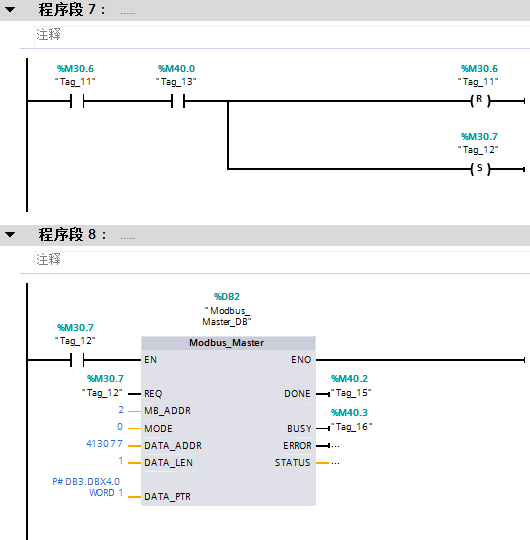
Step 3: (Modbus_Master = PLC as master station read/write instruction, set slave station address, read/write data, and other parameters).
Write frequency to the inverter and use polling method.
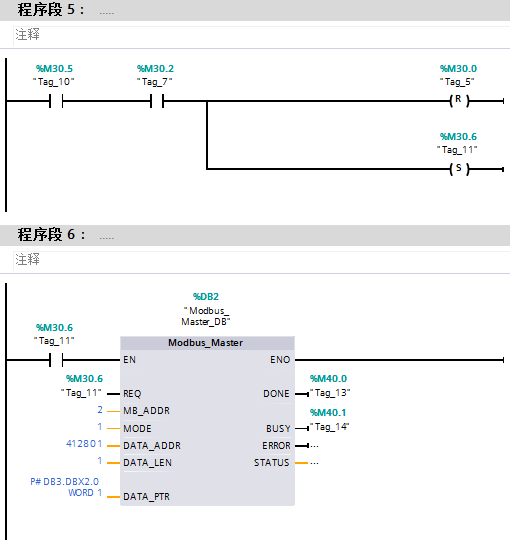
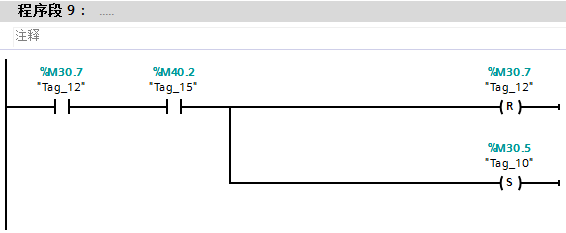
Step 4: (Write control command word to control inverter start/stop, forward/reverse, and use polling method).
Step 5: (Read inverter voltage using polling method).
Step 6: (Read inverter voltage using polling method).
Step 7: (Use single button start/stop method to implement external start/stop of the inverter).

Source: Technical Training Network, Author: Xu Chenshuang, unauthorized reproduction is prohibited!
In the comments, everyone can supplement parts of the article that are incorrect or lacking, so that the next reader can learn more. What you know is exactly what everyone needs.
Scan the QR code below↓↓↓
Get 【Siemens Data Collection】 for free
Three essential tools for electrical workers, easily accessed via WeChat!
[Collection] The “path” of a ten-year electrician, the secret to earning over ten thousand a month!
Which of the five major electrical drawing software (CAD, Eplan, CADe_simu…) do you pick?
The latest electrical version CAD drawing software, with a super detailed installation tutorial!
The latest electrical drawing software EPLAN, with a super detailed installation tutorial!
Common issues for beginners using S7-200 SMART programming software (with download link).
Comprehensive electrical calculation EXCEL sheets, generated automatically! No need to ask for electrical calculations!
Bluetooth earphones, electrical/PLC introductory books are freely given away? Come and claim your electrical gift!
Basic skills in PLC programming: Ladder diagrams and control circuits (with 1164 practical cases of Mitsubishi PLC).
Still can’t understand electrical diagrams? Grab the basics of electrical diagram reading and simulation software, theory and practice quickly!
12 free electrical video courses, 10GB of software/electronic book materials, and 30 days of free live electrical courses are being given away!