This article introduces common smart home product installation methods from a professional and rigorous perspective. It mainly covers the installation methods for eight commonly used smart home products: gateway, panel switch, dimmer switch, scene switch, curtain panel switch, smart socket, infrared treasure, and curtain motor, hoping to assist everyone.
Note: All products use wireless communication, please do not place products in metal boxes to avoid signal shielding.
1. Gateway Installation
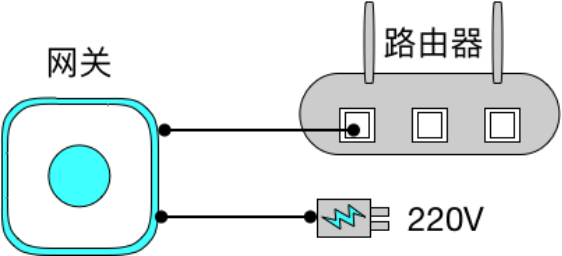
1. Installation conditions for the gateway:
-
There is a usable network interface on the router, and it can access the internet normally;
-
There must be a 220V two-hole socket near the installation location.
2. Installation location for the gateway:
-
For whole-house intelligence (within 150 square meters), it is recommended to install it in the center of the room, considering power supply and network connections; generally installed in the living room or TV cabinet. For areas exceeding 150 square meters, or when walls are too thick to cover the signal, or when cross-floor usage is needed, it is recommended to add a gateway to ensure wireless signal coverage.
-
For regional intelligence (specific room): it is recommended to install it near the power source and network interface; at the same time, try to avoid wall obstructions to the signal.
Note: When using only Wi-Fi devices, the gateway installation is not required, but Wi-Fi coverage is needed, and the device installation location must have good signal strength.
2. Installation of Switches and Sockets
Installation conditions for switch products: the bottom box must be an 86 bottom box, and it must have both neutral and live wires;
Important: Work with power off, do not operate with power on!
1. Panel Switch (Single, Double, Triple)
-
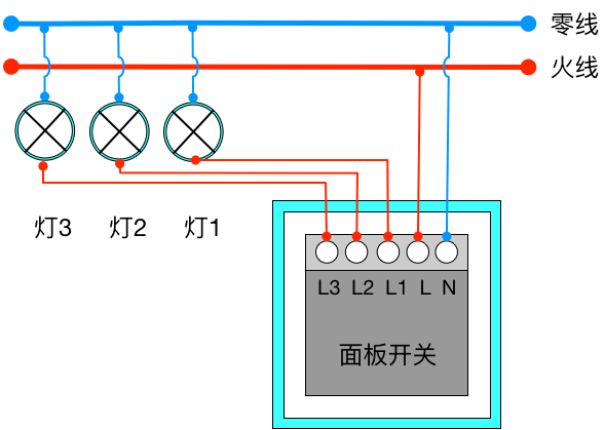
Wiring method: L connects to the external live wire, N connects to the neutral wire, L1, L2, L3 connect to the control live wires of the lamps, and the lamp’s neutral wire connects to the external neutral wire.
-
Wiring steps: Use a flat screwdriver to remove the glass panel of the switch, connect the wires according to the wiring diagram, then secure the switch panel to the 86 bottom box with screws, and finally cover it with the panel.
2. Dimmer Switch
-
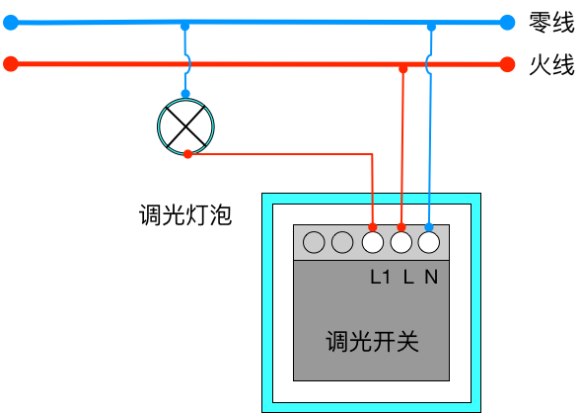
Wiring method: L connects to the external live wire, N connects to the neutral wire, L1 connects to the control live wire of the lamp, and the lamp’s neutral wire connects to the external neutral wire.
-
Wiring steps: Use a flat screwdriver to remove the glass panel of the switch, connect the wires according to the wiring diagram, then secure the switch panel to the 86 bottom box with screws, and finally cover it with the panel.
3. Scene Switch
-
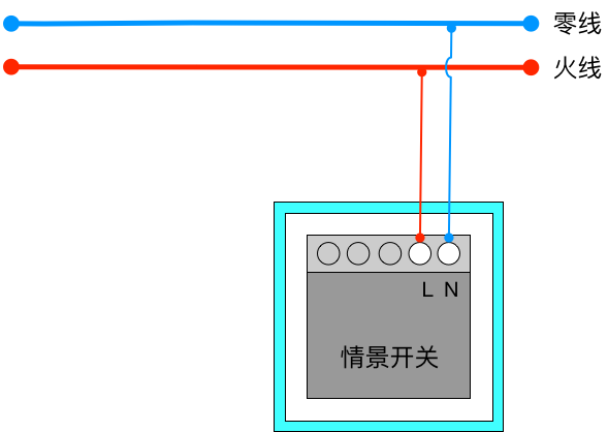
Wiring method: L connects to the external live wire, N connects to the neutral wire.
-
Wiring steps: Use a flat screwdriver to remove the glass panel of the switch, connect the wires according to the wiring diagram, then secure the switch panel to the 86 bottom box with screws, and finally cover it with the panel.
4. Curtain Panel
-
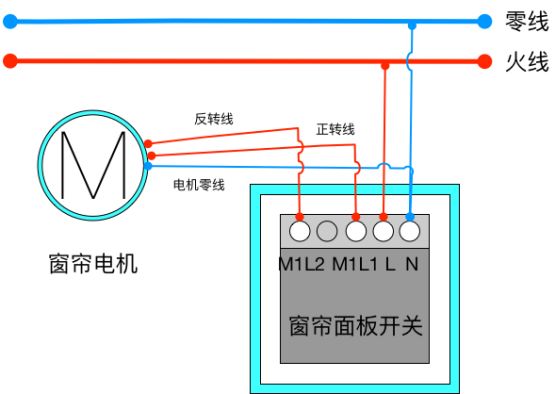
Wiring method: L connects to the external live wire, N/Mn connects to the external neutral wire and the motor’s neutral wire; M1L1 connects to the curtain motor’s forward wire, M1L2 connects to the curtain motor’s reverse wire; if the rotation direction is opposite, please swap the wiring terminals for forward and reverse.
-
Wiring steps: Use a flat screwdriver to remove the glass panel of the switch, connect the wires according to the wiring diagram, then secure the switch panel to the 86 bottom box with screws, and finally cover it with the panel.
5. Smart Socket
-
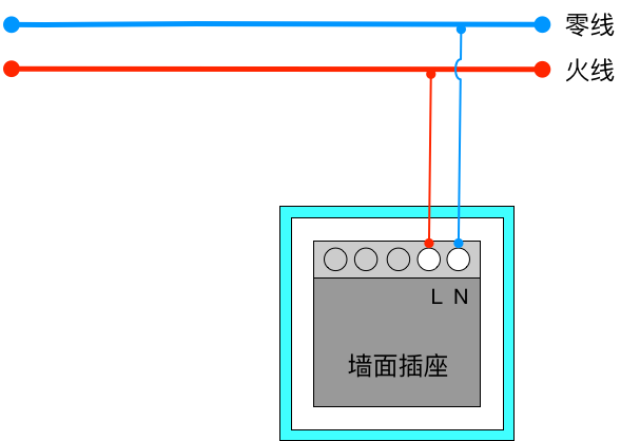
Wiring method: L connects to the external live wire, N connects to the neutral wire.
-
Wiring steps: Use a flat screwdriver to remove the glass panel of the switch, connect the wires according to the wiring diagram, then secure the switch panel to the 86 bottom box with screws, and finally cover it with the panel.
3. Infrared Treasure Installation
1. Installation method for the infrared treasure:
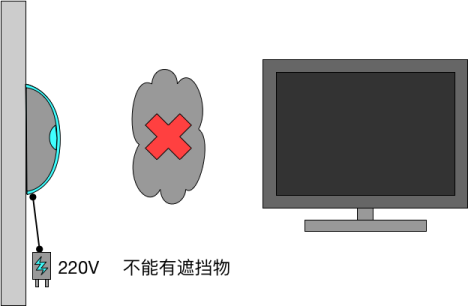
Connect the infrared treasure to the power supply, and the emission window must face the control area, ensuring there are no obstacles between it and the appliances.
4. Motor Installation
1. Installation method for the motor:
1) Align the output shaft of the driver with the large end of the rotating wheel;
2) Rotate the driver 90°, making it parallel to the guide rail;