1. System Introduction:
-
The intelligent flower pot monitors soil moisture using a humidity sensor.
-
It uses the TLC2543 (12-bit ADC) for analog-to-digital conversion.
-
The AT89C51 serves as the main controller.
-
The LCD1602 displays the current moisture level and the set value.
-
It automatically waters and alarms when the moisture level falls below the set value.
2. Introduction to TLC2543:
-
12-bit precision ADC chip.
-
11-channel analog input.
-
SPI interface communication.
-
Maximum conversion rate of 66 kbps.
-
Operating voltage of 4.5-5.5V.
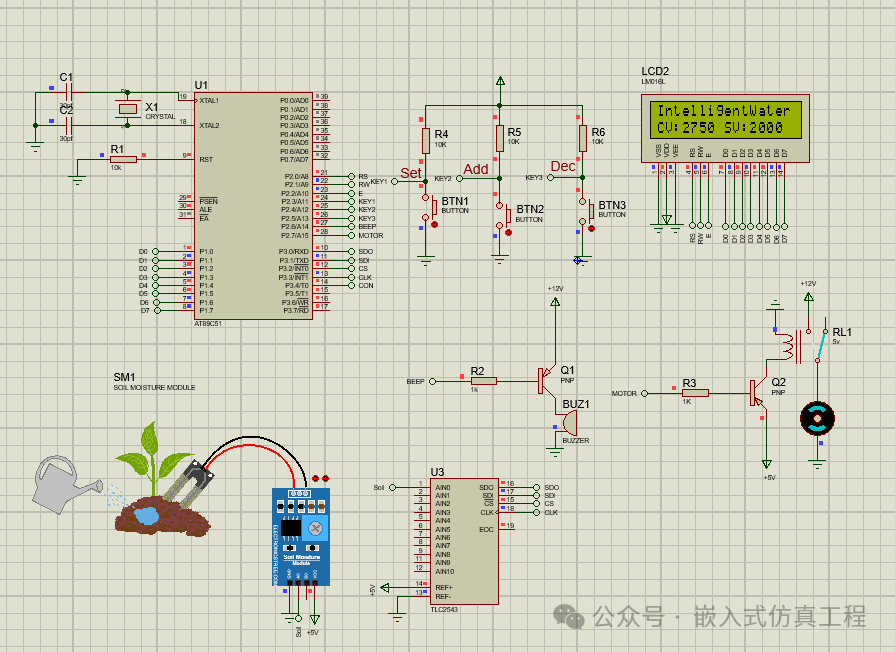
3. Key Points of Proteus Simulation Circuit Design:
-
AT89C51 microcontroller.
-
TLC2543 chip (needs to be added manually).
-
LM016L (LCD1602).
-
Humidity sensor (connected to AIN0).
-
Button circuit (with pull-up resistor).
-
Buzzer and water pump driver circuit (NPN transistor + relay).
-
Necessary resistors and capacitors.
4. Code Implementation
#include<reg51.h>
#define uchar unsigned char
#define uint unsigned int
#define ulong unsigned long
#define LCD1602_DATAPINS P1
sbit LCD1602_E=P2^2;
sbit LCD1602_RW=P2^1;
sbit LCD1602_RS=P2^0;
sbit Set = P2^3;
sbit Add = P2^4;
sbit Dec = P2^5;
sbit BEEP = P2^6;
sbit MOTOR = P2^7;
ulong volt;
sbit CLK=P3^3;
sbit DIN=P3^1;
sbit DOUT=P3^0;
sbit CS=P3^2;
void main()
{
LcdInit();
DisplayListChar(0,0,"IntelligentWater");
DisplayListChar(0,1,"CV:");
DisplayListChar(8,1,"SV:");
TLC2543(0);
while(1)
{
Key_Scan();
TLC2543(0);
DisplayOneChar(3,1,(char)(volt/1000000+'0'));
DisplayOneChar(4,1,(char)(volt/100000%10+'0'));
DisplayOneChar(5,1,(char)(volt/10000%10+'0'));
DisplayOneChar(6,1,(char)(volt/1000%10+'0'));
CurrentValue = volt / 1000;
DisplayOneChar(11,1,(char)(SetValue/1000+'0'));
DisplayOneChar(12,1,(char)(SetValue/100%10+'0'));
DisplayOneChar(13,1,(char)(SetValue/10%10+'0'));
DisplayOneChar(14,1,(char)(SetValue%10+'0'));
if(SetValue>CurrentValue)
{
BEEP = 0;
MOTOR = 0;
}else
{
BEEP = 1;
MOTOR = 1;
}
}
}5. Proteus Simulation Steps:
-
Connect all components according to the circuit diagram.

-
Set the clock frequency of the AT89C51 to 12 MHz.
-
Compile the code and generate the HEX file.
-
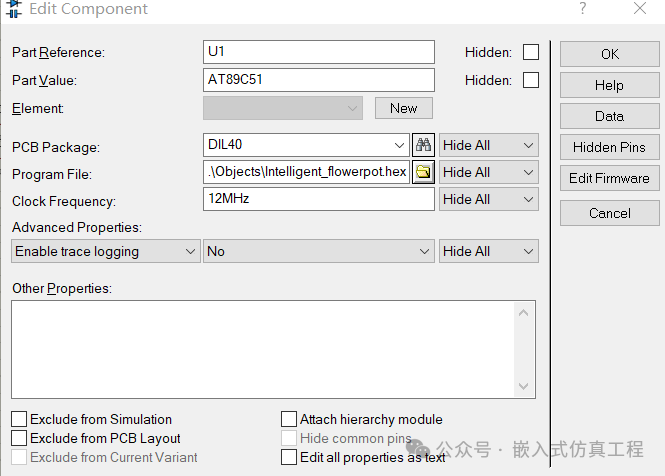
Load the HEX file in the properties of the AT89C51.
-
Run the simulation and adjust the humidity value using the left and right arrows on the humidity sensor.
-
Test the button setting function and the automatic watering logic.
6. Key Function Descriptions:
-
Press SET_KEY to enter the setting mode.
-
In setting mode, Add and Dec adjust the set value.
-
When the actual humidity is below the set value, the buzzer alarms and the water pump is activated.
-
The first line of the LCD displays the current humidity, and the second line displays the set value.
-
The TLC2543 converts the analog humidity into a 12-bit digital value (0-4095).
Notes:
-
The TLC2543 in Proteus may need to be added manually.
-
The humidity sensor needs calibration in practical applications.
-
The water pump control circuit should add a flyback diode to protect the transistor.
-
The button requires hardware debouncing or software delay debouncing.
-
The ADC reference voltage should remain stable to improve accuracy.
This system implements the core functions of an intelligent flower pot, and the hardware design and software logic can be verified through Proteus simulation. In practical applications, parameters such as humidity detection frequency and watering duration can be adjusted as needed.
Follow me (for operation reference, see the article: Send a message to the public account), click the blue text at the top “Embedded Simulation Engineering” or long press to identify the QR code to follow
Reply in the public account
5121
After receiving, it will automatically send the link to the Keil project of this project.