Follow our official account to keep receiving embedded knowledge!
1. Project Overview
Unity is a lightweight unit testing framework designed specifically for C language, with a core goal: to allow you to easily write unit tests in any C compiler and any embedded toolchain.
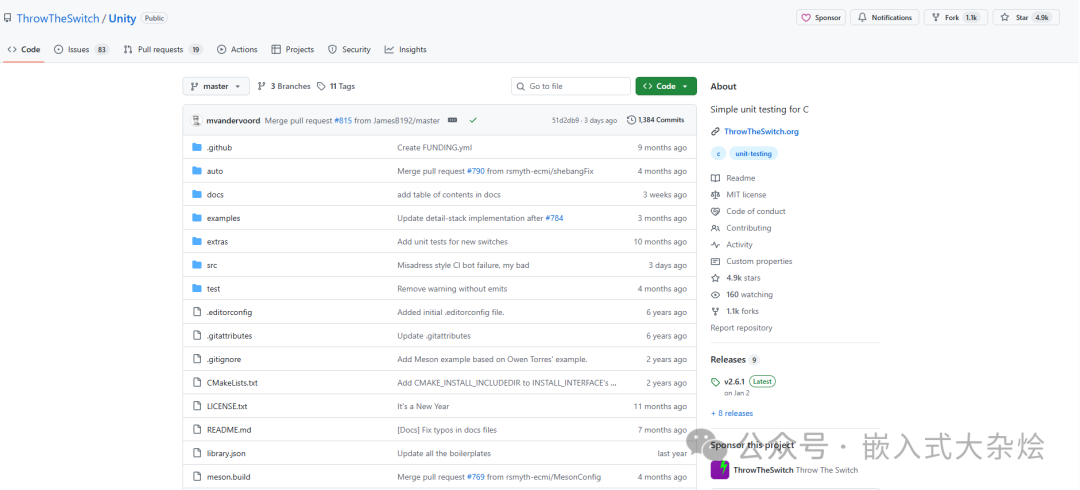
https://github.com/ThrowTheSwitch/Unity
MIT license
It addresses typical issues such as:
- Absence of standard testing frameworks in embedded environments: Many MCU toolchains lack C++ frameworks like gtest/catch2 and do not easily allow complex dependencies.
- Resource constraints: Flash and RAM are limited, so the testing framework must be small and easily “trimmable”.
- Multiple build systems: It should seamlessly integrate with Make, CMake, Meson, PlatformIO, or even custom scripts.
The design of Unity can be summarized in a few points:
- The core consists of
<span>unity.c + unity.h + unity_internals.h</span>, one C file and a pair of header files. - All configurations are done through macros and compile options, with zero runtime dynamic allocation.
- The output style is simple, can be redirected, and is easy for serial ports, log parsers, and CI tools to handle.
2. Core Principles
1. Overall Architecture and Directory Structure
First, let’s look at an overall architecture diagram to understand Unity’s position in the project.
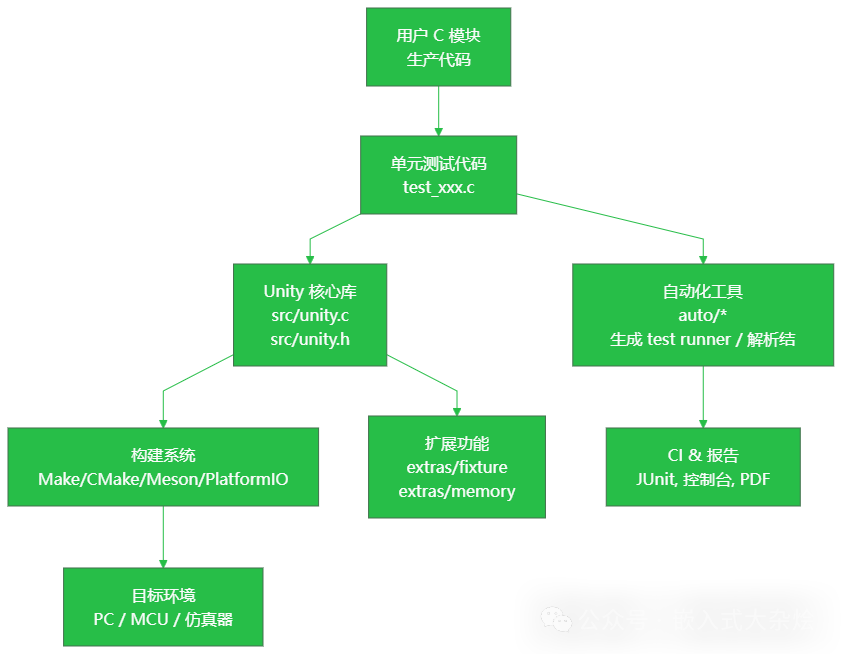
From the repository structure, here are a few key directories:
Unity/
├── src/
│   ├── unity.c                  # Core implementation: assertions, output, test execution control
│   ├── unity.h                  # External assertion macros and API (TEST_ASSERT_*)
│   └── unity_internals.h        # Internal data structures and interfaces
├── extras/
│   ├── fixture/                 # Test fixture extensions: test groups, test suites, etc.
│   ├── memory/                  # Memory allocation tracking extension: detect malloc/free leaks
│   ├── bdd/                     # BDD style support
│   └── eclipse/                 # IDE integration support for Eclipse, etc.
├── auto/
│   ├── generate_test_runner.rb  # Automatically generate test runner
│   ├── parse_output.rb          # Parse test output
│   ├── stylize_as_junit.py      # Convert to JUnit report (Python version)
│   ├── stylize_as_junit.rb      # Convert to JUnit report (Ruby version)
│   └── extract_version.py       # Extract version number from src/unity.h (for build systems)
├── examples/                    # Various example projects (different build methods and configurations)
└── test/                        # Unity's own test project (bootstrap testing)
If you treat Unity as a third-party library in your embedded project, you typically only need to:
- Take the
<span>src/</span>+ required<span>extras/</span>subdirectories; - Compile
<span>unity.c</span>into your own Make/CMake project; - Decide whether to use the scripts in
<span>auto/</span>to automatically generate the test runner.
2. Decoupling Assertion Macros and Internal Implementation
Unity’s external API is all in <span>unity.h</span>, with typical assertion macros looking like this:
TEST_ASSERT_EQUAL_INT(expected, actual);
TEST_ASSERT_FLOAT_WITHIN(delta, expected, actual);
TEST_ASSERT_NULL(ptr);
These macros do not directly implement logic but perform three tasks:
- Capture the call location: The macro uses
<span>__LINE__</span><code><span> to pass the current source file line number to the internal implementation.</span> - Encapsulate display style: For example, whether to print as signed integers or in hexadecimal.
- Forward to internal functions: Such as
<span>UnityAssertEqualIntNumber</span>,<span>UnityAssertFloatsWithin</span>, etc.
To simplify the understanding of the call chain (illustrated with a diagram):
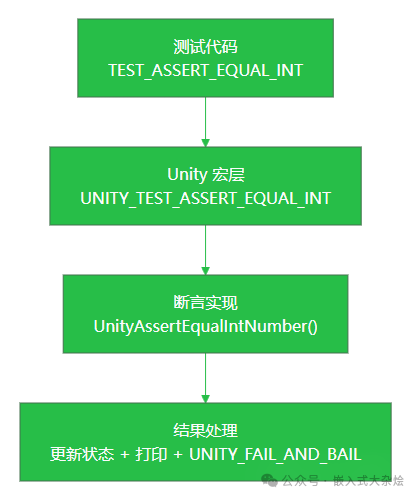
Key points:
- All assertions ultimately rely on a few core comparison functions, such as:
<span>UnityAssertEqualIntNumber</span><span>UnityAssertIntGreaterOrLessOrEqualNumber</span><span>UnityAssertFloatsWithin</span>/<span>UnityAssertDoublesWithin</span><span>UnityAssertEqualMemory</span>, etc.- The “different forms” of string, array, and memory comparisons are actually justdifferent interpretations of parameters and loop controls, with error printing logic completely reused.
The benefits of this design are:
- Providing a large number of
<span>TEST_ASSERT_*</span>macros while keeping the core functions few,thus reducing maintenance costs. - The macros pass line numbers and type information, with internal handling of print formats,ensuring consistent error message styles.
3. Global State and Test Execution Control
Unity manages the entire test lifecycle with a global structure <span>UNITY_STORAGE_T Unity;</span>, which includes:
- Current test name, file name, line number;
- Total number of tests, failures, ignores;
- Current test’s failure/ignore flag;
- Optional detail stack (for extended context information).
Test execution is a “state machine + output” process, which can be better understood with another diagram:
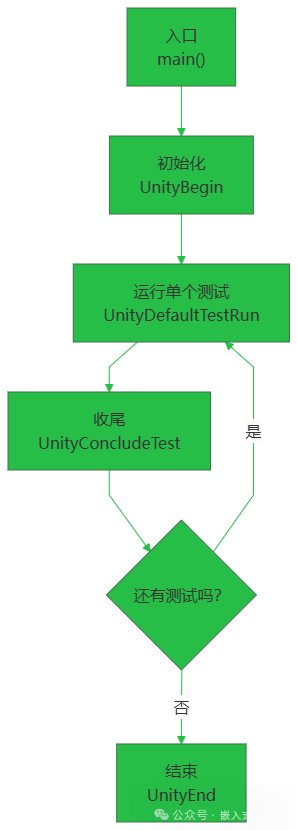
Several key APIs:
-
<span>UnityBegin</span>initializes global state and outputs header information. -
<span>UnityDefaultTestRun</span>(used if you do not use a custom runner) - Fills
<span>Unity.CurrentTestName / LineNumber</span>; - Uses
<span>TEST_PROTECT()</span>to protect<span>setUp</span>, test function, and<span>tearDown</span>; - Calls
<span>UnityConcludeTest</span>to finalize. -
<span>UnityConcludeTest</span>decides based on<span>CurrentTestFailed/CurrentTestIgnored</span>: - Counts towards
<span>TestFailures</span>or<span>TestIgnores</span>; - Outputs a line with the current test result;
- Clears flags.
-
<span>UnityEnd</span>outputs overall statistics (total tests/failures/ignores), prints final<span>OK</span>or<span>FAIL</span>, and returns the number of failures (to<span>main()</span>as exit code).
For embedded systems, this entire setup only relies on the <span>UNITY_OUTPUT_CHAR</span> macro (default is <span>putchar</span>), which you can redefine as:
- Serial transmission function;
- SWO output;
- Ring buffer logging.
4. Configuration Options: On-Demand Trimming + Type Adaptation
In the comments of <span>unity.h</span>, you will find a lot of <span>#define UNITY_...</span> configuration descriptions, such as:
- Integer width and 64-bit support:
<span>UNITY_SUPPORT_64</span>,<span>UNITY_INT_WIDTH</span>,<span>UNITY_LONG_WIDTH</span>,<span>UNITY_POINTER_WIDTH</span>.- Floating-point related:
<span>UNITY_EXCLUDE_FLOAT</span>/<span>UNITY_EXCLUDE_DOUBLE</span><span>UNITY_INCLUDE_DOUBLE</span><span>UNITY_FLOAT_PRECISION</span>/<span>UNITY_DOUBLE_PRECISION</span>.- Output behavior:
<span>UNITY_OUTPUT_CHAR(a)</span>custom character output function.<span>UNITY_DIFFERENTIATE_FINAL_FAIL</span>controls the final<span>FAILED</span>message.- Counter types:
<span>UNITY_LINE_TYPE</span>,<span>UNITY_COUNTER_TYPE</span>can be replaced with larger integer types for very large projects.
The overall design philosophy is:
- All configurations are determined at compile time, relying on macro switches to avoid runtime branches and unnecessary data.
- What is missing can be
<span>#define UNITY_EXCLUDE_*</span>to drop, which is particularly suitable for ROM-constrained MCUs.
3. Practical Application
Below is a typical minimal example demonstrating how to run Unity. Assume you have a simple module <span>calc.c</span>:
// calc.c
int add(int a, int b) {
    return a + b;
}
1. Include Unity Core
Add the following files to your project:
<span>src/unity.c</span><span>src/unity.h</span><span>src/unity_internals.h</span>(only included by unity.c)
Just compile <span>unity.c</span> into your build script (Make/CMake/Meson are all fine).
2. Write a Simple Test File
// test_calc.c
#include "unity.h"
#include "calc.h"

void setUp(void) {
    // Initialization before each test
}

void tearDown(void) {
    // Cleanup after each test
}

void test_add_should_sum_two_positive_numbers(void) {
    TEST_ASSERT_EQUAL_INT(5, add(2, 3));
}

void test_add_should_handle_negative(void) {
    TEST_ASSERT_EQUAL_INT(-1, add(2, -3));
}

int main(void) {
    UnityBegin("test_calc.c");

    UnityDefaultTestRun(test_add_should_sum_two_positive_numbers,
                        "test_add_should_sum_two_positive_numbers", __LINE__);

    UnityDefaultTestRun(test_add_should_handle_negative,
                        "test_add_should_handle_negative", __LINE__);

    return UnityEnd();
}
Actual running results:
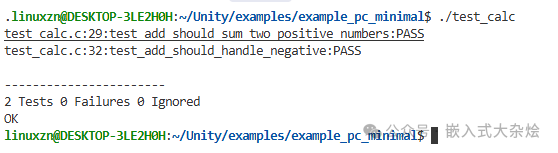
Note a few points:
<span>setUp/tearDown</span>are hooks defined by Unity and must be present (even if empty).- Each test function can be named as desired, but it is recommended to use a
<span>test_</span>prefix for consistency. <span>UnityDefaultTestRun</span>will handle calling<span>setUp/test/tearDown</span>and managing exceptions.
If you use <span>auto/generate_test_runner.rb</span>, it can automatically generate the <span>main</span> and <span>UnityDefaultTestRun</span> calls, allowing you to only write <span>test_...</span> functions.
3. What Happens When an Assertion Fails?
For example, in the second test, we intentionally write it incorrectly:
TEST_ASSERT_EQUAL_INT(0, add(2, -3)); // Actual result is -1
Internally, the process will roughly go through:
<span>TEST_ASSERT_EQUAL_INT</span>macro passes<span>__LINE__</span>, expected value, and actual value to the internal function.<span>UnityAssertEqualIntNumber</span>detects inequality:
- Sets
<span>Unity.CurrentTestFailed = 1</span>; - Flushes output;
<span>TEST_ABORT()</span>exits the current test early.
- Through
<span>UnityTestResultsFailBegin</span>, it prints the prefix:<span>File:Line:Test Name:FAIL:</span> - Prints
<span>Expected</span>and<span>Was</span>. - Calls
<span>UNITY_FAIL_AND_BAIL</span>:
This way, subsequent statements will not continue executing, and <span>UnityConcludeTest</span> will count this test as failed and output a line of statistics.
This “fail-fast” mode is specifically designed for embedded considerations:
- Avoid executing numerous assertions in a fault state;
- Relies on the implementation of
<span>TEST_PROTECT()</span>(usually<span>setjmp/longjmp</span>) to ensure that<span>tearDown</span>still has a chance to execute.
4. Using Fixture Extensions for Test Groups
If you include <span>extras/fixture/src/unity_fixture.c</span> and the corresponding header files, you can use a more advanced syntax:
- Define test groups (
<span>TEST_GROUP</span>) - Use
<span>TEST_SETUP/TEST_TEAR_DOWN</span> - Define test cases using
<span>TEST</span>macro - Run the entire group of tests using
<span>RUN_TEST_GROUP</span>.
Example code is as follows:
#include "unity.h"
#include "unity_fixture.h"
#include "calc.h"

/* First test group: Basic addition scenarios */
TEST_GROUP(CalcBasic);

TEST_SETUP(CalcBasic) {}
TEST_TEAR_DOWN(CalcBasic) {}

TEST(CalcBasic, AddTwoPositiveNumbers)
{
    TEST_ASSERT_EQUAL_INT(5, add(2, 3));
}

TEST(CalcBasic, AddWithNegative)
{
    TEST_ASSERT_EQUAL_INT(-1, add(2, -3));
}

TEST_GROUP_RUNNER(CalcBasic)
{
    RUN_TEST_CASE(CalcBasic, AddTwoPositiveNumbers);
    RUN_TEST_CASE(CalcBasic, AddWithNegative);
}

/* Second test group: Edge and special scenarios */
TEST_GROUP(CalcEdge);

TEST_SETUP(CalcEdge) {}
TEST_TEAR_DOWN(CalcEdge) {}

TEST(CalcEdge, AddWithZero)
{
    TEST_ASSERT_EQUAL_INT(3, add(3, 0));
    TEST_ASSERT_EQUAL_INT(-3, add(-3, 0));
}

TEST(CalcEdge, AddSymmetricNegPos)
{
    TEST_ASSERT_EQUAL_INT(0, add(5, -5));
}

TEST_GROUP_RUNNER(CalcEdge)
{
    RUN_TEST_CASE(CalcEdge, AddWithZero);
    RUN_TEST_CASE(CalcEdge, AddSymmetricNegPos);
}

static void RunAllTests(void)
{
    RUN_TEST_GROUP(CalcBasic);
    RUN_TEST_GROUP(CalcEdge);
}

int main(int argc, const char* argv[])
{
    return UnityMain(argc, argv, RunAllTests);
}
Running results are as follows:
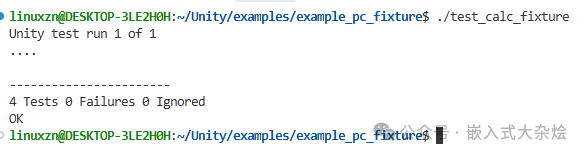
This layer of extension essentially wraps a more “xUnit”-like grouping model on top of the Unity core;
- It still relies on Unity’s assertions and the
<span>UnityBegin/UnityEnd</span>series of functions to complete underlying statistics and output (encapsulated by<span>UnityMain</span>).
For medium to large embedded projects, it is recommended to use fixture extensions to create “module-level test sets” for easier maintenance and closer alignment with common xUnit testing practices.
4. Conclusion
Unity consists of a single <span>.c</span> file and two <span>.h</span> files to achieve all functionalities, with no dynamic allocation and no complex dependencies on the standard library, making it very suitable for MCU and legacy compiler environments.
You might also like:
A lightweight ring buffer management library for embedded systems!
Git interactive rebase to modify commit messages
The Singleton Pattern: Guardian of Global State Consistency in Embedded Systems
Embedded Systems: The Ultimate Showdown between Linux and RTOS!
Embedded Software Advancement Guide, Let’s Level Up Together!
Click to read the original article and get popular embedded books