What is NanoGUI?
NanoGUI is an ultra-lightweight cross-platform GUI toolkit designed for OpenGL 3+, GLES 2/3, and Metal. It wraps NanoVG (Mikko Mononen’s 2D drawing library) and directly provides common UI components such as buttons, sliders, text boxes, and tabs. The key point is that it has both a C++ 17 native interface and a Python nanobind binding, allowing you to simply run <span>pip install nanogui</span> to start using UI in your scripts, which is incredibly convenient.
Tip: If you just want to run a demo on your computer, simply run
<span>pip install nanogui</span>; if you want to run it on a Raspberry Pi, browser, or even iPhone, you will need to compile the source code, which will be discussed later.
What Pain Points Does It Address?
| Traditional Approach | NanoGUI Improvements |
| Manually writing OpenGL UI requires writing vertices, textures, and event dispatch for each button and slider, leading to an explosion of code. | One line of code<span>Button *b = new Button(win, "Click me");</span> with a callback lambda can be done in seconds. |
| Poor cross-platform compatibility requires writing different window system code for Windows, macOS, and Linux. | Unified backend based on GLFW + GLAD + NanoVG allows for one-click switching between OpenGL, GLES, and Metal. |
| Barrier between Python and C++ requires either full C++ or writing C-API, making binding cumbersome. | nanobind binding allows Python calls to be almost identical to C++, enabling easy copy-pasting of code. |
| Blurry rendering on high-DPI screens as ordinary UI libraries often do not support Retina / HDR. | Native support for Retina / HDR ensures clarity on high-DPI screens in macOS, Wayland, and Windows. |
| Lack of layout system requires writing layout algorithms, which can lead to errors. | Automatic layout with BoxLayout, GridLayout, AnchorLayout, etc., is ready to use. |
In short, NanoGUI reduces the task of “writing UI” from thousands of lines of C++ to just a few lines of code, and it can run on Raspberry Pi, Web (via WebAssembly), and iPhone, making it truly one installation, multiple platforms.
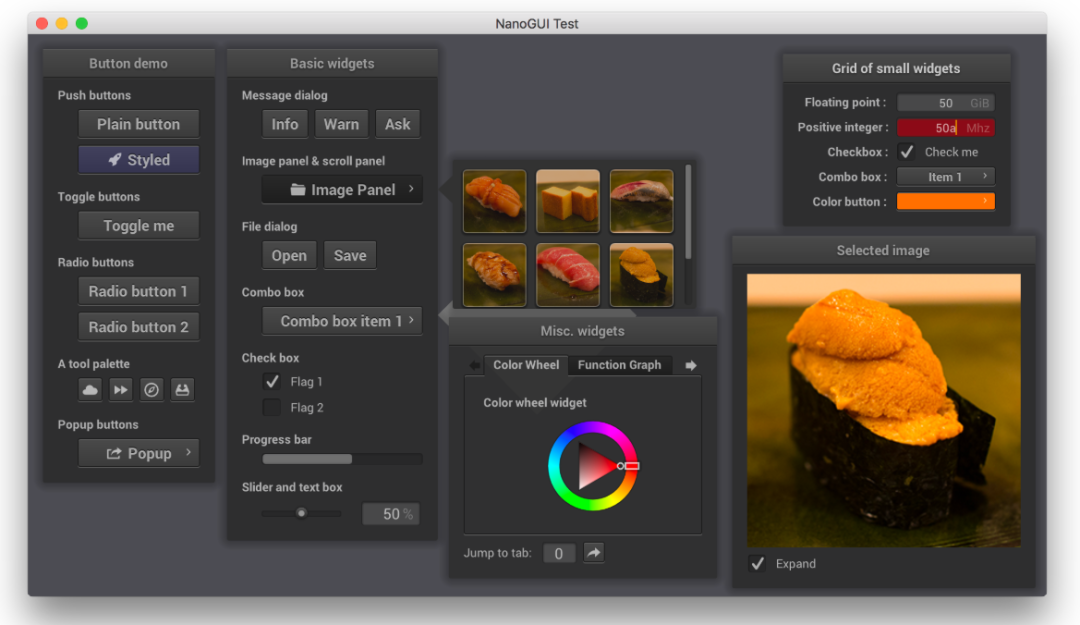
Installation & Usage Tips
1️⃣ Installation (Python version)
pip install nanoguiAfter installation, open the Python REPL and run <span>import nanogui</span>; if there are no errors, you have succeeded.
2️⃣ Compilation (C++ version)
# Clone the repository, remember to include submodules

git clone --recursive https://github.com/mitsuba-renderer/nanogui
cd nanogui

# Install dependencies (Ubuntu example)
sudo apt-get install cmake xorg-dev libglu1-mesa-dev python3-dev

# Generate build files
cmake -S . -B build -DCMAKE_BUILD_TYPE=Release
cmake --build build -j$(nproc)
After compilation, you will find several demo programs in <span>build/examples/</span>; open them to see the UI effects.
3️⃣ Basic Code Example (C++)
#include <nanogui/nanogui.h>
using namespace nanogui;

int main() {
    nanogui::init();

    Screen *screen = new Screen(Vector2i(400,300), "NanoGUI Demo");
    Window *win = new Window(screen, "Small Window");
    win->set_position(Vector2i(15,15));
    win->set_layout(new GroupLayout());

    // Button
    Button *btn = new Button(win, "Click me");
    btn->set_callback([]{ std::cout << "Button clicked!\n"; });

    // Slider + TextBox interaction
    Slider *slider = new Slider(win);
    TextBox *tb = new TextBox(win);
    tb->set_fixed_size(Vector2i(60,25));
    slider->set_callback([tb](float v){ tb->set_value(std::to_string(int(v*100))); });

    screen->set_visible(true);
    screen->perform_layout();
    nanogui::mainloop();

    delete screen;
    nanogui::shutdown();
    return 0;
}
4️⃣ Python Version in a Few Lines
import nanogui as ng

ng.init()
screen = ng.Screen((400,300), "NanoGUI Demo")
win = ng.Window(screen, "Small Window")
win.set_layout(ng.GroupLayout())

btn = ng.Button(win, "Click me")
btn.set_callback(lambda: print("Button clicked!"))

slider = ng.Slider(win)
tb = ng.TextBox(win)
tb.set_fixed_size(ng.Vector2i(60,25))
slider.set_callback(lambda v: tb.set_value(str(int(v*100))))

screen.visible = True
screen.perform_layout()
gn.mainloop()
It is almost identical, just with a different language. For more complex layouts, simply change <span>GroupLayout</span> to <span>BoxLayout</span> or <span>GridLayout</span>, and add some <span>set_fixed_width/height</span> to customize as desired.
Pros and Cons Overview
| Pros | Cons |
| Lightweight: The core library is only a few hundred KB, and compiles quickly. | Documentation is relatively scattered: The official README is sufficient, but lacks systematic tutorials. |
| Cross-platform: Supports OpenGL, GLES, Metal, and even WebAssembly. | Depends on GLFW/GLAD: May require custom trimming in extreme embedded environments. |
| Python binding: nanobind speeds up scripting experiments. | C++ code feels a bit outdated: Still uses raw pointers <span>new</span>, which is not modern RAII. |
| Automatic layout: Saves the hassle of manually calculating coordinates. | Limited theme customization: Default colors and fonts can only change a few properties, lacking CSS-like flexibility. |
| High DPI & HDR: Provides detailed visuals. | Does not support Windows 10 UWP / Android natively (only through EGL/GLES). |
Overall, if you need a UI framework that is easy to get started with, especially if you want to quickly add a tuning panel to an OpenGL project, NanoGUI is a very suitable choice. If you seek extreme theme customization or native mobile UI, you may need to consider other libraries (like Qt or Dear ImGui).
Conclusion: Why Play with NanoGUI?
- • Quick to get started: A few lines of code can yield complete buttons, sliders, and text boxes.
- • Cross-platform: Write once, run everywhere on PC, Raspberry Pi, browser, and iPhone.
- • Python-friendly: Scripting for parameter tuning is no longer a dream.
- • Lightweight and not bloated: Compiles quickly and has a small runtime footprint, suitable for research prototypes and small tools.
If you are frustrated by the lack of UI in your “OpenGL project” or want to pop up a small window for parameter tuning in Jupyter Notebook, NanoGUI is your best choice. Go ahead and try it out to experience the joy of “one-click UI generation”!
Project address: https://github.com/mitsuba-renderer/nanogui