In previous articles, we introduced how to write a simple WDF PCI driver, mentioning that Windows drivers need to be signed after compilation, and we used test signatures in our experiments. This article will explain how to create a test signature for the driver.
Before discussing test signatures, let’s briefly introduce the principle of Windows driver signing. The core principle of Windows driver signing is to verify the trustworthiness and integrity of the driver source through cryptographic techniques and digital certificates, preventing malicious code from tampering with the kernel. Cryptographic techniques include asymmetric encryption and hash algorithms, primarily used to generate and verify driver signatures.
Signature Generation:Developers use a private key to encrypt the hash value of the driver file (e.g., SHA-256) to generate a signature, which is then bound to the driver program.The signature is included in the signature field of the driver package (such as CAT files or driver file metadata) and is associated with a digital certificate issued by a CA (Certificate Authority) or Microsoft to prove the developer’s identity.Signature Verification: When Windows loads the driver, the system uses the public key in the certificate to decrypt the signature, recalculates the driver hash value, and compares it to ensure the file has not been tampered with (integrity). If the signature verification fails, the Windows kernel will refuse to load the driver.From the above description, it can be seen that the certificate is very important in this process, as it identifies the developer’s identity and provides the public key to decrypt the signature to obtain the driver hash value. If the certificate is tampered with, the integrity of the driver cannot be protected, so the certificate must be verified as valid first.The validity of the certificate must be verified through a trust chain, and the certificate must be issued by a trusted root certificate authority (such as Microsoft Root Authority) and not revoked. The Windows kernel needs to verify the certificate chain step by step: driver certificate → intermediate CA certificate → root certificate, with the root certificate pre-installed in the Windows kernel (no network verification required).Taking Microsoft’s WHQL certification as an example, let’s briefly describe the complete signature process.
1. Developer Preparation
-
Apply for an EV Code Signing Certificate from a CA (which requires strict identity verification) and it costs money.
-
Sign the driver file with the certificate’s private key.
2. Microsoft WHQL Certification
- Test the driver compatibility using the Windows Hardware Lab Kit (HLK).
- Submit the HLK test report to Microsoft; after passing the review, Microsoft will use its private key to re-sign the driver package. Once the driver receives Microsoft’s signature, it can be officially released.
3. System Load Verification
-
During installation, check the validity of the Microsoft signature on the driver file (trust chain verification).
-
During kernel loading, forcibly verify whether the driver file hash matches the hash in the signature.
At this point, some may wonder how to handle the situation where a Microsoft signature cannot be obtained during the development and testing phase. The answer is to enable test signature mode on the test machine and apply a test signature to the driver (finally introducing the main topic of this article 😂). To create a test signature for the driver, we first need to generate a self-signed certificate.
First, let’s introduce what a self-signed certificate is. A Windows driver self-signed certificate is a certificate generated by the developer for signing the driver in a local testing environment to bypass Windows’ mandatory driver signing restrictions. Its essence is to act as a certificate authority (CA) for quick testing and verification, but it cannot be used for official releases. The signature created using a self-signed certificate for the driver is called a test signature or self-test signature.
Perhaps everyone is getting a bit sleepy, so let’s get hands-on and conduct some experiments. Below, we will generate a self-signed certificate and then create a test signature for our PCI driver.
To generate a self-signed certificate, you can use the MakeCert.exe tool included with the Windows SDK that comes with Visual Studio installation, but Microsoft no longer recommends using this tool. It is now more recommended to use the PowerShell command New-SelfSignedCertificate to generate a self-signed certificate. The following example uses this PowerShell command to generate a self-signed certificate named TestDriverCert, with the certificate type being CodeSigningCert, which is the required certificate type for Windows drivers: code signing certificate. This certificate uses the RSA asymmetric encryption algorithm with a key length of 2048, and the exported certificate file is:TestDriverCert.cer.

After obtaining the self-signed certificate, we also need to import this certificate into the development machine (for signing) and the test machine (for verifying the signature during driver installation). The command is as follows.
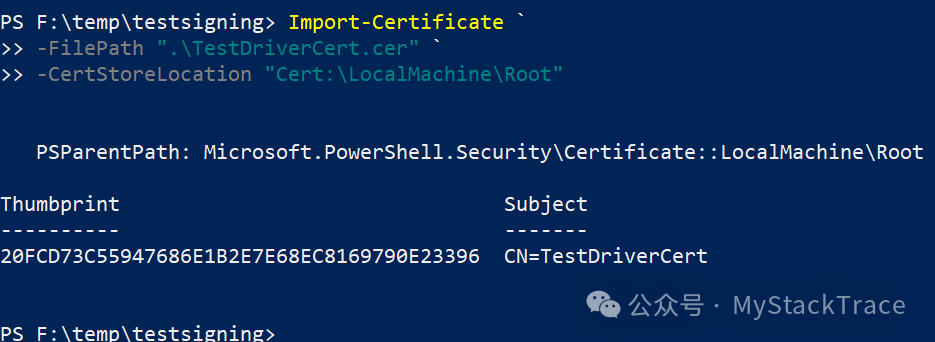
After executing the above command, the self-signed certificate will be imported into the current machine, stored in the “Trusted Root Certification Authorities”. We can view it through certmgr.msc.

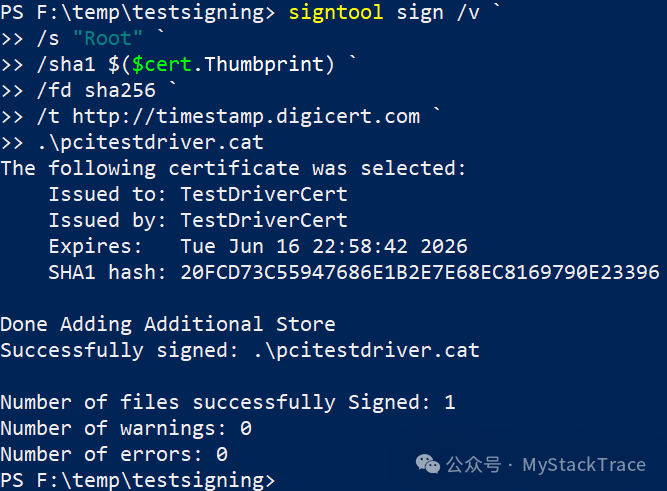
Next, we can sign the driver (.sys) using signtool.exe, which is also included in the Windows SDK. The command signtool uses the /s parameter to specify the location of the certificate store to use, which is the “Root” where we just imported the certificate. The /n parameter specifies the name of the certificate, the /fd parameter specifies the hash algorithm, and the /t parameter specifies the URL of the timestamp server (signatures require timestamps).

After signing the driver itself, we also need to sign the driver’s .cat file. Signing the .cat file is equivalent to storing the hash values of all files in the driver (including .sys, .inf, .dll) in a single file, creating a centralized signature, which simplifies the process and ensures the integrity of all files in the driver. The generation of the driver .cat file requires using Inf2Cat.exe to parse the driver’s .inf file. We can configure it to automatically generate during compilation through the driver project properties in VS, or we can manually run the command line to generate the .cat file after the driver is compiled.

Below is the command to sign the .cat file.
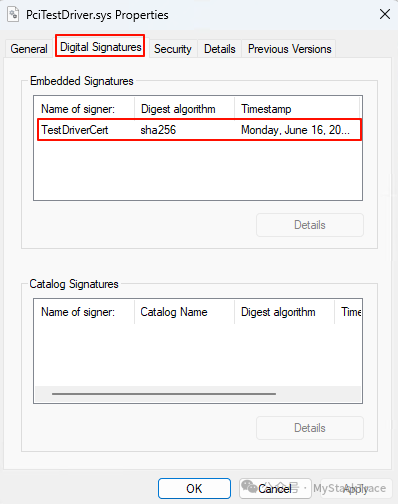
Thus, we have completed the process of creating a test signature for the driver. The properties of the signed driver file will include an additional tab named “Digital Signatures”, which contains all the signatures of the driver file.
Before installing the self-signed certificate and driver on the test machine, we need to enable test signature mode on the test machine by running in cmd:bcdedit /set testsigning on (Secure Boot needs to be disabled), then restart the test machine.
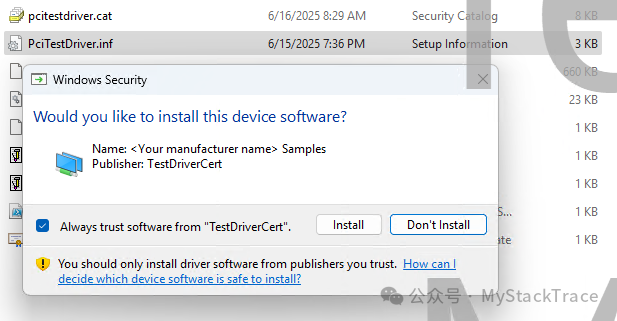
Next, we will copy the self-signed certificate to the test machine and use the Import-Certificate command to install it on the test machine. Then we will also copy the signed driver, including PciTestDriver.sys, pcitestdriver.cat, and PciTestDriver.inf to the test machine for installation. If this is the first installation, the following prompt will appear; just click the Install button.
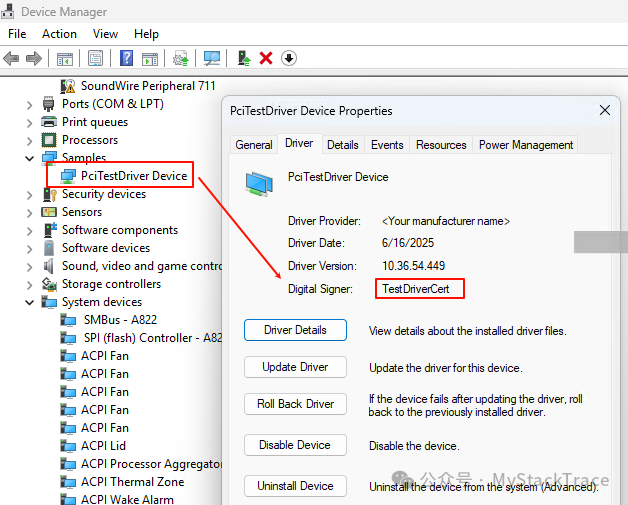
After installation, check the signer of the driver in the device manager, as shown below.