In the field of embedded systems, flexibility and modularity are key to efficiently managing complex projects. The Yocto Project is a powerful build system for creating custom Linux distributions, embodying this concept through its layered mechanism. These layers are essentially a set of repositories containing the instructions and metadata required to build specific target images. By leveraging the layered mechanism, developers can achieve project modularity, reuse, and share previously developed metadata, thereby simplifying the build process.
What is a Yocto Project Layer?
Layers in the Yocto Project can be viewed as build modules containing a series of recipes. These recipes define how to fetch, configure, compile, and package the software components required for the target device. By organizing these recipes into layers, Yocto promotes a structured and reusable approach to project metadata management. This modular design enables developers to:
Reuse existing code: By utilizing layers created by others, you can save time and effort, building upon the work of the broader Yocto community.
Maintain modularity: Layering helps isolate different components of a project, making it easier to manage changes and updates.
Facilitate collaboration: Since individual layers can be maintained independently, different teams or individuals can work on different layers without interfering with each other.
Exploring Available Layers
One significant advantage of using Yocto is the ability to leverage a vast library of existing layers contributed by the community. These layers cover a wide range of functionalities, from supporting different hardware platforms to specific software packages. To browse available layers, you can visit the following link:
OpenEmbedded Layer Index: https://layers.openembedded.org/layerindex/branch/master/layers/
This resource provides a comprehensive list of layers suitable for different Yocto versions, helping you find the layers needed for your project.
Checking Layers in a Yocto Distribution
To start using layers in a Yocto environment, you first need to check which layers are included in your distribution. Follow these steps:
Set up the build environment:
First, navigate to your Yocto project directory, typically called poky. Then, initialize the build environment using the following command:
source oe-init-build-env
Show active layers:
Once the environment is set up, you can view the currently active layers in your Yocto distribution by running the following command:
bitbake-layers show-layers
This command will start the BitBake server (if it is not already running) and list all the layers configured in the current environment.
Example output:
The output of the bitbake-layers show-layers command will display something similar to the following:
| layer | path | priority |
| meta | /home/aaksha/Desktop/Repos/yocto/layers/poky/meta | 5 |
| meta-poky | /home/aaksha/Desktop/Repos/yocto/layers/poky/meta-poky | 5 |
| meta-yocto-bsp | /home/aaksha/Desktop/Repos/yocto/layers/poky/meta-yocto-bsp | 5 |
When there are two layers that contain the same recipe, priority becomes useful.
When multiple layers provide the same metadata, recipes, or configurations, layer priority is used to manage and resolve conflicts. Priority helps BitBake determine which layer should take precedence when such conflicts occur.
How does priority work?
- Layer priority: Each layer can set a priority value using the BBFILE_PRIORITY variable in its layer.conf file. When layer files conflict, the layer with the higher priority will override files in the lower priority layer.
- Conflict resolution: If two layers provide the same recipe or configuration file, the recipe or configuration file from the layer with the higher priority is used. If the priorities are the same, Yocto’s default behavior is applied, which usually means that files from the layer later in the BBLAYERS list take precedence.
Example:
Consider two layers: meta-layerA with a priority of 6 and meta-layerB with a priority of 8. If both layers provide a recipe for package-x, the recipe from meta-layerB will be used because it has a higher priority.
In the provided output, the priorities of meta, meta-poky, and meta-yocto-bsp are all 5.
This means that if these layers provide conflicting recipes or configurations, BitBake will use other criteria (such as the order in BBLAYERS) to decide which one to use, rather than relying solely on priority.
Why set priorities?
- Customization: If you create custom layers (e.g., meta-embedded-related) to override or extend recipes from the base layer, you can set a higher priority for your custom layer to ensure that changes take precedence.
- Dependency management: Some layers are designed to extend or modify the behavior of other layers, and their priorities are set to ensure this is executed correctly.
- Avoiding conflicts: When using multiple third-party layers, setting priorities can help avoid conflicts and ensure predictability in the build process.
How to set priorities?
In the layer.conf file of your custom layer (e.g., meta-embedded-related), you can set the priority as follows:
BBFILE_PRIORITY_meta-embedded-related = “8”
Prerequisites
Follow the well-documented steps in the Yocto documentation: https://docs.yoctoproject.org/brief-yoctoprojectqs/index.html#building-your-image to build a basic Yocto image with minimal functionality.
Execution
The following demonstrates the final steps to add a custom Yocto layer to include a custom psplash screen. PSplash (Plymouth Splash) is a lightweight and simple splash screen utility commonly used in embedded Linux systems, displaying a graphical splash screen during system startup.
Step 1: Run the basic Qemu image using the GTK graphical interface
After building a basic Yocto image using the link mentioned in the prerequisites, you should be able to run the image on Qemu with the following command:`sudo qemu-system-x86_64 -kernel bzImage -drive file=core-image-minimal-qemux86-64.rootfs.ext4,format=raw,if=virtio -append “root=/dev/vda rw console=ttyS0” -enable-kvm -m 512 -net nic -net user -display gtk`
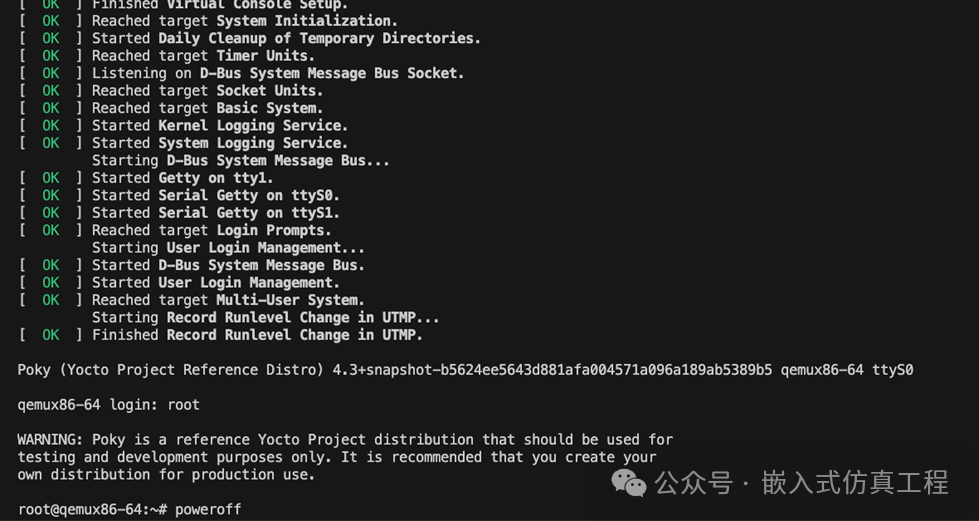
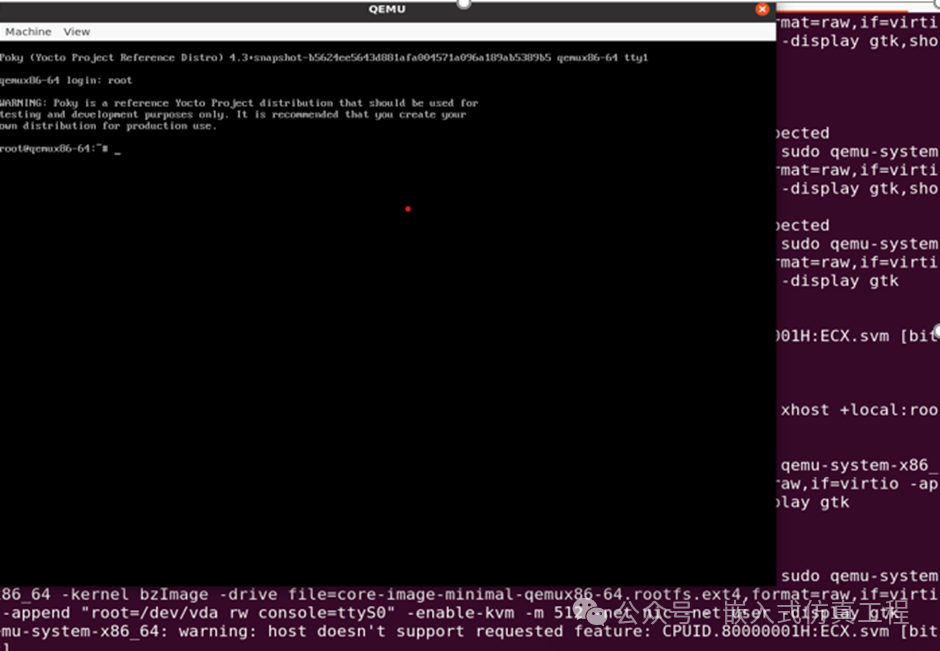
This verifies that the initial build is functioning correctly and can boot on Qemu. Now, the next step is to add a layer for configuring the custom Hogwarts image as the splash screen image.
Step 2: Create the meta-yocto-splash-img layer using the following command
The following command will take you into the poky/build directory:cd poky
Execute the `source oe-init-build-env` command, then create the layer: `bitbake-layers create-layer ../meta-yocto-splash-img`
Step 3: Create a recipe and add the required files to the custom layer
Then, when you see the meta-yocto-splash-img layer in poky, create a directory here:mkdir -p recipes-core/psplash/files.Next, place the custom yocto-custom-splash-img.png image file (in .png format) in the files directory. Then, return to the parent directory of the psplash folder,
create psplash_git.bbappend using commandtouch psplash_git.bbappend
Step 4: Update the bbappend file to override the default BitBake core content
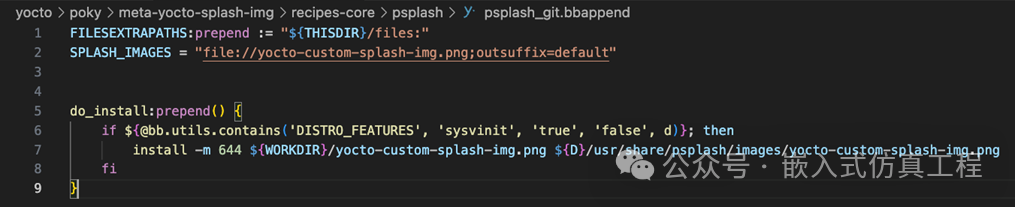
The .bbappend file in the Yocto Project is a mechanism for extending or modifying existing BitBake recipes (.bb files). The .bbappend file allows you to add or override parts of the original recipe without directly modifying the original .bb file. This is particularly useful for customizing recipes provided by upstream layers or for maintaining custom changes separately. In this demonstration, the Yocto Project provides the psplash_git.bb bitbake recipe. Therefore, you need to use a psplash_git.bbappend file containing the following content to provide a custom image path for the SPLASH_IMAGES variable, allowing this .bbappend file to override that variable in the psplash_git.bb file. Additionally, you will need to add the do_install API in psplash_git.bb to store the custom splash image in the path shown in the screenshot below. The do_install task in Yocto Project recipes is responsible for copying and organizing the built files into the appropriate directories in the target root filesystem, preparing them for packaging and deployment.
Step 5: Verify the default layer.conf content of the newly created custom layer
Then, the content of layer.conf seems to remain unchanged, and the configuration used is the default configuration, as shown in the screenshot below.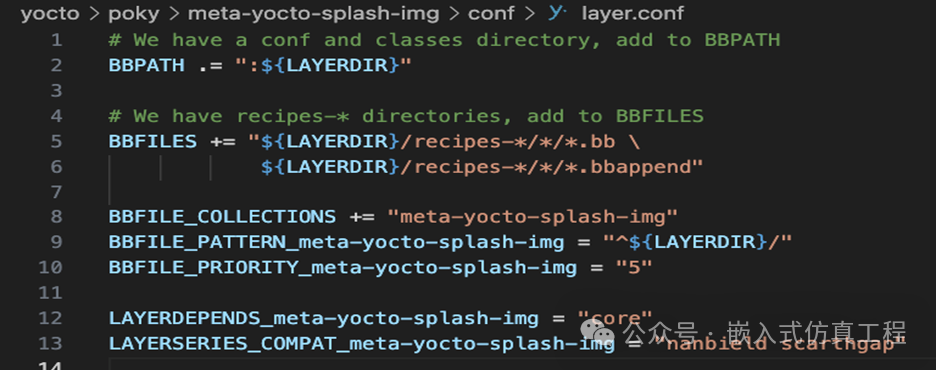
Step 6: Enable the required dependencies in the local.conf file
As shown, the local.conf file has been updated to enable framebuffer and splash screen (psplash). The framebuffer provides a simple interface for rendering images and graphics on the display without a full graphical environment, making it ideal for displaying a splash screen during system startup, before the full graphical user interface is available.
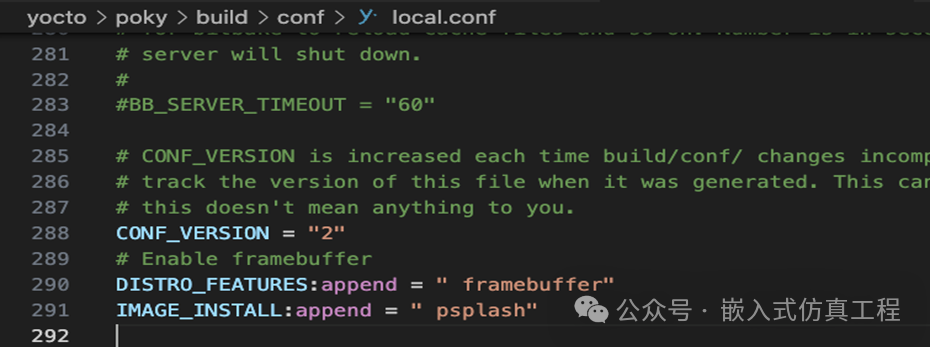
Step 7: Add the custom layer to the Yocto image build
Finally, to add the layer to the build, you can execute the following command:bitbake-layers add-layer ../meta-yocto-splash-img and check for the Yocto layers in the build by executing bitbake-layers show-layers.
Note: The Bitbake server is starting…
| layer | path | priority |
| core | /home/aaksha/Desktop/Repos/yocto/poky/meta | 5 |
| yocto | /home/aaksha/Desktop/Repos/yocto/poky/meta-poky | 5 |
| yoctobsp | /home/aaksha/Desktop/Repos/yocto/poky/meta-yocto-bsp | 5 |
| meta-yocto-splash-img | /home/aaksha/Desktop/Repos/yocto/poky/meta-yocto-splash-img | 5 |
Step 8: Final execution and output verification
Now, run the Qemu emulator again following Step 1 to display the custom splash screen.
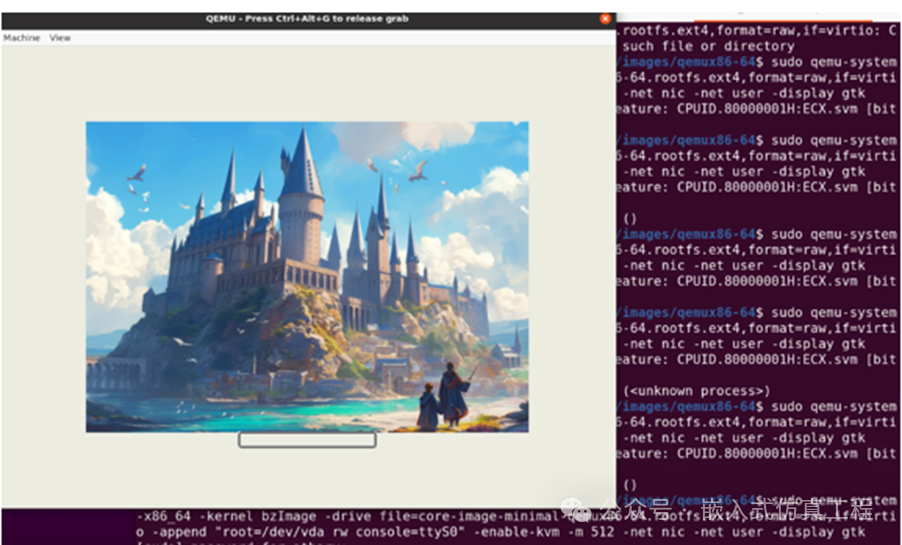
Final Summary
- This article outlined the steps to create a custom Yocto layer and update the splash screen of a proprietary product during startup.
- It delved into the fundamental modules of Yocto distribution layers, which consist of recipes.
- After building this layered custom Yocto distribution Linux image, we learned to safely test our modifications in a controlled emulation environment using Qemu on an x86 platform.
I encourage readers to take advantage of the open embedded example layers and explore other layers provided in the Yocto distribution:
meta-python
This layer provides Python libraries and tools that are not available in the core layer. It is essential for users looking to add Python-related libraries or applications such as pip, numpy, scipy, etc., to their Yocto images.
meta-networking
If you are developing network-related products, the meta-networking layer can integrate tools like iptables or openssh. It offers a rich set of networking solutions and tools, making it ideal for DIY projects that require custom network configurations or support for other network protocols.
meta-multimedia
This layer can be a great addition for users attempting to build multimedia-related packages such as audio, video, and image processing. It is suitable for DIY media projects involving audio or video, streaming, or custom media players.
Welcome to follow (operation reference article: Follow the public account and send a message operation), click the top blue text “Embedded Simulation Engineering” or long press to identify the QR code to follow<img src=”https://mmbiz.qpic.cn/mmbiz_jpg/u6dg6T7c2f5Hsu7d9TkVcs64R11MicZ7lNA0gP9mxRYujKMAOhUqmm8TLNSWOPEAxXkDzrxoT6MliccziccpwOPOw/640?wx_fmt=other&watermark=1&wxfrom=5&wx_lazy=1&tp=webp#imgIndex=0″