
It is better to chase the wind than to wait for it; the process of pursuit becomes the meaning of life.
U-Boot Boot Process
01 Introduction
For developers working at the Linux system layer or driver layer, understanding the entire boot process of Linux is crucial. However, it is not realistic to interpret the entire system from the source code step by step, and we do not need to know too many details about the operation of the entire system. We can first have a general understanding of the boot steps of the Linux system and then look into the details as needed during actual development.
For Linux systems, we know that there are three main components: Bootloader, Kernel, and rootfs. Today, we will discuss the Bootloader part, specifically U-Boot, which is a type of Bootloader.
02 Introduction to U-Boot
2.1 What is U-Boot
As mentioned earlier, U-Boot is a type of Bootloader program. So what does Bootloader mean? It is easy to understand and can be broken down into two words:Boot: Start-up, hardware initialization.Loader: Load and guide the kernel to start.
In simple terms, it is a program that initializes related hardware peripherals (such as MMU, clock, watchdog, DDR, eMMC, etc.) after the system is powered on and guides the loading of the kernel to start. It is a bare-metal program that runs before the Linux kernel, and its main job is to start the Linux kernel. Of course, the actual work of the Bootloader is much more complex.
The role of the Bootloader in a Linux system is equivalent to the BIOS in a Windows system.
Currently, there are many ready-made Bootloader software available on the market, among which U-Boot is the most widely used.
U-Boot (Universal Boot Loader) is an open-source software that follows the GPL protocol. With continuous updates, it has now integrated more advanced features.
2.2 The Position of U-Boot in the System
From the moment the system is powered on to the startup of the user program, let’s take a look at the flowchart below: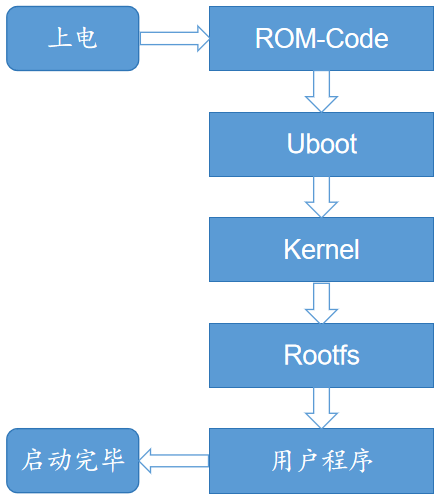 This diagram briefly describes the complete boot process of a Linux system. It can be seen that after the system is powered on, a ROM Code program is executed first, then it jumps to U-Boot, then to the kernel, and finally mounts the root filesystem. The subsequent steps are familiar to us, which are the three main components mentioned earlier. What is this ROM Code? We will explain it in detail next.
03 U-Boot Boot Process
3.1 Boot ROM Code Stage
3.1.1 What is Boot ROM Code
First of all, we know that to run the system, we must first burn the system image to an external storage device (such as eMMC, SD card, etc.). This burning process actually writes the executable file to the external storage device. When the system is powered on, it will read it into memory to run. So who completes this burning action? It cannot be done out of thin air, so it indicates that before we burn the system, there is already a program running inside the chip, which is the Boot ROM Code.
Usually, chip manufacturers integrate a small ROM inside the SoC, which contains the power-on startup code (once solidified, it cannot be changed). This code is the Boot ROM Code.
3.1.2 The Work of Boot ROM Code
After the system board is powered on, the first to take over the system is the Boot ROM Code from the SoC manufacturer. The Boot ROM Code first needs to initialize the hardware environment (such as CPU configuration, disabling the watchdog, initializing the clock, USB Controller, MMC Controller, NAND Controller, etc.).
As mentioned earlier, the Boot ROM Code is located in the chip, while the other system images are burned onto external storage devices. Therefore, the Boot ROM Code also needs to read the executable program that will run next from the external storage into the chip’s SRAM memory for execution.
There may be some questions about why we cannot directly read the executable program into the external DDR for execution.
Theoretically, it is possible, but the DDR controller designed by the SoC manufacturer generally supports many types of DDR devices and provides a compatibility list. How could the SoC manufacturer know which type of memory is used on the user’s PCB? Therefore, directly reading the external executable program into DDR is obviously not very friendly. Generally, SoCs will have a small internal SRAM, and the Boot ROM Code will read the external executable program from the storage and place it in SRAM for execution.
As mentioned, the Boot ROM Code needs to read the executable program that will run next into the chip’s SRAM memory for execution. The program executed after the Boot ROM Code is called SPL. Since the Boot ROM Code is the first to execute after power-on, it is also called the first-stage boot program; the program that follows it is called the second-stage boot program (SPL, Secondary Program Loader).
3.2 SPL Stage
3.2.1 What is SPL
Careful readers may have noticed that in the SDK of many chip manufacturers, there is a directory related to SPL in the U-Boot source code directory, which indicates that SPL is also part of U-Boot.
In the previous section, we introduced SPL (Secondary Program Loader). From the name, it should be a secondary loading program. So what does it load? The answer is obvious; it will load the actual U-Boot program (i.e., the U-Boot binary we usually compile) into DDR for execution.
3.2.2 Why is SPL Needed
Earlier, we mentioned that the Boot ROM Code reads SPL into the chip’s SRAM for execution, and then SPL loads U-Boot for execution. So can’t we have the Boot ROM Code load U-Boot directly, skipping the SPL step?
Theoretically, it is possible, but there is a problem: the internal SRAM built into SoC manufacturers is usually very small (generally 4K/8K/16K..), while the U-Boot binary we compile is usually quite large (ranging from hundreds of K to several M). It is impossible to read the entire U-Boot into the internal SRAM for execution.
Thus, another solution was devised: first create a small U-Boot, which is called SPL. It is very small (smaller than the internal SRAM), and it is first loaded into SRAM by the Boot ROM for execution, and then SPL completes the loading of U-Boot.
3.2.3 The Work of SPL
So what does SPL need to do? The main task is to initialize the DDR Controller, then read the actual U-Boot from external storage (eMMC/SD card) into DDR, and then jump to the actual U-Boot. It can be said that it is the boot program for U-Boot.
3.3 Bootloader Stage
At this point, after the previous two stages, we finally jump to the actual U-Boot program.
The work done by U-Boot is more complex, summarized as follows:
First Stage: Hardware initialization (MMU, clock, watchdog, DDR3, eMMC, etc.), interrupt masking, setting processor speed and clock frequency, preparing RAM space, loading U-Boot second-stage code into RAM space.
Second Stage: Board-level hardware initialization (serial port, network card, USB, LCD, etc.), loading kernel image, setting boot parameters, jumping to the kernel.
The overall flowchart from ROM Code to kernel stage is as follows: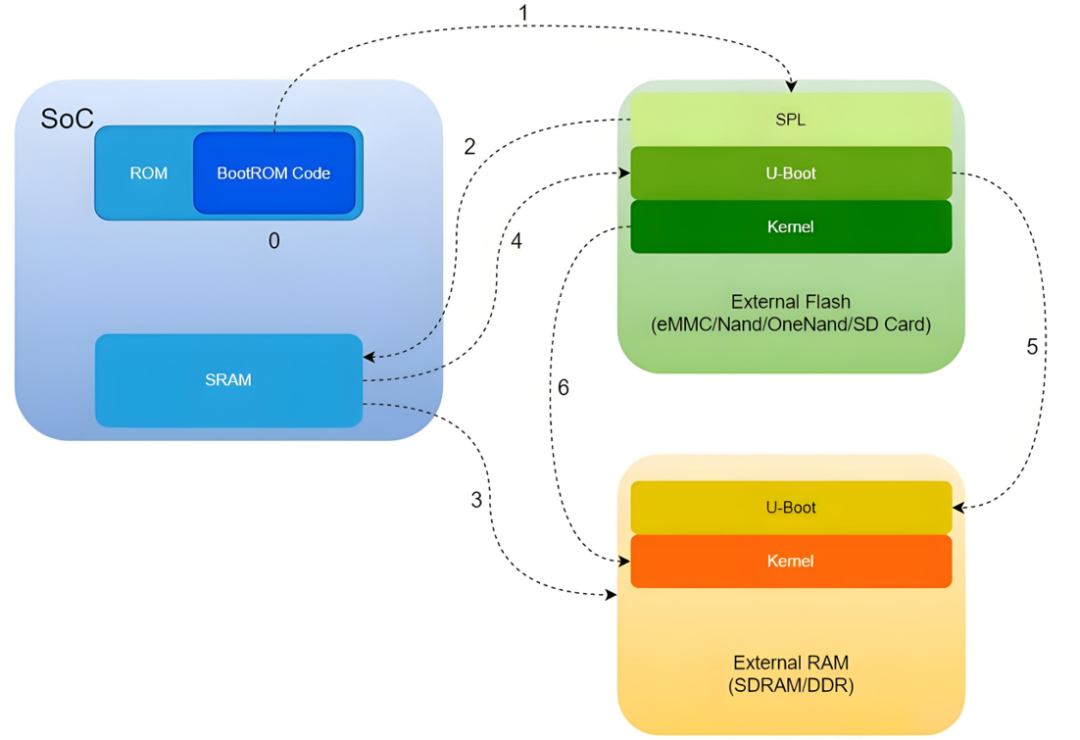 (Image source from reference materials)Some steps are marked here:
0. After power-on, Boot ROM Code starts executing, initializing the clock, disabling the watchdog, turning off the cache, disabling interrupts, etc., determining the boot device based on the Bootstrap Pin, and initializing peripherals;
1. Using peripheral drivers, read SPL from storage;
2. SPL is read into SRAM for execution, at this point, control is transferred to our SPL;
3. SPL initializes external DDR;
4. SPL uses drivers to read U-Boot from external storage and place it in DDR;
5. Jump to U-Boot in DDR for execution;
6. Load the kernel;
04 Conclusion
Reference materials (if there is any infringement, please contact for removal):
https://blog.csdn.net/zhoutaopower/article/details/123133291