1. Install Necessary Packages:
sudo apt-get updatesudo apt-get install python3-smbus python3-dev i2c-toolssudo apt-get install python3-smbus2. Confirm I2C Interface is Enabled:
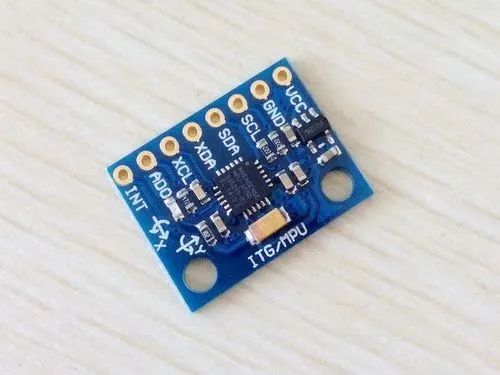
sudo raspi-config command to open the Raspberry Pi configuration tool.3. Confirm Sensor Connections:
4. Navigate to the Directory to Store Code
cd /home/pi/my_code_directory5. Create a New .py File
nano mpu6050_qt.py6. Enter the Code
import sys
from PyQt5.QtWidgets import QApplication, QMainWindow, QVBoxLayout, QWidget, QPushButton, QLabel, QMessageBox
from PyQt5.QtCore import QTimer
import RPi.GPIO as GPIO
import smbus

class DataCollectionApp(QMainWindow):
    def __init__(self):
        super().__init__()
        self.setWindowTitle("Data Collection App")
        # Create buttons and labels
        self.start_button = QPushButton("Start Collection")
        self.stop_button = QPushButton("Stop Collection")
        self.accel_label = QLabel("Waiting for data collection...")
        self.gyro_label = QLabel("Waiting for data collection...")
        # Set layout
        layout = QVBoxLayout()
        layout.addWidget(self.start_button)
        layout.addWidget(self.stop_button)
        layout.addWidget(self.accel_label)
        layout.addWidget(self.gyro_label)
        central_widget = QWidget()
        central_widget.setLayout(layout)
        self.setCentralWidget(central_widget)
        # Connect signals and slots
        self.start_button.clicked.connect(self.start_collection)
        self.stop_button.clicked.connect(self.stop_collection)
        # Initialize state
        self.is_collecting = False
        self.timer = QTimer()
        self.timer.timeout.connect(self.update_data)

    def start_collection(self):
        if not self.is_collecting:
            self.is_collecting = True
            self.timer.start(2000)  # Update data every 2 seconds
        else:
            QMessageBox.warning(self, "Warning", "Collection already started!")

    def stop_collection(self):
        if self.is_collecting:
            self.is_collecting = False
            self.timer.stop()
        else:
            QMessageBox.warning(self, "Warning", "Collection has not started yet!")

    def read_data(self):
        bus = smbus.SMBus(1)
        device_address = 0x68  # MPU6050 device address
        # Start accelerometer and gyroscope
        bus.write_byte_data(device_address, 0x6B, 0x00)
        bus.write_byte_data(device_address, 0x1B, 0x08)
        # Read acceleration values
        accel_x = self.read_word_2c(bus, device_address, 0x3B)
        accel_y = self.read_word_2c(bus, device_address, 0x3D)
        accel_z = self.read_word_2c(bus, device_address, 0x3F)
        # Read gyroscope values
        gyro_x = self.read_word_2c(bus, device_address, 0x43)
        gyro_y = self.read_word_2c(bus, device_address, 0x45)
        gyro_z = self.read_word_2c(bus, device_address, 0x47)
        return (accel_x, accel_y, accel_z), (gyro_x, gyro_y, gyro_z)

    def read_word_2c(self, bus, address, register):
        high = bus.read_byte_data(address, register)
        low = bus.read_byte_data(address, register + 1)
        value = (high << 8) + low
        if value >= 0x8000:
            return -((65535 - value) + 1)
        else:
            return value

    def update_data(self):
        acceleration, gyro = self.read_data()
        accel_data = "Acceleration: {}, {}, {}".format(acceleration[0], acceleration[1], acceleration[2])
        gyro_data = "Gyroscope: {}, {}, {}".format(gyro[0], gyro[1], gyro[2])
        self.accel_label.setText(accel_data)
        self.gyro_label.setText(gyro_data)

if __name__ == "__main__":
    app = QApplication(sys.argv)
    window = DataCollectionApp()
    window.show()
    sys.exit(app.exec_())
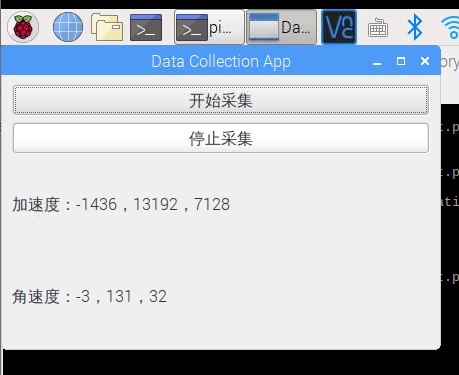
7. Execute the Code
python3 mpu6050_qt.pyPlease note: Execute under VNC login, otherwise the interface cannot pop up.
Related Past Articles:
Raspberry Pi | I2C Communication
Raspberry Pi | Angular Velocity and Acceleration Sensor

Want to know more?
Quickly scan the code to follow!