Integrated Graphics Passthrough and Virtualization
Original content from Derek Seaman’s Tech Blog, original title “Proxmox VE 8.3: Windows 11 vGPU (VT-d) Passthrough with Intel Alder Lake”
Translator’s Note:This is a translated article. The intention is to document my experience while implementing PVE integrated graphics virtualization, where I encountered many pitfalls through various Chinese blogs and podcasts, wasting a lot of time. Eventually, I found the source article, which is this one from Derek Seaman’s blog. This translation serves as a reference for myself and others. There may be editing and formatting issues, so if you encounter errors when copying the code, please refer to the original article.
Typically, GPU passthrough involves passing the entire PCIe graphics device to a virtual machine. This means that only one virtual machine can utilize the GPU resources. The advantage is that video output can be displayed on an external monitor via the computer’s HDMI or DisplayPort. However, only one virtual machine can use the GPU. If you want to install the PVE system on a desktop computer while also fully utilizing the GPU resources for a desktop operating system through an external monitor, this article will help you achieve that.
There is a method to share the GPU among multiple PVE virtual machines. This technology is called Intel VT-d, which can virtualize GPU resources and present a virtual function (VF) to up to 7 virtual machines. This allows 7 virtual machines to use the GPU simultaneously, but you will lose the ability to use a physically connected monitor. Therefore, these virtual machines are limited to remote desktop access.
Both GPU passthrough and vGPU have their applicable scenarios. It entirely depends on what functionality you want your setup to achieve. This article will focus on vGPU configuration and how to share your GPU with up to 7 PVE virtual machines. Currently, I have only tested Windows 11 virtual machines. In the past, there were issues with Linux virtual machines regarding Intel drivers, which led to some vGPU-related problems. So if you want to try using vGPU on a Linux virtual machine, please test it at your own risk.
What does the GPU look like in Windows 11?
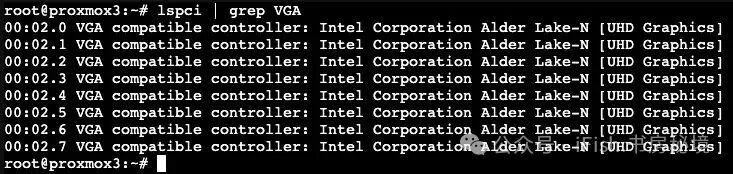
When using vGPU virtualization, the operating system is unaware that you have virtualized the GPU. The screenshot below is from my Beelink i5-1240P Proxmox VE 8.1 host. The “root” GPU is located at PCIe 02.0, and you can see 7 virtualized GPUs.
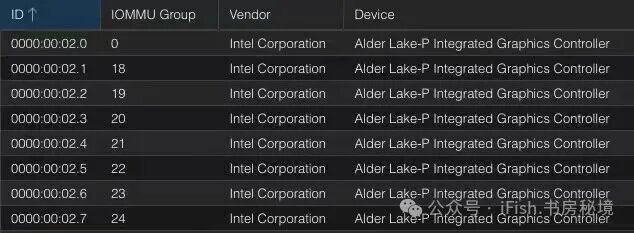
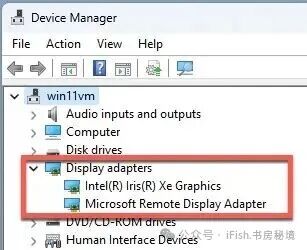
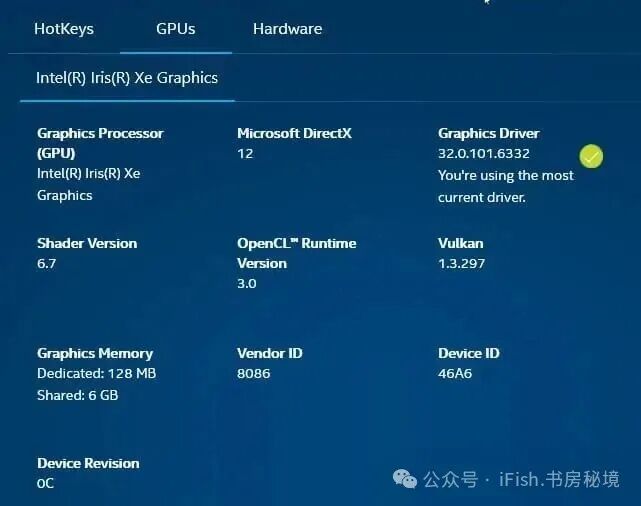
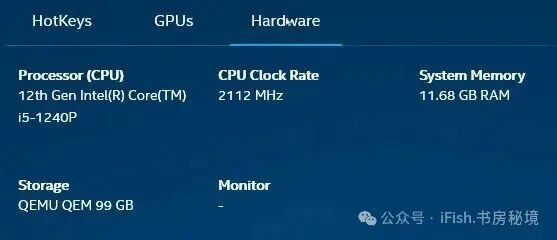
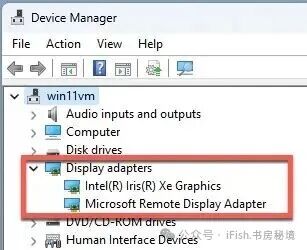
I have assigned one of the virtualized integrated graphics (00:02.1) to the Windows 11 Pro virtual machine. From Windows’ perspective, the standard WHQL Intel driver works fine. The virtualized integrated graphics is displayed as Intel Iris Xe. You can even view various hardware details of this integrated graphics in the Intel Arc control application.
My Work Configuration
Not all Intel CPUs support the virtualization of integrated graphics. Intel only supports this feature on its 11th generation and newer CPUs, considering previous generations as “legacy.” I have seen users on forums reporting issues with Intel’s 11th generation CPUs, so this may or may not apply to you. My latest configuration is as follows:
- Beelink SEi12 Pro (Intel 12th Gen Core i5-1240P)
- Proxmox VE 8.3 (Kernel version 6.8.12-5)
- Windows 11 Pro (24H2)
- Intel Graphics Driver 32.0.101.6332 (December 23, 2024)
Note:Your PVE host motherboard must support and have Intel VT-d enabled in the BIOS. Not all motherboards support VT-d for GPU. If this feature is disabled, when you try to add a VF PCI device to the Windows virtual machine, you will see a prompt saying “IOMMU not detected.” Your BIOS may also have a feature called SR-IOV that needs to be enabled as well.
LXC vGPU VF Compatibility
If you have sufficient technical ability to run Windows 11 in a virtual machine and use integrated graphics virtualization, you may also have some Linux LXC that can similarly use GPU resources (like Plex). Compatibility between Linux LXC and vGPU VFs may have issues.
As of the publication of this article, the Plex LXC on Ubuntu 22.04 has HDR tone mapping issues. The Linux Intel Media Driver (IMD) does not utilize integrated graphics virtualization technology well. If you enable HDR tone mapping on the Plex server and watch HDR content on devices that require server-side HDR tone mapping, the video stream may be corrupted.
Despite the above issues, Plex hardware transcoding still works. Hardware transcoding uses the XE graphics module in the CPU (not the GPU), while HDR tone mapping uses the GPU itself. This means that these two hardware offloads use different APIs, and when using integrated graphics virtualization, the GPU offload for HDR tone mapping will fail.
The latest update on the above issues is:Plex’s Chuck posted on the forum stating that he consulted with engineers, and they will work to make Plex compatible with SR-IOV. However, the required kernel modifications or GRUB updates will need to be done by the user. Intel has provided mainline SR-IOV for the Linux 6.4 kernel and is developing version 6.5. You can follow the progress in SR-IOV Mainlining.
In summary, if you have LXC running on your PVE host that requires GPU resources, they may not work well with vGPU VFs. When Intel releases the official 6.5 version software package, it should provide broader compatibility. Configuring LXC to use vGPU VFs requires modifying the LXC configuration file. Since this article is about Windows 11 vGPU, that process is not covered here. I will discuss the necessary LXC configuration changes in another article.
PVE Kernel Configuration
Note:If you have previously pinned your PVE kernel, please unpin it first and then restart the PVE host to enter the new kernel that you want to modify and support integrated graphics virtualization.
- Open a shell on your PVE host and run the following commands. First, we need to install Git, kernel headers, and do some cleanup.
- We need to clone the DKMS repository and do some build work.
apt update && apt install git sysfsutils pve-headers mokutil -y
rm -rf /usr/src/i915-sriov-dkms-*
rm -rf /var/lib/dkms/i915-sriov-dkms
rm -rf ~/i915-sriov-dkms*
find /lib/modules -regex ".*/updates/dkms/i915.ko" -delete
cd ~
git clone https://github.com/strongtz/i915-sriov-dkms.git
apt install build-* dkms
cd ~/i915-sriov-dkms
dkms add .
- Now we will build the new kernel and check the status. Verify that it shows as installed.
VERSION=$(dkms status -m i915-sriov-dkms | cut -d':' -f1)
dkms install -m $VERSION --force
dkms status
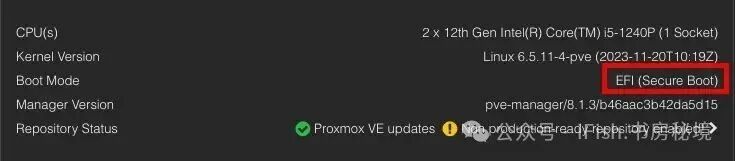
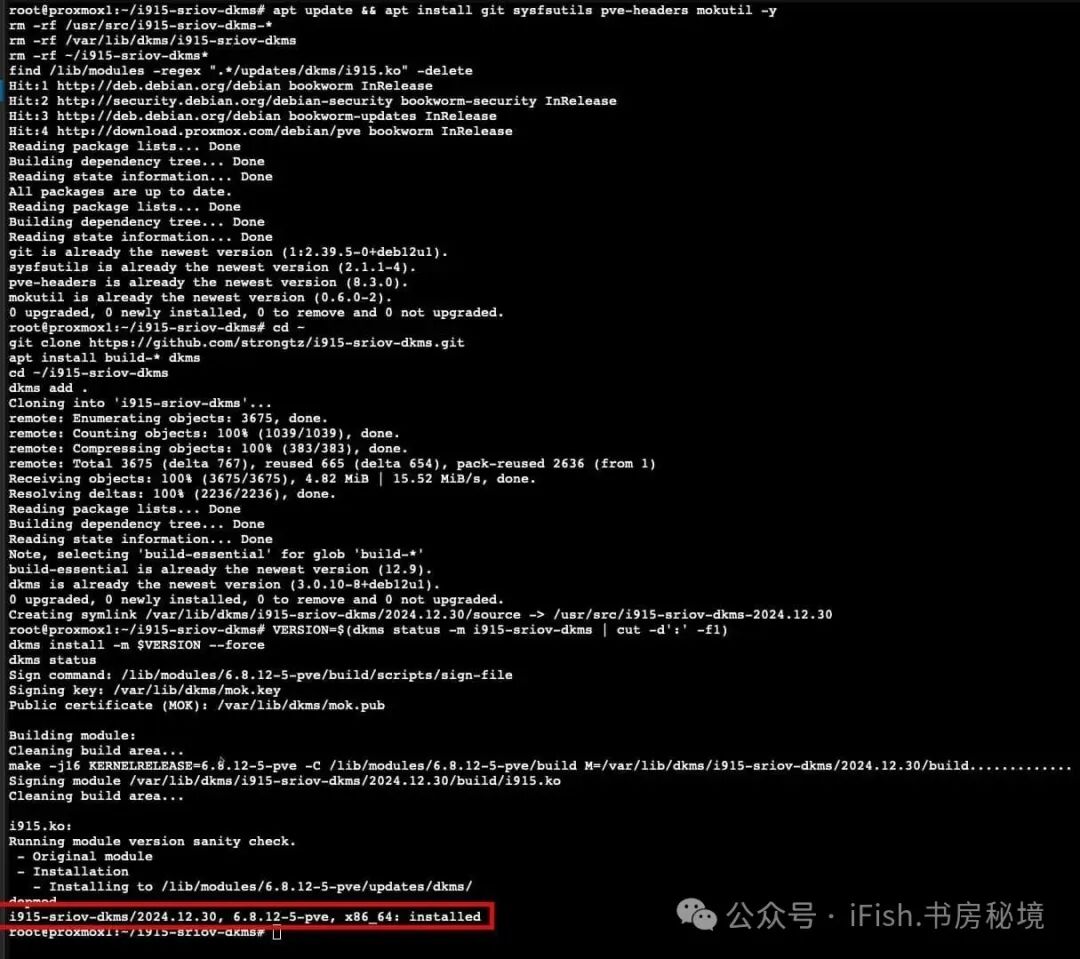 4. For newly installed Proxmox 8.1 and later versions, secure boot may be enabled. We need to load the DKMS key so that the kernel can load the module. Run the following command and enter the password. This password is only for MOK settings and will be used again when you restart the host. After this, this password does not need to be the same as the one you use for the root account.
mokutil --import /var/lib/dkms/mok.pub
Proxmox GRUB Configuration
Note:The default installation of PVE uses the GRUB bootloader. If your system is set up this way, please follow the steps in this section. If you are using ZFS or another configuration that uses systemd bootloader, please skip to the systemd section below.
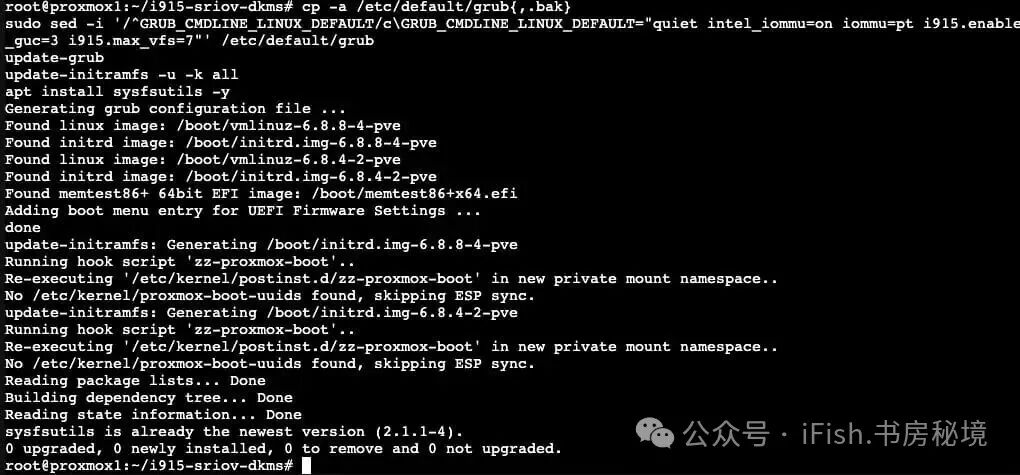
- If your PVE host does not have a Google Coral PCIe TPU, run the following command in the Proxmox shell. If you do, you will know, so if you are unsure, run the first set of commands. If your Google Coral is USB, also use the first set of commands. If your Google Coral is a PCIe module, run the second set of commands.
cp -a /etc/default/grub{,.bak}
sudo sed -i '/^GRUB_CMDLINE_LINUX_DEFAULT/c\GRUB_CMDLINE_LINUX_DEFAULT="quiet intel_iommu=on iommu=pt i915.enable_guc=3 i915.max_vfs=7"' /etc/default/grub
update-grub
update-initramfs -u -k all
- If your Proxmox host does have a Google Coral PCIe TPU and you are using PCIe passthrough technology to connect to LXC or virtual machines, please use this command instead. This command will blacklist the Coral device at the Proxmox host level so that your LXC/virtual machine can gain exclusive access.
cp -a /etc/default/grub{,.bak}
sudo sed -i '/^GRUB_CMDLINE_LINUX_DEFAULT/c\GRUB_CMDLINE_LINUX_DEFAULT="quiet intel_iommu=on iommu=pt i915.enable_guc=3 i915.max_vfs=7 initcall_blacklist=sysfb_init pcie_aspm=off"' /etc/default/grub
update-grub
update-initramfs -u -k all
apt install sysfsutils -y
Proxmox SystemD Bootloader
Note:If your PVE host is not using GRUB to boot (the default case) but is using systemd, please follow the steps below. If you are using ZFS, this is likely the case. If you are using GRUB, please skip this section.
- Modify the kernel loader
nano /etc/kernel/cmdline
- Add the following text to the end of the current line (do not add a new line or break the line).
intel_iommu=on iommu=pt i915.enable_guc=3 i915.max_vfs=7
- Run the following command to update the bootloader.
proxmox-boot-tool refresh
Complete PCI Configuration
- Now we need to find the PCIe bus where the graphics card is located (00:02.0).
 2. Run the following command, modifying the PCIe bus number as needed. In this case, I am using 00:02.0. To verify that the file has been modified, use the cat command to check the file and ensure it has been modified.
echo "devices/pci0000:00/0000:00:02.0/sriov_numvfs = 7" > /etc/sysfs.conf
cat /etc/sysfs.conf

- Restart the Proxmox host. If you are using Proxmox 8.1 or later and have secure boot enabled, you must set MOK. During the Proxmox host reboot, monitor the boot process and wait for the MOK management window to appear (as shown in the screenshot below). If you miss the first reboot, you will need to rerun the mokutil command and reboot again. Until this setup is completed, the DKMS module will not load.
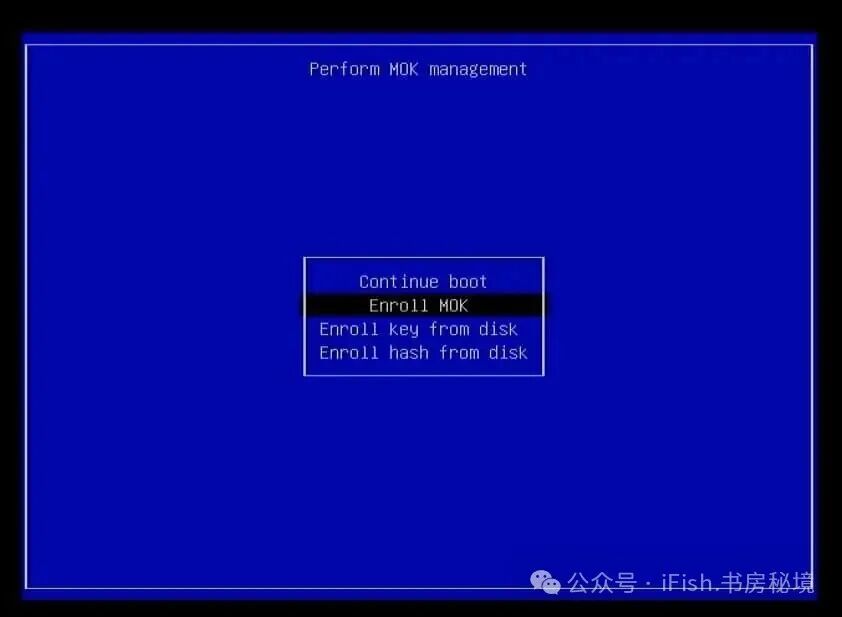
- Select Enroll MOK, Continue, <password>, Yes, Reboot.
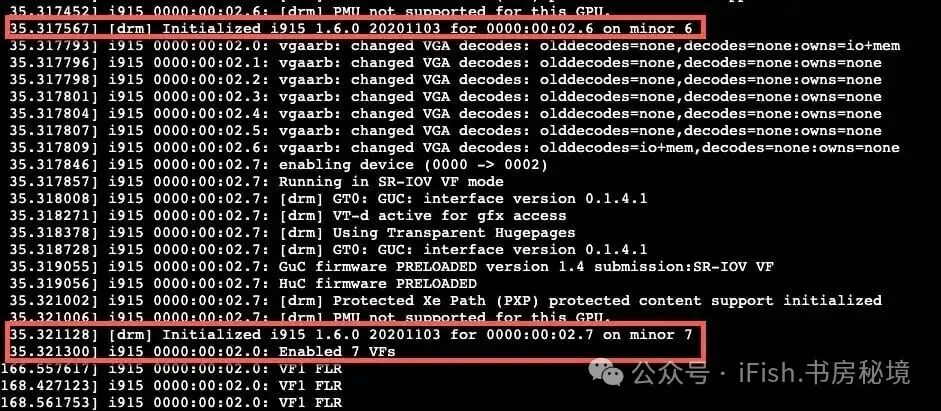
- Log into the Proxmox host, open a Shell, and then run the commands below. The first command should return eight lines of PCIe device information. The second command should return a lot of log data. If everything goes well, you should see PCIe ID 1-7, and finally display Enable 7 VFs. If you are using secure boot and do not see 7 VFs, then the DKMS module may not have loaded. Troubleshoot as necessary.
lspci | grep VGA
dmesg | grep i915
- Now that the Proxmox host is ready, we can install and configure Windows 11. If you do not see Enable 7 VFs, please stop. Troubleshoot as necessary. If you are using secure boot and do not see 7 VFs, please check the MOK configuration again.
Since this article focuses on the process of integrated graphics virtualization, the sections on installing Windows 11 in PVE are omitted. The omitted section titles in English are as follows:
- Windows 11 Installation
- Windows 11 Initial ConfigurationFor information on installing Windows 11, please search for related articles.
Windows 11 vGPU Configuration
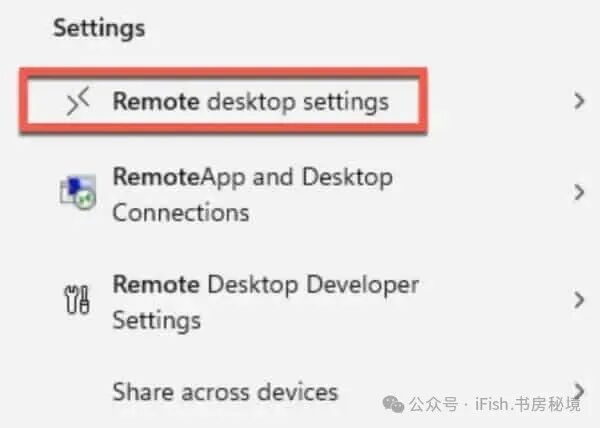
- Open the Proxmox console to connect to the virtual machine and log into Windows 11. Type “Remote Desktop” in the search bar, then click on Remote Desktop settings.
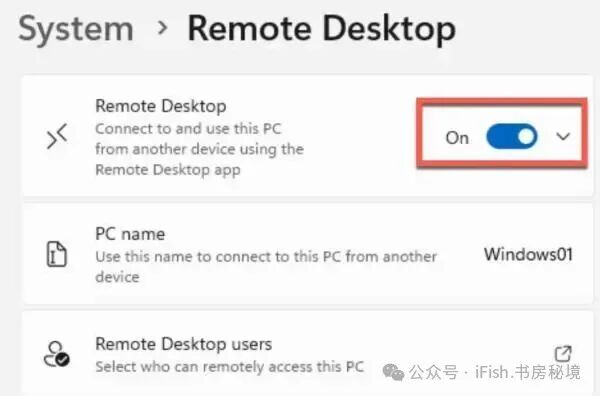
- Enable Remote Desktop. Click Confirm.
- Open your RDP client and log in using the username and credentials you set. You should now see your Windows desktop, while the Proxmox console window should display the lock screen.
- In the Windows virtual machine, open a browser and download the latest Intel graphics driver. For example, I am obtaining the “Intel® Arc™ & Iris® Xe Graphics – Windows” version 31.0.101.6253.
- Shut down the Windows virtual machine. Wait for the virtual machine to power off.
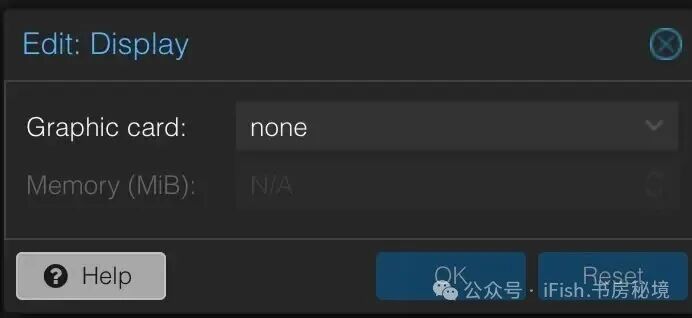
- In the Proxmox console, click on the Windows 11 virtual machine in the left panel. Then click on Hardware. Click on the display item in the right panel. Click Edit and change it to none.
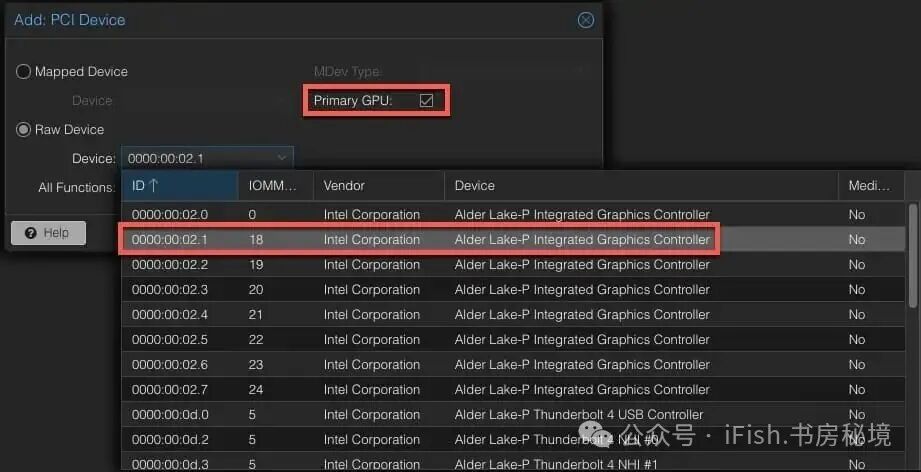
Note:If the 7 GPU VFs are not listed in the next few steps, try restarting your Proxmox host to see if they reappear. Then try adding one to your Windows virtual machine again. 7. At the top of the right panel, click Add, then select PCI Device.8. Select Original Device. Then check all available PCI devices. Select a sub-function (e.g., .1, .2, etc.) of the graphics controller (i.e., any entry other than 00:02.0).Do not use the root “0” device for any operation. I selected 02.1. Click Add. Do not check the All Functions checkbox. Check the checkbox next to Primary GPU. Click Add.
- Start the Windows 11 virtual machine and wait a few minutes for it to boot and make RDP available. Note that since we removed the virtual VGA device, the Proxmox Windows console will not connect.You will see a connection server failure message. Now you can only access Windows via RDP.
- Connect to the Windows 11 virtual machine.Note:If the RDP session opens but the screen is black, try restarting the virtual machine to see if that resolves the issue.
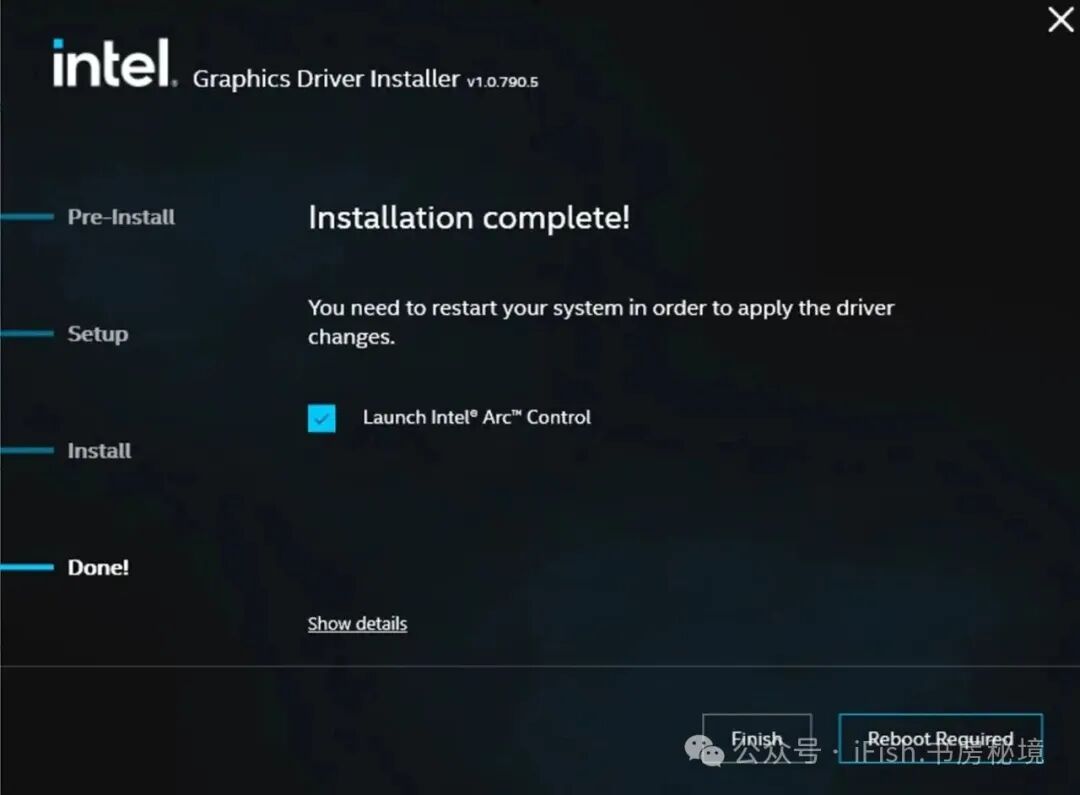
- Find the Intel graphics driver installer and run it. If all goes well, you will see the Installation Complete! interface. Restart. If you encounter issues while running the Intel installer, jump to the troubleshooting section below to see if any suggestions can help you.
Windows 11 vGPU Verification
- Connect to Windows via RDP and launch Device Manager.
- Expand Display Adapters and confirm that there is a healthy Intel adapter (e.g., no error 43).Note:If you do see an error, restart the virtual machine immediately and check again. If the error persists, reinstall the Intel Arc driver and restart once or twice.
- Launch Intel Graphics Software. Click the gear icon (Settings), System, and expand GPU.
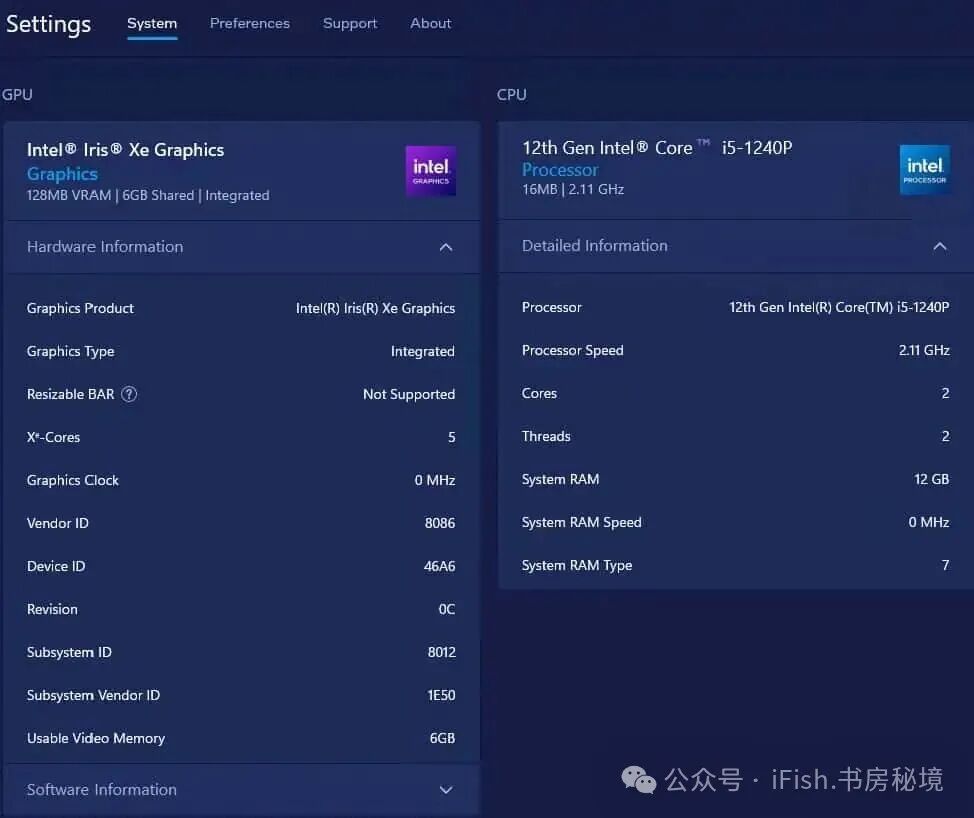
- Open Task Manager, then watch a web video. Verify that the GPU is in use.
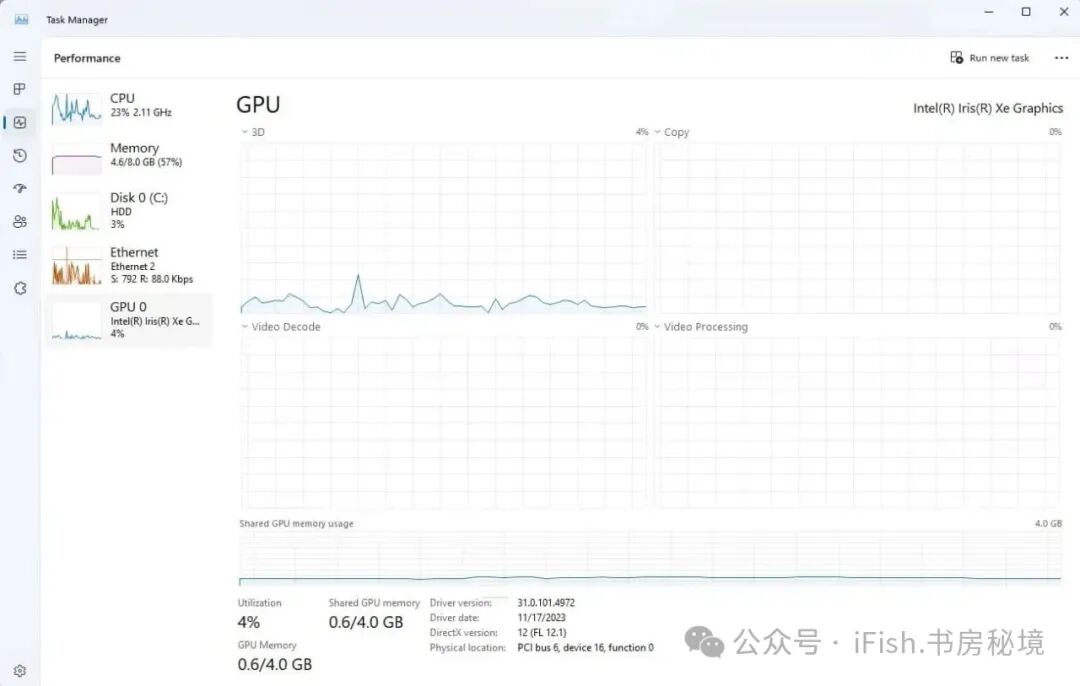
Troubleshooting Intel Driver Installation
The first time I did this on my N100 Proxmox server, there were issues with the Intel driver installation. For some reason, the RDP would freeze during the installation process or disconnect and then fail to reconnect. I had to restart the virtual machine from the Proxmox interface and then restart the installation using the “Clean” option in the Intel installer. After a few reinstalls, it worked fine. The first run on my i5-1240P server went very smoothly. If RDP cannot connect within a few minutes after the virtual machine restarts, restart the virtual machine and try again.In rare cases, if you restart the Proxmox host and the Windows 11 virtual machine shows a GPU device error, try restarting the Proxmox host again to see if that resolves the issue. Reinstalling the Intel driver may also help.Additionally, if you see the following message in the dmesg log, it likely means you have enabled secure boot and did not properly configure MOK or enter the MOK password after the first host reboot. If this is the case, please rerun the mok utility command, connect a physical monitor/keyboard to your Proxmox host, reboot, and complete the MOK setup.i915: Module verification failed: signature and/or required key missing – kernel is taintedI also noticed that sometimes Windows tries to replace the Intel ARC driver you installed with an older version from years ago that does not work at all. If you see driver errors, check the version Windows is trying to use. Ensure it is the latest version you manually installed, not an old version from years ago.
How to Use Intel GPU VFs
You can configure up to 7 virtual machines on the Proxmox host to use vGPU resources. Each virtual machine must be assigned a unique PCIe VF. Additionally, no virtual machine can use the “root” PCIe GPU device. If a running virtual machine is assigned the root GPU, the VFs will not work properly.Some readers have asked if they can connect an HDMI cable to their mini PC and access the Windows 11 desktop. As far as I know, this is not possible because the HDMI output is bound to the main PCIe GPU device, which we are not using. You will only be able to access your desktop via RDP. You need to use full GPU PCIe passthrough to achieve this.
Future Proxmox Kernel Upgrades
As Proxmox continues to update to newer Linux kernel versions, you will need to reconfigure DKMS to patch the new kernel. Fortunately, this is a relatively simple process.Just follow the Proxmox kernel configuration section. This will rebuild the new kernel using the latest DKMS module.There is a dependency between DKMS modules and the Linux kernel. Sometimes DKMS modules may have issues on the new kernel or require manual adjustments to DKMS files.Do not assume that the latest Proxmox kernel will be successfully patched by DKMS. You can check the dkms GitHub issue page to see if there are known issues or report a new issue if you encounter problems. If you want to be cautious, I would wait a few days or weeks after a new kernel is released to see if any issues arise in the DKMS repository.There is a clever solution to prevent Proxmox from updating to install a new kernel. You can use the following pin command to allow Proxmox to update everything except the kernel. Of course, you will eventually need to update the kernel, but this way you can update it on your own schedule and check the forums to confirm if anyone has encountered issues with the latest Proxmox kernel. To use the pin command, run the following command to pin your current kernel version.
proxmox-boot-tool kernel pin $(uname -r)
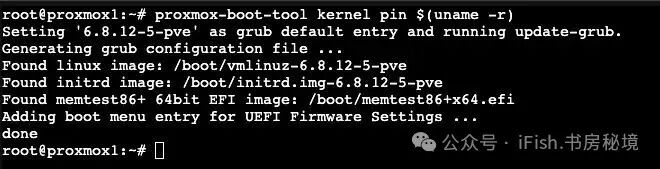
When you are ready to upgrade the kernel, run the unpin command. Update your Proxmox host, then pin the new kernel again.
proxmox-boot-tool kernel unpin
Unable to Connect via RDP
If for some reason you cannot connect to your virtual machine via RDP, there is a way to restore the local Proxmox console. For example, this may happen when your password expires. To enable the Proxmox console (and disable vGPU):
- Shut down the Windows virtual machine
- Remove the PCIe VF device connected to your GPU.
- Modify Display Hardware Properties and change it to Default settings.
- Start the virtual machine and wait for the Proxmox console to connect.
After that, to re-enable vGPU:
- Shut down the virtual machine.
- Set Display to None
- Reassign the PCIe GPU VF device.
- Start the virtual machine.
Kernel Cleanup (Optional)
Over time, as you run Proxmox and perform regular upgrades, the system may accumulate many old kernels. This is not a problem in itself, but it can waste storage space. If you want to clean up unused kernels, you can use a powerful community script to remove old versions. No reboot is required after cleanup. This is entirely optional and mentioned for good system maintenance.
bash -c "$(wget -qLO - https://github.com/community-scripts/ProxmoxVE/raw/main/misc/kernel-clean.sh)"
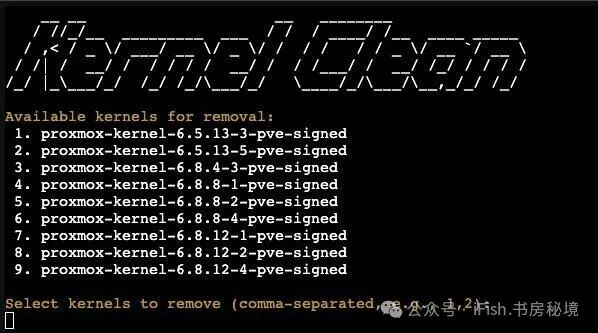
Summary
The process of configuring vGPU for Windows 11 on Proxmox VE 8.3 using VT-d is somewhat cumbersome, but it works very well for me. By using virtual functions (VFs), you can share the Intel GPU with up to seven virtual machines simultaneously. Keep in mind that each virtual machine on the Proxmox host that you want to use vGPU must use a unique virtual integrated graphics. Using GPU VFs means you cannot connect a physically connected monitor to the Proxmox host, nor can you access the virtual machine’s desktop. You must use remote desktop to access the Windows 11 desktop.
Configuring vGPU with VFs on the Proxmox host may negatively impact Linux virtual machines or LXC (like Plex) that require GPU resources. If you are using other virtual machines/LXC that require GPU resources, be sure to thoroughly test them, including HDR tone mapping. Additionally, remember that when you perform Proxmox host updates and install a new kernel, you will have to use dkms to re-patch the kernel; otherwise, vGPU VFs will not work properly. By using the kernel pin command, you can upgrade the kernel on your own schedule while allowing other Proxmox updates to be installed.