MQTT, as a lightweight publish/subscribe messaging protocol, provides real-time and reliable messaging services for resource-constrained IoT devices in low bandwidth, high latency, or unstable network environments. lwIP, as a similarly lightweight TCP/IP protocol implementation, minimizes the use of hardware resources, especially memory, while providing complete TCP/IP functionality, making lwIP very suitable for small embedded systems. So, what sparks will arise from combining these two widely used protocols in IoT? This article will implement a simple MQTT Client using the MQTT library provided by lwIP, offering references and insights for the development of MQTT services and applications based on lwIP.
Introduction to lwIP
lwIP (lightweight IP) is a lightweight TCP/IP protocol developed by Adam Dunkels at the Swedish Institute of Computer Science (SICS). Its open-source nature and rapid version update rate have led to widespread discussion and usage. The implementation of lwIP focuses on reducing RAM usage, and it has designed an independent memory and packet management mechanism, requiring only tens of KB of RAM and around 40KB of ROM, allowing it to be used in low-end embedded systems. To reduce data copying and improve transmission efficiency, lwIP does not adopt a strict layered structure but assumes that layers are transparently visible to each other, allowing data to be shared without copying, which effectively enhances data transmission efficiency. Another advantage of lwIP over other protocol stacks is that it can be ported to an operating system or run independently in a no-OS environment. lwIP is fully functional, supporting not only the basic communication functions of TCP/IP but also application features like DNS, DHCP, and MQTT. Of course, these features can be modularly selected, allowing developers to customize applications that meet specific needs and effectively utilize limited system resources.
Environment Setup
Although lwIP can run directly in a no-OS environment, operating it based on an operating system is more convenient when system resources are relatively abundant. lwIP was designed from the beginning to provide a set of OS-related interfaces, allowing developers to improve the interfaces provided by lwIP according to different operating systems. To simplify the porting process, this article uses RT-Thread as the onboard operating system. RT-Thread uses lwIP as the default TCP/IP stack and provides a rich set of board support packages, making development based on lwIP easier.
This article is based on RT-Thread version 4.1.1 and lwIP version 2.1.2, using the Raspberry Pi 4B as the development board. First, start RT-Thread using the official documentation and ensure that the development board can connect to the internet.
The lwIP MQTT library is not available by default in RT-Thread and needs to be enabled by modifying the SCons build script of RT-Thread. Specifically, add the following line in rt-thread\components\net\lwip\lwip-2.1.2\Sconscript :
src += lwipmqtt_SRCSAdditionally, it is necessary to allocate extra timeout memory blocks for MQTT in lwIP’s memory pool. Modify the macro in rt-thread\components\net\lwip\port\lwipopts.h :
#define LWIP_MQTT 8And at the end of #define MEMP_NUM_SYS_TIMEOUT , add + LWIP_MQTT .
Code Development
Create a new file mqtt_client.c in the rt-thread\bsp\raspberry-pi\raspi4-64\applications directory.
First, here is the connection establishment function.
void mqtt_client_do_connect(mqtt_client_t *client, int flag){ struct mqtt_connect_client_info_t ci; memset(&ci, 0, sizeof(ci)); /* Here you can set the MQTT client information such as client id, username, password, willmsg, etc., where client id is mandatory */ ci.client_id = "lwip_test"; /* Initialize the connection from the client to the server based on IP_ADDR and determine the registration of SUB or PUB callback functions based on flag */ /* IP4_ADDR is used to initialize the internal ip address format of lwIP */ ip_addr_t ip_addr; IP4_ADDR(&ip_addr, IP_ADDR0, IP_ADDR1, IP_ADDR2, IP_ADDR3); if (flag == FLAG_SUB) { mqtt_client_connect(client, &ip_addr, 1883, mqtt_connection_cb, NULL, &ci); } else if(flag == FLAG_PUB) { mqtt_client_connect(client, &ip_addr, 1883, mqtt_pub_connection_cb, NULL, &ci); }}The PUB connection callback function, where mqtt_pub_request_cb is the callback function after the publish is completed.
static void mqtt_pub_connection_cb(mqtt_client_t *client, void *arg, mqtt_connection_status_t status) { if (status == MQTT_CONNECT_ACCEPTED) { printf("mqtt_connection_cb: Successfully connected\n"); const char *pub_payload = "hello this is lwIP"; err_t err; u8_t qos = 2; u8_t retain = 0; mqtt_publish(client, PUB_TOPIC, pub_payload, strlen(pub_payload), qos, retain, mqtt_pub_request_cb, arg); } else { printf("mqtt_connection_cb: Disconnected, reason: %d\n", status); }}The SUB connection callback function, where mqtt_sub_request_cb is the callback function after the subscribe is completed. mmqtt_incoming_publish_cb and mqtt_incoming_data_cb are triggered when processing the topic and data after receiving the publish message.
static void mqtt_pub_connection_cb(mqtt_client_t *client, void *arg, mqtt_connection_status_t status) { if (status == MQTT_CONNECT_ACCEPTED) { printf("mqtt_connection_cb: Successfully connected\n"); const char *pub_payload = "hello this is lwIP"; err_t err; u8_t qos = 2; u8_t retain = 0; mqtt_publish(client, PUB_TOPIC, pub_payload, strlen(pub_payload), qos, retain, mqtt_pub_request_cb, arg); } else { printf("mqtt_connection_cb: Disconnected, reason: %d\n", status); }}When processing the publish topic, different references can be set based on the topic, and different processing can be done on the publish data based on the reference.
static int inpub_id;static void mqtt_incoming_publish_cb(void *arg, const char *topic, u32_t tot_len){ printf("Incoming publish at topic %s with total length %u\n", topic, (unsigned int)tot_len); if (topic[0] == 'A') { /* All topics starting with 'A' are processed in the same way */ inpub_id = 1; } else { /* Processing for all other topics */ inpub_id = 2; } /* Processing in this demo */ inpub_id = -1;}static void mqtt_incoming_data_cb(void *arg, const u8_t *data, u16_t len, u8_t flags){ printf("Incoming publish payload with length %d, flags %u\n", len, (unsigned int)flags); printf("mqtt payload: %s\n", (const char *)data); if (flags & MQTT_DATA_FLAG_LAST) { /* Process data based on reference */ if (inpub_id == -1) { /* No processing in this demo */ return; } else if (inpub_id == 1) { /* Process data for topics starting with 'A' */ } else { printf("mqtt_incoming_data_cb: Ignoring payload...\n"); } } else { /* Handle long payloads, save in buffer or file */ }}Finally, here is the main function, which can be used as a terminal command through the macro MSH_CMD_EXPORT provided by RT-Thread.
static int mqttClient(int argc, char **argv){ if (argc < 2) { print_help(); return 0; } if (strcmp(argv[1], "sub") == 0) { // do sub mqtt_client_t *client = mqtt_client_new(); if (client != NULL) { mqtt_client_do_connect(client, FLAG_SUB); } } else if (strcmp(argv[1], "pub") == 0) { // do pub mqtt_client_t *clientpub = mqtt_client_new(); if (clientpub != NULL) { mqtt_client_do_connect(clientpub, FLAG_PUB); } } else { // error print_help(); } return 0;}MSH_CMD_EXPORT(mqttClient, a simple mqtt client);Testing
Use the MQTT 5.0 client tool – MQTTX for the following tests (https://mqttx.app/en).
Testing Subscription Messages
-
Enter the subscription command in the terminal.
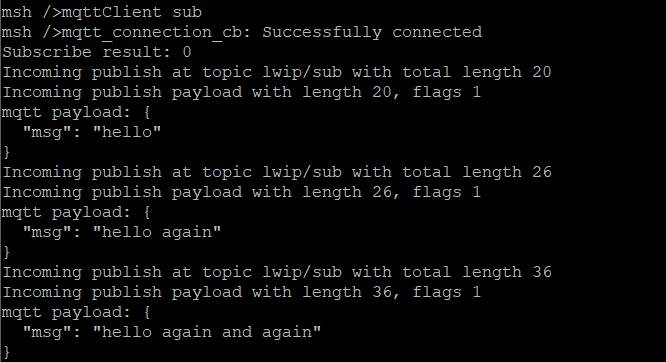
mqttClient sub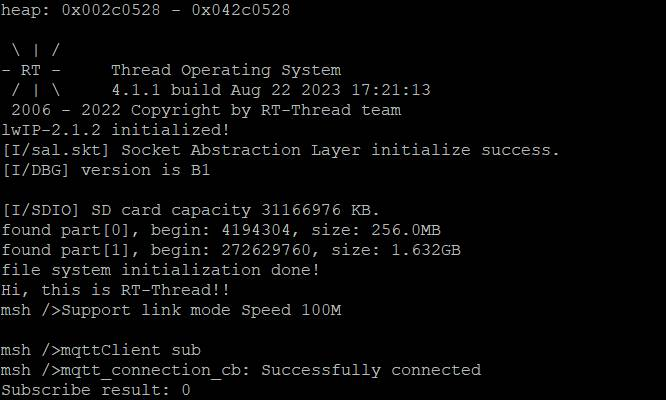
-
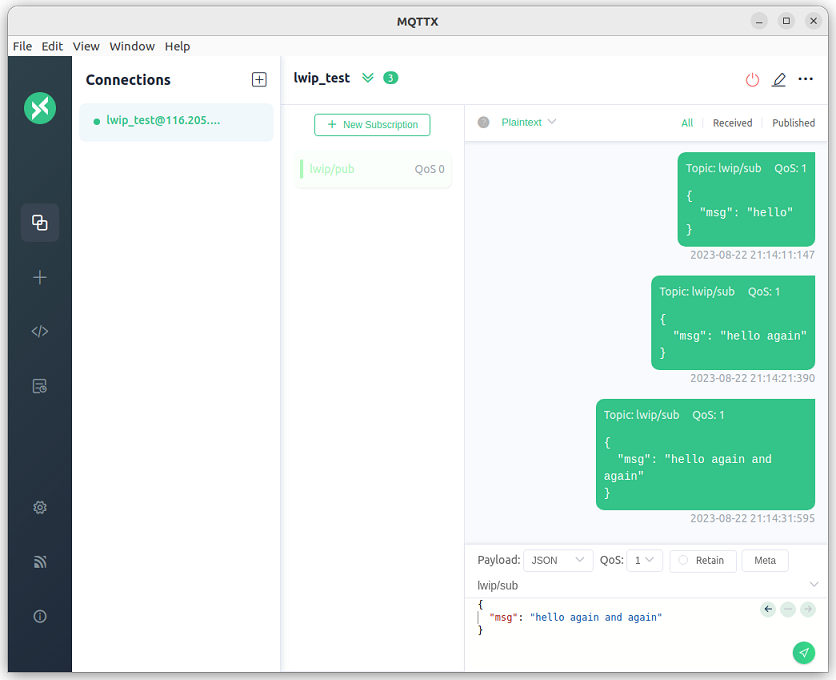
Use the MQTTX client to connect to the MQTT server and send a message to the topic lwip/sub.
-
Check the terminal information on the development board, and you will see that the message published by MQTTX has been successfully received.
Testing Publish Messages
-
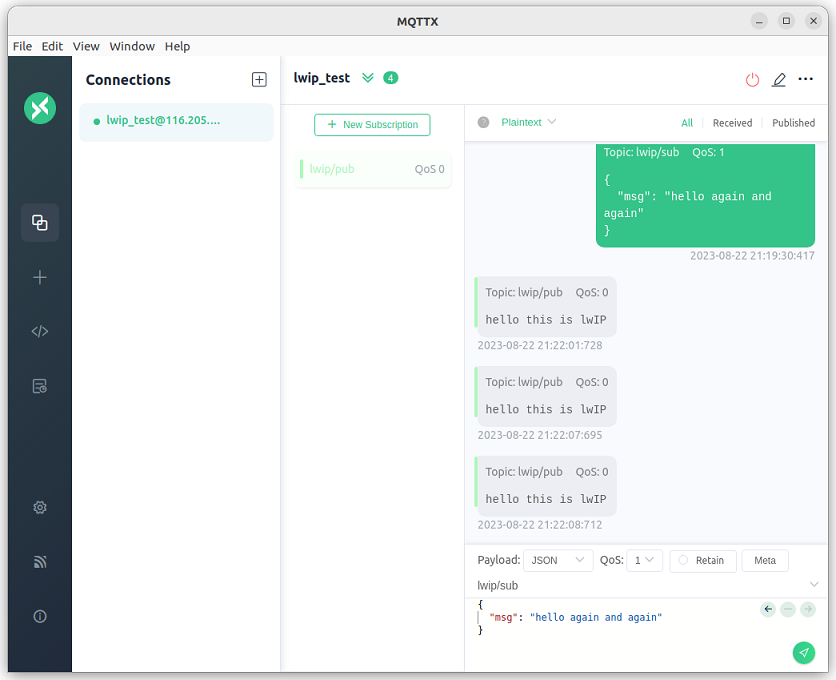
Subscribe to the topic lwip/pub in the MQTTX client.
-
Enter the publish command in the terminal.
mqttClient pub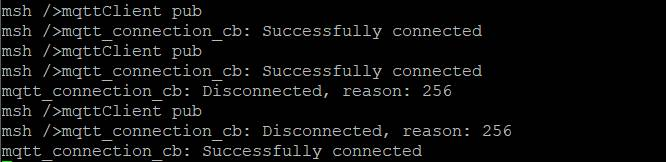
-
In the MQTTX client, check the message sent by the development board.
Complete Code
See mqtt client over lwip (https://github.com/OdyWayne/mqtt_client-over-lwIP).
Conclusion
This article established a simple MQTT client using the MQTT library of lwIP and completed the connection of this client with the MQTT server along with SUB and PUB tests. MQTT can provide reliable messaging and massive connection support for remote devices with minimal code and limited bandwidth. Similarly, lwIP can provide complete and reliable TCP/IP services while occupying very few resources. The combination of the two can provide real-time and reliable messaging services for IoT communication devices, even in resource-constrained environments.

Click “Read the original text” to learn more