This article is dedicated to Jetson TX2 users who are new to GPU development (if you’re not familiar with Ubuntu, I generally suggest that you learn it on your computer before diving into TX2). These users are often eager but have no idea where to start.
When you receive our Jetson TX2 development kit, it is likely that we have already flashed Jetpack 3.3 for you. For an introduction to Jetpack 3.3, including which SDKs and libraries it contains, you can refer to NVIDIA Jetson Embedded Development Platform Jetpack 3.3 Release and Why You Must Use Jetpack to Flash Your New NVIDIA Jetson TX2?
Remember: when we say the development environment is set up, we mean that Jetpack has been flashed correctly. Please don’t keep asking us: Is the development environment set up? If you have specific needs, point them out before purchasing the TX2 to determine if it supports your specific development.
Before you start playing with the TX2, please clarify this question: What do I intend to do with the Jetson TX2?

Power On
Several points to note:
-
Please connect an HDMI monitor directly to the TX2; do not use HDMI to VGA adapters; if you don’t have an HDMI monitor, please buy one or borrow one.
-
The TX2 does not power on automatically, so after plugging in the power cable, please press the switch! Don’t think such a small matter doesn’t need to be reminded; indeed, many beginners get confused here!
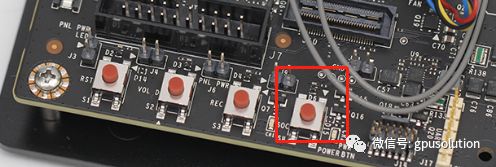
On the lower left, there are 4 buttons: from left to right, they are Reset Button (RST), User Defined Button (Vol), Force Recovery Button (REC), Power Button (Power BTN).
-
Note that the fan will not operate until a certain temperature is reached, so it is normal for the fan not to turn on after powering up.
-
Right-click on the mouse -> Open Terminal (the following $ symbol indicates executing commands) to open a terminal.
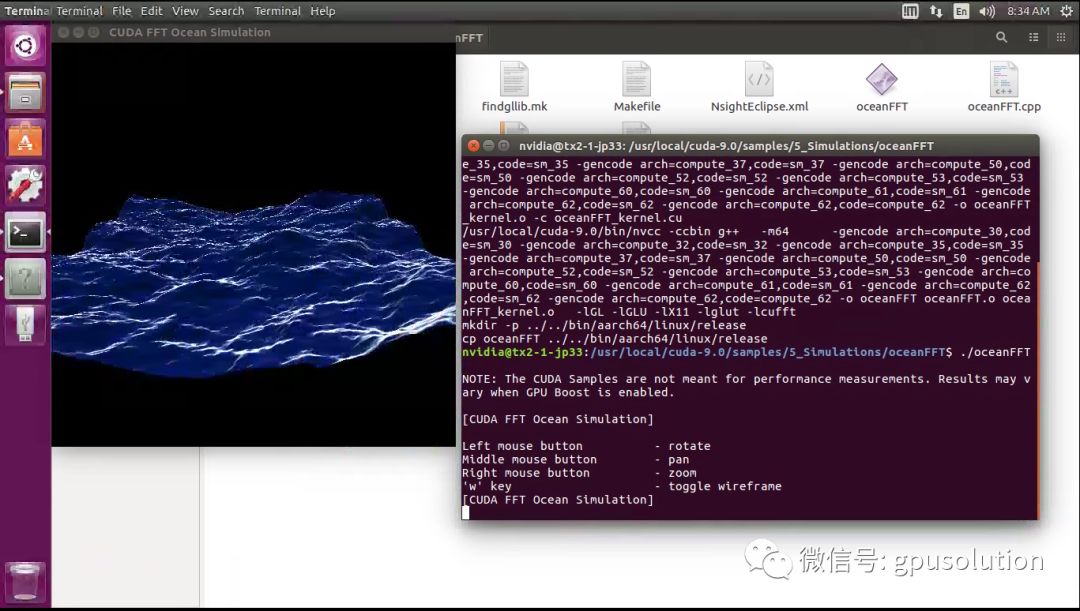
Run an Ocean Simulation Example
-
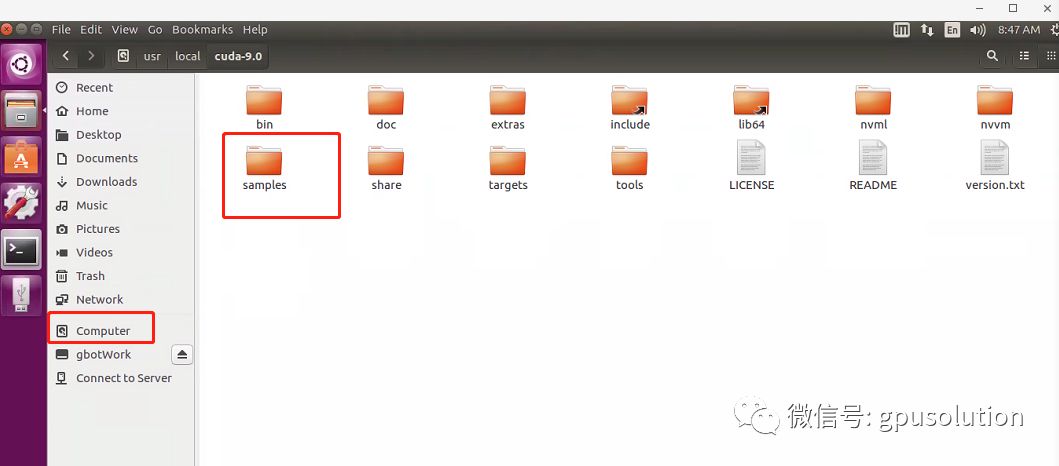
Where is CUDA installed?
Actually, CUDA is located in /usr/local/cuda-x-y (X Y is the CUDA version).
If you only know how to use a graphical interface, just navigate through the file manager to find the usr directory.
Note that this differs from many TX2 CUDA Sample tutorials found on Baidu, as most online tutorials were run under Jetpack 3.1. There have been changes in versions after Jetpack 3.2, and it is possible that changes will continue in the future, so keep up to date.
Execute an ocean simulation sample.
Navigate to the directory /usr/local/cuda-9.0/samples/5_Simulations/oceanFFT.
Execute sudo make.
You will be prompted to enter a password, which is nvidia.
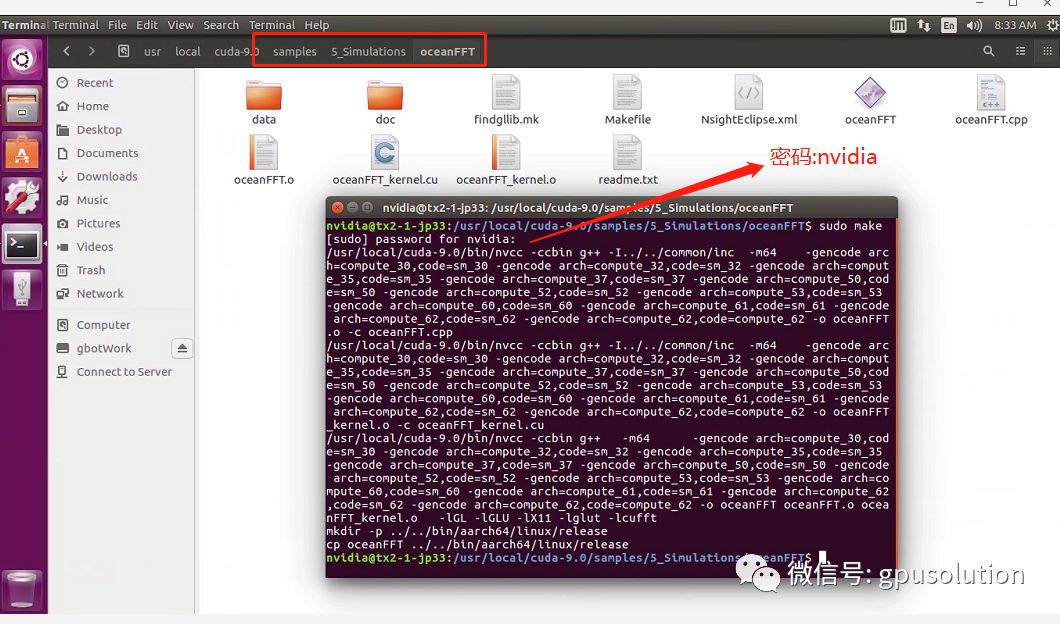
Execute the command ./oceanFFT.
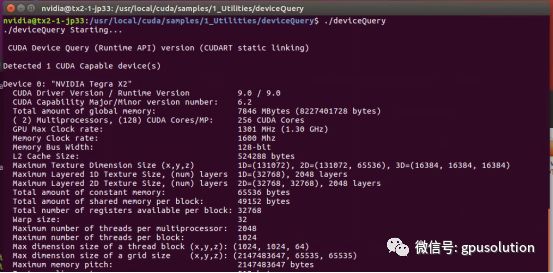
CUDA Device Properties
Enter the following in the terminal:
$ cd /usr/local/cuda/samples/1_Utilities/deviceQuery
$ sudo make
$ ./deviceQuery # The result is shown in the image below.
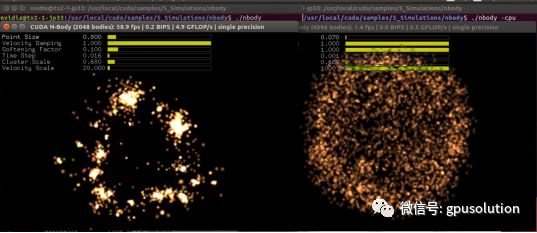
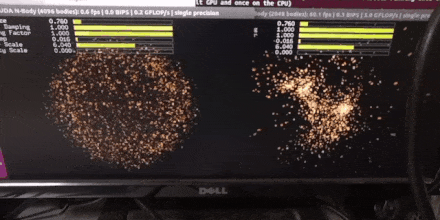
GPU and CPU Performance Comparison
$ cd /usr/local/cuda/samples/5_Simulations/nbody
$ sudo make
$ ./nbody –help# Displays parameter options.
$ ./nbody# Executes with GPU as shown in the left image (performance displayed in the yellow box).
$ ./nbody -cpu# Executes with CPU as shown in the right image (performance displayed in the yellow box).
Accessing the Onboard Camera
Both of the following methods work:
$ nvgstcapture-1.0 –prev-res=3
$ gst-launch-1.0 nvcamerasrc ! ‘video/x-raw(memory:NVMM), width=(int)1920, height=(int)1080, format=(string)I420, framerate=(fraction)60/1’ ! nvvidconv ! ‘video/x-raw(memory:NVMM), format=(string)I420’ ! nvoverlaysink -e
Bounding Box for Vehicles
This is the code from the multimedia API:
$ cd ~/tegra_multimedia_api/samples/backend
$ ./backend 1 ../../data/Video/sample_outdoor_car_1080p_10fps.h264 H264 –trt-deployfile ../../data/Model/GoogleNet_one_class/GoogleNet_modified_oneClass_halfHD.prototxt –trt-modelfile ../../data/Model/GoogleNet_one_class/GoogleNet_modified_oneClass_halfHD.caffemodel –trt-forcefp32 0 –trt-proc-interval 1 -fps 10
(The command is on one line, but the formatting here is poor, so please bear with it. The first execution may take a long time and may not yield results. Please execute it a second time to see the output below.)
A TensorRT Example
$ cd /usr/src/tensorrt/samples
$ sudo make# Compiles all samples, executables are found in the ../bin directory.
$ cd ../bin# You can execute any executable in this directory.
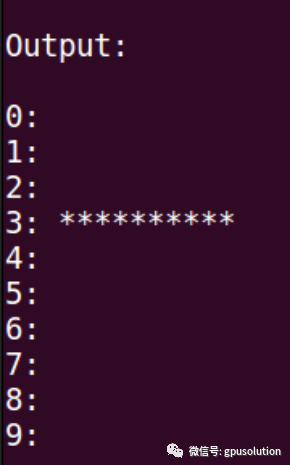
$ ./sample_mnist# The image above shows the system randomly generated handwritten symbols, and the image below shows the TRT prediction results.
Alright, after successfully executing the above examples, you should have a basic feel for this board.
Now think carefully about what you want to do with this development board?
In the direction of machine vision:
NVIDIA Jetson OpenCV Practical Development Tutorial (Part 2)
NVIDIA Jetson OpenCV Practical Development Tutorial (Part 1)
In the direction of camera:
NVIDIA Jetson Camera Development Video Tutorial
What cameras does NVIDIA Jetson TX2 support?
In the direction of deep learning:
Examples of deep learning running on Jetson TX2
For those who know Matlab:
The new version of Matlab has fully integrated support for NVIDIA Jetson, this operation…
Tips for generating and deploying object detection CUDA code on NVIDIA Jetson platform using Matlab (with Chinese subtitles)
Building prototypes on NVIDIA Jetson platform using Matlab GPU Coder (with Chinese subtitles)
See what projects others have done:
Google Brain scientists teach robots to walk using NVIDIA Jetson TX2
See how various industries utilize NVIDIA Jetson to create intelligent machines in one minute
Underwater drones unveil the secrets of the deep sea using NVIDIA Jetson TX2
Creating AI agricultural robots using NVIDIA Jetson