Introduction:
Are you still struggling with information blockage and low efficiency during microcontroller debugging? Are you frequently plugging and unplugging serial cables, modifying code, and reprogramming? Today, we proudly introduce a “Swiss Army Knife” level debugging tool tailored for embedded developers—letter-shell! It allows you to debug your microcontroller applications in real-time, flexibly, and efficiently, just like operating a Linux terminal!
1. What is letter-shell? Core Functionality
In simple terms, letter-shell is a command line interpreter (Shell) that runs on your embedded device (microcontroller). It receives text commands you send through communication interfaces such as serial, USB, and network, executes the corresponding operations, and returns the results to you.
Its core function is to provide a powerful real-time interactive debugging interface for your embedded programs.
What can it help you do?
-
📊 View system information in real-time:
-
Memory usage (
<span>free</span>) -
Task/thread status (
<span>ps</span>) -
System uptime (
<span>uptime</span>) -
View/modify variable values (
<span>myVar</span>,<span>myVar=10</span>) -
Call specific functions (
<span>myFunction param1 param2</span>)
⚙️ Dynamically control system behavior:
-
Set operational parameters (e.g., PID parameters
<span>set_kp 2.5</span>) -
Start/stop functional modules (
<span>motor_start</span>,<span>sensor_stop</span>) -
Trigger specific tests or processes (
<span>run_self_test</span>,<span>enter_bootloader</span>)
🛠️ Simplify testing and diagnostics:
-
Individually test hardware peripherals (
<span>led_toggle</span>,<span>read_adc 1</span>) -
Simulate events or data (
<span>inject_data "0xAA,0x55"</span>) -
View logs (
<span>tail log.txt</span>– requires a file system)
Summary: letter-shell turns the internal state and key functions of your program into executable commands, allowing you to say goodbye to “blind debugging” and debug microcontrollers like operating a Linux terminal!
2. Quick Start: Core Usage Steps
Assuming you have successfully integrated letter-shell into your project (see the third section for migration methods), using it is very simple:
-
Connect the device: Connect to your development board using a serial tool (e.g., PuTTY, SecureCRT, MobaXterm).
-
Start the Shell: After the device starts, you should see the shell prompt in the serial terminal (default may be
<span>letter:/$ </span>or your custom one). -
Input commands:
-
<span>sysinfo</span>View system information -
<span>get_temperature</span>Call a function to get the temperature -
<span>set_led_brightness 80</span>Set LED brightness to 80% -
<span>myCounter</span>View the value of variable<span>myCounter</span> -
<span>myCounter=100</span>Set the value of variable<span>myCounter</span>to 100
-
Input
<span>help</span>or<span>?</span><code><span> to view the list of all registered commands and brief help.</span> -
Input command names and parameters (if any) to execute operations. For example:
View results: The results or output information of the command execution will be directly echoed in the serial terminal.
3. Key Focus: How to Port to Your System?
Porting letter-shell to your project is key to its functionality. The process is relatively clear and mainly involves the following steps:
-
Obtain the source code:
-
GitHub:
<span>https://github.com/NevermindZZT/letter-shell</span> -
Gitee (domestic):
<span>https://gitee.com/NevermindZZT/letter-shell</span>
-
Official repository:
-
Download the source code, usually just copy the
<span>shell</span>folder (including<span>shell.c</span>,<span>shell.h</span>,<span>shell_port.c</span>,<span>shell_cfg.h</span>, etc.) to your project directory.
Add files to the project:
-
In your IDE (Keil, IAR, VSCode+GCC, etc.), add
<span>shell.c</span>and<span>shell_port.c</span>to the project source files. -
Ensure the compiler can find the header file paths for
<span>shell.h</span>and others.
Key porting point: Implement character input/output (core!)
-
This is the most critical step in porting! letter-shell needs you to tell it how to receive and send characters.
-
Modify the
<span>shell_port.c</span>file: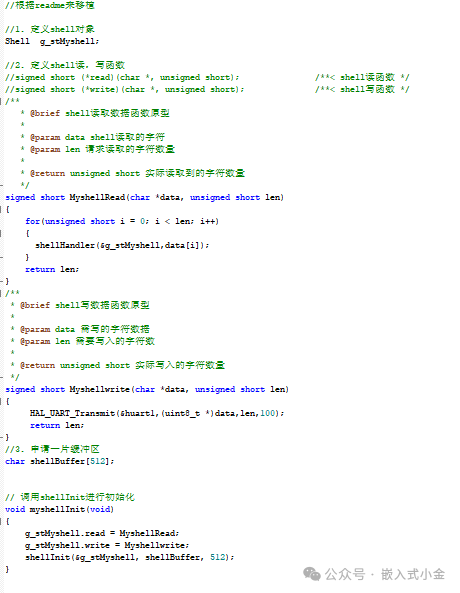
4. Configuration and Initialization (shell_cfg.h & main.c):
-
Configure
<span>shell_cfg.h</span>: Trim and configure shell functions according to your needs. Common configuration items: -
<span>SHELL_USING_CMD_EXPORT</span>: Enable command export macros (must be enabled). -
<span>SHELL_HELP_LIST_USER</span>: Whether to display user commands in the<span>help</span>command. -
<span>SHELL_HISTORY_MAX_NUM</span>: Number of command history records. -
<span>SHELL_DOUBLE_CLICK</span>: Whether to support double-click events. -
<span>SHELL_USING_COMPANION</span>: Whether to support companion tasks (for handling time-consuming commands). -
Disable unnecessary advanced features (e.g., file system support
<span>SHELL_USING_FS</span>) based on resource availability. -
Initialize Shell: In your
<span>main.c</span>initialization code (after hardware initialization), create and start the shell task or object.
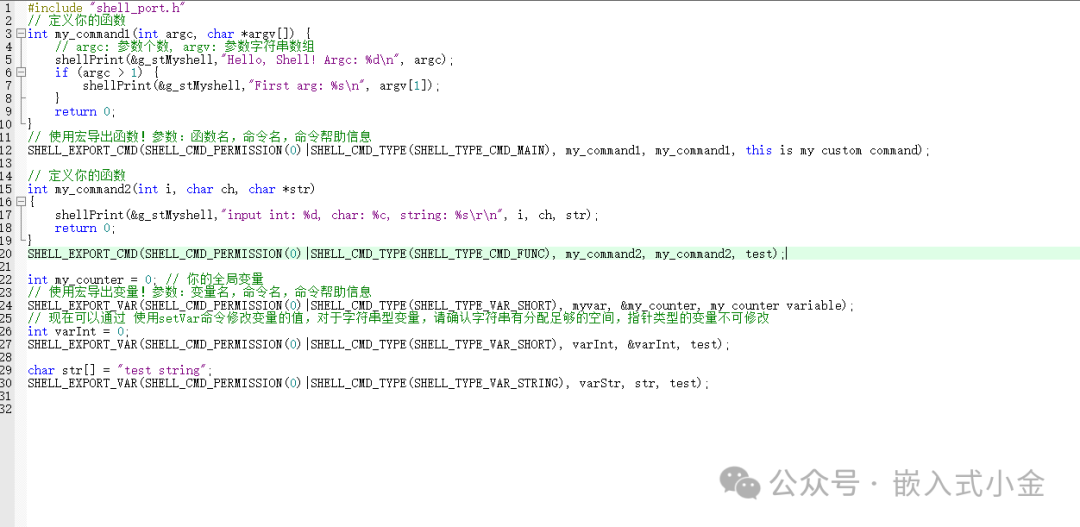
5. Export your commands/functions/variables:
-
Core magic: Use the macros provided by letter-shell, and one line of code can turn your functions or variables into shell commands!
-
Export functions as commands:
6. Compile, program, and test!
-
Compile your project, ensuring there are no errors.
-
Program the code to the target board.
-
Open the serial terminal, connect to the development board, and power it on. You should see the shell prompt; try entering
<span>help</span>to see the list of exported commands and test your custom commands!
4. Common Questions and Tips
-
Q: No response to commands?
-
Check if the serial connection and baud rate are correct.
-
Check if the
<span>shellWrite</span>porting is correct, ensuring data can be sent out. -
Check if the
<span>shellRead</span>porting ensures input can be received. -
Confirm that the spelling of the exported command names is correct.
-
Q: Prompt not appearing?
-
Check if the Shell initialization code is executed.
-
Check if the default prompt output is disabled in
<span>shell_cfg.h</span>. -
Q: How to customize the prompt?
-
Modify the
<span>SHELL_DEFAULT_PROMPT</span>macro definition in<span>shell_cfg.h</span>. -
Resource usage: letter-shell is very lightweight, typically requiring only a few KB of ROM, and RAM requirements depend on configuration (e.g., history size). For chips with extremely tight resources, unnecessary features can be trimmed away.
Conclusion: Take Action Now to Improve Efficiency!
Porting and using letter-shell is not complicated, yet it can bring a qualitative leap to your embedded development and debugging.Hands-on practice is the best way to master it!
📦 Get the Tool:
-
Project Repository: https://github.com/NevermindZZT/letter-shell or https://gitee.com/NevermindZZT/letter-shell
-
Detailed Documentation: The
<span>README.md</span>and<span>docs</span>folders in the repository provide more comprehensive configuration instructions and API references. -
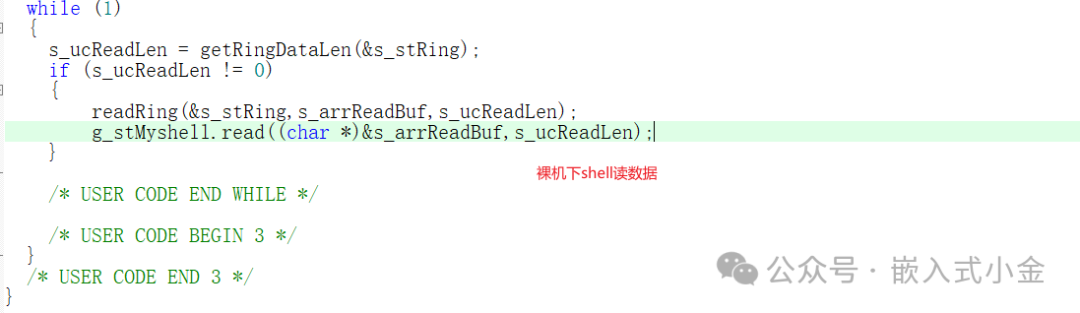
You can also check the author’s porting tutorial, but I used a circular buffer to receive data; you can refer to the author’s article
Circular Buffer
Embedded Xiao Jin, WeChat Official Account: Embedded Xiao Jin “Circular Buffer Queue: The ‘Data Interchange Bridge’ of Embedded Communication | Efficient Processing Secrets for 51/32 Microcontrollers”
It contains step-by-step screenshots of the author’s porting process and a successful demo.
Files shared via cloud drive: shell link: https://pan.baidu.com/s/1m5Lk3lDnFu83S5ufMjQm1A extraction code: 8xji
Hurry up and download the source code, try to integrate it into your next project following the steps in this article, and experience the powerful charm of command-line debugging! Encounter problems? Feel free to leave a message in the comments for discussion!