Follow the blue text and reply with “Introductory Materials” to get a tutorial from beginner to advanced on microcontrollers.
The development board will guide you in your journey.
Written by: Wu Ji (WeChat: 2777492857)
The full text is about3821 words long, and it takes about 10 minutes to read.
Today, let’s talk about the layered architecture design of embedded software.
Have you ever felt this way: at the beginning of a project, a few hundred lines of code are enough to achieve functionality, and you feel great. However, as requirements iterate and functionalities increase, your main.c or several core files start to balloon rapidly, with various peripheral drivers, business logic, data processing, and even interface display (if any) code all mixed together like a big stew?
Making a small change to a feature might require you to sift through half the project, where a single change can affect everything. During debugging, when a bug pops up, you have to search through thousands of lines of chaotic code like a detective. Want to reuse a certain driver module from this project in the next one? Sorry, the code is too tightly coupled, and trying to extract it feels like rewriting it from scratch.
If you frequently nod your head at the above scenarios, congratulations, you have encountered a common and urgent problem. Layered architecture is the tool that can help you escape this code swamp.
1. What is layered architecture? Sounds impressive?
Don’t worry, it’s not that complicated. The core idea of layered architecture can be summarized in eight words: Divide and conquer, isolate concerns..
It’s like building a house. The foundation is the foundation, the load-bearing walls are the load-bearing walls, the plumbing and electrical systems are the plumbing and electrical systems, and the interior decoration is the interior decoration. You wouldn’t mix steel reinforcement and soft furnishings during construction, would you? Each layer (or trade) has its own clear responsibilities, and they collaborate through pre-defined interfaces (like reserved pipes and electrical connections).
Layered architecture in embedded software follows the same principle. We vertically divide the entire software system into several layers based on responsibilities and dependencies. Each layer focuses on solving a specific part of the problem and only interacts with its adjacent layers.
2. Why use layering? Isn’t it better to go all in?
If you enjoy struggling in the mud of code, or if your project is simple enough to just turn on, blink, and turn off a light, then you can indeed ignore it.
However, if your project is slightly more complex, the benefits brought by layered architecture will definitely make you feel that the initial investment in this thought process is worthwhile:
1. Clarity: The code structure is clear, and the logic is distinct. Want to see hardware operations? Go to the driver layer. Want to see business processes? Go to the application layer. Each has its own role, and the difficulty of reading and understanding the code decreases significantly. Mom no longer has to worry about me not understanding my own code!
2. Maintainability: Requirement changes? Bug fixes? It’s easier to locate problems because you know where the issue is likely to be. When modifying, the impact is generally limited to the current layer or adjacent layers, greatly reducing the risk of introducing new bugs. Say goodbye to the awkwardness of “pressing down one gourd only to have another pop up”.
3. Reusability: Once the lower-level drivers are written, as long as the hardware interface remains unchanged, they can be directly reused in different projects. Middleware services (like communication protocol stacks) are also powerful tools across projects. If the application logic is designed properly, it can even be migrated across different hardware platforms, requiring only the replacement of the lower-level drivers and board support packages. What do we call this? This is called “invest once, yield multiple times”!
4. Ease of testing: After layering, each layer can be more easily unit tested or integrated tested. You can simulate lower-level interfaces to test upper-level logic or directly test the correctness of lower-level drivers without waiting for the entire system to be fully set up. Testing can be introduced earlier, ensuring better quality.
5. Team collaboration: Different people can be responsible for developing different layers. Zhang San is responsible for the drivers, Li Si is responsible for application logic, and Wang Wu is responsible for middleware. As long as everyone agrees on the interfaces, they can work in parallel without interfering with each other (or with controllable interference), greatly improving development efficiency.
3. Classic layered models
Although there is no absolute unified standard, a common and practical layered model for embedded software usually includes the following parts:
1. Driver Layer / HAL – Hardware Abstraction Layer
Responsibilities: This is the lowest layer, directly interacting with the hardware. It is responsible for operating the MCU’s registers, initializing peripherals (GPIO, UART, SPI, I2C, ADC, etc.), and providing the most basic hardware read/write functions. For example, HAL_SPI_Transmit(), GPIO_SetPinLevel().
Characteristics: It is closely related to specific hardware models. Many chip manufacturers provide official HAL libraries, which belong to this layer. Its goal is to abstract hardware details, providing stable and unified hardware operation interfaces to upper layers.
Principle: This layer should remain as “pure” as possible, only performing hardware operations without mixing in any business logic.
2. Board Support Package Layer (BSP)
Responsibilities: This layer is optional but highly recommended. It is built on top of the driver layer and relates to specific circuit board designs. It knows which GPIO pins are connected to the LED, which SPI interface is connected to a specific sensor. It provides interfaces aimed at “specific functional units on the board”. For example, BSP_LED_On(LED_ID_STATUS), BSP_ReadTemperature().
Characteristics: It calls functions from the driver layer but encapsulates board-specific information. When changing boards, the driver layer may not need significant changes, but the BSP layer will almost certainly need to be modified.
Benefits: It completely decouples application layer code from specific pins and specific peripheral channels. The application layer only needs to care about whether the “status light” is on or off, without needing to know which pin it is connected to.
3. Middleware Layer
Responsibilities: Provides some general software services that are essential but not closely related to specific business. For example: Real-Time Operating Systems (RTOS), File Systems, Communication Protocol Stacks (TCP/IP, Modbus, CANopen), Graphics Libraries (GUI), Algorithm Libraries (PID Controllers, Filtering Algorithms), etc.
Characteristics: Typically reusable software components that do not directly depend on hardware (or their hardware dependencies have been encapsulated by lower layers). They provide higher-level service support for the application layer.
4. Application Layer
Responsibilities: This is the top layer of the software system, implementing the final business logic and functionality of the product. It determines what the device “does” and “how it does it”. For example, the application layer code of a thermostat will include reading temperature (calling BSP layer interfaces), executing PID algorithms (possibly calling middleware layer algorithm libraries), controlling heating/cooling devices (calling BSP layer interfaces), responding to user button presses (calling BSP layer interfaces), updating displays (possibly calling middleware graphics libraries or BSP layer interfaces), etc.
Characteristics: Highly customized and closely related to specific product requirements. It should only call interfaces provided by lower layers, and it is absolutely forbidden to directly manipulate hardware registers or call the lowest-level HAL functions. That would be “overstepping authority”, and the architect would be very displeased.
The specific number of layers can be determined based on the complexity of the project.
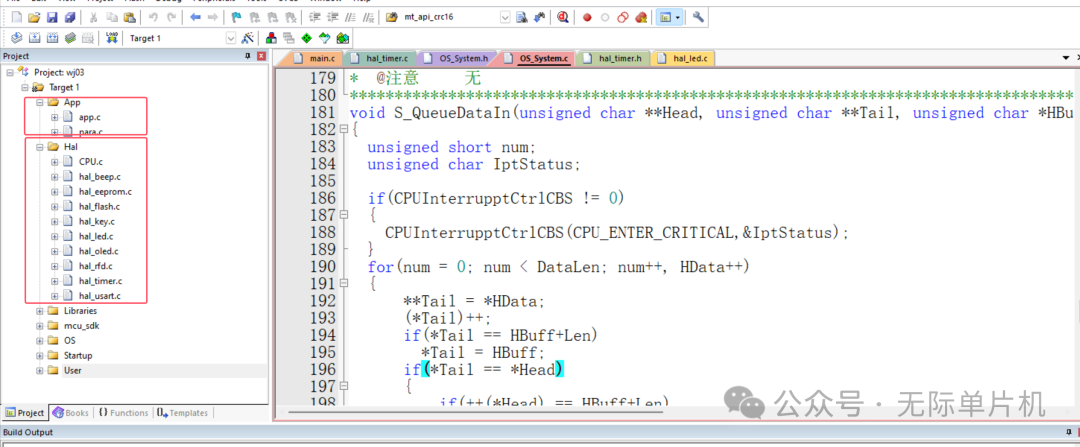
For our Wu Ji microcontroller project, project 3 is somewhat complex, using 2 layers: hardware layer and application layer.
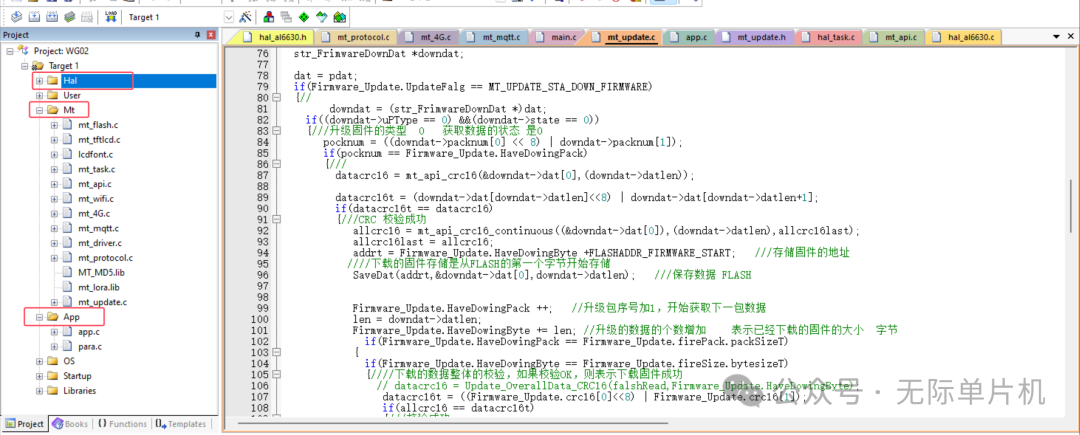
Project 6, however, is much more complex, so it is divided into 3 layers: hardware layer, middleware layer, and application layer.
Golden Rule: Unidirectional Dependency
Layered architecture has an extremely important principle: dependencies are unidirectional. Typically, upper layers depend on lower layers.
• The application layer can call interfaces provided by the middleware layer, BSP layer, or driver layer.
• The middleware layer can call the BSP layer or driver layer.
• The BSP layer calls the driver layer.
• The driver layer directly operates the hardware.
Conversely? No! The lower layer should not know about the existence of upper layers, nor should it directly call functions from upper layers. (Callback functions and event notification mechanisms are exceptions; they are pre-agreed “reverse registrations” that essentially maintain clarity of dependencies).
It’s like if the foundation workers need to know the wallpaper color of the top-floor bedroom to do their job, can the house still be built?
4. Putting it into practice: starting from the folder structure
How to implement the layered thinking in your project?
• Directory structure: In your project, create corresponding folders, such as Drivers, BSP, Middleware, Application. Place the corresponding layer files inside. Clear and straightforward, a blessing for perfectionists.
• Interface design (.h files): Each layer should have clear header files (.h) to define the public functions and data structures it provides to upper layers. This is the “contract” between layers. The header files should only contain what is “visible to others”, while the internal implementation details are encapsulated in the corresponding .c files, using the static keyword to limit scope.
• Data flow: Try to pass data through function parameters and return values. Avoid abusing global variables, as they are a breeding ground for coupling. If layers need to share complex states, consider defining structures and passing them via pointers.
Code example: The layered journey of lighting an LED
Assuming we want to implement a button press to toggle an LED on and off.
• Driver Layer (gpio_driver.h, gpio_driver.c)
// gpio_driver.h
typedef enum{    GPIO_PIN_LOW,    GPIO_PIN_HIGH} GPIO_PinState;
void GPIO_InitPin(uint port, uint pin, uint mode); // Hypothetical initialization function
void GPIO_SetPinLevel(uint port, uint pin, GPIO_PinState state);
GPIO_PinState GPIO_ReadPinLevel(uint port, uint pin);
// gpio_driver.c
// ... Implement specific register operations ...
// Use static to hide internal helper functions
• BSP Layer (bsp_board.h, bsp_board.c)
// bsp_board.h
// Define specific LED and button identifiers on the board
#define BOARD_LED_STATUS_PORT   GPIOA
#define BOARD_LED_STATUS_PIN    5
#define BOARD_BUTTON_USER_PORT  GPIOC
#define BOARD_BUTTON_USER_PIN   13
typedef enum{    BUTTON_PRESSED,    BUTTON_RELEASED} Button_State;
void BSP_LED_Init(void);
void BSP_LED_On(void);
void BSP_LED_Off(void);
void BSP_LED_Toggle(void);
void BSP_Button_Init(void);
Button_State BSP_Button_GetState(void);
// bsp_board.c
#include "gpio_driver.h" // Depend on driver layer
#include "bsp_board.h"
void BSP_LED_Init(void){    // Call GPIO_InitPin to configure PA5 as output
    GPIO_InitPin(BOARD_LED_STATUS_PORT, BOARD_LED_STATUS_PIN, GPIO_MODE_OUTPUT);}
void BSP_LED_On(void){    GPIO_SetPinLevel(BOARD_LED_STATUS_PORT, BOARD_LED_STATUS_PIN, GPIO_PIN_HIGH);}
void BSP_LED_Off(void){    GPIO_SetPinLevel(BOARD_LED_STATUS_PORT, BOARD_LED_STATUS_PIN, GPIO_PIN_LOW);}
// ... Other BSP function implementations, calling GPIO driver ...
Button_State BSP_Button_GetState(void){    if (GPIO_ReadPinLevel(BOARD_BUTTON_USER_PORT, BOARD_BUTTON_USER_PIN) == GPIO_PIN_LOW) // Assume low level pressed    {        return BUTTON_PRESSED;    }
    else    {        return BUTTON_RELEASED;    }}// ...
• Application Layer (app_main.h, app_main.c)
// app_main.h
void App_Init(void);
void App_Run(void);
// app_main.c
#include "bsp_board.h" // Depend on BSP layer
#include "app_main.h"// May also need to include RTOS or other middleware header files
static Button_State lastButtonState = BUTTON_RELEASED;
void App_Init(void){    BSP_LED_Init();    BSP_Button_Init();    // Other application initialization}
void App_Run(void) // Assume called in a loop or task{    Button_State currentButtonState = BSP_Button_GetState();    // Simple button debounce and edge detection logic    if (currentButtonState == BUTTON_PRESSED && lastButtonState == BUTTON_RELEASED)    {        // Detected press event        BSP_LED_Toggle(); // Call BSP layer interface to control LED    }
    lastButtonState = currentButtonState;    // Other application logic...    // Delay_ms(10); // Appropriate delay to prevent CPU spinning or for debouncing}
Do you see? The application layer doesn’t care which pin the LED is connected to, or whether the button is active high or low. It only deals with the “semantics” defined by the BSP layer. If the board changes, and the LED is connected to PB10, and the button becomes active high, you only need to modify the macros and logic in bsp_board.c and bsp_board.h, and app_main.c doesn’t need to change a single line! This is the power of layering.
5. Do small projects also need layering? Is it overkill?
Good question! For extremely simple projects (like just controlling one or two IO ports), strict layering may indeed introduce a bit of extra file and function call overhead. However:
1. Good habits are cultivated: Practicing layered thinking from simple projects helps you develop good programming habits to tackle more complex challenges in the future.
2. Overhead is often negligible: Modern compilers have strong optimization capabilities, and this function call overhead is usually not a performance bottleneck. The maintenance and readability improvements it brings are significant.
3. Flexibly grasp, with thoughts leading the way: Even if you don’t strictly create all layer directories and files, you should have a layered awareness. In code organization, try to separate hardware operations, board-level adaptations, and application logic, even if it’s just by using function blocks and comments within the same file. The key is the shift in mindset.
Embedded software development is not just about making the code run. Writing robust, maintainable, and reusable code is a necessary path for engineers to advance. Layered architecture design thinking is a powerful tool to help you achieve this goal.
It is not a mysterious magic; it is a simple yet effective engineering methodology: keep it simple, stay focused, and clarify boundaries..
Next time you create a new microcontroller project, take a moment to think: can my code be layered?
end