Hello everyone, I am a newly hired embedded engineer. Like many friends who are just starting out, I feel both excited and a bit anxious in the vast ocean of technology: how can I transform the theories from books into the ability to solve real problems? My answer is – to get hands-on with a project. The project I chose is to drive an LED strip. You might think that lighting up an LED is just the “Hello World” of the embedded world, what’s the difficulty? But my goal is far more than just turning on a light. I aim to achieve colorful animations, smooth breathing effects, and the ability to switch in real-time via buttons – behind this is a comprehensive application of the core peripherals of a microcontroller, forming a complete micro embedded system.1. Project Overview: A Small LED Strip, A Big World Why do I firmly believe that driving an LED strip is one of the best practical projects for beginners in embedded systems?
 First, its feedback is extremely intuitive. Every small change in the code can immediately translate into changes in light and shadow. This strong positive feedback is the greatest motivation for me to tackle the chip manual and debug complex timing. More importantly, its technical dimensions are very comprehensive. To achieve the final effect, I need to pass through the following levels:Basic Control (GPIO): Controlling pins like a switch is the starting point.Debugging Lifeline (UART): Learning how to make the chip “speak” and print debugging information is key to locating issues.Precise Timer (TIM): Saying goodbye to inefficient delay waits, achieving precise PWM dimming and smooth animation frame rates.High-Speed Communication (SPI): Mastering the protocol for communicating with dedicated driver chips to stably send massive color data.Interrupt System (EXTI): Responding to button actions to achieve human-computer interaction. This project is like a thread that strings together the most core pearls in embedded development. It teaches me not isolated knowledge points, but a system that works in coordination.2. Hardware Platform: My “Main Battleship” STM32H743 Apollo Development Board
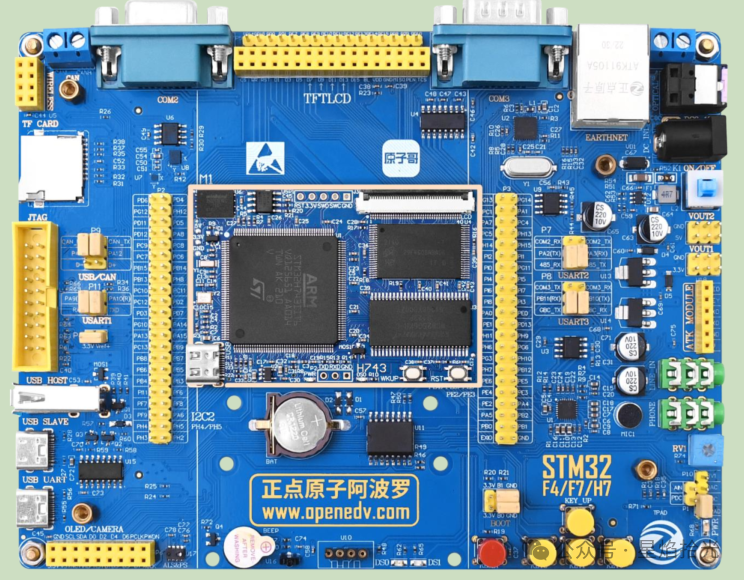 “To do a good job, one must first sharpen their tools.” The core platform I chose is the Apollo development board from ZhiDian YuanZi, which is equipped with a powerful STM32H743II microcontroller.Some may ask, does driving an LED strip require such a high-performance chip? My considerations are:Leave room for complex effects: The H743 with a main frequency of over 400MHz and a powerful DMA controller can easily handle complex animation algorithms with high refresh rates (such as over 60FPS), and in the future, even applications like audio visualization will be effortless.Lower the learning threshold: This development board integrates an ST-Link debugger, allowing power supply, program download, and debugging to be completed with just one USB cable, enabling me to focus on code logic rather than environment setup.Rich resources: The onboard buttons, LEDs, and complete pin headers provide great convenience for learning and verification.3. Series Article Roadmap: Our Practical JourneyThis series of articles will document my complete learning process. I will divide the journey into two major modules, totaling six articles, gradually achieving the goal step by step:Module 1: Mastering Core Peripherals (Building a Solid Foundation)
In-depth Analysis of GPIO: From registers to HAL library, lighting up the first LED
UART Communication Practice: printf redirection and debugging techniques
Timer Principles and Applications: Achieving precise timing and PWM dimming
External Interrupts: Button detection and debouncing
Module 2: LED Strip Project Practice (Comprehensive Application)Driver Chip and SPI Communication: Achieving LED strip cascading and flowing light effects – Tackling the core driver to light up the entire strip.PWM Grayscale Control: Achieving smooth breathing light effects – Infusing soul into the light, achieving brightness gradients.Button Interrupts and State Machines: Achieving multi-mode dynamic switching – Increasing interaction to complete a complete work. My sharing will not only include successful experiences but also every pitfall encountered, every debugging thought process, and the problem-solving journey. I hope this can be a warm and detailed reference.As a newcomer to embedded systems, I know I am just getting started. Writing these articles is for reflection and also for communication. I warmly welcome everyone to leave comments in my public account, sharing your thoughts or valuable experiences.What was your first embedded project? I look forward to communicating with you.See you in the next article, let’s light up the first light of embedded development together!