In this article, we will implement first-person view FPV video remote control functionality based on the ESP32-CAM vision module, achieving true visualization and remote control of everything. The method implemented in this article is to enable the web service function of the ESP32, using a webpage to achieve remote control. The advantage of this approach is that the development cost is very low; a remote control system can be operated on devices such as computers, Android phones, and Apple phones, as long as they can access the webpage.
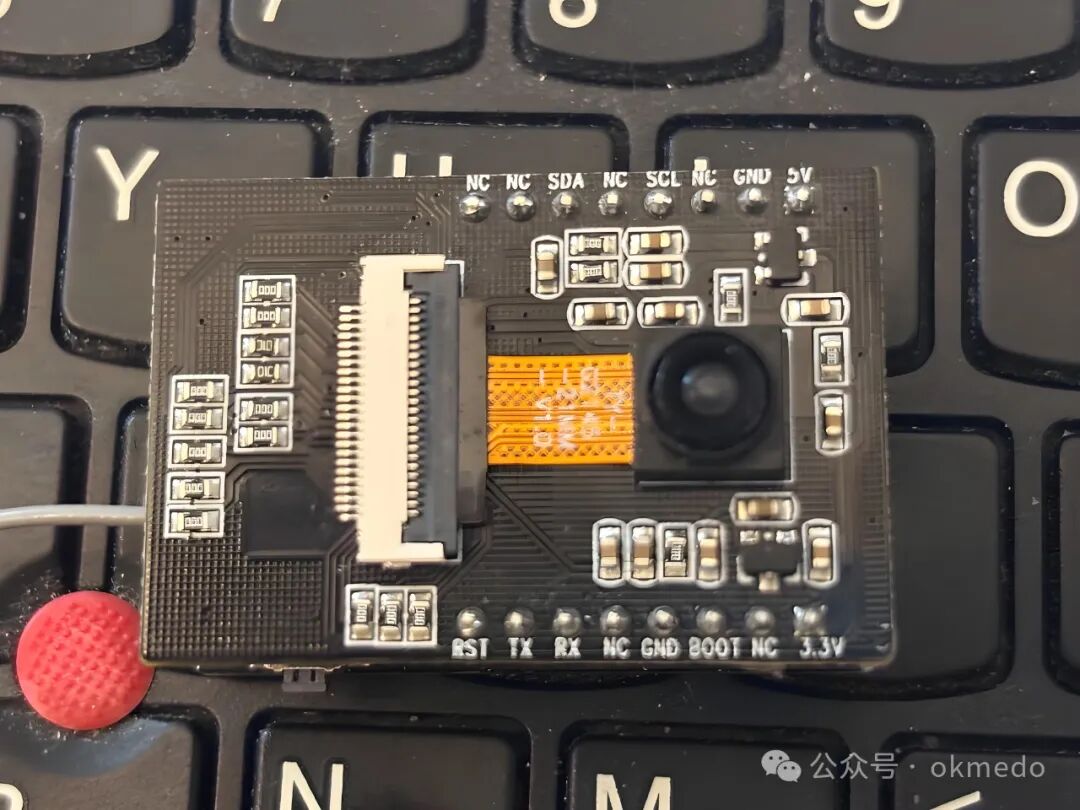
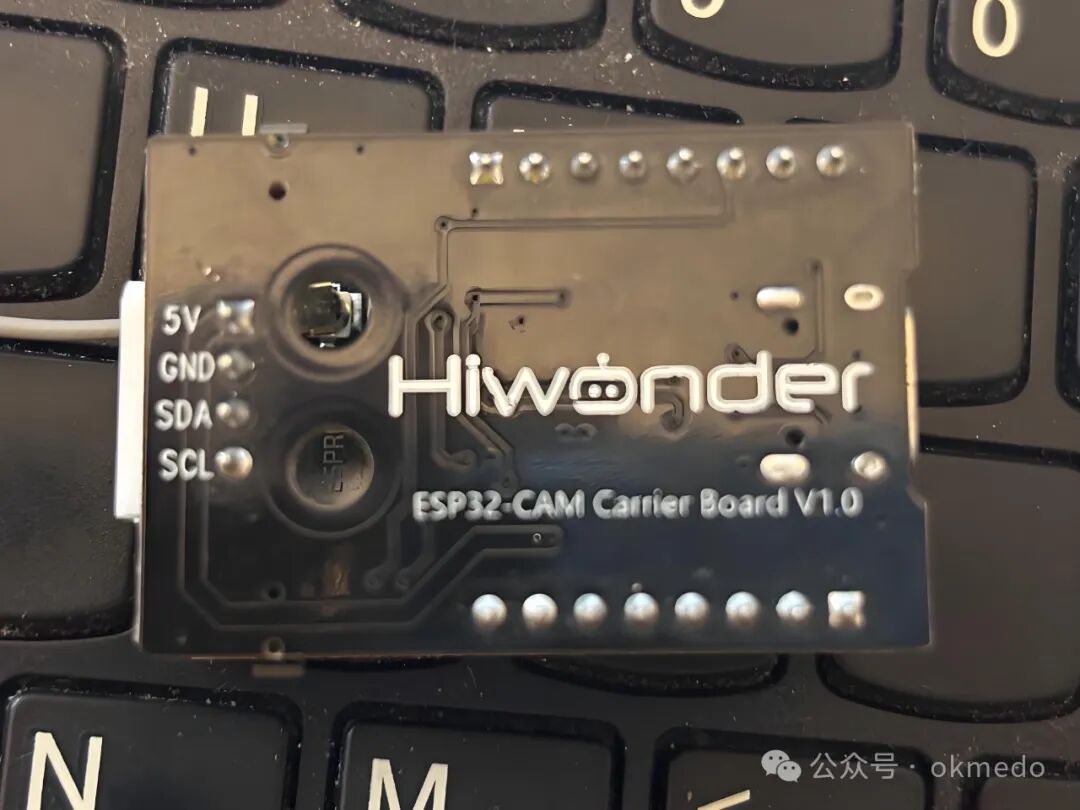
1. The ESP32-CAM Module Used in This Article.
2. The Development Platform Chosen in This Article
The development platform chosen for the program code involved in this article is Arduino.
3. Configuration of the ESP32-CAM Module
The configuration of the ESP32-CAM module used here is based on the official example configuration, but it is important to modify some parameters; otherwise, the video may lag. The video module configuration is written in the setup function, where we will also start the ESP32’s web service and WIFI network connection, etc. For more information on these topics, please refer to other articles in this public account.
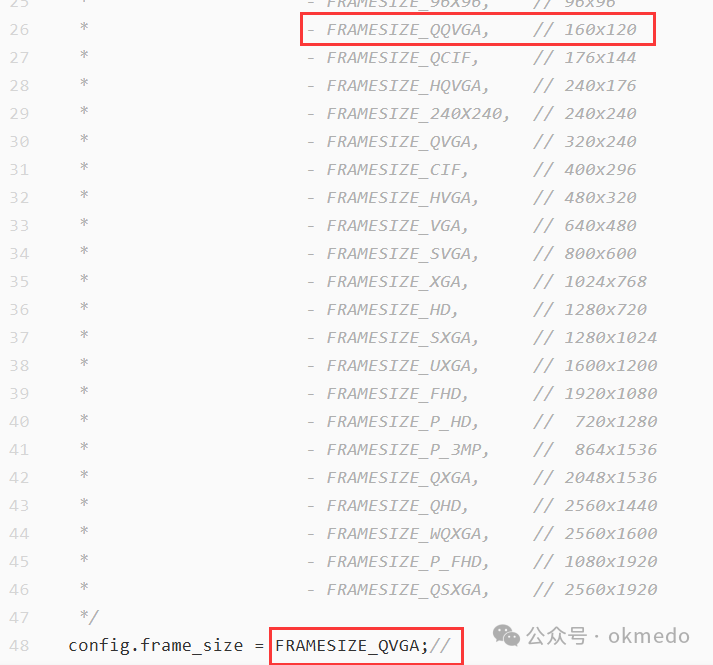
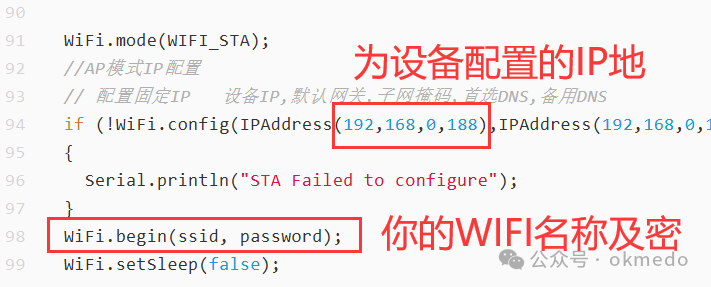
void setup() { Serial.begin(115200); camera_config_t config; config.ledc_channel = LEDC_CHANNEL_0; config.ledc_timer = LEDC_TIMER_0; config.pin_d0 = Y2_GPIO_NUM; config.pin_d1 = Y3_GPIO_NUM; config.pin_d2 = Y4_GPIO_NUM; config.pin_d3 = Y5_GPIO_NUM; config.pin_d4 = Y6_GPIO_NUM; config.pin_d5 = Y7_GPIO_NUM; config.pin_d6 = Y8_GPIO_NUM; config.pin_d7 = Y9_GPIO_NUM; config.pin_xclk = XCLK_GPIO_NUM; config.pin_pclk = PCLK_GPIO_NUM; config.pin_vsync = VSYNC_GPIO_NUM; config.pin_href = HREF_GPIO_NUM; config.pin_sccb_sda = SIOD_GPIO_NUM; config.pin_sccb_scl = SIOC_GPIO_NUM; config.pin_pwdn = PWDN_GPIO_NUM; config.pin_reset = RESET_GPIO_NUM; config.xclk_freq_hz = 15000000; /* @param frame_size One of * - FRAMESIZE_96X96, // 96x96 * - FRAMESIZE_QQVGA, // 160x120 * - FRAMESIZE_QCIF, // 176x144 * - FRAMESIZE_HQVGA, // 240x176 * - FRAMESIZE_240X240, // 240x240 * - FRAMESIZE_QVGA, // 320x240 * - FRAMESIZE_CIF, // 400x296 * - FRAMESIZE_HVGA, // 480x320 * - FRAMESIZE_VGA, // 640x480 * - FRAMESIZE_SVGA, // 800x600 * - FRAMESIZE_XGA, // 1024x768 * - FRAMESIZE_HD, // 1280x720 * - FRAMESIZE_SXGA, // 1280x1024 * - FRAMESIZE_UXGA, // 1600x1200 * - FRAMESIZE_FHD, // 1920x1080 * - FRAMESIZE_P_HD, // 720x1280 * - FRAMESIZE_P_3MP, // 864x1536 * - FRAMESIZE_QXGA, // 2048x1536 * - FRAMESIZE_QHD, // 2560x1440 * - FRAMESIZE_WQXGA, // 2560x1600 * - FRAMESIZE_P_FHD, // 1080x1920 * - FRAMESIZE_QSXGA, // 2560x1920 */ config.frame_size = FRAMESIZE_QVGA;// config.pixel_format = PIXFORMAT_RGB565; // for streaming PIXFORMAT_RGB565 //config.pixel_format = PIXFORMAT_RGB565; // for face detection/recognition config.grab_mode = CAMERA_GRAB_WHEN_EMPTY; config.fb_location = CAMERA_FB_IN_PSRAM; config.jpeg_quality = 6;//12 config.fb_count = 1; // if PSRAM IC present, init with UXGA resolution and higher JPEG quality // for larger pre-allocated frame buffer. if(config.pixel_format == PIXFORMAT_JPEG){ if(psramFound()){ config.jpeg_quality = 10; config.fb_count = 2; config.grab_mode = CAMERA_GRAB_LATEST; } else { // Limit the frame size when PSRAM is not available config.frame_size = FRAMESIZE_VGA; config.fb_location = CAMERA_FB_IN_DRAM; } } else { // Best option for face detection/recognition // config.frame_size = FRAMESIZE_240X240;#if CONFIG_IDF_TARGET_ESP32S3 config.fb_count = 2;#endif }#if defined(CAMERA_MODEL_ESP_EYE) pinMode(13, INPUT_PULLUP); pinMode(14, INPUT_PULLUP);#endif // camera init esp_err_t err = esp_camera_init(&config); if (err != ESP_OK) { Serial.printf("Camera init failed with error 0x%x", err); return; }Serial.println("Camera init ok"); sensor_t * s = esp_camera_sensor_get(); WiFi.mode(WIFI_STA); //AP模式IP配置 // 配置固定IP 设备IP,默认网关,子网掩码,首选DNS,备用DNS if (!WiFi.config(IPAddress(192,168,0,188),IPAddress(192,168,0,1),IPAddress(255,255,255,0),IPAddress(192,168,0,1),IPAddress(192,168,0,1))) { Serial.println("STA Failed to configure"); } WiFi.begin(ssid, password); WiFi.setSleep(false); while (WiFi.status() != WL_CONNECTED) { delay(500); Serial.print("."); } Serial.println("WiFi connected"); startCameraServer(); server_init(); Serial.print("Camera Ready! Use 'http://"); Serial.print(WiFi.localIP()); Serial.println("' to connect");}
Points to note:
1. The configuration of the video frame size; the larger the video, the clearer it is, but it may lag; the smaller it is, the blurrier it is, but it will be smoother. Configure according to the specific application situation.
2. The IP address configured for the device and the configuration of the WIFI network. For more information on WIFI network configuration, please refer to this article to upgrade the configuration function of this article. ESP32|ESP32-S3-N16R8 initialization of WIFI network connection and network parameter settings.
4. Video Stream Program Code
This article uses the official video stream reference code, removing over 80% of unnecessary parts, leaving only the core code for generating the video stream as follows.
//#include <string>#include "esp_http_server.h"//#include "esp_timer.h"#include "esp_camera.h"#include "img_converters.h"//#include "fb_gfx.h"#include "esp32-hal-ledc.h"//#include "sdkconfig.h"//#include <iostream>
int led_duty = 0;bool isStreaming = false;typedef struct{    httpd_req_t *req;    size_t len;} jpg_chunking_t;
#define PART_BOUNDARY "123456789000000000000987654321"static const char *_STREAM_CONTENT_TYPE = "multipart/x-mixed-replace;boundary=" PART_BOUNDARY;static const char *_STREAM_BOUNDARY = "\r\n--" PART_BOUNDARY "\r\n";static const char *_STREAM_PART = "Content-Type: image/jpeg\r\nContent-Length: %u\r\nX-Timestamp: %d.%06d\r\n\r\n";
httpd_handle_t stream_httpd = NULL;
static esp_err_t stream_handler(httpd_req_t *req){    camera_fb_t *fb = NULL;    struct timeval _timestamp;    esp_err_t res = ESP_OK;    size_t _jpg_buf_len = 0;    uint8_t *_jpg_buf = NULL;    char part_buf[128];
    static int64_t last_frame = 0;    if (!last_frame) {        last_frame = esp_timer_get_time();    }
    res = httpd_resp_set_type(req, _STREAM_CONTENT_TYPE);    if (res != ESP_OK) {        return res;    }
    httpd_resp_set_hdr(req, "Access-Control-Allow-Origin", "*");    httpd_resp_set_hdr(req, "X-Framerate", "60");
    while (true) {        fb = esp_camera_fb_get();        if (!fb) {            res = ESP_FAIL;        } else {            _timestamp.tv_sec = fb->timestamp.tv_sec;            _timestamp.tv_usec = fb->timestamp.tv_usec;
            // Directly process image data            if (fb->format != PIXFORMAT_JPEG) {                bool jpeg_converted = frame2jpg(fb, 80, &_jpg_buf, &_jpg_buf_len);                esp_camera_fb_return(fb);                fb = NULL;                if (!jpeg_converted) {                    //log_e("JPEG compression failed");                    res = ESP_FAIL;                }            } else {                _jpg_buf_len = fb->len;                _jpg_buf = fb->buf;            }        }
        if (res == ESP_OK) {            res = httpd_resp_send_chunk(req, _STREAM_BOUNDARY, strlen(_STREAM_BOUNDARY));        }        if (res == ESP_OK) {            size_t hlen = snprintf(part_buf, 128, _STREAM_PART, _jpg_buf_len,                                   _timestamp.tv_sec, _timestamp.tv_usec);            res = httpd_resp_send_chunk(req, part_buf, hlen);        }        if (res == ESP_OK) {            res = httpd_resp_send_chunk(req, (const char *)_jpg_buf, _jpg_buf_len);        }
        // Clean up resources        if (fb) {            esp_camera_fb_return(fb);            fb = NULL;            _jpg_buf = NULL;        } else if (_jpg_buf) {            free(_jpg_buf);            _jpg_buf = NULL;        }
        if (res != ESP_OK) {            //log_e("Send frame failed");            break;        }
        // Calculate frame rate        int64_t fr_end = esp_timer_get_time();        int64_t frame_time = fr_end - last_frame;        last_frame = fr_end;        frame_time /= 1000;                //log_i("MJPG: %uB %ums (%.1ffps)", (uint32_t)(_jpg_buf_len),(uint32_t)frame_time, 1000.0 / (uint32_t)frame_time);    }
    return res;}
void startCameraServer(){    httpd_config_t config = HTTPD_DEFAULT_CONFIG();    config.max_uri_handlers = 16;    httpd_uri_t stream_uri = {        .uri = "/stream",        .method = HTTP_GET,        .handler = stream_handler,        .user_ctx = NULL#ifdef CONFIG_HTTPD_WS_SUPPORT        ,        .is_websocket = true,        .handle_ws_control_frames = false,        .supported_subprotocol = NULL#endif    };        config.server_port=81;    config.ctrl_port=81;    if (httpd_start(&stream_httpd, &config) == ESP_OK)    {        httpd_register_uri_handler(stream_httpd, &stream_uri);    }}
Points to note in this code segment:
1. Pay attention to the route configured for accessing the video stream.
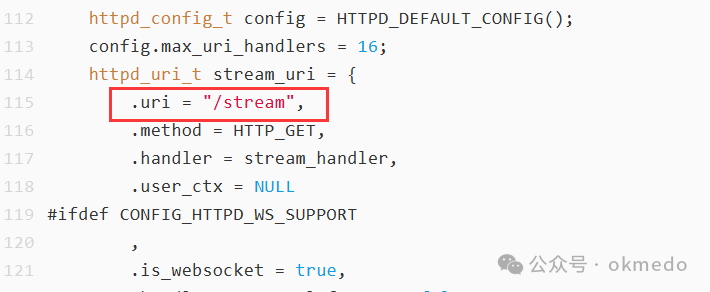
2. Note the port number set here; be sure to modify or configure it accordingly.
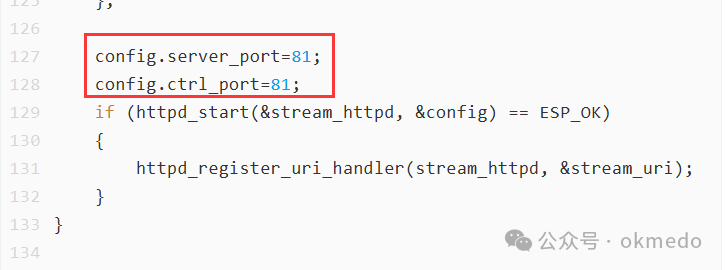
During the debugging phase, it is recommended to debug one function at a time, for example, first debug whether the video stream is normal. By using the above configuration, access:
http://192.168.0.188:81/stream
You should be able to see the video image. If you cannot see the video image, debug this function before proceeding to the next step.
5. Browser Remote Control Program Code
It is important to note that this code is not the final code; it is used during the development and debugging phase and is an ASP program code file. During the development phase, first implement the basic functions in the ASP program code on the IIS server, and then convert the program code into a string to write into the ESP32 chip.
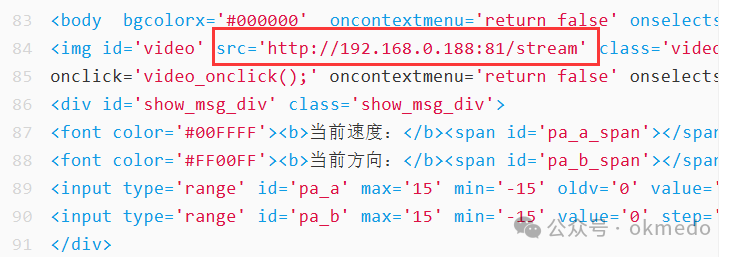
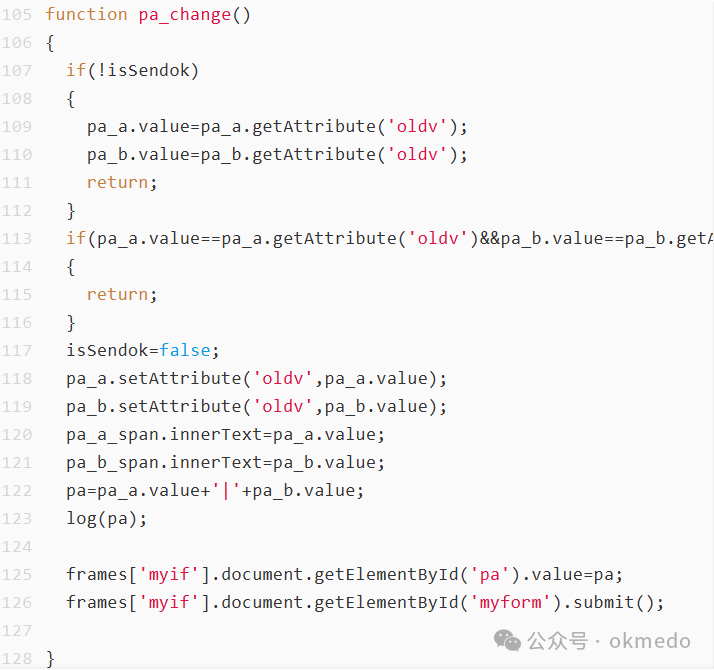
<html><head><meta name='viewport' content='width=device-width,initial-scale=1' ><meta http-equiv='Content-Type' content='text/html; charset=UTF-8'><style>body{ font-sizex:24px; colorx:#FFFFFF; transform:rotate(90deg); }.video{ position:absolute; left:-48vw; top:19vh; height:100vw; width:100vh; }.show_msg_div{ position:absolute; left:-20vh; top:30vh; width:90vw; height:8em; background-colorx:rgba(0,0,0,0.5);}.myif{ displayx:none; position:absolute; left:5vh; top:20vh; width:50vh; height:50vw;}.pa_a{ position: absolute; left:-25px; bottom:-100px; width: 200px; transform:rotate(-90deg);} .pa_b { position: absolute; right:-300px; bottom:-100px; width: 200px; } [class^='pa_']::-webkit-slider-runnable-track { height: 60px; background:#CFCFCF; border-radius:30px; } [class^='pa_']::-moz-range-track { height: 60px; background:#CFCFCF; border-radius:30px;} [class^='pa_']::-webkit-slider-thumb { width:120px; height:120px; margin-top:-25px; background:rgba(156,39,176,0.2);} [class^='pa_']::-moz-range-thumb { width:120px; height:120px; margin-top:-25px; background:rgba(156,39,176,0.2);}</style><title>Universal Remote Control Program</title></head><body bgcolorx='#000000' oncontextmenu='return false' onselectstart='return false' ><img id='video' src='http://192.168.0.188:81/stream' class='video' onclick='video_onclick();' oncontextmenu='return false' onselectstart='return false'><div id='show_msg_div' class='show_msg_div'><font color='#00FFFF'><b>Current Speed:</b><span id='pa_a_span'></span></font><br><font color='#FF00FF'><b>Current Direction:</b><span id='pa_b_span'></span></font><br><input type='range' id='pa_a' max='15' min='-15' oldv='0' value='0' step='1' class='pa_a' oninput='pa_change()'><input type='range' id='pa_b' max='15' min='-15' value='0' step='1' class='pa_b' oninput='pa_change()'></div><iframe name='myif' onload='myif_onload()' class='myif' src='/setv' srcx='https://www.okmedo.com/'></iframe></body></html> <script>const video=document.getElementById('video');const pa_a=document.getElementById('pa_a');const pa_b=document.getElementById('pa_b');const pa_a_span=document.getElementById('pa_a_span');const pa_b_span=document.getElementById('pa_b_span'); var isSendok=true; function pa_change(){ if(!isSendok) { pa_a.value=pa_a.getAttribute('oldv'); pa_b.value=pa_b.getAttribute('oldv'); return; } if(pa_a.value==pa_a.getAttribute('oldv')&&pa_b.value==pa_b.getAttribute('oldv')) { return; } isSendok=false; pa_a.setAttribute('oldv',pa_a.value); pa_b.setAttribute('oldv',pa_b.value); pa_a_span.innerText=pa_a.value; pa_b_span.innerText=pa_b.value; pa=pa_a.value+'|'+pa_b.value; log(pa); frames['myif'].document.getElementById('pa').value=pa; frames['myif'].document.getElementById('myform').submit();} function myif_onload(){ rv=frames['myif'].document.body.innerText; if(rv.indexOf('ok')<2) { rv='Server save error, please exit editing and re-enter\r\n'+rv; } isSendok=true;} function log(v){ console.log(v);}</script>Points to note:
1. The video stream address configured here is the same as the video stream address configured earlier. In actual use, these addresses need to be dynamically generated based on the configuration.
2. This is mainly used for the asynchronous transmission of remote control commands. During debugging, change srcx to src here, and change the previous src to srcx. When writing to the ESP32 chip normally, change it back.
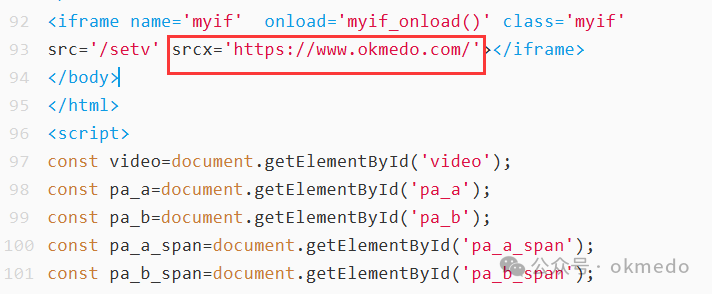
3. This function is mainly used for sending remote control commands.
4. This function can be used for returning device status data, such as battery level, signal strength, etc.

6. Writing Browser Remote Control Program Code to the ESP32 Chip
The fifth part is the browser remote control program code debugged on the IIS server. Once the required functions are basically debugged, the above program code can be converted into a string and written into the ESP32 chip. The process of converting to a string is handled by DeepSeek, with the following prompt:
Help me connect the following code into the variable html with plus signs, connecting each line once, formatting it properly, and do not change my source code. For example: html=html+"<html>";html=html+"<head>";html=html+"<meta name='viewport' content='width=device-width,initial-scale=1' >";Then provide all the ASP program code written in the fifth step to DeepSeek, and it will process it correctly. Ultimately, you will get a web service page code inside the ESP32, which is our remote control page.
void index_handle(){  String html="";  html = html + "<html>";  html = html + "<head>";  html = html + "<meta name='viewport' content='width=device-width,initial-scale=1' >";  html = html + "<meta http-equiv='Content-Type' content='text/html; charset=UTF-8'>";  html = html + "<style>";  html = html + "body";  html = html + "{";  html = html + "  font-sizex:24px;";  html = html + "  colorx:#FFFFFF;";  html = html + "  transform:rotate(90deg);  ";  html = html + "}";  html = html + ".video";  html = html + "{";  html = html + "  position:absolute;";  html = html + "  left:-48vw;";  html = html + "  top:19vh;";  html = html + "  height:100vw;";  html = html + "  width:100vh;   ";  html = html + "}";  html = html + ".show_msg_div";  html = html + "{";  html = html + "  position:absolute;";  html = html + "  left:-20vh;";  html = html + "  top:30vh;";  html = html + "  width:90vw;";  html = html + "  height:8em;  ";  html = html + "  background-colorx:rgba(0,0,0,0.5);";  html = html + "}";  html = html + ".myif";  html = html + "{";  html = html + "  display:none;";  html = html + "  position:absolute;";  html = html + "  left:5vh;";  html = html + "  top:20vh;";  html = html + "  width:50vh;";  html = html + "  height:50vw;";  html = html + "}";  html = html + ".pa_a{";  html = html + "  position: absolute;";  html = html + "  left:-25px;";  html = html + "  bottom:-100px;";  html = html + "  width: 200px; ";  html = html + "  transform:rotate(-90deg);";  html = html + "}";  html = html + ".pa_b {";  html = html + "  position: absolute;";  html = html + "  right:-300px;";  html = html + "  bottom:-100px;";  html = html + "  width: 200px;  ";  html = html + "}";  html = html + "[class^='pa_']::-webkit-slider-runnable-track {";  html = html + "  height: 60px; ";  html = html + "  background:#CFCFCF;";  html = html + "  border-radius:30px; ";  html = html + "}";  html = html + "[class^='pa_']::-moz-range-track {";  html = html + "  height: 60px;";  html = html + "  background:#CFCFCF;";  html = html + "  border-radius:30px;";  html = html + "}";  html = html + "[class^='pa_']::-webkit-slider-thumb {";  html = html + "  width:120px;";  html = html + "  height:120px;";  html = html + "  margin-top:-25px;";  html = html + "  background:rgba(156,39,176,0.2);";  html = html + "}";  html = html + "[class^='pa_']::-moz-range-thumb {";  html = html + "  width:120px; ";  html = html + "  height:120px;";  html = html + "  margin-top:-25px; ";  html = html + "  background:rgba(156,39,176,0.2);";  html = html + "}";  html = html + "</style>";  html = html + "<title>Universal Remote Control Program</title>";  html = html + "</head>";  html = html + "<body  bgcolorx='#000000'  oncontextmenu='return false'  onselectstart='return false' >";  html = html + "<img id='video' src='http://192.168.0.188:81/stream' class='video' ";  html = html + "onclick='video_onclick();' oncontextmenu='return false' onselectstart='return false'>";  html = html + "<div id='show_msg_div' class='show_msg_div'>";  html = html + "<font color='#00FFFF'><b>Current Speed:</b><span id='pa_a_span'></span></font><br>";  html = html + "<font color='#FF00FF'><b>Current Direction:</b><span id='pa_b_span'></span></font><br>";  html = html + "<input type='range' id='pa_a' max='15' min='-15' oldv='0' value='0' step='1' class='pa_a' oninput='pa_change()'>";  html = html + "<input type='range' id='pa_b' max='15' min='-15' value='0' step='1' class='pa_b' oninput='pa_change()'>";  html = html + "</div>";  html = html + "<iframe name='myif'  onload='myif_onload()' class='myif' src='/setv' srcx='https://www.okmedo.com/'></iframe>";  html = html + "</body>";  html = html + "</html> ";  html = html + "<script>";  html = html + "const video=document.getElementById('video');";  html = html + "const pa_a=document.getElementById('pa_a');";  html = html + "const pa_b=document.getElementById('pa_b');";  html = html + "const pa_a_span=document.getElementById('pa_a_span');";  html = html + "const pa_b_span=document.getElementById('pa_b_span');";  html = html + "var isSendok=true;";  html = html + "function pa_change()";  html = html + "{";  html = html + "  if(!isSendok)";  html = html + "  {";  html = html + "    pa_a.value=pa_a.getAttribute('oldv');";  html = html + "    pa_b.value=pa_b.getAttribute('oldv');";  html = html + "    return;";  html = html + "  }";  html = html + "  if(pa_a.value==pa_a.getAttribute('oldv')&&pa_b.value==pa_b.getAttribute('oldv'))";  html = html + "  {";  html = html + "    return;";  html = html + "  }";  html = html + "  isSendok=false;";  html = html + "  pa_a.setAttribute('oldv',pa_a.value);";  html = html + "  pa_b.setAttribute('oldv',pa_b.value);";  html = html + "  pa_a_span.innerText=pa_a.value;";  html = html + "  pa_b_span.innerText=pa_b.value;";  html = html + "  pa=pa_a.value+'|'+pa_b.value;";  html = html + "  log(pa);";  html = html + "  frames['myif'].document.getElementById('pa').value=pa;";  html = html + "  frames['myif'].document.getElementById('myform').submit();";  html = html + "}";  html = html + "function myif_onload()";  html = html + "{";  html = html + "  rv=frames['myif'].document.body.innerText;";  html = html + "  if(rv.indexOf('ok')<2)";  html = html + "  {";  html = html + "    rv='Server save error, please exit editing and re-enter\r\n'+rv;";  html = html + "  }  ";  html = html + "    isSendok=true;";  html = html + "}";  html = html + "function log(v)";  html = html + "{";  html = html + "  console.log(v);";  html = html + "}";  html = html + "</script>";
  // Send with UTF-8 encoding  // Serial.print(html);  server.send(200,"text/html; charset=UTF-8",html);  //charset=UTF-8 is the key setting for displaying Chinese characters}
7. Code for Receiving Control Commands on the ESP32-CAM Module
void setv(){ String pa=server.arg("pa"); Serial.println(pa); temp="<form id='myform' method='post' stylex='background-color:#FF0000;'>"; temp=temp+"<textarea id='pa' name='pa' rows='20' cols='100'></textarea>"; temp=temp+"<input type='submit' value='Submit'>"; temp=temp+"</form>"; temp=temp+"ok"; server.send(200,"text/html; charset=UTF-8",temp); //charset=UTF-8 is the key setting for displaying Chinese characters}
The final control commands will be in the pa variable inside this function, for example, the two control commands transmitted in this article, one for speed and one for direction, formatted as: 5|6. This indicates speed 5 and direction 6, which will then be used for the actual control of the device.
8. Remote Control Data Transmission Test
Open http://192.168.0.188/ in a mobile browser or WeChat to start testing. This article has not yet written a real control program; it mainly implements the video stream transmission of first-person view FPV remote control and the transmission of control commands and return of device data. The test results for control commands and data transmission are very satisfactory, with a control command response speed within 200ms. Now let’s take a look at the test video.