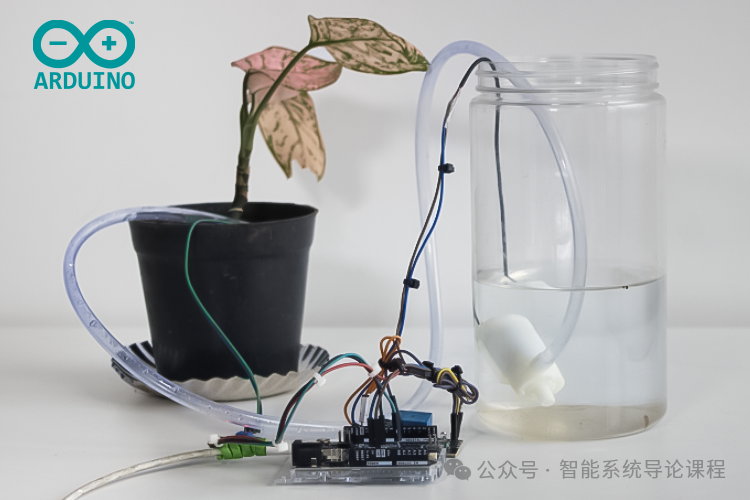
Forget to water your plants again? Don’t worry, this project allows you to remotely control a water pump to ensure your plants stay hydrated. Monitor soil moisture and activate the pump from anywhere using the Blynk app. The onboard LED matrix adds a fun expression for the plants based on moisture levels. With simple components, this DIY system keeps your plants healthy and happy!
 This circuit uses the Arduino UNO R4 WiFi as the main controller, requiring only minor code modifications. The built-in LED matrix on the UNO R4 simulates the plant’s expressions.
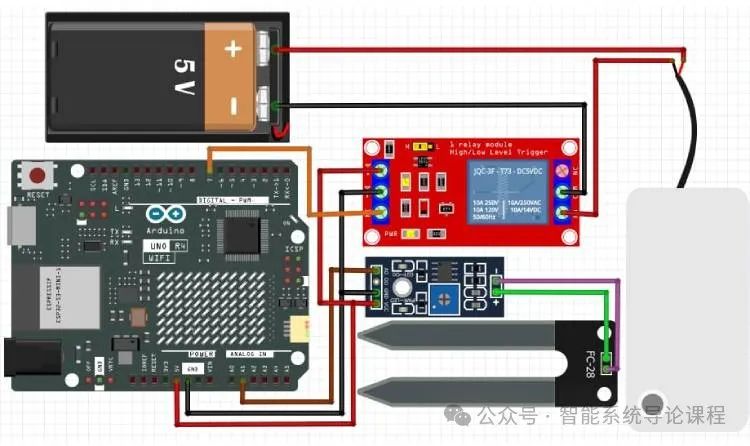 The soil moisture sensor is connected to the analog input pin (A0) of the Arduino to read the soil moisture levels. Since the GPIO pins of the Arduino cannot directly drive the water pump, a relay module with an external power supply is used instead of a motor driver. The water pump is controlled through the relay module, which switches the pump on and off based on the moisture level in the soil. The relay module and sensor are powered by the Arduino’s 5V pin, while the pump can be powered by the Arduino or an external power supply.In this project, the Arduino UNO R4 Wi-Fi is powered via USB-C. Therefore, there is no need for an external power supply; the pump can be powered directly from the Arduino’s 5V pin. Here is how the system is assembled:
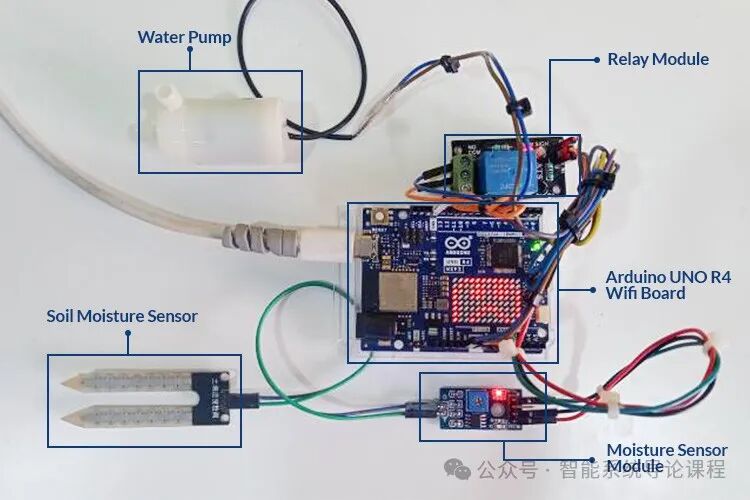 Here, the Arduino is powered through the USB port, bypassing the voltage regulator on the Arduino Uno R4 WiFi board, allowing it to draw up to 2 milliamps from the 5V pin, which is sufficient to drive all these devices, including the water pump.Reference Program
/*************************************************************  Blynk is a platform with iOS and Android apps to control  ESP32, Arduino, Raspberry Pi and the likes over the Internet.  You can easily build mobile and web interfaces for any  projects by simply dragging and dropping widgets.
    Downloads, docs, tutorials: https://www.blynk.io    Sketch generator:           https://examples.blynk.cc    Blynk community:            https://community.blynk.cc    Follow us:                  https://www.fb.com/blynkapp                                https://twitter.com/blynk_app
  Blynk library is licensed under MIT license  This example code is in public domain.
 *************************************************************  This example shows how to use Arduino WiFi shield  to connect your project to Blynk.
  Please update your shield firmware:    https://www.arduino.cc/en/Hacking/WiFiShieldFirmwareUpgrading
  Feel free to apply it to any other example. It's simple! *************************************************************/
/* Comment this out to disable prints and save space *///#define BLYNK_PRINT Serial
/* Fill in information from Blynk Device Info here */#define BLYNK_TEMPLATE_ID "XXXXXXXXXXXX"#define BLYNK_TEMPLATE_NAME "XXXXXXXXXXXXX"#define BLYNK_AUTH_TOKEN "XXXXXXXXXXXXXXX"
#include <SPI.h>#include <WiFiS3.h>#include <BlynkSimpleWifi.h>#include "Arduino_LED_Matrix.h"#include <EEPROM.h>
#define moisture_sensor A0#define relay 7
BlynkTimer timer;ArduinoLEDMatrix matrix;  //Create an led matrix object
// Your WiFi credentials.// Set password to "" for open networks.char ssid[] = "XXXXXXXXX";char pass[] = "XXXXXXXXX";
int eeprom_addr = 0;  //eeprom addressint sensorValue = 0;  // variable to store the value coming from the sensorint prev_pump_status = 0;int pump_status = 0;float moist_percent = 0.00;


const uint32_t HAPPY_LED[] = {    0x3fc48a95,    0x58019fd9,    0x5889871};
const uint32_t NORMAL_LED[] = {    0x3fc40298,    0xd98d8019,    0x5889871};
const uint32_t SAD_LED[] = {    0x3fc48a9d,    0xd8898018,    0x71889905};

BLYNK_WRITE(V1){     //read data from Blynk cloud  pump_status = param.asInt();  EEPROM.write(eeprom_addr,pump_status);  prev_pump_status = EEPROM.read(eeprom_addr);  Serial.println(prev_pump_status);  Serial.println(pump_status);}
void sendSensor(){   //send data to Blynk cloud  Blynk.virtualWrite(V0,moist_percent);}
void init_renesas_MCU_IO(){  pinMode(relay, OUTPUT);  pinMode(moisture_sensor, INPUT);  analogReadResolution(12); //change to 12-bit resolution  matrix.begin(); //initialise the led matrix*/
void track_soil_moisture(){
  // read the value from the sensor:   sensorValue = analogRead(moisture_sensor);   moist_percent = 100 - ((float)sensorValue / 4096.0) * 100;
  if(moist_percent >= 0 && moist_percent < 33.33){    Serial.println("DRY");    matrix.loadFrame(SAD_LED);  }  else if(moist_percent >= 33.33 && moist_percent < 66.66){    Serial.println("MODERATE");    matrix.loadFrame(NORMAL_LED);  }  else if(moist_percent >= 66.66 && moist_percent <= 100){    Serial.println("WET");    matrix.loadFrame(HAPPY_LED);  }}
void setup(){  // Debug console  Serial.begin(9600);
  Blynk.begin(BLYNK_AUTH_TOKEN, ssid, pass);
  init_renesas_MCU_IO();
  timer.setInterval(1000L,sendSensor);
  prev_pump_status = EEPROM.read(eeprom_addr);  pump_status = prev_pump_status;}
void loop(){  Blynk.run();  timer.run();
  track_soil_moisture();  if(pump_status == 0){    Serial.println("Water pump is off");    digitalWrite(relay, LOW);  }  else if(pump_status == 1){    Serial.println("Water pump is on");    digitalWrite(relay,HIGH);  }  delay(500);}