1 Overview
The QNX operating system is an embedded hard real-time operating system launched by QNX, a subsidiary of BlackBerry in Canada, and belongs to the UNIX-like operating systems. The operation method of the Shell command line and the commands are almost the same as those in the Linux system.
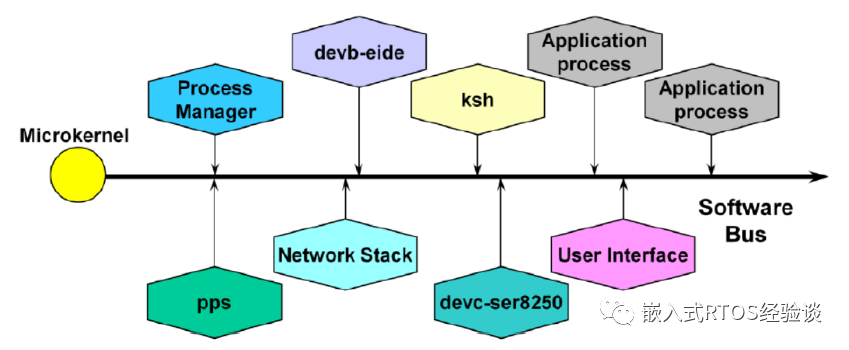
The QNX operating system follows a microkernel architecture, where the kernel is responsible for the most basic tasks such as task scheduling, interrupt handling, and message processing. It connects the microkernel, process manager (the microkernel and process manager are actually a file named procnto, with each chip architecture corresponding to a different procnto file, such as x86 and ARMv7), device drivers, service programs, protocol stacks, and user applications through a message soft bus, as shown in the figure below.
As mentioned above, QNX belongs to a microkernel architecture, and the driver and kernel are not a whole; therefore, implementing a driver in QNX is as convenient as implementing a user application. During actual debugging, one can step through the code, print outputs, and even open two or more QNX Momentics IDEs for program coordination.
2 Overall Structure
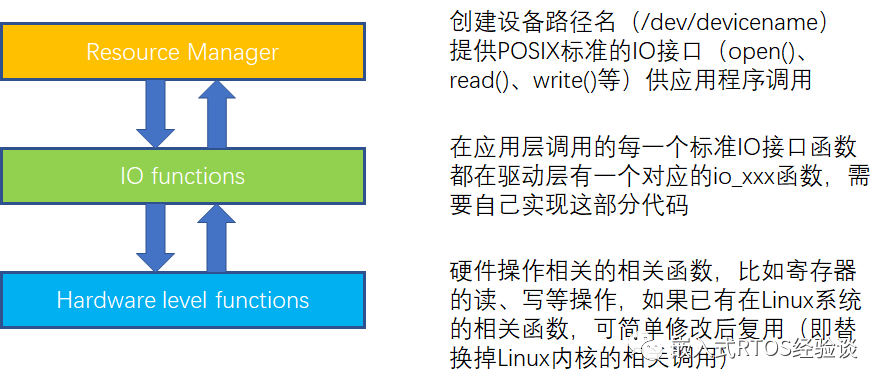
As shown in the above figure, a complete QNX driver is divided into three parts: first, creating a resource manager, which can create paths and names for devices (for example, for serial port 1, the path can be set to /dev/ser1), allowing users to operate the target device as if it were a file, thus achieving control over the target device; second, implementing specific I/O interface functions, which can also be considered part of the resource manager, where driver developers implement the specific operations of each I/O function that need to be provided to the driver user; third, implementing specific hardware operations, such as reading and writing configurations for device registers or mapped memory.
3 Specific Implementation
The resource manager is the core of the QNX driver. The official QNX documentation provides fixed steps and related program examples for creating a resource manager. Below is a specific code segment demonstrating the process of creating a resource manager.
int create_resource_manager(int argc, char **argv)
{
    /* declare variables we'll be using */
    thread_pool_attr_t   pool_attr;
    resmgr_attr_t        resmgr_attr;
    dispatch_t           *dpp;
    thread_pool_t        *tpp;
    int                  id;
    if ((dpp = dispatch_create()) == NULL)
    {
        return EXIT_FAILURE;
    }
    memset(&resmgr_attr, 0, sizeof resmgr_attr);
    resmgr_attr.nparts_max   = 1;
    resmgr_attr.msg_max_size = 2048;
    iofunc_func_init(_RESMGR_CONNECT_NFUNCS, &connect_funcs,
                     _RESMGR_IO_NFUNCS, &io_funcs);
    io_funcs.read  = io_read;
    io_funcs.write = io_write;
    iofunc_attr_init(&attr, S_IFNAM | 0666, 0, 0);
    attr.nbytes = strlen (buffer)+1;
    id = resmgr_attach(
            dpp,            /* dispatch handle        */
            &resmgr_attr,   /* resource manager attrs */
            "/dev/device_name",    /* device name            */
            _FTYPE_ANY,     /* open type              */
            0,              /* flags                  */
            &connect_funcs, /* connect routines       */
            &io_funcs,      /* I/O routines           */
            &attr);         /* handle                 */
    if(id == -1) {
        fprintf(stderr, "%s: Unable to attach name.\n", argv[0]);
        return EXIT_FAILURE;
    }
    /* initialize thread pool attributes */
    memset(&pool_attr, 0, sizeof pool_attr);
    pool_attr.handle = dpp;
    pool_attr.context_alloc = dispatch_context_alloc;
    pool_attr.block_func = dispatch_block;
    pool_attr.unblock_func = dispatch_unblock;
    pool_attr.handler_func = dispatch_handler;
    pool_attr.context_free = dispatch_context_free;
    pool_attr.lo_water = 2;
    pool_attr.hi_water = 4;
    pool_attr.increment = 1;
    pool_attr.maximum = 50;
    /* allocate a thread pool handle */
    if((tpp = thread_pool_create(&pool_attr,
                                 POOL_FLAG_EXIT_SELF)) == NULL) {
        fprintf(stderr, "%s: Unable to initialize thread pool.\n",
                argv[0]);
        return EXIT_FAILURE;
    }
    /* start the threads, will not return */
    thread_pool_start(tpp);
    return 0;
}
The above code shows the most general process for creating a Resource Manager. In actual implementation, one can directly find different process example codes in the official QNX documentation and make some simple modifications according to their actual needs.
In the above code, there is the following code:
iofunc_func_init(_RESMGR_CONNECT_NFUNCS, &connect_funcs,  _RESMGR_IO_NFUNCS, &io_funcs);
io_funcs.read  = io_read;
io_funcs.write = io_write;
The above code calls two functions, namely io_read() and io_write(). These two functions are the I/O function layer mentioned in the overall structure. When the user writes an application, after opening this device, calling the read() function will directly trigger the io_read() function through the message communication mechanism; when the application calls the write() function, it will directly trigger the io_write() function through the message communication mechanism.
An example implementation of the io_read() function is as follows. The brown font code is the self-implemented part, where data read from the hardware device is stored in the buffer, and the application can call the read() function to trigger the execution of io_read(), sending the data in the buffer to the application through the message communication mechanism and including the actual length of the data sent.
int io_read (resmgr_context_t *ctp, io_read_t *msg, RESMGR_OCB_T *ocb)
{
    int         nleft;
    int         nbytes;
    int         nparts;
    int         status;
    if ((status = iofunc_read_verify (ctp, msg, ocb, NULL)) != EOK)
        return (status);
    if ((msg->i.xtype & _IO_XTYPE_MASK) != _IO_XTYPE_NONE)
        return (ENOSYS);

    nleft = ocb->attr->nbytes - ocb->offset;
    nbytes = min (msg->i.nbytes, nleft);
    if (nbytes > 0) {
        /* set up the return data IOV */
        SETIOV (ctp->iov, buffer + ocb->offset, nbytes);
        /* set up the number of bytes (returned by client's read()) */
        _IO_SET_READ_NBYTES (ctp, nbytes);
        ocb->offset += nbytes;
        nparts = 1;
    } else {
        /*
         * they've asked for zero bytes or they've already previously
         * read everything
         */
        _IO_SET_READ_NBYTES (ctp, 0);
        nparts = 0;
    }
    /* mark the access time as invalid (we just accessed it) */
    if (msg->i.nbytes > 0)
        ocb->attr->flags |= IOFUNC_ATTR_ATIME;
    return (_RESMGR_NPARTS (nparts));
}
An example implementation of the io_write() function is as follows. The brown font code is the self-implemented part, where the io_write() function obtains the data sent by the application layer program through the call to the write() function via the message communication mechanism and performs corresponding hardware actions based on the received data. For example, if it is a serial driver, the hardware-level function for sending data may need to be called to write the received data to the corresponding register of the serial port and send it out; if it is an LED program, it may need to call the corresponding hardware-level function to change the GPIO port’s signal level to turn the light on or off.
int io_write (resmgr_context_t *ctp, io_write_t *msg, RESMGR_OCB_T *ocb)
{
    int  status;
    char *buf;
    unsigned int leds=0;
    if ((status = iofunc_write_verify(ctp, msg, ocb, NULL)) != EOK)
        return (status);
    if ((msg->i.xtype & _IO_XTYPE_MASK) != _IO_XTYPE_NONE)
        return(ENOSYS);
    /* set up the number of bytes (returned by client's write()) */
    _IO_SET_WRITE_NBYTES (ctp, msg->i.nbytes);
    buf = (char *) malloc(msg->i.nbytes + 1);
    if (buf == NULL)
        return(ENOMEM);
    resmgr_msgread(ctp, buf, msg->i.nbytes, sizeof(msg->i));
    buf [msg->i.nbytes] = '\0'; /* just in case the text is not NULL terminated */

    /* call hardware low-level operation function */
    free(buf);
    if (msg->i.nbytes > 0)
        ocb->attr->flags |= IOFUNC_ATTR_MTIME | IOFUNC_ATTR_CTIME;
    return (_RESMGR_NPARTS (0));
}
4 Porting Drivers from Other Operating Systems
From personal experience, when porting drivers from other systems to the QNX operating system, the following steps should be followed:
-
Extract all the basic operation function codes for the device from the drivers of other systems. For example, for a serial driver, operations such as initializing the serial port, sending data, receiving data, and configuring serial port parameters should be OS-independent (the only relevant part may be mapping the physical base address to the virtual base address);
-
Create a framework for a resource manager, set the path and device name, and associate all necessary I/O operation functions in io_func;
-
Link the first two parts together through the I/O operation functions;
-
Handle operations in the entire driver program, such as parsing and processing the received command line parameters.
5 Conclusion
QNX provides a very general framework for driver development, reducing the overall development difficulty of drivers, with a clear overall program architecture that lowers the probability of errors.