Are you interested in Ethernet communication? In this post, we will explore the world of Ethernet communication using the ENC28J60 module and the Arduino development board. Whether you are a beginner or an experienced Arduino enthusiast, this will be helpful for you. In this article, we will learn how to connect the ENC28J60 module and provide step-by-step instructions and key points. Through simple explanations and practical examples, we will learn how to establish a TCP/IP connection, send and receive data, and create our own web server using the ENC28J60 module.
Required Components
● Arduino Micro Development Board
● ENC28J60 Ethernet Network Module
● Male/Female Jumper Wires
Pin Configuration of the ENC28J60 Ethernet Module
This module is equipped with the ENC28J60 Ethernet network controller, supporting various network protocols. With its SPI interface, it can easily communicate with microcontrollers. The maximum data transfer rate of this chip is 10Mbps, which is sufficient for many applications. The module has 10 pins, as shown in the figure below.

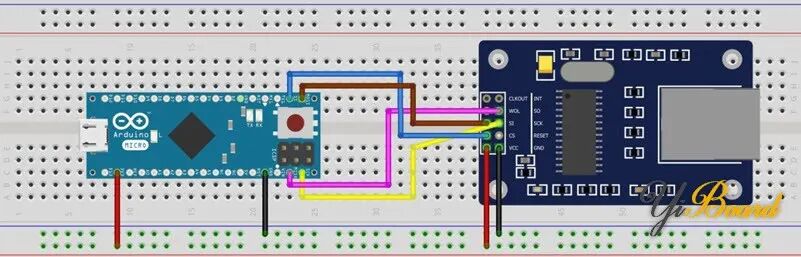
Hardware Connections to Create a Web Server with Arduino and ENC28J60 Module
Connect the various components as shown, linking the SPI pins of the Arduino development board to the SPI pins of the Ethernet module.
Note: The power supply voltage for the ENC28J60 Ethernet module must be 3.3V. Higher voltages may burn out the chip.
Web Server Code
Before we start writing the code, first download the EthernetENC library from this link and install it in the Arduino software.
Now let’s begin writing the web server code. With this code, the Arduino reads 6 analog inputs and displays them in a specific format on the web server page.
/*  modified on OCT 23, 2023  Modified by MajidMerati from Arduino Examples*/
#include <SPI.h>
#include <EthernetENC.h>
// Enter a MAC address and IP address for your controller below.
// The IP address will be dependent on your local network:
byte mac[] = {  0xDE, 0xAD, 0xBE, 0xEF, 0xFE, 0xED};
IPAddress ip(192, 168, 6, 101);
// Initialize the Ethernet server library
// with the IP address and port you want to use
// (port 80 is default for HTTP):
EthernetServer server(80);

void setup() {
  // You can use Ethernet.init(pin) to configure the CS pin
  //Ethernet.init(10);  // Most Arduino shields
  //Ethernet.init(5);   // MKR ETH shield
  //Ethernet.init(0);   // Teensy 2.0
  //Ethernet.init(20);  // Teensy++ 2.0
  //Ethernet.init(15);  // ESP8266 with Adafruit Featherwing Ethernet
  //Ethernet.init(33);  // ESP32 with Adafruit Featherwing Ethernet

  // Open serial communications and wait for port to open:
  Serial.begin(9600);
  while (!Serial) {
    ; // wait for serial port to connect. Needed for native USB port only
  }
  Serial.println("Ethernet WebServer Example");

  // start the Ethernet connection and the server:
  Ethernet.begin(mac, ip);

  // Check for Ethernet hardware present
  if (Ethernet.hardwareStatus() == EthernetNoHardware) {
    Serial.println("Ethernet shield was not found.  Sorry, can't run without hardware. :(");
    while (true) {
      delay(1); // do nothing, no point running without Ethernet hardware
    }
  }
  if (Ethernet.linkStatus() == LinkOFF) {
    Serial.println("Ethernet cable is not connected.");
  }

  // start the server
  server.begin();
  Serial.print("server is at ");
  Serial.println(Ethernet.localIP());
}

void loop() {
  // listen for incoming clients
  EthernetClient client = server.available();
  if (client) {
    Serial.println("new client");
    // an http request ends with a blank line
    boolean currentLineIsBlank = true;
    while (client.connected()) {
      if (client.available()) {
        char c = client.read();
        Serial.write(c);
        // if you've gotten to the end of the line (received a new line
        // character) and the line is blank, the http request has ended,
        // so you can send a reply
        if (c == '\n' && currentLineIsBlank) {
          // send a standard http response header
          client.println("HTTP/1.1 200 OK");
          client.println("Content-Type: text/html");
          client.println("Connection: close");  // the connection will be closed after completion of the response
          client.println("Refresh: 5");  // refresh the page automatically every 5 sec
          client.println();
          client.println("<!DOCTYPE HTML>");
          client.println("<html>");
          // output the value of each analog input pin
          for (int analogChannel = 0; analogChannel < 6; analogChannel++) {
            int sensorReading = analogRead(analogChannel);
            client.print("analog input ");
            client.print(analogChannel);
            client.print(" is ");
            client.print(sensorReading);
            client.println("<br />");
          }
          client.println("</html>");
          break;
        }
        if (c == '\n') {
          // you're starting a new line
          currentLineIsBlank = true;
        } else if (c != '\r') {
          // you've gotten a character on the current line
          currentLineIsBlank = false;
        }
      }
    }
    // give the web browser time to receive the data
    delay(1);
    // close the connection:
    client.stop();
    Serial.println("client disconnected");
}