
How to Connect PLC Using WINCC and TCP/IP
Prerequisites
The prerequisite for establishing communication between the PLC system and WINCC6.0 via Ethernet is that the PLC system is equipped with an Ethernet module or uses a PLC with a PN interface. The list of Ethernet modules is shown in the table below:

Note: Only modules that support the ISO communication protocol can support (Industrial Ethernet) communication. Specific details can be checked in the module information in STEP7. The following steps in this document apply to the CPU 315-2PN/DP model of PLC, using a standard Ethernet card for connection.
Configuration Process
1. STEP7 Hardware Configuration
Use the STEP7 programming software to configure the PLC system in software. Insert the actual PLC hardware in the Hardware interface, as shown in Figure 1.1:
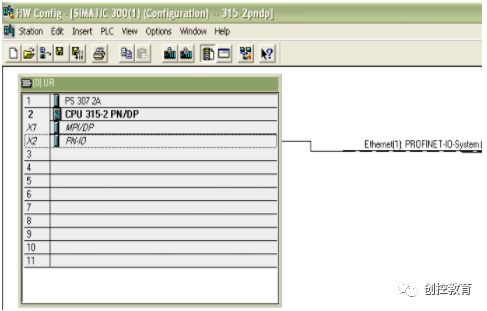
Figure 1.1
Double-click the PN-IO slot to pop up the PN-IO properties dialog, as shown in Figure 1.2:
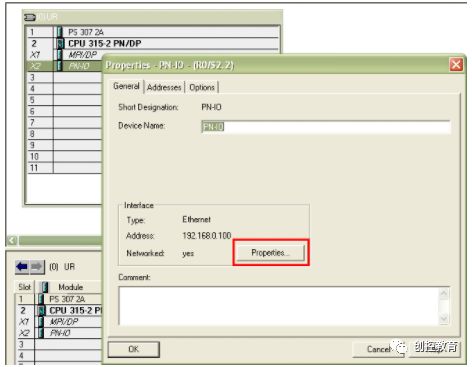
Figure 1.2
Click the properties dialog in Figure 1.2 to pop up the network parameter settings dialog, as shown in Figure 1.3:
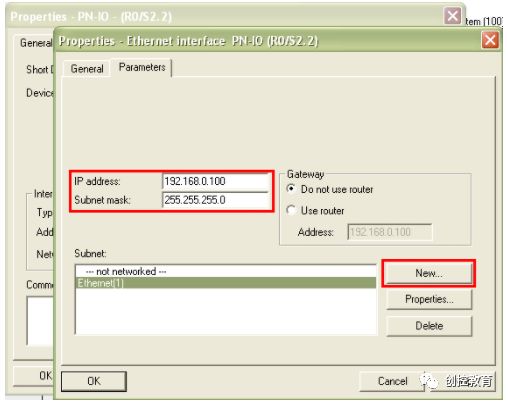
Figure 1.3
Click the New button to create an industrial Ethernet network, input the IP address of the PN module and the Subnet mask. In simple cases, do not enable the gateway.
When using the CPU+ Ethernet module for communication, double-click the Ethernet module to automatically pop up the Ethernet module’s property information, setting the Ethernet communication module’s IP address and subnet mask. The method is the same as the property settings of PN-IO, as shown in the figure below: Note that if you want to use the TCP/IP communication method, you must enable the IP Protocol being used, and set the IP address and subnet mask, as shown in Figure 1.4:
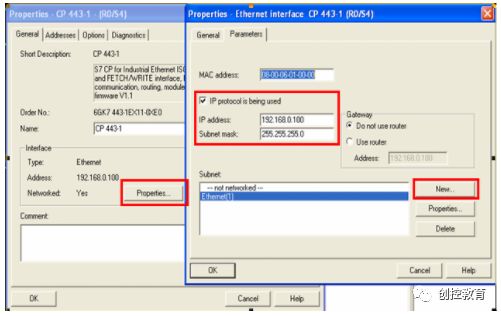
Figure 1.4
Download the configuration to the CPU, and the PLC side is set up. For the first time using Ethernet communication, you must ensure that you first use the MPI or PROFIBUS communication method to download the configured parameters to the target PLC, after which you can monitor programs and download projects via Ethernet.
2. Set IP Address and Communication Check
Set the windows operating system TCP/IP parameters on the computer with WINCC, ensuring the IP address of the WINCC configuration computer is in the same network segment as the PLC Ethernet communication module or PN-IO IP address, paying attention to the subnet mask settings, as shown in Figure 1.5:
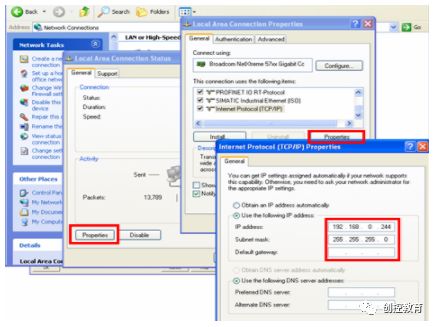
Figure 1.5
By typing CMD in the program ? running interface to enter the DOS interface, use the network command PING to test whether the Ethernet communication is established. The command for PING is as follows: ping target IP address – parameters
As shown in Figure 1.6:
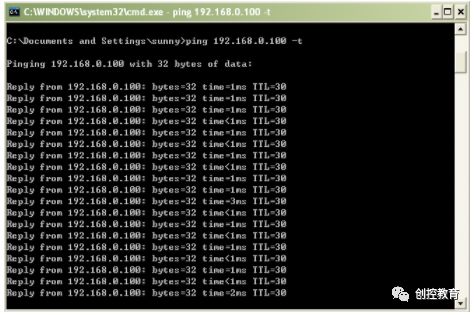
Figure 1.6
In this case, the PN-IO IP address is 192.168.0.100 with a subnet mask: 255.255.255.0; the configuration computer’s IP address is 192.168.0.244 with a subnet mask: 255.255.255.0. This indicates that Ethernet communication has been established and is in good condition.
Note: If you cannot Ping the PLC PN port or Ethernet module here, communication cannot be established, and subsequent steps should not be performed. To ensure successful communication, the actual physical Ethernet communication must remain normal.
3. Add Driver and Set System Parameters
Open the WINCC project in Tag Management–>SIMATIC S7 PROTOCOL SUITE->TCP/IP
Right-click on TCP/IP, click on System Parameter in the pop-up menu, as shown in Figure 1.7, which will pop up the System Parameter- TCP/IP dialog. Select the Unit label to view the Logic device name. After default installation, the logic device name is CP-TCPIP, as shown in Figure 1.8:
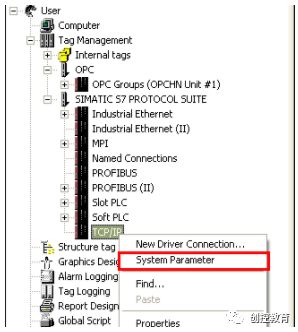
Figure 1.7
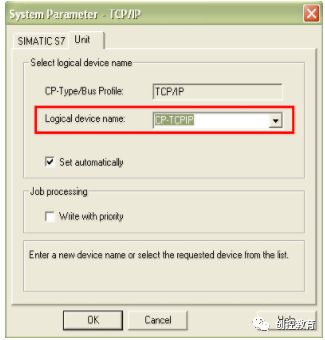
Figure 1.8
4. Set Set PG/PC Interface
Set the communication interface by entering the control panel of the operating system, double-clicking Set PG/PC Interface. After default installation, there is no CP-TCPIP in the application access point, so this application access point needs to be added manually, as shown in Figure 1.9:
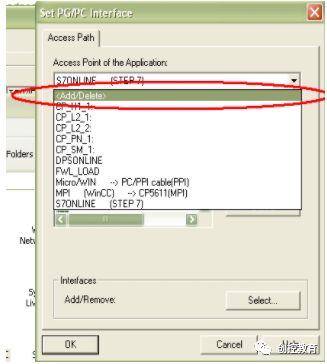
Figure 1.9
When you select <Add/Delete>, a dialog will pop up, as shown in Figure 1.10:
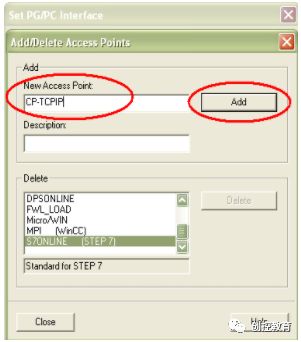
Figure 1.10
Click the Add button, and the application access point will be added to the access point list, as shown in Figure 1.11:
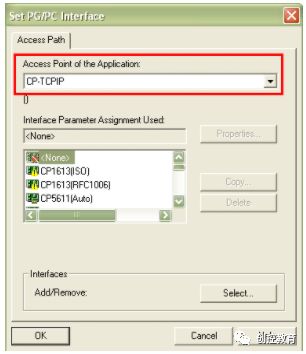
Figure 1.11
In the case shown in Figure 1.11, select the Interface Parameter Assignment Used: choose TCP/IP-> the actual network card’s name. After setting, it will be as shown in Figure 1.12:
Note:
a. Your network card will display differently, please ensure the selected entry is the name of the standard Ethernet card you are using.
b. The application access name used here is CP-TCPIP, because after successful installation of WINCC, CP-TCPIP is the default name under the TCP/IP driver, so we add the access point with this name under Set PG/PC Interface. You can also use other names, but you must ensure they are modified and kept completely consistent; otherwise, communication cannot be established.
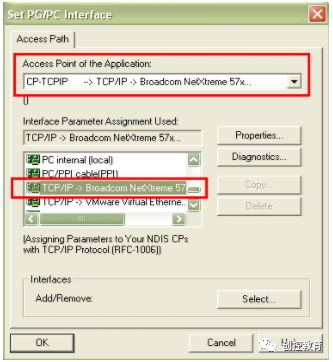
Figure 1.12
Click the Diagnostics button to diagnose the network card to ensure it is functioning properly, as shown in Figure 1.13:
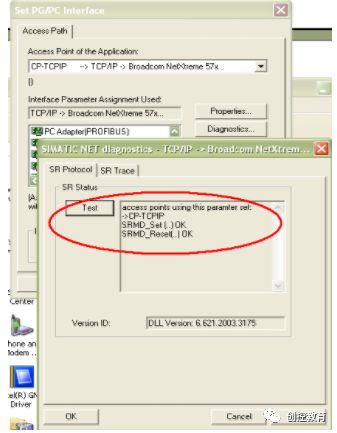
Figure 1.13
5. Add Channel and Connection Settings
Add driver connection and set parameters. Open the WINCC project in Tag Management–>SIMATIC S7 PROTOCOL SUITE->TCP/IP, right-click on TCPIP, and in the drop-down menu, click on New Driver Connection, as shown in Figure 1.14. In the pop-up Connection properties dialog, click the Properties button, which will pop up the Connection Parameter- TCP/IP properties dialog, fill in the parameters, as shown in Figure 1.15:
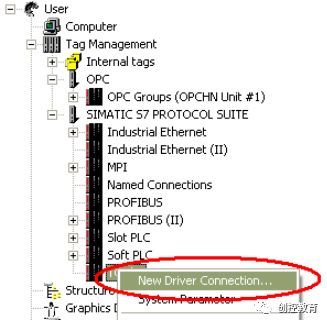
Figure 1.14
In the pop-up dialog, enter the IP address and rack number and slot number of the PN-IO or Ethernet module that has been set in STEP7.
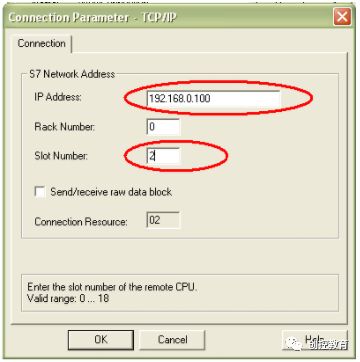
Figure 1.15
In the pop-up Connection properties, click the Properties button, and in the pop-up Connection Parameter, enter the parameters:
IP Address: (the IP address of the communication module)
Rack Number: the rack number where the CPU is located. Generally, fill in 0 unless in special complex usage cases.
Slot Number: the slot number where the CPU is located.
Note: If you are using S7-300 PLC, then the Slot Number parameter is 2, and if it is an S7-400 PLC, then you must check the slot number in the STEP7 project’s Hardware software; do not fill it in arbitrarily based on experience and physical installation position. Possible parameters are 2, 3, 4 (mainly determined by the size of the power supply), otherwise, communication cannot be established.
6. Connection Test and Communication Diagnosis
Use the channel diagnostic program in the WINCC tools, WinCC Channel Diagnosis, to test whether communication is established. Note: At this time, the PLC must be in running state; older versions of the PLC must be in RUN-P or RUN state, and WINCC must be activated. According to the position shown in Figure 1.16, enter the channel diagnostic tool to check whether communication has been successfully established. As shown in Figure 1.17, the green “√” indicates that communication has been successfully established.
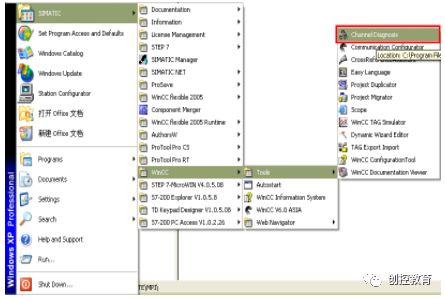
Figure 1.16
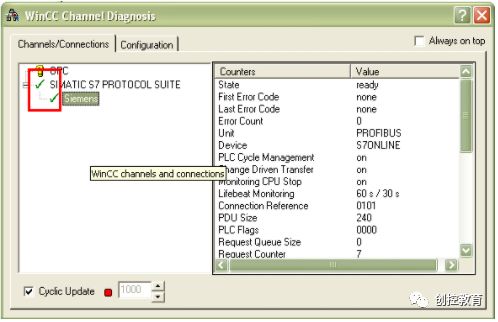
Figure 1.17
Thus, the process of connecting the PLC using a standard Ethernet card through TCP/IP with WINCC is complete.
(Content sourced from the internet, copyright belongs to the original author)
Disclaimer: If copyright issues arise, please contact for deletion! No individual or institution assumes any legal responsibility.