Nowadays, whether in security engineering or weak current engineering, the connection with networks is becoming increasingly close. Among the basic knowledge of networks, the ping command is the most frequently used in projects. Generally, we only use its basic functions. Today, let’s take a detailed look at the 7 basic uses of the Ping command, mastering which will make you an expert!
1. Basic of the ping command
2. Using ping -t
3. Using ping -a
4. Using ping -n
5. Using ping -l size
6. Using ping -r count
7. How to batch ping hundreds to thousands of IP addresses
1. Introduction to the basic ping command
In networking, ping is a very powerful TCP/IP tool. Its main functions are:
1. To detect network connectivity and analyze network speed.
2. To obtain the server IP based on the domain name.
3. To determine the operating system used by the other party and the number of routers the data packet has passed by looking at the TTL value returned by ping.
We usually use it to directly ping an IP address to test network connectivity.
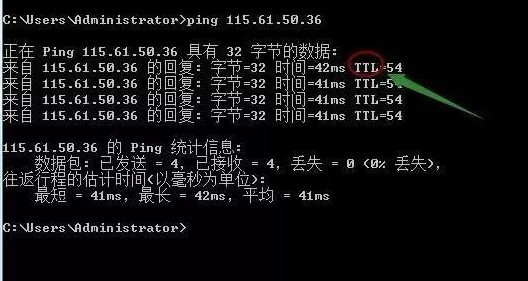
For example, directly ping an IP address or gateway. If the ping is successful, the above data will be displayed. Some friends may ask what bytes=32; time<1ms; TTL=128 means.
Bytes value: The size of the data packet, which is in bytes.
Time value: The response time; the smaller this time, the faster you connect to this address.
TTL value: Time To Live, indicating the time the DNS record exists on the DNS server. It is a value in the IP protocol packet that tells the router when the data packet needs to be discarded.
By looking at the size of the TTL value returned by Ping, we can roughly judge whether the target system is Windows or UNIX/Linux.
Therefore, the general TTL values are:
Between 100-130ms, Windows system;
Between 240-255ms, UNIX/Linux system.
Of course, today we are mainly understanding the other references of ping.
In addition to directly pinging the IP address of the network to verify network smoothness and speed, the ping command has these uses.
2. Using ping -t
Pings the specified computer continuously until interrupted by the administrator.
This indicates that the computer is connected to the router, and the network performance is good. Below, press Ctrl+C to terminate the continuous ping, which will summarize how many data packets were sent and how many were successful.

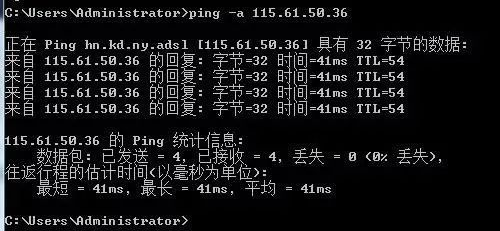
3. Using ping -a
Ping -a resolves the computer name with the NetBios name. This means that by pinging its IP address, you can resolve the hostname. When you encounter an IP but do not know which device it is, you can use ping -a to find out its hostname.
4. Using ping -n
By default, it usually only sends four data packets. This command allows you to define the number of packets sent, which is very helpful for measuring network speed. For example, if I want to test how long it takes to send 10 data packets and the fastest and slowest times, I can find out through the following:
From the above, I can see that in sending 10 data packets to 47.93.187.142, all 10 were returned with no loss. Among these 10 packets, the fastest return speed was 32ms, the slowest was 55ms, and the average speed was 37ms. This indicates that my network is good.
If for some bad networks, like in a monitoring system that is very laggy, testing like this may show some losses. If the loss is significant, it indicates poor network performance, allowing for a direct assessment of the network situation.
5. Using ping -l size
ping -l size: Sends a data packet of the specified size to the target host.
By default, the size of the data packet sent by Windows ping is 32 bytes, and the maximum size that can be sent is 65500 bytes. If the size of the data packet sent at once is greater than or equal to 65500 bytes, it may cause the receiving computer to crash. Therefore, Microsoft limits this value; this parameter, combined with others, can be very dangerous. For example, attackers can use it with the -t parameter for DOS attacks. (So it is dangerous; do not use it on others’ computers lightly.)
For example: ping -l 65500 -t 211.84.7.46
This will continuously ping the IP address until interrupted by the user with Ctrl+C.
It will continuously send data packets of size 65500 bytes to the computer at 211.84.7.46. If you only have one computer, it may not have much effect, but if there are many computers, it can completely paralyze the other party, causing severe network congestion, showing its tremendous power.
6. Using ping -r count
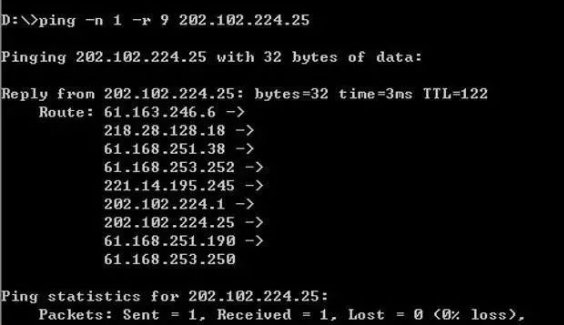
This command records the routes of outgoing and returning data packets in the “Record Route” field, probing the number of routes passed, but can only trace up to 9 routes at most.
ping -n 1 -r 9 202.102.224.25 (Send one data packet and record up to 9 routes)
This will show the 9 routes passed. In troubleshooting, it can quickly locate the issue.
7. How to batch ping multiple IP addresses simultaneously
1. Ping a subnet
If there are numerous IP addresses in a subnet and testing each individually is cumbersome, we can directly batch ping the subnet to see which IP address has problems at a glance.
First, look at the code and directly enter in the command line:
for /L %D in (1,1,255) do ping 10.168.1.%D
Modify the IP address range to the range you want to check.
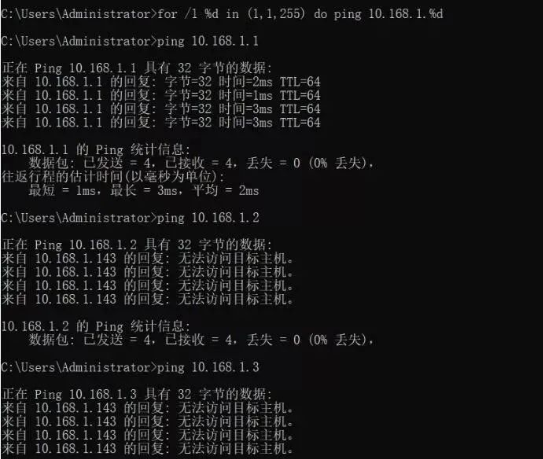
After entering the batch command, it will automatically ping all IP addresses in the subnet.
So what does this segment of code “for /L %D in(1,1,255) do ping 10.168.1.%D” mean?
The (1,1,255) in the code indicates the starting and ending range, which checks all IP addresses from 192.168.1.1 to 192.168.1.255, incrementing by 1 each time until all 255 IPs are checked.
2. Upgrading the ping subnet
Although the above command can batch ping addresses, it can look cumbersome when a lot of results are displayed in the command line window. So let’s upgrade it with the following code.
for /L %D in (1,1,255) do ping -n 10.168.1.%D >>a.txt
Note that the IP address is variable; you just fill in the subnet you need to test, and a.txt can also be renamed as you wish.
This will import the results into a.txt. After checking all IPs, open a.txt and search for “TTL=”; those containing it are reachable addresses, while those without “TTL=” are unreachable. See the image below.
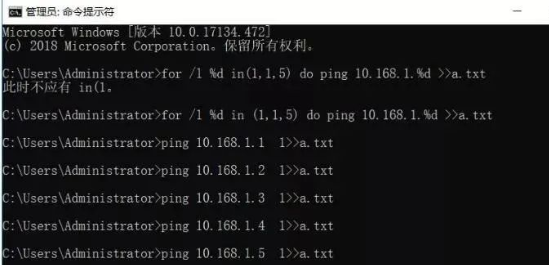
After opening, just search for those without TTL.
3. Further upgrading the ping subnet command
Many might say that searching like this is still inconvenient and requires checking back and forth. So let’s see if there is a simpler method. The monitoring system has mentioned this before.
There is certainly a way. Let’s look at the code.
for /l %D in (1,1,255) do (ping 192.168.1.%D -n 1 && echo 192.168.1.%D>>ok.txt || echo 192.168.1.%D >>no.txt)
This code will place reachable and unreachable IPs into two separate files. Isn’t that convenient? See the image below:
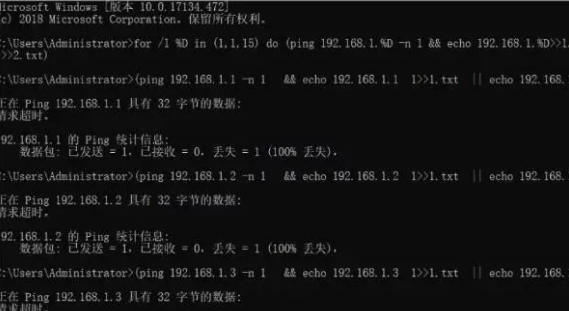
This code is very practical and can be used in large networks. Just be careful when entering it; however, it doesn’t matter. You can directly bookmark this article and copy the code inside when you need it, then just change the IP addresses.
4. The ultimate method for pinging subnet commands
The three codes mentioned above are all aimed at batch checking IP addresses within the same subnet. However, in actual projects, there may also be different subnets that need to be checked simultaneously. So what to do?
There is a method to batch check unplanned IP addresses simultaneously. Let’s look at the code:
for /f %D in (ip.txt) do (ping %D -n 1 && echo %i>>ok.txt || echo %D >>no.txt)
Notice that an ip.txt file has been added. You need to prepare this file yourself, writing the addresses you want to ping inside it. You can ping over 1000 IP addresses at once, and the code will read the IP addresses from this file and place the results into two files. I won’t provide screenshots here as it’s easy to understand.
Additionally, note that the files generated by the above code will be in your command line’s default directory. This means if your command line status is: ‘c:windowssystem32>’
Then the generated files will be in the system’s system32 directory.If it’s ‘c:’, then the files will be in the root directory of C drive.You can adjust this according to your actual situation.