The importance of cybersecurity lies in its direct relation to personal privacy, corporate assets, and even the security of national critical infrastructure. As the degree of digitalization continues to increase, the methods of cyber attacks have become more diverse, covert, and destructive. Any weak link can lead to data breaches, system paralysis, or economic losses. Therefore, building a robust security defense has become an indispensable part of modern society.
As a professional security distribution optimized for penetration testing and security auditing, Kali Linux integrates a large number of attack simulation and defense assessment tools, enabling security researchers to discover system vulnerabilities, verify protective capabilities, and strengthen the overall security system in a legally authorized environment. It is not only a core platform for learning cybersecurity offensive and defensive techniques but also an important aid for security teams in risk assessment and defense construction. In this issue, we will get to know it better~
What is Kali Linux
Introduction to Kali Linux
Kali Linux is a Debian-based Linux distribution specifically designed for digital forensics and penetration testing. It is developed and maintained by Offensive Security and is the successor to the famous BackTrack Linux.

Core Features:
- • Pre-installed with over 600 security testing tools
- • Completely free and open-source
- • Supports multiple hardware platforms (x86, x64, ARM)
- • Customized kernel optimized for security testing
- • Supports various persistent installation methods
Official Website: https://www.kali.org
The History of Kali Linux
Development Timeline:
- • 2006: BackTrack is born, based on Slackware
- • 2010: BackTrack 5 is released, based on Ubuntu
- • 2013: Redesigned and released Kali Linux 1.0, based on Debian
- • 2016: Rolling release version is launched
- • 2019: Kali Linux 2019.4 is released, defaulting to non-root users
- • 2020: Kali Linux 2020.1 is released, introducing a new desktop environment
- • 2021: Enhanced support for Apple M1 architecture (Apple Silicon)
- • 2022: Kali Linux 2022.4 is released, switching the kernel to Linux 6.0
- • 2023: Automated attack framework “Kali Autopilot” is launched, adding about 9 new tools
- • 2024: Default Python upgraded to 3.12, officially dropping support for i386 (32-bit) images.
- • 2025: Added support for Nexmon wireless firmware (for Wi-Fi injection and monitoring)
Differences Between Kali Linux and Other Distributions
Comparison with Mainstream Distributions:
| Feature | Kali Linux | Ubuntu | CentOS |
|---|---|---|---|
| Purpose | Penetration testing, security research | General desktop/server | Enterprise server |
| Pre-installed Tools | 600+ security tools | Basic software | Server software |
| Update Method | Rolling release | Regular release | Regular release |
| User Target | Security professionals | General users | Operations personnel |
| Default Permissions | High privilege environment | Standard permissions | Standard permissions |
Why Choose Kali Linux:
- • No need to manually install hundreds of security tools
- • Compatibility between tools is thoroughly tested
- • Regular updates include the latest security tools
- • Active community support
- • Rich official documentation and tutorials
Application Scenarios of Kali Linux
Main Uses:
- • Penetration Testing
- • Vulnerability Research
- • Digital Forensics
- • Reverse Engineering
- • Security Auditing
- • Web Application Testing
- • Wireless Network Security Testing
Target Audience:
- • Penetration testing engineers
- • Security researchers
- • Cybersecurity practitioners
- • Information security students
- • Ethical hackers
- • IT auditors
Important Note: Kali Linux is designed as a tool for professional security testing and is not suitable as a daily operating system. Please ensure you have the appropriate legal authorization and professional knowledge before use.

Main Tool Categories of Kali Linux
Information Gathering Tools
Network Scanning:
- • Nmap: Network discovery and security auditing
- • Masscan: Fast port scanner
- • Unicornscan: Asynchronous port scanning
DNS Analysis:
- • DNSenum: DNS enumeration tool
- • DNSrecon: DNS reconnaissance tool
- • Fierce: DNS scanner
Web Application Scanning:
- • WhatWeb: Web fingerprinting
- • Nikto: Web server scanner
- • Dirb: Web content scanner
Vulnerability Analysis Tools
Vulnerability Scanning:
- • OpenVAS: Open-source vulnerability assessment system
- • Nikto: Web server vulnerability scanner
- • Legion: Automated penetration testing framework
Database Assessment:
- • SQLMap: Automated SQL injection tool
- • SQLNinja: SQL Server injection tool
Fuzz Testing:
- • Spike: Fuzz testing framework
- • Bed: Protocol fuzz testing
Web Application Analysis
Proxy Tools:
- • Burp Suite: Web application security testing platform
- • OWASP ZAP: Web application security scanner
- • Paros: Web proxy tool
Web Crawlers:
- • CutyCapt: Web page screenshot tool
- • HTTrack: Website mirroring tool
Password Attack Tools
Online Attacks:
- • Hydra: Network login cracker
- • Medusa: Parallel login cracker
- • Ncrack: High-speed network authentication cracking
Offline Attacks:
- • John the Ripper: Password cracking tool
- • Hashcat: GPU password cracking
- • RainbowCrack: Rainbow table cracking
Wireless Attack Tools
802.11 Tools:
- • Aircrack-ng: Wireless network security suite
- • Reaver: WPS cracking tool
- • Wifite: Automated wireless attacks
Bluetooth Tools:
- • Bluelog: Bluetooth scanner
- • Btscanner: Bluetooth device scanner
Post-Exploitation Tools
Metasploit Framework:
- • Modular penetration testing platform
- • Contains thousands of exploit modules
- • Supports custom payloads
PowerSploit:
- • PowerShell post-exploitation framework
- • Windows environment attack toolkit
Empire:
- • Pure PowerShell post-exploitation agent
- • Suitable for Windows environments
Forensic Tools
Digital Forensics:
- • Autopsy: Digital forensics platform
- • Binwalk: Firmware analysis tool
- • Bulk Extractor: Data extraction tool
Memory Forensics:
- • Volatility: Memory forensics framework
Reverse Engineering
Debuggers:
- • GDB: GNU debugger
- • EDB: Linux debugger
- • OllyDbg: Windows debugger (via Wine)
Disassemblers:
- • Radare2: Reverse engineering framework
- • Ghidra: NSA open-source reverse tool
- • IDA Free: Disassembler tool
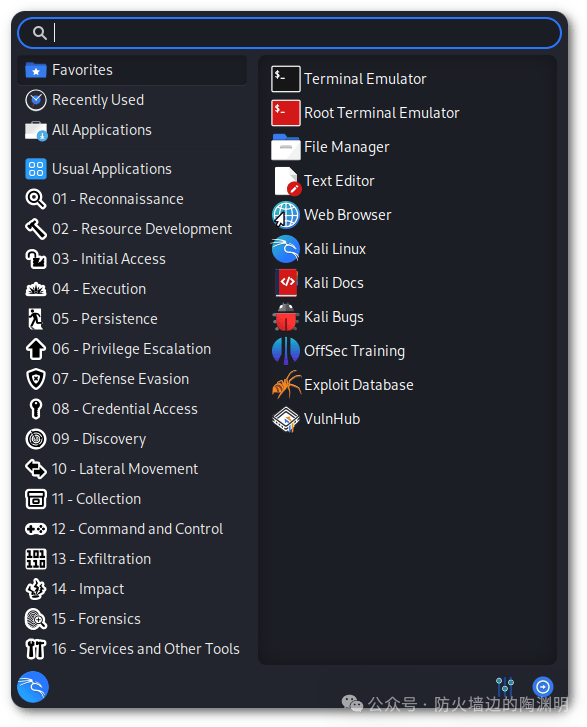
System Requirements
Hardware Requirements
Minimum Configuration:
- • Processor: 1 GHz dual-core CPU
- • Memory: 2 GB RAM
- • Hard Disk: 20 GB of available space
- • Graphics Card: Supports 1024×768 resolution
Recommended Configuration:
- • Processor: 2 GHz quad-core CPU or higher
- • Memory: 4 GB RAM or more (8 GB recommended)
- • Hard Disk: 50 GB or more SSD
- • Graphics Card: Supports hardware acceleration
Virtual Machine Configuration Recommendations:
- • Processor: 2 virtual CPUs
- • Memory: 4 GB RAM
- • Hard Disk: 50 GB dynamically allocated
- • Network: Bridged or NAT mode
Supported Platforms
Architecture Support:
- • amd64 (64-bit, most commonly used)
- • i386 (32-bit, no longer supported)
- • ARM (Raspberry Pi, etc.)
- • ARM64 (new ARM devices)
Installation Methods:
- • Full installation (physical machine)
- • Virtual machine installation (VMware, VirtualBox, Hyper-V)
- • Live USB (plug and play without installation)
- • WSL (Windows Subsystem for Linux)
- • Docker container
- • Cloud platform (AWS, Azure, GCP)
Getting Kali Linux
Download Image
Official Download Address:
https://www.kali.org/get-kaliImage Types:
1. Installer Image
kali-linux-2025.3-installer-amd64.iso
Size: Approximately 4 GB
Usage: Standard installation image, recommended for use
2. Live Image
kali-linux-2025.3-live-amd64.iso
Size: Approximately 3.8 GB
Usage: Live boot, can run without installation
3. Network Installer
kali-linux-2025.3-installer-netinst-amd64.iso
Size: Approximately 700 MB
Usage: Minimal installation, downloads packages via the network
4. Virtual Machine Image
kali-linux-2025.3-virtualbox-amd64.7z
kali-linux-2025.3-vmware-amd64.7z
Usage: Pre-configured virtual machine images, ready to use
Select Download Source
Official Source:
https://cdimage.kali.org/kali-2025.3/Domestic Mirror Sites (recommended, faster download speed):
Tsinghua University:
https://mirrors.tuna.tsinghua.edu.cn/kali-images/

University of Science and Technology of China:
https://mirrors.ustc.edu.cn/kali-images/

Aliyun:
https://mirrors.aliyun.com/kali-images/
Verify Download Integrity
Download SHA256 Checksum File:
# Download checksum file
wget https://cdimage.kali.org/kali-2025.3/SHA256SUMS
Linux/macOS Verification:
# Calculate SHA256 of the ISO
sha256sum kali-linux-2025.3-installer-amd64.iso

# Compare with the value in the SHA256SUMS file
grep kali-linux-2025.3-installer-amd64.iso SHA256SUMS
Windows Verification:
# Using PowerShell
Get-FileHash kali-linux-2025.3-installer-amd64.iso -Algorithm SHA256

# Or using certutil
certutil -hashfile kali-linux-2025.3-installer-amd64.iso SHA256
Installation Method Selection
Physical Machine Installation
Advantages:
- • Best performance, directly using hardware resources
- • Supports all features, including wireless network cards
- • Suitable for professional penetration testing
Disadvantages:
- • Requires independent hardware or dual-boot system
- • Installation is relatively complex
- • May have hardware compatibility issues
Applicable Scenarios:
- • Professional security practitioners
- • Need to use wireless attack tools
- • Require optimal performance
Virtual Machine Installation
Advantages:
- • Safe isolation, does not affect the host system
- • Can create snapshots for easy recovery
- • Easy to manage and migrate
- • Suitable for learning and testing
Disadvantages:
- • Performance has some loss
- • Limited support for wireless network cards
- • Requires sufficient resources from the host
Applicable Scenarios:
- • Beginners learning to use
- • Testing environment setup
- • Parallel use of multiple systems
Virtualization Platform Selection:
- • VMware Workstation (Windows platform, free for personal use)
- • VMware Fusion (macOS platform, free for personal use)
- • VirtualBox (open-source and free, cross-platform)
- • Hyper-V (built into Windows)
- • Parallels Desktop (macOS platform, commercial software)
WSL Installation (Windows Subsystem for Linux)
Advantages:
- • Deep integration with Windows
- • Fast startup, low resource usage
- • Convenient for using command-line tools
Disadvantages:
- • Does not support GUI tools (requires additional configuration)
- • Network functionality is limited
- • Does not support certain low-level operations
Applicable Scenarios:
- • Daily use for Windows users
- • Mainly using command-line tools
- • Development and scripting
Live USB
Advantages:
- • No installation required, plug and play
- • Does not modify the existing system
- • Highly portable
Disadvantages:
- • Data is not persistent
- • Performance is limited by USB speed
- • Requires reconfiguration on each boot
Applicable Scenarios:
- • Emergency use
- • On-site forensics
- • System repair
Demonstration of Physical and Virtual Machine Installation
Pre-built Virtual Machine Images
The official website provides virtual machine images for multiple platforms. After downloading and extracting, simply open it with the corresponding virtualization software, which is very simple and easy to do ^_^
Virtual Machine & Physical Machine
For creating a bootable USB for a physical machine, refer to the guide on easily creating a system boot disk: All-platform USB Boot Tool Guide
After creating the virtual machine, mount the ISO image and click to start the virtual machine.
The subsequent installation process is basically the same for both physical and virtual machines, and you can refer to the official website for screenshots: https://www.kali.org/docs/installation/hard-disk-install
WSL Installation Tutorial
Enable WSL
Enable WSL Feature in Windows 10/11:
# Run PowerShell as Administrator

# Enable WSL feature
dism.exe /online /enable-feature /featurename:Microsoft-Windows-Subsystem-Linux /all /norestart

# Enable Virtual Machine Platform
dism.exe /online /enable-feature /featurename:VirtualMachinePlatform /all /norestart

# Restart the computer
shutdown /r /t 0
Set WSL 2 as Default:
# Download and install the WSL 2 kernel update package
# https://aka.ms/wsl2kernel

# Set WSL 2 as the default version
wsl --set-default-version 2
Install Kali Linux
Method 1: Install from Microsoft Store:
1. Open Microsoft Store
2. Search for "Kali Linux"
3. Click "Get" or "Install"
4. Wait for the download to complete
Method 2: Install via Command Line:
# List available distributions
wsl --list --online

# Install Kali Linux
wsl --install -d kali-linux
Initial Configuration
First Launch:
# Start Kali
wsl -d kali-linux

# Or find Kali Linux in the start menu
Create User:
Enter new username: kali
Enter password:
Confirm password:
Update System:
# Update package list
sudo apt update

# Upgrade system
sudo apt upgrade -y

# Install Kali meta-package
sudo apt install -y kali-linux-default
Install GUI
Install Xfce Desktop Environment:
# Install Xfce
sudo apt install -y kali-desktop-xfce

# Install X Server (choose xrdp or VcXsrv)
sudo apt install -y xrdp
sudo service xrdp start
Using VcXsrv:
1. Download VcXsrv: https://sourceforge.net/projects/vcxsrv/
2. Install and start VcXsrv
3. Configure display settings: Multiple windows, Display number 0
4. Set DISPLAY environment variable in Kali

# Add to ~/.bashrc
echo 'export DISPLAY=$(cat /etc/resolv.conf | grep nameserver | awk "{print \$2}"):0' >> ~/.bashrc
source ~/.bashrc

# Start GUI application
startxfce4 &&
Using Windows 11 Native GUI Support:
# Windows 11 supports running GUI applications directly
# No additional configuration required

# Directly start GUI applications
firefox &&
System Configuration and Optimization
Change Software Sources
Edit Source List:
sudo nano /etc/apt/sources.listReplace with Domestic Mirrors:
# Tsinghua University Mirror
deb https://mirrors.tuna.tsinghua.edu.cn/kali kali-rolling main contrib non-free non-free-firmware

# University of Science and Technology of China Mirror
deb https://mirrors.ustc.edu.cn/kali kali-rolling main contrib non-free non-free-firmware

# Aliyun Mirror
deb https://mirrors.aliyun.com/kali kali-rolling main contrib non-free non-free-firmware
Update Packages:
sudo apt update
sudo apt upgrade -y
Install Common Tools
Development Tools:
# Compilation tools
sudo apt install -y build-essential gcc g++ make cmake

# Version control
sudo apt install -y git

# Editors
sudo apt install -y vim neovim

# Python development
sudo apt install -y python3-pip python3-venv
Network Tools:
# Network diagnostics
sudo apt install -y net-tools traceroute

# Network analysis
sudo apt install -y wireshark

# Download tools
sudo apt install -y wget curl aria2
Security Tool Meta-package:
# Default toolset
sudo apt install -y kali-linux-default

# Complete toolset (approximately 15 GB)
sudo apt install -y kali-linux-large

# Top 10 tools
sudo apt install -y kali-tools-top10

# Web application testing tools
sudo apt install -y kali-tools-web

# Wireless tools
sudo apt install -y kali-tools-wireless

# Password attack tools
sudo apt install -y kali-tools-passwords
Disk Space Usage of Different Installations
| Metapackage/DE | Xfce | GNOME | KDE | Headless |
|---|---|---|---|---|
| kali-linux-core | 3.7G | 4.1G | 5.2G | 1.5G |
| kali-tools-top10 | 6.7G | 7.0G | 8.2G | 5.0G |
| kali-linux-default | 13G | 13G | 15G | 13G |
| kali-linux-large | 20G | 20G | 21G | 19G |
| kali-linux-everything | 34G | 35G | 36G | 34G |
Configure SSH
Start SSH Service:
# Start SSH service
sudo systemctl start ssh

# Enable on boot
sudo systemctl enable ssh

# Check status
sudo systemctl status ssh
Configure SSH:
# Edit configuration file
sudo nano /etc/ssh/sshd_config

# Common configurations
Port 22
PermitRootLogin no
PasswordAuthentication yes
PubkeyAuthentication yes

# Restart service
sudo systemctl restart ssh
Generate SSH Keys:
# Generate RSA key pair
ssh-keygen -t rsa -b 4096 -C "[email protected]"

# Or generate ED25519 key (more secure)
ssh-keygen -t ed25519 -C "[email protected]"

# View public key
cat ~/.ssh/id_rsa.pub
Firewall Configuration
Using UFW:
# Install UFW
sudo apt install -y ufw

# Enable firewall
sudo ufw enable

# Allow SSH
sudo ufw allow 22/tcp

# Allow HTTP and HTTPS
sudo ufw allow 80/tcp
sudo ufw allow 443/tcp

# Check status
sudo ufw status verbose

# Disable firewall (if needed)
sudo ufw disable
Performance Optimization
Adjust Swappiness:
# Check current value
cat /proc/sys/vm/swappiness

# Temporarily modify
sudo sysctl vm.swappiness=10

# Permanently modify
echo 'vm.swappiness=10' | sudo tee -a /etc/sysctl.conf
Clean Up System:
# Clean package cache
sudo apt clean
sudo apt autoclean

# Remove unnecessary packages
sudo apt autoremove -y

# Clean logs
sudo journalctl --vacuum-time=7d
Disable Unnecessary Services:
# List all services
systemctl list-unit-files --type=service

# Example to disable a service
sudo systemctl disable bluetooth.service
sudo systemctl disable cups.service
Security Recommendations
System Security
Regular Updates:
# Create update script
cat << 'EOF' > ~/update.sh
#!/bin/bash
sudo apt update
sudo apt upgrade -y
sudo apt dist-upgrade -y
sudo apt autoremove -y
sudo apt clean
EOF

chmod +x ~/update.sh

# Set periodic task (every Sunday at 2 AM)
sudo crontab -e
# Add:
0 2 * * 0 /home/kali/update.sh
Configure Firewall:
# Default deny incoming, allow outgoing
sudo ufw default deny incoming
sudo ufw default allow outgoing

# Only open necessary ports
sudo ufw allow 22/tcp
sudo ufw enable
Disable Unnecessary Services:
# List all running services
systemctl list-units --type=service --state=running

# Disable unnecessary services
sudo systemctl disable avahi-daemon
sudo systemctl stop avahi-daemon
Data Security
Encrypt Sensitive Data:
# Use GPG to encrypt files
gpg -c sensitive_file.txt

# Decrypt files
gpg sensitive_file.txt.gpg

# Securely delete files
sudo apt install -y secure-delete
srm sensitive_file.txt
Regular Backups:
# Create backup script
cat << 'EOF' > ~/backup.sh
#!/bin/bash
BACKUP_DIR="/backup"
DATE=$(date +%Y%m%d_%H%M%S)

# Backup important directories
tar -czf $BACKUP_DIR/kali_backup_$DATE.tar.gz \
    ~/Documents \
    ~/Scripts \
    ~/.ssh \
    ~/.config

# Delete backups older than 30 days
find $BACKUP_DIR -name "kali_backup_*.tar.gz" -mtime +30 -delete
EOF

chmod +x ~/backup.sh
Legal Use
Important Reminder:
1. Use only within authorized scope
2. Comply with local laws and regulations
3. Do not attack unauthorized targets
4. Respect privacy and data security
5. Use Kali Linux for learning and research
6. Obtain professional certifications such as CEH, OSCP, etc.
Code of Ethics:
As a security researcher, you should:
- Protect the interests of clients and the public
- Honestly report discovered vulnerabilities
- Not exploit vulnerabilities for illegal activities
- Continuously learn and improve skills
- Adhere to professional ethical standards
Learning Resources
Official Resources
Kali Official Documentation:
https://www.kali.org/docs/
- Installation guide
- Tool documentation
- Usage tutorials
Kali Training:
https://www.kali.org/training/
- Official training courses
- Certification exams
- Online labs
Kali Forum:
https://forums.kali.org/
- Community support
- Problem discussions
- Experience sharing
Online Learning Platforms
Offensive Security:
https://www.offensive-security.com/
- PWK (Penetration Testing with Kali Linux)
- OSCP certification
- High-quality penetration testing trainingHackTheBox:
https://www.hackthebox.eu/
- Online target practice
- CTF competitions
- Hands-on exercisesTryHackMe:
https://tryhackme.com/
- Guided learning
- From beginner to advanced
- Interactive labsPentesterLab:
https://pentesterlab.com/
- Web penetration testing
- Step-by-step courses
- Practical exercises
Book Recommendations
Beginner Level:
"The Art of Penetration Testing with Kali Linux"
"Metasploit Penetration Testing Guide"
"Deep Analysis of Web Security"
"Web Security for White Hats"
Advanced Level:
"Hacker Attack and Defense Techniques: Web Practical Edition"
"Intranet Security Attack and Defense: Penetration Testing Practical Guide"
"Android Security Attack and Defense Practical"
"Vulnerability Warfare: Essentials of Software Vulnerability Analysis"
Video Tutorials
Bilibili has a wealth of resources available for learning, but the quality varies, so you need to discern.
- Search "Kali Linux Tutorial" on Bilibili
- Search "Penetration Testing" on Bilibili
- Security courses on MOOC
- Security courses on 51CTO
Practice Platforms
Target Practice:
DVWA (Damn Vulnerable Web Application)
WebGoat
Metasploitable 2/3
VulnHub
PentesterLab
CTF Platforms:
CTFtime (event calendar)
XCTF
Attack and Defense World
BugkuCTF
Subsequent Learning Path Map
If you are very interested in cybersecurity, here is a learning path map for your reference.
Foundation Stage
Essential Learning Content:
1. Basic Linux Commands
   - File operations, permission management
   - Shell scripting
   - Network configuration

2. Basic Networking
   - TCP/IP protocol stack
   - HTTP/HTTPS protocols
   - DNS, routing, switching

3. Basic Programming
   - Python (recommended)
   - Bash scripting
   - Regular expressions

4. Basic Web Knowledge
   - HTML/CSS/JavaScript
   - Server configuration
   - Database basics
Practical Projects:
- Set up a local web server
- Write a simple network scanning script
- Deploy DVWA and complete all exercises
- Learn to use basic Kali tools
Advanced Stage
In-depth Learning:
1. Common Vulnerabilities
   - OWASP Top 10
   - SQL injection, XSS, CSRF
   - File upload, command injection
   - Logic vulnerabilities

2. Tool Mastery
   - Advanced usage of Burp Suite
   - Metasploit Framework
   - Nmap scripting engine
   - Custom SQLMap

3. Penetration Testing Methodology
   - Information gathering
   - Vulnerability scanning
   - Exploitation
   - Post-exploitation
   - Report writing
Practical Projects:
- Participate in HackTheBox/TryHackMe
- Complete all courses in WebGoat
- Set up a penetration testing lab
- Participate in CTF competitions
Advanced Stage
Professional Directions:
1. Web Penetration Testing
   - Advanced vulnerability discovery
   - Code auditing
   - Bypassing WAF

2. Intranet Penetration
   - Domain penetration
   - Lateral movement
   - Privilege escalation

3. Mobile Security
   - Android/iOS reverse engineering
   - APP security testing

4. Wireless Security
   - WiFi cracking
   - Bluetooth security
   - RFID security

5. Vulnerability Research
   - Binary vulnerability analysis
   - Fuzzing
   - Exploit development
Certification Exams:
- OSCP (Offensive Security Certified Professional)
- CEH (Certified Ethical Hacker)
- GPEN (GIAC Penetration Tester)
- eWPT (Web Application Penetration Tester)
Final Thoughts
Common Misconceptions
Misconception 1: Kali Linux is all-powerful
Fact: Kali is just a collection of tools; the key lies in the user's skills and knowledgeMisconception 2: Installing Kali makes you a hacker
Fact: It requires a lot of learning and practice; understanding principles is more important than toolsMisconception 3: You can test any target at will
Fact: You must obtain explicit authorization; unauthorized testing is illegalMisconception 4: Kali is suitable for daily use
Fact: Kali is optimized for security testing and is not suitable as a daily desktop systemLearning Recommendations
Step by Step:
1. Master basic Linux
2. Learn networking and web knowledge
3. Understand vulnerability principles
4. Become proficient with tools
5. Participate in hands-on practice
6. Continuously learn and update
Focus on Practice:
- Set up a lab environment
- Complete target practice
- Participate in CTF competitions
- Attempt vulnerability reproduction
- Keep learning notes
Adhere to Ethics:
- Obtain legal authorization
- Protect privacy data
- Responsibly disclose vulnerabilities
- Help improve security levels
Career Development
Employment Directions:
- Penetration testing engineer
- Security researcher
- Security consultant
- Incident response engineer
- Security training instructor
Skill Requirements:
- Solid technical foundation
- Good learning ability
- Clear logical thinking
- Excellent communication skills
- Professional ethical standards
Continuous Development:
- Stay updated on the latest security trends
- Participate in open-source projects
- Obtain professional certifications
- Attend security conferences
- Write technical articles
Appendix: Common Command Quick Reference
System Management
# Update system
sudo apt update && sudo apt upgrade -y

# View system information
uname -a
lsb_release -a

# Disk usage
df -h

# Memory usage
free -h

# Process management
ps aux | grep process_name
kill -9 PID

# Service management
sudo systemctl start service_name
sudo systemctl stop service_name
sudo systemctl status service_name
sudo systemctl enable service_name
Network Commands
# View network interfaces
ip addr show
ifconfig

# Test connectivity
ping -c 4 8.8.8.8

# Trace route
traceroute google.com

# DNS query
nslookup example.com
dig example.com

# Port scanning
nmap -sS target.com

# View network connections
netstat -tuln
ss -tuln
File Operations
# File search
find / -name filename
locate filename

# File permissions
chmod 755 file
chown user:group file

# Compress and decompress
.tar -czf archive.tar.gz directory/
tar -xzf archive.tar.gz

# View file content
cat file
less file
head -n 10 file
tail -f file
User Management
# Add user
sudo adduser username

# Delete user
sudo deluser username

# Change password
passwd
sudo passwd username

# User group management
sudo usermod -aG groupname username
groups usernameDisclaimer: This article is for learning and research purposes only. Please do not use it for illegal purposes. Before conducting any tests with Kali Linux, please ensure you have obtained legal authorization.
I hope this content helps you successfully get started with this powerful security testing platform. If you have any questions, feel free to leave a comment for discussion.