
In daily life, do you often listen to music while editing documents, occasionally switching to a browser for information? In the world of computers, the Linux system also performs similar “multitasking” operations, and at the heart of it all is the crucial role of the “process.” A process, simply put, is an instance of a running program. When you start a program in the Linux system, such as opening the text editor Vim, the system creates a process for that program, allocating necessary resources like memory and CPU time, allowing it to become “active” in the system. It is important to distinguish between a program and a process.
A program is an executable file stored on disk; it is static, like a “manual” filled with instructions, quietly waiting to be executed; whereas a process is the dynamic execution of a program, having its own lifecycle from creation, execution to eventual termination, like a vibrant “executor” traversing the system according to the program’s instructions. The dynamism of a process is reflected in its changing states during execution. A process may pause due to waiting for input/output or acquiring resources, or it may continue running after being scheduled by the CPU. This dynamic change allows the Linux system to efficiently manage and schedule multiple tasks.
1. Process Control Block (PCB)
In the Linux system, process management relies on the Process Control Block (PCB), which acts like a “secret file” for the process, recording various key information about the process and serving as an important basis for the operating system to manage and schedule processes.
When a program is loaded into memory and becomes a real process, the operating system creates a PCB to describe it. The PCB stores the process identifier, state, priority, memory pointers, program counter, I/O status information, etc. For instance, the process identifier (PID) is a unique number identifying a process, similar to an ID number for individuals; the operating system uses the PID to identify and manage different processes. The process state records whether the process is currently running, ready, waiting, etc., determining the scheduling order of processes.
In addition to these core fields, there are other fields in the PCB that also play important roles. For example, the priority field determines the priority level of the process when competing for CPU resources; processes with higher priority are more likely to obtain CPU time and execute first. The memory pointer field points to the process’s code segment, data segment, and stack segment, allowing the operating system to clearly understand the process’s memory layout for efficient memory management.
In Linux, the PCB is implemented through the task_struct structure. This structure is defined in the Linux kernel code and contains all information related to the process, serving as the core for the kernel’s process management and scheduling. If you are interested in the specific content of the task_struct structure, you can explore the Linux kernel source code.
Using certain commands, we can view relevant information about processes, thus understanding some of the content in the PCB. For example, using the ps -ef command allows you to view detailed information about all processes currently in the system, including process ID, parent process ID, user, CPU usage, memory usage, etc.; the top command provides an interactive process status monitoring interface, displaying real-time information about process CPU usage, memory usage, etc., giving you a clear view of the process’s running status.
2. Creating Processes in Linux
In the Linux system, creating processes is a common and important operation, and the fork() function is the key “magic” function that implements this operation.
The fork() function creates a child process, which is a copy of the parent process. When the fork() function is called, the operating system allocates a new process control block (PCB) for the child process and copies most of the resources from the parent process, including the code segment, data segment, heap, stack, etc. The copying uses a technique called “Copy-On-Write” (COW), meaning that at the initial creation of the child process, the parent and child processes share the same physical memory pages, and only when one of the processes attempts to modify data does it actually copy the data to a new physical memory page, thus saving memory resources and improving the efficiency of process creation.
At the code level, the fork() function returns twice: once in the parent process with the child process’s process ID (PID) and once in the child process with a return value of 0. By checking the return value of the fork() function, we can distinguish between the parent and child processes, allowing them to execute different code logic. Here is a simple example code:
#include <stdio.h>
#include <unistd.h>
#include <sys/types.h>

int main() {
    pid_t pid;
    pid = fork();
    if (pid < 0) {
        // Failed to create child process
        perror("fork error");
        return 1;
    } else if (pid == 0) {
        // Child process
        printf("I am the child process, my PID is %d, my parent's PID is %d\n", getpid(), getppid());
    } else {
        // Parent process
        printf("I am the parent process, my PID is %d, and I just created a child with PID %d\n", getpid(), pid);
    }
    return 0;
}
In this example, the fork() function creates a child process. Both the parent and child processes continue executing the code after the fork() function, and by checking the value of pid, we can have the parent and child processes print different information, showcasing their identities and relationships.
Regarding the shared code and data between the parent and child processes, although they initially share the same physical memory pages, this does not mean their data is completely shared. When one of the processes performs a write operation on the data, due to the copy-on-write mechanism, a new physical memory page is allocated for that process to store the modified data, without affecting the data of the other process. For example, if both the parent and child processes have a global variable count, if the child process modifies the value of count, the value of count in the parent process will not change, reflecting the independence of data between processes.
The copy-on-write technique has significant advantages in process creation. It avoids unnecessary copying of large amounts of data during process creation, greatly speeding up the process creation and reducing memory usage. Especially in scenarios where a large number of processes are created or large amounts of data are copied, the copy-on-write technique can significantly enhance system performance and resource utilization. For instance, in server applications, it may be necessary to frequently create child processes to handle client requests, and using copy-on-write can allow the server to respond to requests more efficiently, reducing system overhead.
In addition to the fork() function, the exec family of functions also plays an important role in process creation and control, as they replace the current process’s memory space with a new program, including the code segment, data segment, heap, and stack. In other words, when a process calls an exec family function, it abandons the currently executing program and executes a new program instead.
The exec family of functions has several variants, such as execl, execv, execlp, execvp, execle, execvpe, etc. Their main differences lie in the way parameters are passed and how environment variables are handled. For example, the prototype of the execl function is int execl(const char *path, const char *arg, …); where path is the path to the program to be executed, and arg is the list of parameters passed to the program, ending with NULL. The prototype of the execlp function is int execlp(const char *file, const char *arg, …); which searches for the program to be executed based on the environment variable PATH, without needing to specify the full path.
In practical applications, fork() and exec() are often used together. For example, in a shell, when we input a command, the shell first calls fork() to create a child process, and then the child process calls the exec() function to execute the user-input command. This ensures that the shell process is not blocked while executing the command and can continue to accept user input. Here is a simple example code demonstrating the combined use of fork() and exec():
#include <stdio.h>
#include <unistd.h>
#include <sys/types.h>
#include <stdlib.h>

int main() {
    pid_t pid;
    pid = fork();
    if (pid < 0) {
        perror("fork error");
        exit(1);
    } else if (pid == 0) {
        // Child process
        execlp("ls", "ls", "-l", NULL);
        // If exec fails, it will execute here
        perror("exec error");
        exit(1);
    } else {
        // Parent process
        wait(NULL);  // Wait for child process to finish
        printf("Child process has finished.\n");
    }
    return 0;
}
In this example, the parent process calls fork() to create a child process, and the child process calls execlp() to execute the ls -l command, listing the files in the current directory. If exec executes successfully, the child process’s memory space will be replaced by the ls program and will not return to the original code; if execution fails, it will print an error message and exit. The parent process waits for the child process to finish using wait(NULL) and then prints a prompt message.
3. Foreground, Background, and Daemon Processes in Linux
In the Linux system, processes have different “lifestyles,” among which foreground processes, background processes, and daemon processes are the three most common types, each with distinct differences in running characteristics, user interaction methods, and application scenarios.
3.1 Foreground Processes: The “Active Participants” Interacting Directly with Users
Foreground processes are those that interact directly with users, monopolizing the current terminal. When you enter a command in the terminal and execute it directly, such as ls -l, a foreground process is started. During the execution of this process, the terminal is occupied by it, and you cannot input other commands until this process completes or is manually terminated. For example, when you run a program that requires continuous user input, it is a foreground process, and you must focus on interacting with this process, waiting for its response.
3.2 Background Processes: The “Unsung Heroes” Working Silently
Background processes run in the background and do not occupy the terminal’s input/output; you can continue executing other commands in the terminal after starting a background process. By adding the “&” symbol at the end of a command, you can run a command in the background. For example, if you want to run a long-running script test.sh without blocking the terminal, you can start it with ./test.sh &.
Background processes inherit the standard output (stdout) and standard error (stderr) of the current session, so their output will still be displayed synchronously in the command line, but they do not inherit the standard input (stdin) of the current session, meaning you cannot input commands to this task. If you want to view the tasks running in the background of the current terminal, you can use the jobs command; to bring a command from the background to the foreground, use the fg command; and the bg command can resume a command that has been paused in the background.
3.3 Daemon Processes: The “Loyal Guardians” Ensuring System Stability
Daemon processes are a special type of background process that completely detach from the controlling terminal and session, running silently in the system background, unaffected by user logins and logouts. Their main characteristics include having no controlling terminal to avoid interference from the terminal; not occupying frontend resources, allowing normal execution of other bash commands. Most servers in the Linux system are implemented using daemon processes, such as the Internet server inetd, web server httpd, mail server sendmail, and database server mysqld.
These daemon processes start running when the system boots and will continue to run until the system shuts down unless forcibly terminated. Daemon processes generally run with root user privileges because they need to use certain special ports (1 – 1024) or resources. Moreover, the parent process of daemon processes is usually the init process, which is a non-interactive program without a controlling terminal, so any output needs special handling, typically redirecting standard input, output, and error to /dev/null (the null device) or log files.
To turn a process into a daemon, you can use the nohup command, which allows the corresponding process to continue running after you log out or close the terminal. For example, nohup ./test.sh > a.txt 2>&1 & will run the test.sh script as a daemon, redirecting output to the a.txt file. You can also implement this at the code level by calling the daemon function or manually performing a series of steps, such as creating a child process, calling setsid to create a new session, changing the working directory, resetting file permission masks, and closing unnecessary file descriptors.
For example, the web server httpd acts as a daemon, continuously running in the system background, listening on specific ports (such as 80 or 443) for requests from clients (such as browsers). When a request is received, it processes the request and returns the corresponding web content, providing web services to users without manual intervention and unaffected by terminal operations. Another example is the system logging process syslogd, which is responsible for recording various log information from the system, running silently since the system startup, continuously logging system-generated messages to specified log files, providing important references for system maintenance and troubleshooting.
4. Common Commands for Process Management in Linux
In the Linux system, mastering process management commands is key to efficient operations and development. These commands are like a “Swiss Army knife,” playing an indispensable role in monitoring and controlling processes. Below, we will delve into some commonly used process management commands.
4.1 ps: The Tool for Viewing Process Status
The ps (Process Status) command is used to view the status of running processes in the current system; it acts like a “photographer” of the process world, capturing a “snapshot” of processes and providing detailed information about them.
This command displays detailed information about processes, such as process ID, CPU percentage usage, process status, running time, etc.
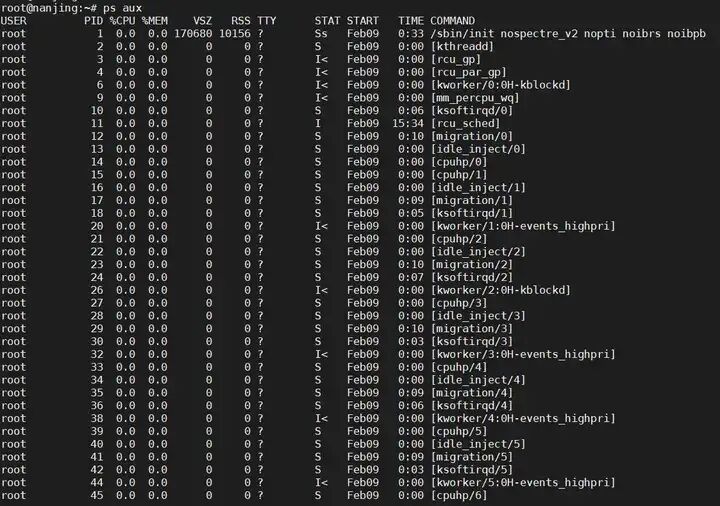
Common Options and Examples::
-ef: Displays all process information in full format, including user ID (UID), process ID (PID), parent process ID (PPID), CPU usage (C), start time (STIME), terminal device (TTY), CPU time used by the process (TIME), and the command that started the process (CMD), etc. For example, executing ps -ef will yield output similar to the following:
UID        PID  PPID  C STIME TTY          TIME CMD
root         1     0  0 08:30?        00:00:01 /sbin/init
user       101     1  0 09:00 pts/0    00:00:00 bash
-aux: Displays processes of all users, including user (USER), PID, CPU usage (%CPU), memory usage (%MEM), virtual memory size (VSZ), resident memory size (RSS), terminal device (TTY), process status (STAT), start time (START), CPU time used by the process (TIME), and the command that started the process (COMMAND), etc. For example, the output of ps -aux is as follows:
USER       PID %CPU %MEM    VSZ   RSS TTY      STAT START   TIME COMMAND
root         1  0.0  0.1  20016  1212?        Ss   08:30   0:00:01 /sbin/init
user 101 0.1 0.5 12288 5124 pts/0 R+ 09:00 0:00:00 bash- The difference between -ef and -aux is that -ef is a UNIX-style option, focusing more on process relationships (like PPID and UID); while -aux is a BSD-style option, focusing more on process resource usage (like %CPU and %MEM).
- -C: Searches for processes by command name, for example, ps -C firefox can find information related to the firefox process.
- -p: Searches for processes by process ID, for example, ps -p 1234 can view the status of the process with ID 1234.
4.2 top: The Dynamic Dashboard for Real-Time Monitoring
The top command is a commonly used real-time system monitoring tool in the Linux system; it acts like a dynamic “dashboard,” providing real-time displays of resource usage by various processes, similar to the task manager in Windows.
This command displays detailed information about processes, such as process ID, CPU percentage usage, process status, running time, etc. You can also use the top command to view the resource usage of processes, such as CPU, memory, and I/O.
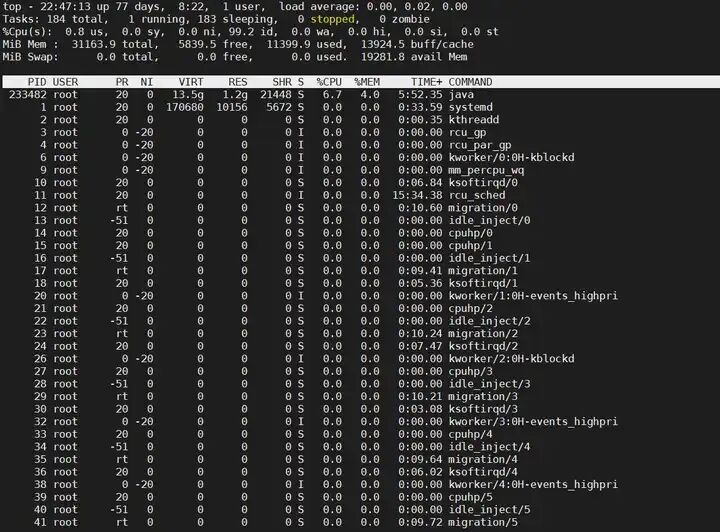
Main Functions and Uses::
- Real-time Monitoring: Provides a real-time, dynamic view of the current state of the system, including system uptime, number of logged-in users, average load, etc. The average load refers to the average number of processes in a runnable and uninterruptible state over a specific time interval, serving as an important indicator of system load.
- Process Management: Allows users to view the running status of various processes in the system, including PID, user, priority, virtual memory usage, physical memory usage, shared memory usage, status (such as running, sleeping, stopped, etc.), CPU usage, memory usage, running time, and command line name, etc. Users can perform operations such as sorting, killing, and adjusting priority on processes through interactive commands.
- Resource Monitoring: Monitors overall CPU usage, user space usage, system space usage, etc.; displays the usage of physical memory and swap space, including total, used, and free amounts.
Basic Usage:: Type the top command in the terminal and press enter to start the top program. By default, it will display a list of all processes in the system, sorted by CPU usage.
Common Options::
- -u: Displays only the processes owned by a specified user, for example, top -u root displays only the processes of the root user.
- -n: Specifies the number of times the top command updates before automatically exiting, for example, top -n 5 means it will update 5 times before exiting.
- -d: Sets the interval time for screen updates, defaulting to 3 seconds, for example, top -d 5 means it will update the screen every 5 seconds.
- -b: Runs in batch mode, usually combined with redirection to save output to a file, for example, top -b -n 1 > top_output.txt saves a snapshot of the data from a single update to the top_output.txt file.
- -H: Displays in thread mode, showing detailed information for each thread rather than just processes.
Interactive Commands: While top is running, users can change the displayed content or sorting method through a series of interactive commands. For example, press the P key to sort by CPU usage; press the M key to sort by memory usage; press the T key to sort by time/cumulative time; press the f or F key to enter the field management interface, allowing users to customize the displayed fields; press the k key to kill a process, requiring the input of the process’s PID and signal; press the r key to reset the process’s priority; press the q key to exit top.
4.3 htop: A More Powerful Interactive Monitoring Tool
htop is a powerful interactive system monitoring tool that enhances top, providing a more intuitive interface and richer operational features. This command displays detailed information about processes, such as process ID, CPU percentage usage, process status, running time, etc. You can use the htop command to view the resource usage of processes, such as CPU, memory, and I/O, and you can use keyboard shortcuts for interactive operations.
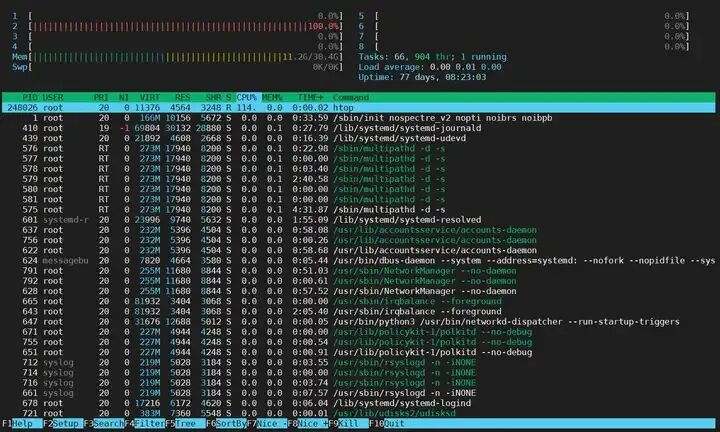
Features and Advantages::
- User-Friendly Interface: Uses color displays, making information clear at a glance, and supports mouse operations for more convenient use.
- Detailed Process Information: Not only displays basic information about processes but also shows the complete command line for each process, helping users understand the specific execution status of processes.
- Powerful Interactive Features: Provides more shortcut key operations, such as pressing F1 to display the help page; pressing F2 to enter the settings menu; pressing F3 to search for processes; pressing F4 to filter processes; pressing F5 to display the process hierarchy in tree view; pressing F6 to select different sorting methods, such as by CPU usage, memory usage, etc.; pressing F7 and F8 to increase or decrease the nice value of processes; pressing F9 to kill processes; pressing F10 to exit htop.
Display Interface:: The interface displayed by the htop command mainly consists of a title bar, process list, bar graph area, and shortcut key prompt bar. The title bar at the top of the interface shows the overall status of the system, including CPU usage, memory usage, number of processes, etc.; the process list in the main part of the interface displays currently running processes and their related information; the bar graph area on the left or right or top of the interface visually represents the usage of system resources, such as CPU usage, memory usage, disk read/write, etc.; the shortcut key prompt bar at the bottom of the interface displays commonly used shortcut key operations, helping users quickly understand and use htop’s features.
Common Options::
- -d: Sets the delay between updates, for example, htop -d 5 means the delay between screen updates is 5 seconds.
- -u: Displays only the processes owned by the user, for example, htop -u user displays only the processes of the user.
- -p: Displays only the process with a specific ID, for example, htop -p 1234 displays only the process with ID 1234.
- -s: Sorts processes by a given column, for example, htop -s %CPU sorts processes by CPU usage.
- -t: Displays the process hierarchy in tree view in the command line.
- –no-color: Opens htop in monochrome mode, disabling color.
4.4 pgrep: Precise Process ID Search
pgrep is a utility used to search for processes based on name, user, group, and other criteria, helping us quickly find the process IDs (PIDs) of running processes that match a given pattern.
Common Options and Examples::
- -u: Searches for processes owned by a specific user, for example, pgrep -u root searches for all processes owned by the root user.
- -g: Searches for processes in a specific group, for example, pgrep -g group_name searches for processes belonging to the group_name group.
- -P: Searches for child processes of a given parent PID, for example, pgrep -P 1234 searches for all child processes of the parent process with ID 1234.
- -f: Matches against the full command line (not just the process name), for example, pgrep -f “python app.py” searches for processes executing the python app.py command.
- -l: Displays process names along with their PIDs, for example, pgrep -l bash outputs both the process ID and process name.
- -o: Returns only the first matching process, for example, pgrep -o firefox returns only the ID of the first matching firefox process.
- -v: Performs a reverse search (returns processes that do not match the pattern), for example, pgrep -v -f “bash” returns all processes that are not executing the bash command.
- -c: Prints the count of matches, for example, pgrep -c java outputs the number of java processes currently in the system.
- -x: Matches exactly (i.e., matches the full name of the command), for example, pgrep -x sshd matches only the process named sshd and does not match other process names containing sshd.
- -d: Specifies the separator for PIDs, defaulting to a newline character, for example, pgrep ssh -d’ ‘ outputs multiple ssh process IDs separated by spaces.
- -i: Matches case-insensitively, for example, pgrep -i FIREFOX can match the firefox process.
- -n: Selects only the latest (most recently started) matching process, for example, pgrep -n chrome returns the ID of the most recently started chrome process.
4.5 pkill: Precise Process Termination
pkill is a command used to terminate processes based on process name or other attributes, combining the functionalities of pgrep and kill, making it more convenient to terminate processes that meet certain conditions.
Common Options and Examples::
- -9: Forcefully kills the process, which is one of the most commonly used options, used to terminate processes that are difficult to close normally. For example, pkill -9 firefox forcefully kills all firefox processes.
- -15: The default signal used to terminate processes normally, attempting to gracefully close the process. For example, pkill -15 apache2 normally terminates all apache2 processes.
- -u: Specifies the user running the process, for example, pkill -9 -u redis redis-server forcefully kills the redis-server process running under the redis user.
- -f: Matches against the full command line, for example, pkill -f “python app.py” terminates processes executing the python app.py command.
4.6 kill: Flexible Signal Sending to Processes
kill is a command used to send signals to processes, allowing us to control processes in various ways, such as terminating, pausing, or resuming processes.
Signal Introduction:: In the Linux system, signals are a mechanism for asynchronous event notification, used to notify processes of various events or requests. Common signals include:
- SIGTERM (15): The default termination signal; when a process receives this signal, it attempts to terminate normally, cleaning up resources, etc.
- SIGKILL (9): The forceful termination signal; when a process receives this signal, it immediately terminates without performing any cleanup operations, usually used to terminate processes that do not respond to the SIGTERM signal.
- SIGSTOP (17,19,23): Pauses the process; when a process receives this signal, it stops running but does not release resources.
- SIGCONT (18,20,25): Resumes a paused process, allowing it to continue running.
Usage Examples::
- To terminate the process with ID 1234, you can use kill 1234 (default sends SIGTERM signal); if the process does not respond, you can use kill -9 1234 to forcefully terminate it.
- To pause the process with ID 5678, you can use kill -STOP 5678; to resume that process, you can use kill -CONT 5678.
4.7 killall: Batch Termination of Processes by Name
killall is a command used to terminate a group of processes based on their names, allowing you to terminate all matching processes at once, which is very convenient.
Usage Examples::
- To terminate all httpd processes, you can use killall httpd, which sends the SIGTERM signal to all processes named httpd, attempting to terminate them normally.
- If you need to forcefully terminate, you can use killall -9 httpd, sending the SIGKILL signal to all httpd processes.
4.8 pgrep: Powerful Process Searching
pgrep is a powerful process searching tool that can find processes based on various criteria. In addition to the options mentioned earlier, it can also combine with regular expressions for more flexible searching.Examples::
- To find all processes with “apache” in the command line, you can use pgrep -f apache.
- To find all bash processes running under the current user, you can use pgrep -u $USER bash.
4.9 pidof: Quickly Obtain Process ID
pidof is a command used to quickly obtain the process ID of a specified process name, and its output is very concise, containing only the process ID.
Usage Example:: To get the ID of the nginx process, you can use pidof nginx; if there are multiple nginx processes in the system, it will output all process IDs separated by spaces.
4.10 nice and renice: Adjusting Process Priority
In the Linux system, the priority of a process determines its precedence in competing for CPU resources. The nice and renice commands are used to adjust the priority of processes, allowing us to allocate system resources reasonably based on actual needs.
- nice Command: The nice command is used to start a new process with a specified priority. The priority range is from -20 (highest priority) to 19 (lowest priority), with a default priority of 0. For example, to start a python program with a higher priority (-5), you can use nice -n -5 python my_script.py. Here, the -n option is used to specify the priority.
- renice Command: The renice command is used to adjust the priority of already running processes. For example, to adjust the priority of the process with ID 1234 to 10, you can use renice 10 1234. If you want to adjust the priority of all processes belonging to the user to 5, you can use renice 5 -u user.