This article demonstrates the deployment of <span>x86-RockyLinux</span> in a freshly installed system environment using <span>all-in-one</span>, with just four short commands to deploy k8s 1.31.14 + ks3.4.1 (monitoring, alerting, logging) both online and offline. If you have other needs, feel free to add me on WeChat <span>sd_zdhr</span>.
The next demonstration will expand from one master node to three master nodes.
1. Introduction
About kt
<span>kt</span> is a product developed based on <span>kk</span>, retaining all functionalities of <span>kk</span>. The secondary development mainly adapts to the domestic environment of Xinchuang, simplifies the <span>arm</span> deployment process, and supports offline deployment in domestic environments. It supports domestic operating systems for both <span>arm64</span> and <span>amd64</span> architectures, and has been adapted to the following chips and operating systems.
New features of kt
- Adaptation for arm architecture harbor, providing a deployment experience as simple as X86.
- Enhanced offline environment deployment. Common international and domestic operating system dependencies are built into the installation package. The adapted chips and operating systems are as follows:
<span>./kt init-os</span>A single command to complete the installation and initialization of operating system dependencies.- CPU: Kunpeng, Feiteng, Haiguang, Zhaoxin, Intel, AMD, etc.
- OS: CentOS, Rocky Linux, Ubuntu, Debian, Galaxy Kirin V10, Kirin V11, Kirin Defense Edition, Kirin Xinan, Zhongbiao Kirin V7, Tongxin UOS, Huawei Euler, Mobile Cloud, Alibaba Longxi, etc.
- Support for enabling the firewall, exposing only ports
<span>30000-32767</span>, while adding other k8s ports to the node whitelist. <span>./kt firewall</span>A single command to automatically obtain node information and configure the whitelist and firewall.
kt version updates and download address
- kt: kt[1]
- Follow me to stay updated
2. Environment Preparation
Basic server information
| Hostname | Architecture | OS | Configuration | IP |
|---|---|---|---|---|
| all-in-one | x86_64 | Rocky Linux 8.10 | 4 cores 8GB | 192.168.85.160 |
Upload the corresponding architecture <span>kt-x86.tar.gz</span> to the server.
This article uses kt:<span>3.1.12</span> version, which supports all k8s versions released until <span>2025-11-16</span>. Due to the new version of k8s requiring etcd minimum version 3.5.24, the default version of kt is upgraded to 3.6.6, and the corresponding etcd scripts are modified accordingly.
2.1 System Initialization
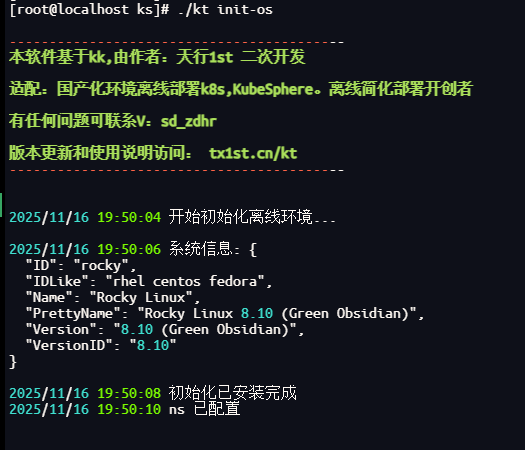
The operating system does not need to install docker, nor does it require setting up selinux, swap, etc. A brand new operating system is sufficient. After extracting the <span>kt</span> file, execute <span>./kt init-os</span>. The compatible operating systems and architectures are listed in <span>1. Introduction</span>.
This command <span>kt</span> will automatically determine the operating system and architecture to install dependencies and perform necessary initialization configurations.
3 Create Harbor Private Repository
3.1 Upload Offline Artifacts
Upload offline artifacts, configuration files, kt, and sh scripts to one of the nodes on the server, and subsequent operations to create the cluster will be performed on this node.

~~3.2 Create Cluster Configuration File ~~
Mainly modify the relevant node and harbor information for generating <span>~~config-sample.yaml~~</span>
Use the configuration file from the cloud disk, no longer using the command generated below.
./kt create config --with-kubernetes 1.31.14 --with-kubesphere 3.4.1
3.3 Modify Configuration File
Configure the generated <span>config-sample.yaml</span> according to the actual server information.
kind: Cluster
metadata:
  name: sample
spec:
  hosts:
  - {name: node1, address: 192.168.85.160, internalAddress: 192.168.85.160, user: root, password: "123456"}
  roleGroups:
    etcd:
    - node1
    control-plane:
    - node1
    worker:
    - node1
    # If you need to use kk to automatically deploy the image repository, please set this host group (it is recommended to separate the repository from the cluster to reduce mutual impact)
    # If you need to deploy harbor and the containerManager is containerd, since harbor deployment depends on docker, it is recommended to deploy harbor on a separate node
    registry:
    - node1
  controlPlaneEndpoint:
    ## Internal loadbalancer for apiservers
    # internalLoadbalancer: haproxy

    domain: lb.kubesphere.local
    address: ""
    port: 6443
  kubernetes:
    version: v1.31.14
    clusterName: cluster.local
    autoRenewCerts: true
    containerManager: docker
  etcd:
    type: kubekey
  network:
    plugin: calico
    kubePodsCIDR: 10.233.64.0/18
    kubeServiceCIDR: 10.233.0.0/18
    ## multus support. https://github.com/k8snetworkplumbingwg/multus-cni
    multusCNI:
      enabled: false
  registry:
    type: harbor
    registryMirrors: []
    insecureRegistries: []
    privateRegistry: "dockerhub.kubekey.local"
    namespaceOverride: "kubesphereio"
    auths: # if docker add by `docker login`, if containerd append to `/etc/containerd/config.toml`
      "dockerhub.kubekey.local":
        username: "admin"
        password: Harbor@123 # This can be customized, new feature in kk3.1.8
        skipTLSVerify: true # Allow contacting registries over HTTPS with failed TLS verification.
        plainHTTP: false # Allow contacting registries over HTTP.
        certsPath: "/etc/docker/certs.d/dockerhub.kubekey.local"
  addons: []
---
apiVersion: installer.kubesphere.io/v1alpha1
kind: ClusterConfiguration
metadata:
  name: ks-installer
  namespace: kubesphere-system
  labels:
    version: v3.4.1
  ...
Note: Here are some precautions.
<span>config-sample.yaml</span> configuration file’s spec:hosts parameter
Official introduction
- address: The SSH login IP address of the server.
- internalAddress: The internal IP address of the server within the subnet.
Note: If the deployed servers are in the same region and the internal IPs can communicate, use internal IPs for both address and internalAddress. Previously, some users bought cloud servers for testing and used public IPs for address, which caused slow cluster creation due to low public bandwidth during the deployment process.
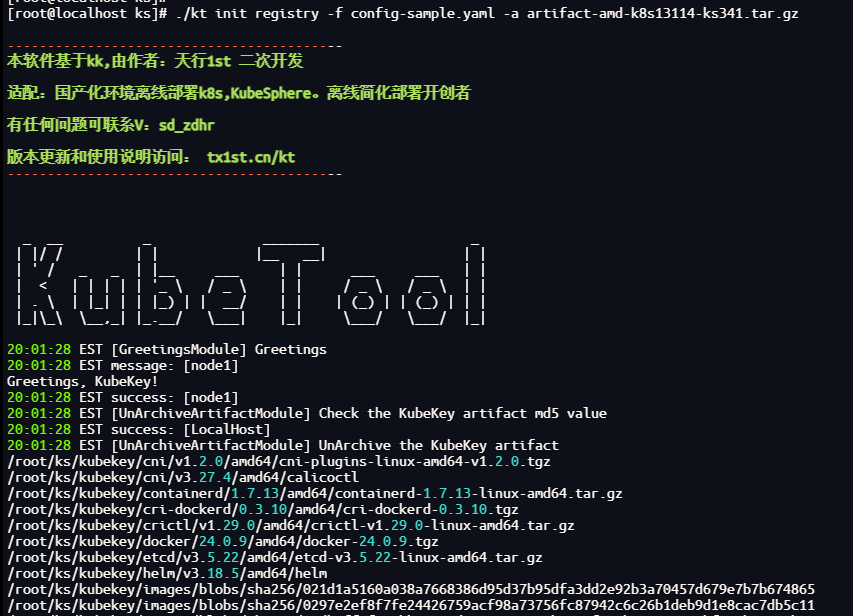
3.4 Create Harbor Image Repository
Note: Harbor must use docker, so the node must use docker runtime.
./kt init registry -f config-sample.yaml -a artifact-amd-k8s13114-ks341.tar.gz
This command will automatically install docker and docker-compose on the harbor node.
3.5 Create Harbor Project
Note:
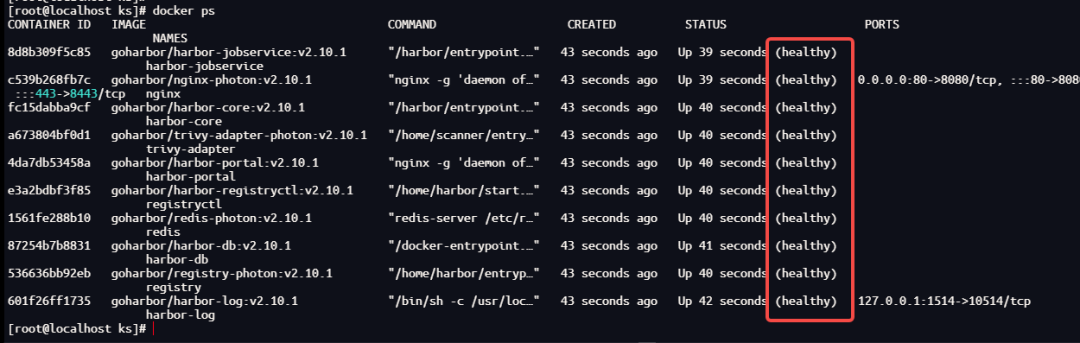
Harbor administrator account:admin, password:Harbor@123. The password is synchronized with the corresponding password in the configuration file.
The harbor installation files are located in <span><font style="background-color:rgb(255,245,235);">/opt/harbor</font></span> directory, where harbor can be maintained.
After installation, wait for all containers to start (about 1 minute), and check the status by executing <span>docker ps</span>.
Create Harbor project
chmod +x create_project_harbor.sh && ./create_project_harbor.sh
4 Create k8s and KubeSphere
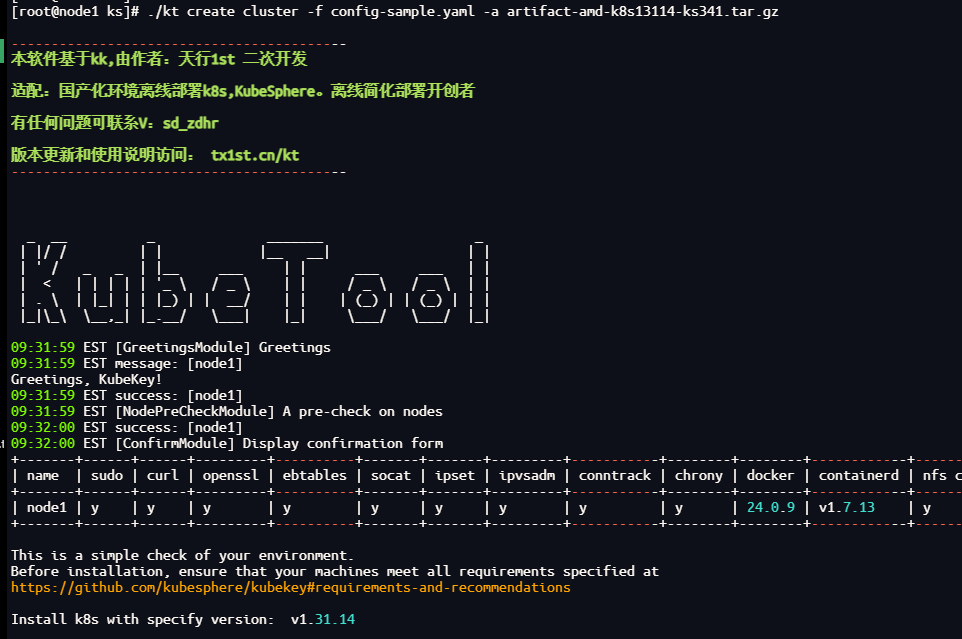
./kt create cluster -f config-sample.yaml -a artifact-amd-k8s13114-ks341.tar.gz
This command will automatically push the images from the offline artifacts to the <span>harbor</span> private repository.
After execution, you will see the following prompt, enter <span>yes/y</span> to continue.
Wait for a while until you see the familiar arrow indicating installation completion >>—>

During this time, you can open another window and use the following command to view the deployment logs.
kubectl logs -n kubesphere-system $(kubectl get pod -n kubesphere-system -l 'app in (ks-install, ks-installer)' -o jsonpath='{.items[0].metadata.name}') -f
Continue to wait for a while until you see the installation success message.
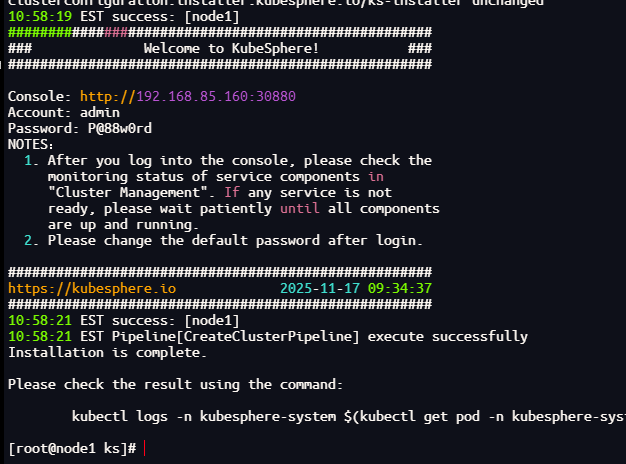
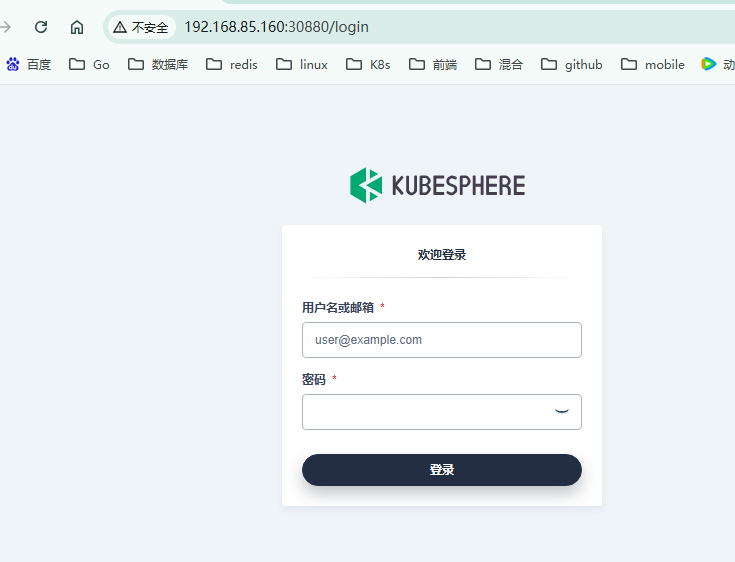
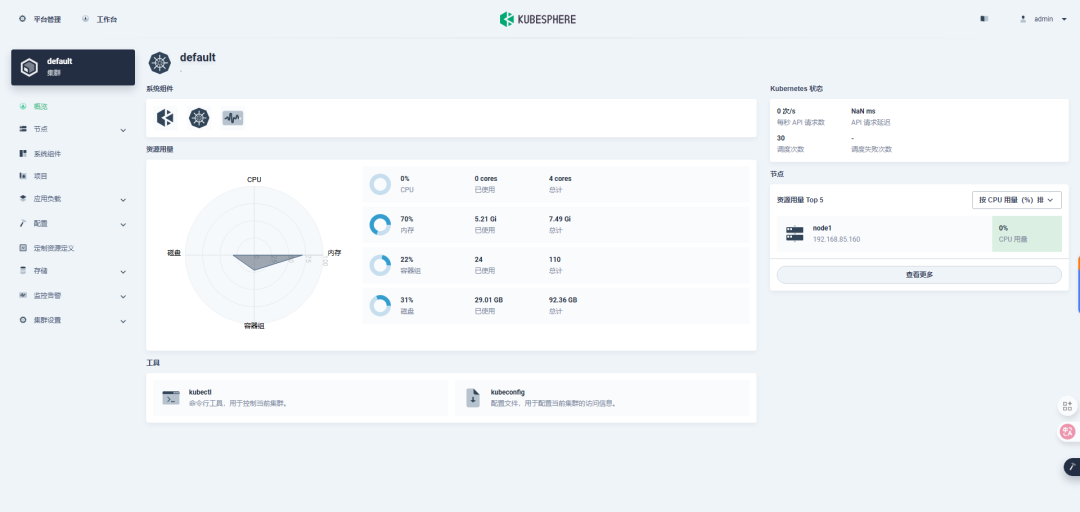
5 Verification
Login page
Cluster management
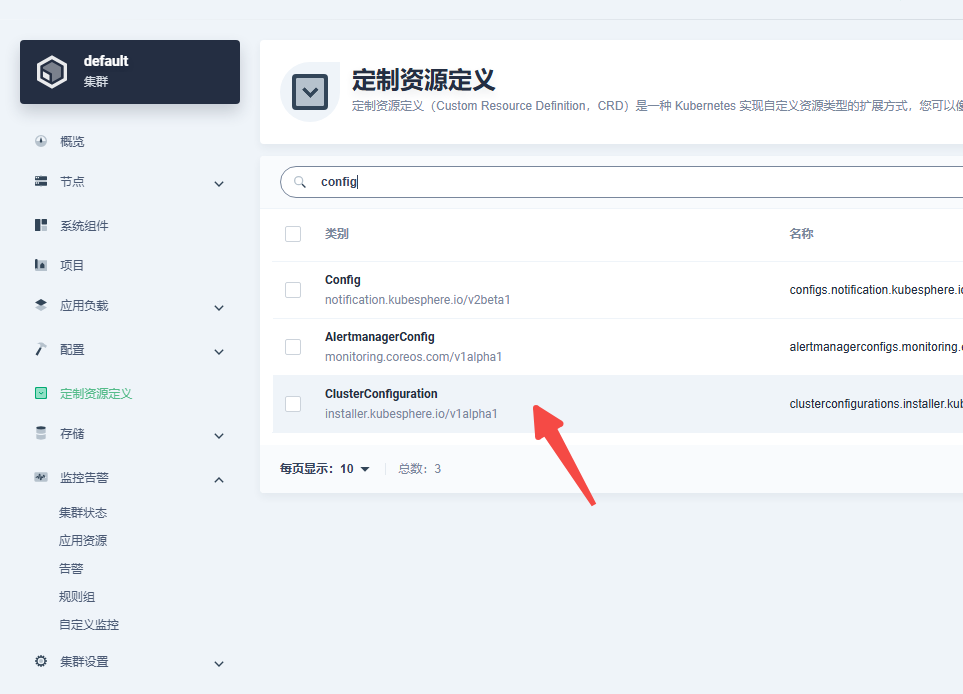
Monitoring and alerting
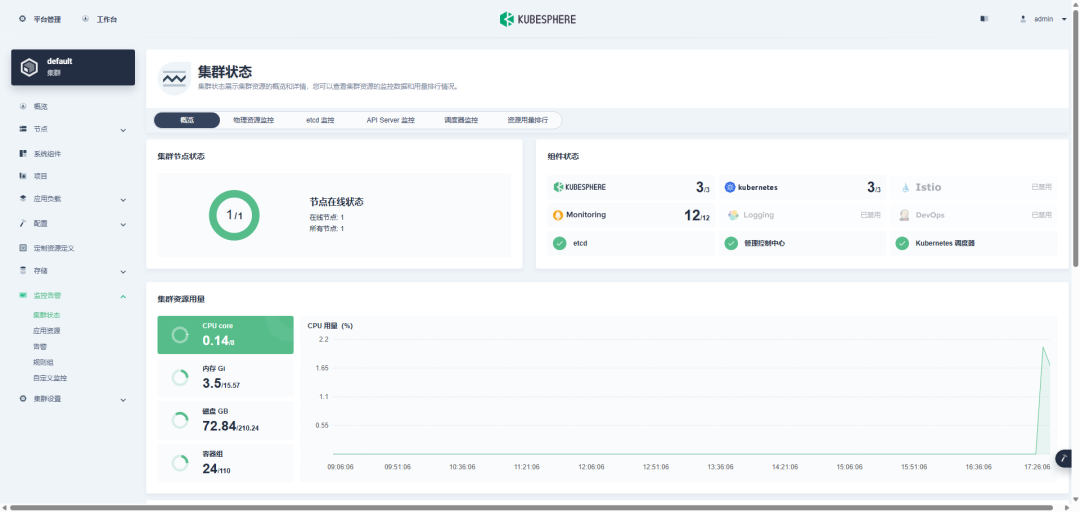
The configuration file by default only installs monitoring. If you need to install other components, you can enable them in the custom resources.
Reference link[1]
kt description: https://tx1st.cn/kt.